Table of Contents
Advertisement
Quick Links
Advertisement
Table of Contents

Related Manuals for Supermicro AOC-MIBE6-m1C


Summary of Contents for Supermicro AOC-MIBE6-m1C
- Page 1 AOC-MIBE6-m1C AOC-MIBE6-m1CM User's Guide Revision 1.0...
- Page 2 For more information, go to www.P65Warnings.ca.gov. The products sold by Supermicro are not intended for and will not be used in life support systems, medical equipment, nuclear facilities or systems, aircraft, aircraft devices, aircraft/emergency communication devices or other critical systems whose failure to perform be reasonably expected to result in significant injury or loss of life or catastrophic property damage.
- Page 3 MHIBE-m1CG add-on card. About this Add-on Card The AOC-MIBE6-m1C(M) is a powerful and versatile InfiniBand and Ethernet con- troller in a flexible small form factor SIOM (Super I/O Module). Featuring Mellanox® ConnectX-6 controller, it can provide up to 100Gbps InfiniBand EDR or 100 Gbps Ethernet connectivities optimized for high-performance computing networks and is ideal for demanding Enterprise and HPC applications.
- Page 4 Super AOC-MIBE6-m1C(M) Add-on Card User's Guide Conventions Used in the User's Guide Pay special attention to the following symbols for proper system installation and to prevent damage to the system or injury to yourself: Note: Additional information given to provide information for the correct system setup.
- Page 5 Preface...
- Page 6 Super AOC-MIBE6-m1C(M) Add-on Card User's Guide Contacting Supermicro Headquarters Address: Super Micro Computer, Inc. 980 Rock Ave. San Jose, CA 95131 U.S.A. Tel: +1 (408) 503-8000 Fax: +1 (408) 503-8008 Email: marketing@supermicro.com (General Information) support@supermicro.com (Technical Support) Website: www.supermicro.com Europe Address: Super Micro Computer B.V.
-
Page 7: Table Of Contents
Table of Contents Table of Contents Preface Chapter 1 Overview Overview ......................1-1 Key Features ....................1-1 Specifications ....................1-2 Available SKUs ....................1-4 Chapter 2 Hardware Components Add-On Card Image and Layout ..............2-1 Jumpers and Major Components ..............2-3 QSFP28 Ethernet/Infiniband Connections ............ -
Page 8: Chapter 1 Overview
Overview Congratulations on purchasing your add-on card from an acknowledged leader in the industry. Supermicro products are designed with the utmost attention to detail to provide you with the highest standards in quality and performance. For product support and updates, please refer to our website at http://www.supermicro.com/ products/nfo/networking.cfm#adapter. -
Page 9: Specifications
Super AOC-MIBE6-m1C(M) Add-on Card User's Guide Specifications General • Super I/O Module (SIOM) form factor • Mellanox® ConnectX-6 controller • Single QSFP28 port with speeds up to 100Gbps per port • PCIe 4.0 compliant Networking Features • Jumbo frame support (9.6KB) •... - Page 10 Chapter 1: Overview • Flexible match-action flow tables Tunneling encapsulation / de-capsulation • Intelligent interrupt coalescence • Header rewrite supporting hardware offload of NAT router Management Features • Jumper for standby power (default disabled) • Network Controller Sideband Interface (NC-SI) •...
-
Page 11: Available Skus
Supported Platforms • Supermicro® motherboards with Super I/O Module (SIOM) slot • Supermicro® server systems with Super I/O Module slot (see SIOM Compat- ibility Matrix online at http://www.supermicro.com/support/resources/AOC/ AOC_Compatibility_SIOM.cfm. Please note that this product is sold only as part of an integrated solution with Supermicro server systems. -
Page 12: Chapter 2 Hardware Components
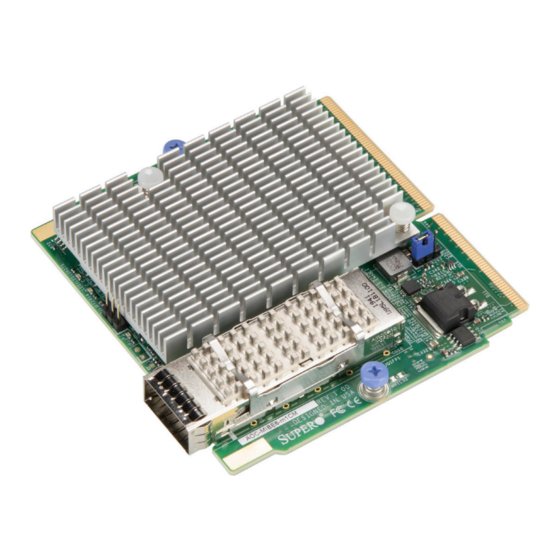
Chapter 2: Hardware Components Chapter 2 Hardware Components Add-On Card Image and Layout The AOC-MIBE6-m1C(M) Image Note: Without bracket, the PCBA is the same for AOC-MIBE6-m1CM and AOC-MIBE6-m1C. 1. Mellanox® ConnectX-6 VPI 5. LED10 2. JCAGE1 6. Jumper JP2 3. JQSFP1 7. - Page 13 Super AOC-MIBE6-m1C(M) Add-on Card User's Guide LED10 LED11 LED1 LED12 JP10 JP11 JCAGE1 JQSFP1 AOC-MIBE6-m1c DESIGNED IN USA REV:1.00 The AOC-MIBE6-m1C(M) Layout 1. Mellanox® ConnectX-6 VPI 5. LED10 2. JCAGE1 6. Jumper JP2 3. JQSFP1 7. Jumper JP11 4. LED1...
-
Page 14: Jumpers And Major Components
Pin 1: I2C_SDA I2C Header (for debug purpose) Pin 2:I2C_SCL Pin 3: Ground The following major components are installed on the AOC-MIBE6-m1C(M): 1. Super I/O Module (SIOM) form factor 2. Mellanox® ConnectX-6 controller 3. Up to 100Gbps InfiniBand EDR or 100Gbps Ethernet 4. -
Page 15: Qsfp28 Ethernet/Infiniband Connections
Super AOC-MIBE6-m1C(M) Add-on Card User's Guide QSFP28 Ethernet/Infiniband Connections JQSFP1 Connector One quad small form-factor pluggable optical transceiver connector (JQSFP1) is located on the add-on card. Connect a direct-attach QSFP28 cable to this port to provide Infiniband (100Gbps) and Ethernet (100Gbps) communication. See the layout below for the location. -
Page 16: Chapter 3 Installation
Chapter 3: Installation Chapter 3 Installation Static-Sensitive Devices Electrostatic Discharge (ESD) can damage electronic com ponents. To avoid dam- aging your add-on card, it is important to handle it very carefully. The following measures are generally sufficient to protect your equipment from ESD. Precautions •... -
Page 17: Before Installation
Super AOC-MIBE6-m1C(M) Add-on Card User's Guide Before Installation Before you install the add-on card, follow the instructions below. 1. Power down the system. 2. Unplug the power cord. 3. Use industry-standard anti-static equipment such as gloves or a wrist strap and follow the precautions on page 3-1 to avoid damage caused by ESD. - Page 18 SKU. It needs to be installed onto the chassis. Insert the SIOM card into the motherboard Tighten the screw Install the bracket onto the chassis Install the motherboard in the chassis Note: Supermicro recommends that this SIOM card be installed by a system integrator or by the manufacturer.
- Page 19 Super AOC-MIBE6-m1C(M) Add-on Card User's Guide Follow the steps below to install the add-on card into your system that supports a swappable bracket. The add-on card must be installed in the swappable bracket before it can be installed in your system 1.
-
Page 20: Installing Drivers On Windows
Follow the steps below to install the drivers for the Windows operation systems. Download the driver from the Supermicro CDR-NIC LAN driver CD, the Intel® Sup- port website that contains the latest driver, or go to the Supermicro site at https:// www.supermicro.com/wftp/Networking_Drivers/. -
Page 21: Installing Drivers (For Mellanox® Connectx®-6 Vpi)
Use the following procedures to install drivers on the Linux operating system. Installing InfiniBand Drivers for the Linux Operating System 1. Download the driver from the Supermicro CDR-NIC LAN driver CD, the Mella- nox® Support website that contains the latest driver, or go to the Supermicro site at https://www.supermicro.com/wftp/Networking_Drivers/Mellanox/. -
Page 22: Changing From Infiniband To Ethernet Mode
Chapter 3: Installation Changing from InfiniBand to Ethernet Mode AOC-MIBE6-m1C(M) is by default set to InfiniBand mode. To change the setting to Ethernet mode, please follow the instructions below. 1. Double-check and make sure that the add-on card is detected. Run the Ispci... - Page 23 Super AOC-MIBE6-m1C(M) Add-on Card User's Guide 3. To check whether the add-on card is set to Ethernet or InfiniBand mode and to verify if the LAN port is active or not, run the following command: Ibv_devinfo [root@localhost MIBE6]# ibv_devinfo hca_id: mlx5_0...
- Page 24 Chapter 3: Installation 5. To change the add-on card to Ethernet mode (LINK_TYPE=2), please enter command #mlxconfig -d<vendor_part id> and then key in "y" to apply the new configuration. (The command below is using the device ID in step 4 on page 3-11).
-
Page 25: Using The Mellanox Controller For Pxe Boot
Super AOC-MIBE6-m1C(M) Add-on Card User's Guide Using the Mellanox Controller for PXE Boot To use PXE boot, the Mellanox (QSFP) port needs to be configured as either Ethernet or InfiniBand mode depending on the previous setup. Please follow the instructions below to use PXE boot. - Page 26 Chapter 3: Installation 4. Go to BIOS. From the top of the tool bar, select "Boot" to enter the submenu. Select "Network Drive BBS Priorities" and then select "FlexBoot v#.#.###..." under Boot Option #1. 5. To boot from PXE automatically, make sure that Boot Option #1 is "Network: Flex boot"...