Table of Contents
Advertisement
Advertisement
Table of Contents

Related Manuals for Rational iCombi Classic Series


Summary of Contents for Rational iCombi Classic Series
- Page 1 ® iCombi Classic Operating instructions...
-
Page 3: Table Of Contents
1 Introduction........................................Product warranty......................................Target group ........................................Intended use ........................................Working with this manual ..................................1.4.1 Explanation of symbols..................................1.4.2 Explanation of pictograms ................................1.4.3 Explanation of safety messages ..............................1.4.4 Images........................................1.4.5 Technical changes....................................2 General safety instructions ..................................Safety instructions for units with a gas connection ........................... - Page 4 7 Finishing........................................31 Cooking climate and temperature................................31 Finishing food........................................ 31 8 Programming mode ....................................33 Start programming mode ..................................33 Pre-defined programme .................................... 33 Create new programme ..................................... 34 Start programme ......................................36 Edit programme......................................36 Delete programme....................................... 37 Sort programme list.....................................
- Page 5 13.3.3 Error messages heating hot air..............................52 13.3.4 Error messages moisture ................................52 13.3.5 Error messages CleanJet ................................. 53 13.3.6 Error messages Care..................................53 13.3.7 Notification centre .................................... 53 13.3.8 Error messages when operating the UltraVent ........................54 14 Maintenance ......................................... 55 14.1 Replacing air filter......................................
-
Page 6: Introduction
This unit may not be used outdoors. This unit may not be used for continuous industrial mass production of food. All other uses are contrary to the intended purpose, and may be dangerous. RATIONAL AG assumes no liability for the consequences of using the unit contrary to the intended use. -
Page 7: Explanation Of Safety Messages
1 | Introduction Useful tips for simple use of your unit. 1.4.3 Explanation of safety messages If you see the following safety messages, you are being warned about hazardous situations and instructed to avoid these situations. DANGER If you see the signal word DANGER, you are being warned about situations that lead to serious injury or death. WARNING If you see the signal word WARNING, you are being warned about situations that may lead to serious injury or death. -
Page 8: General Safety Instructions
Your unit must be maintained by your RATIONAL Service Partner. Do not modify the unit or the unit installation undertaken by your RATIONAL Service Partner. Do not use the unit if it is damaged. A damaged unit is not safe and can cause damage or fire. -
Page 9: Safety Instructions For Units With A Gas Connection
Hot food can otherwise spill out. To prevent material damage due to improper use of accessories: – Use only original RATIONAL accessories. – Use only the VarioSmoker to smoke food. Cold food is not to be added to the unit for rethermalization while hot food is being held. -
Page 10: Personal Protective Equipment
2 | General safety instructions – Do not press any light or unit switches, do not pull any plugs from sockets and do not use mobile telephones or phones. This may cause sparks and increase the risk of an explosion. –... -
Page 11: The Icombi Classic
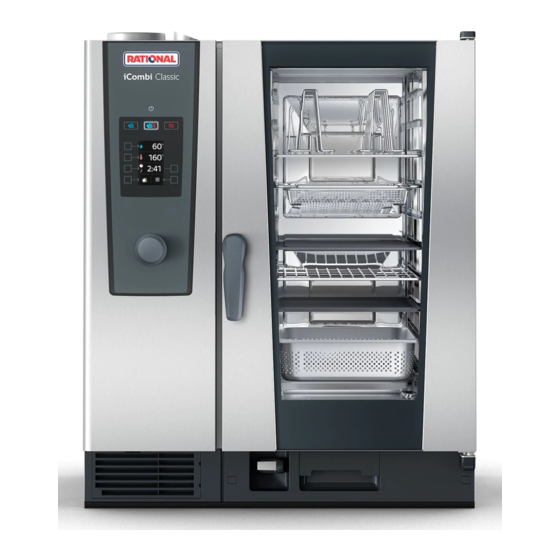
3 | The iCombi Classic The iCombi Classic Cooking cabinet Control panel Display Cooking cabinet door Central dial Door handle Hand shower USB port Care drawer Air filter Model 10-1/1 Model 6-1/1 Model 6-2/1 Model 10-2/1 Operating instructions 11 / 64... -
Page 12: How To Work With The Unit
Initial start-up When starting up your unit for the first time, it has already been properly installed by a RATIONAL Service Partner. The self-test has already been performed and the unit is therefore ready for operation. You can find all the information on installation in the installation manual enclosed. -
Page 13: Maximum Load Sizes
4 | How to work with the unit Maximum load sizes NOTICE High load sizes could damage the unit If you exceed the maximum load size, this may damage the unit. 1. Only load the unit with the maximum load sizes stated here Model Max. -
Page 14: Loading The Unit With The Mobile Oven Rack Or The Mobile Plate Rack
4 | How to work with the unit Rack level over 1.60 m If your unit has been installed so that the top rack is 1.60 m above the floor, you must apply the warning symbol supplied at that position. 4.6.1 Loading the unit with the mobile oven rack or the mobile plate rack WARNING... -
Page 15: Loading The Combi-Duo With The Mobile Oven Rack Or The Mobile Plate Rack
4 | How to work with the unit 1. Remove the hinging rack. 2. Place the run-in rail for the mobile oven rack on the floor of the cooking chamber, so that the 2 fixing pins are inserted in the recesses intended for them in the rear part of the cooking chamber. 3. - Page 16 4 | How to work with the unit 1. Remove the hinging rack. 2. Place the run-in rail for the mobile oven rack on the floor of the cooking cabinet so that the 2 fixing pins are inserted in the recesses intended for them in the rear part of the cooking cabinet. 3.
-
Page 17: Inserting Core Temperature Probe
4 | How to work with the unit Inserting core temperature probe The following sections describe how to work both with the core probe and with the externally attachable core probe. CAUTION Hot core probe There is a risk of burns if you touch the hot core probe without protective gloves. 1. - Page 18 4 | How to work with the unit Meat, e.g. steak Whole chicken Small food item, e.g. goulash Fish fillets Whole fish Vegetables, e.g. potatoes Meat, e.g. steak 1. Insert the core probe at an angle into the food so that the tip of the core probe is in the thickest part of the food.
-
Page 19: Using The Hand Shower
4 | How to work with the unit Make sure that the tip of the core probe does not protrude into the abdominal cavity of the chicken. Do not insert the core probe into the leg. Fish fillets 1. Insert the core probe at an angle into the food so that the tip of the core probe is in the thickest part of the food. - Page 20 4 | How to work with the unit CAUTION The hand shower and the water coming out of the hand shower can reach over 60 °C You could burn yourself if you touch hot components or come in contact with hot water. 1.
-
Page 21: Removing Hinging Rack
4 | How to work with the unit Removing hinging rack 1. Hold the hinging rack in the middle of the top trays. 2. Press the hinging rack upwards (A). 3. Tilt the left hinging rack in the cooking cabinet (B). 4. - Page 22 4 | How to work with the unit 4. Dispose of the fat properly. NOTICE! Fat and other liquid substances that are collected in the fat collecting container must be disposed of in compliance with legal requirements. Never dispose of fat in the drain. Never use fat that you have collected in the fat collecting container to cook food or as food.
-
Page 23: Preparing Food
5 | Preparing food Preparing food Open modes Cooking modes Cooking cabinet humidity Cabinet temperature Cooking time Core temperature Menu Additional functions The following modes are available: – Steam [} 26] – Combination of steam and hot air [} 27] – Convection [} 28] You can choose from the following cooking parameters [} 23]: –... - Page 24 5 | Preparing food 2. Turn the central dial and set the desired cooking cabinet humidity. 3. Press the central dial to confirm your setting. Cabinet temperature With this cooking parameter, you can set the temperature in the cooking cabinet. This is how you set the cooking cabinet temperature: 1.
-
Page 25: Additional Functions
5 | Preparing food Additional functions Heat With this additional function, the cooking cabinet is preheated in order to produce a thermal buffer. This is how you set the temperature to which the unit should preheat. 1. Press the button 2. -
Page 26: Steam
5 | Preparing food 2. Press the button > You automatically return to the cooking parameters. The cooking time cooking parameter is then replaced with the Delta-T cooking function. The current cooking chamber temperature and the delta temperature are displayed. 3. -
Page 27: Combination Of Steam And Hot Air
5 | Preparing food > The selection of cooking parameters will automatically return to the cooking time cooking parameter. 5. Turn the central dial and set the desired cooking time. 6. Press the central dial to confirm your setting. 7. To cook the food with the core temperature, press this button once: 8. -
Page 28: Convection
5 | Preparing food 6. Press the central dial to confirm your setting. > The selection of cooking parameters will automatically return to the cooking time cooking parameter. 7. Turn the central dial and set the desired cooking time. 8. Press the central dial to confirm your setting. 9. - Page 29 5 | Preparing food 2. Press the button 3. Turn the central dial and set the maximum cooking cabinet humidity. 4. Press the central dial to confirm your setting. > The selection of cooking parameters will automatically return to the cooking cabinet temperature cooking parameter.
-
Page 30: Sous-Vide Cooking
6 | Sous-vide cooking Sous-vide cooking In sous-vide cooking, food is prepared, seasoned, marinated or seared, vacuum-packed in a sous-vide bag and then cooked. This intensifies the food's own flavour, preserves the natural colours, precious vitamins and minerals are retained and cooking losses are reduced thanks to the gentle cooking. After cooking, the food must be cooled. Before the food is served, it is reheated still in the plastic bag, then removed from the bag and then finished according to the final dish. -
Page 31: Finishing
7 | Finishing Finishing Using Finishing, you can separate your food production from service and thus give yourself some freedom for the important things in cooking: planning, menu design or creative plating. Quality losses from keeping food warm are minimised and perfect food quality is assured. Only finish the foods that you actually need, adjust the required food to your guest numbers. - Page 32 7 | Finishing 3. Turn the central dial and set the desired cooking cabinet humidity. 4. Press the central dial to confirm your setting. > The selection of cooking parameters will automatically return to the cooking cabinet temperature cooking parameter. 5.
-
Page 33: Programming Mode
8 | Programming mode Programming mode You can create and save your own cooking programmes in programming mode. There are 100 programme slots available. You can assign up to 12 cooking steps to each programme. For you this means it is easy to use, no checking, no monitoring. -
Page 34: Create New Programme
8 | Programming mode Programme Steps Settings Step 2 Cooking cabinet temperature: 140 °C Cooking cabinet humidity: 60 % Fan level: 4 Cooking time: 24 minutes Step 3 Cooking mode: Convection Cooking cabinet temperature: 140 °C Cooking cabinet humidity: 60 % Fan level: 4 Cooking time: 1 minute Plate finishing... - Page 35 8 | Programming mode Programme cooking step Depending on which cooking step you have selected, you can select different cooking parameters [} 23]. You can also select different additional functions [} 25]. 1. Press the button for a desired cooking parameter. 2. Turn the central dial to apply your setting. 3.
-
Page 36: Start Programme
8 | Programming mode Add another cooking step 1. Press the button > The operating mode buttons will start flashing. 2. Select the desired mode and continue programming the cooking step. Edit cooking step 1. To edit the cooking step, press the button: 2. -
Page 37: Delete Programme
8 | Programming mode 5. Press the button 6. If you want to rename the cooking process, make your changes and press the button to confirm your changes: > You can choose from the following editing options: Add cooking step Delete cooking step Edit cooking parameter Add cooking step... -
Page 38: Upload And Download Programmes
8 | Programming mode Upload and download programmes You can download programs you have created on one unit and transfer them to another iCombi Classic. You have connected a USB flash drive with the unit. 1. Press the button on the start screen: 2. -
Page 39: Settings
9 | Settings Settings Open settings 1. Press the button on the start screen: 2. Press the button You can change the following settings: Set the temperature unit [} 39] Set date and time [} 40] 1. To open more settings, press this button: You can change the following settings: Switch keyboard [} 41] 1. -
Page 40: Set Date And Time
9 | Settings 1. Press the button on the start screen: 2. Press the button 3. Press the button and select the temperature unit °C or °F. Set date and time You can change the following settings: Date in DDMMYYYY format Time in HH:MM format Real time format in 12-hour format or 24-hour format 1. -
Page 41: Switch Keyboard
9 | Settings Edit date 1. Press the button > The DD value will start flashing. 2. Turn the central dial and select the desired day. 3. Press the central dial to confirm your setting. 4. Repeat the step until you have edited the month and year entries. Edit time 1. -
Page 42: Kitchen Management
10 | Kitchen management Kitchen management 10.1 Hygiene management 10.1.1 Logged HACCP data The following HACCP data is logged for each batch: Batch number Unit model Serial number Software version Date and time Cleaning programme Cabinet temperature Set core temperature Measured core temperature Time (hh:mm:ss) Temperature unit... -
Page 43: Connected Units To A Network
10 | Kitchen management 4. Press the button HACCP >> The HACCP data will be downloaded as a .txt file. You can open the file in word processing or spreadsheet programs. 10.2 Connected units to a network If you want to connect your units with ConnectedCooking, your units must be integrated into a network and equipped with either the optional Ethernet module or the optional WiFi module. -
Page 44: Automatic Cleaning
11 | Automatic cleaning Automatic cleaning Your iCombi Pro is equipped with an automatic cleaning system. Select the cleaning program, place the displayed number of Active Green tabs and care tabs and the unit will clean itself. At the same time, the integrated care system keeps the steam generator free of scale. -
Page 45: Start Automatic Clean
11 | Automatic cleaning Cleaning programme Description Care agents required light Suitable for removing light dirt Active Green cleaner tablets and scale resulting from use of the care tabs unit at up to 200 °C. medium Suitable for removing dirt and Active Green cleaner tablets scale resulting from cooking care tabs... -
Page 46: Abort Automatic Clean
Active Green cleaner tablets, reduce the number of tabs in the next automatic clean. If foam still forms, contact your RATIONAL Service Partner. You can light the cooking cabinet with the LED strip during the clean. To do this, press this button: 11.4... -
Page 47: Care
12 | Care Care WARNING Fat or food residues in the cooking cabinet If you do not clean the cooking cabinet sufficiently, there is a risk of fire from fat and food residues. 1. Clean the unit daily. 2. In the event of fire, leave the cooking cabinet door closed. This will remove the oxygen from the fire. Turn off the unit. -
Page 48: Cleaning Cooking Cabinet Door
12 | Care Substances containing hydrochloric acid, caustic solution, sulphur or other oxygen-requiring substances Undiluted alcohol, methanol or solvents such as acetone, benzene, toluene or xylene Oven cleaner or grill cleaner Steel wool High-pressure washer Sharp or pointed tools 12.4 Cleaning cooking cabinet door Cooking cabinet door gasket Glass panel lock... -
Page 49: Cleaning The Hand Shower
12 | Care 12.5 Cleaning the hand shower 1. Pull the hand shower hose out completely and hold it firmly. 2. Clean the hand shower and the hose with a soft sponge. 3. To remove stubborn scale, clean the hand shower and the hose with diluted vinegar. 12.6 Cleaning the drip tray and drain channel 1. -
Page 50: Inspiration And Help
You can scan the QR code shown with your smartphone now to save the information displayed. 13.3 Problem resolution For all error messages, please contact your RATIONAL Service Partner [} 50]. Always have the serial number of your unit ready. You can find the serial number on the model plate. 50 / 64... -
Page 51: Error Messages Heating Steam Generator
Error messages for gas units If your unit it connected to the gas supply, the following additional error message could appear. For all error messages, please contact your RATIONAL Service Partner [} 50]. Always have the serial number of your unit ready. -
Page 52: Error Messages Heating Hot Air
13 | Inspiration and help Error report Cause Cooking possible Data communication failed Service (E) 60 The initialisation of the ignition box is – defective. Gas system failed Switch the unit off and on again. If the error is still displayed, call your Service Partner. -
Page 53: Error Messages Cleanjet
13 | Inspiration and help 13.3.5 Error messages CleanJet Error report Cause Cooking possible Service (E) 25 The water quantity required by the – iCareSystem is too low. Water volume cleanjet too low Service (E) 26 The ball valve cannot find the open position. -
Page 54: Error Messages When Operating The Ultravent
Error messages when operating the UltraVent The following error messages may appear when your operate your unit with an UltraVent. For all error messages, please contact your RATIONAL Service Partner [} 50]. Always have the serial number of your unit ready. Error report... -
Page 55: Maintenance
14 | Maintenance Maintenance You can perform the following maintenance work yourself: Replacing air filter [} 55] Replacing the cooking cabinet door gasket [} 56] For the following maintenance work, contact your RATIONAL Service Partner: Replacing LED cover 14.1 Replacing air filter Required tool screwdriver A message will be displayed that the air filter needs to be replaced. -
Page 56: Replacing The Cooking Cabinet Door Gasket
14 | Maintenance 14.2 Replacing the cooking cabinet door gasket 1. Open the cabinet door. 2. Pull the cooking cabinet door gasket out from the groove and dispose of it. 3. Moisten the retaining lips of the new gasket with soapy water. 4. -
Page 57: Transport
15 | Transport Transport 15.1 Empty steam generator Before transporting the unit, you must empty the steam generator. 1. Disconnect the unit from the water supply. 2. Press the button on the start screen: 3. Press the button 4. Press the button 5. - Page 58 15 | Transport CAUTION Units could tip over when transported over thresholds or inclinations When moving units over thresholds or inclinations, the unit could tip over and injure you. 1. Carefully move units over thresholds and inclinations. CAUTION Units and Combi-Duos on castors can tip over when transported or moved If your unit is on castors or your Combi-Duo is on a stand with castors and you do not release the parking brakes before you transport or move the unit, the unit or Combi-Duo may tip over and injure you.
-
Page 59: Decommissioning And Disposal
16 | Decommissioning and disposal Decommissioning and disposal 16.1 Decommissioning Contact your RATIONAL Service Partner if you would like to decommission the unit. 16.2 Disposal Old units contain recyclable materials. Dispose of old units in an environmentally sound way using the appropriate disposal systems. -
Page 60: Technical Data
17 | Technical data Technical data Please also note the technical data on the model plate. The model plate is on the left next to the control panel. 17.1 Units with an electrical connection Value Weight (without packaging)Model 6-1/1 147 kg Weight (without packaging)Model 6-2/1 93 kg Weight (without packaging)Model 10-1/1... -
Page 61: Units With A Gas Connection
17 | Technical data EN 60335-1:2012 + A11:2014 + A13:2017 EN 60335-2-42:2002 + A1:2008 + A11:2012 EN 61000-3-2:2014; EN 61000-3-3:2013 EN 55014-1:2006+A1:2009+A2:2011; EN55014-2:2015 EN 62233:2008 EN 1717:2000 17.4.2 Units with a gas connection This unit meets the following EU directives: Regulation (EU) 2016/426 on units burning gaseous fuels Directive 2014/53/EU on the harmonisation of the laws of the Member States relating to the making available on the market of radio equipment... -
Page 62: Regulatory Information
18 | Regulatory Information Regulatory Information This device complies with part 15 of the FCC Rules. Operation is subject to the following two conditions: (1) This device may not cause harmful interference, and (2) this device must accept any interference received, including interference that may cause undesired operation. This equipment has been tested and found to comply with the limits for a Class A digital device, pursuant to part 15 of the FCC Rules. - Page 63 Air filter Hand shower 19 Cleaning 49 Spray 19 Air speed 25 Heat 25 Cabinet door Maintenance Clean gasket 48 Replace air filter 55 Clean LED cover 48 Replace gasket 56 Cleaning 48 Cabinet temperature 24 Combination of steam and hot air 27 Operating the unit Convection...
- Page 64 RATIONAL UK Limited Siegfried-Meister-Straße 1 86899 Landsberg am Lech Tel. +49 (0)8191 3270 Fax +49 (0)8191 21735 info@rational-online.com rational-online.com...