
Related Manuals for Philips CDR700BK


Summary of Contents for Philips CDR700BK
- Page 1 Audio CD Recorder CDR- CDR- AUDIO AUDIO Toll Free Help Line Ligne d'assistance en service libre Linea de ayuda telefónica sin cargo 800-531-0039...
- Page 2 And most importantly you can count on our uncompromising commitment to your total satisfaction. All of this is our way of saying welcome – and thanks for investing in a Philips product. Sincerely, Lawrence J. Blanford President and Chief Executive Officer P.S.
- Page 3 Canada English: This digital apparatus does not exceed the Class B limits for radio noise emissions from digital apparatus as set out in the Radio Interference Regulations of the Canadian Department of Communications. Français: Cet appareil numérique n’émet pas de bruits radioélectriques dépassant les limites applicables dans la règlement sur le brouillage radioélectriques édicté...
-
Page 4: Important Safety Instructions
IMPORTANT SAFETY INSTRUCTIONS Read these instructions. Keep these instructions. Heed all warnings. Follow all instructions. Do not use this apparatus near water. Clean only with dry cloth. Do not block any ventilation openings. Install in accordance with the manufacturer´s instructions. Do not install near any heat sources such as radiators, heat registers, stoves, or other apparatus (including amplifiers) that produce heat. -
Page 5: Limited Warranty
This warranty gives you specific legal rights.You may have other rights which vary from state/province to state/province. Philips Service Solutions Group, P.O. Box 2976, Longview,Texas 75606, USA, (903) 242-4800 LIMITED WARRANTY AUDIO CD RECORDER... -
Page 6: Table Of Contents
Table of contents General information Welcome...7 Environmental information ...7 About this manual...7 Technical data ...7 Discs for recording ...8 Discs for playback...8 Maintenance ...8 Accessories ...8 Operating buttons Controls...9 Display DISPLAY indications...10 DISPLAY messages ...11 MENU messages...12 Connections Which connections do you need?...13 Explanation of connections...13 How to connect your recorder Analog connections...14... -
Page 7: General Information
Welcome ! Thank you for buying this Philips Compact Disc Recorder. In the 1980s Philips invented a new audio system - the CD. The CD (compact disc) revealed the new dimensions of digital sound and added to the pleasure of audio. -
Page 8: Discs For Recording
CDRW compatible. To ensure proper working of the CD recorder we recommend the use of Philips audio CDR and audio CDRW discs only. Note: Do not use a computer CDR or CDRW as recording will... -
Page 9: Operating Buttons
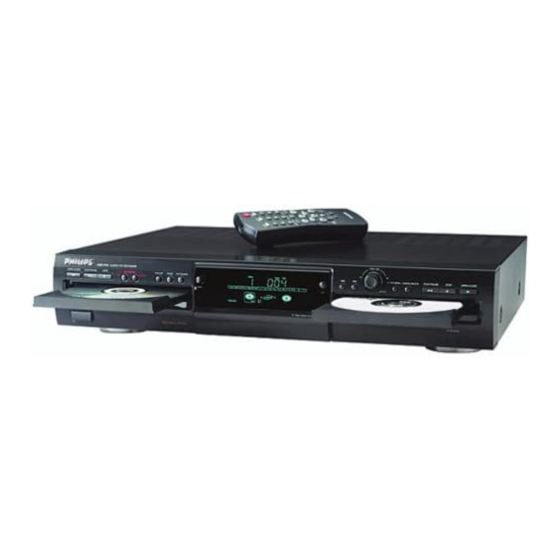
5 6 7 8 9 0 CDR 778 AUDIO CD RECORDER OPEN / CLOSE PLAY / PAUSE STOP RECORDING FINALIZE TYPE RECORD POWER ON/OFF PUSH DOWN TO OPEN OPEN Controls CD recorder 1 POWER ON/OFF turns the CD recorder ON or OFF (if the recorder is in Standby mode, any button press will activate the CD recorder) 2 Standby indicator 3 CD Recorder disc tray... -
Page 10: Display
Display DISPLAY indications TRACK TIME TRACK TOTAL 2 3 4 9 10 11 12 13 14 15 16 17 18 19 20 + SYNC MANUAL RECORD CHANGER DIGITAL OPTICAL ANALOG 1 REM/REC TIME remaining time/remaining recording time/recording time 2 TRACK track number 3 FE balance (lights during balance adjustment) -
Page 11: Display Messages
DISPLAY messages Messages, as listed and explained here, may appear on the display for your guidance. General READING reading disc information OPEN during tray opening CLOSE during tray closing NO DISC no disc inserted, disc unreadable or disc inserted upside down PROG FULL program full INSERT DISC... -
Page 12: Menu Messages
Display Play CHANGER MODE CD changer-mode selected DJ-MODE DJ- mode selected when recording buttons are pressed in DJ-mode PROGRAM program mode selected ALBUM TITLE will be followed by album title TRACK TITLE will be followed by track title ALBUM ARTIST will be followed by artist name TRACK ARTIST will be followed by track artist name... -
Page 13: Connections
We have described the most common ways of connecting the CD recorder. If you still have difficulties with the connections, please contact the Philips Consumer Service desk in your area. ANALOG... -
Page 14: How To Connect Your Recorder
How to connect your recorder Tip: If the integrated CD player deck will be the only source from which you are going to record, just connect the analog output for playback of the CD recorder to your amplifier/receiver (cord 1). Analog connections These connections are required for playback on the CD recorder deck as well as the CD player deck (cord 1). -
Page 15: Ac Power Supply
Digital optical connection Instead of the digital coaxial connection you can make use of the optical input.. Optical connections are less sensitive to external disturbances.This connection is required for direct recording from an external digital optical source (e.g. a CD player, DVD, DAT). -
Page 16: Remote Control
Remote control Inserting batteries in the remote control Open the battery compartment cover. Insert 2 batteries (AA, LR6 or UM-3; as supplied) as shown. Replace the cover. Note:We recommend you use 2 batteries of the same type and condition. Batteries contain chemical substances, so they should be disposed of properly. -
Page 17: Recording General
Inserting discs PO W ER ON /O FF Important! 1) This CD recorder is designed for regular CD(RW)s.Therefore, do not use any accessories such as disc stabilizer rings or CD treatment sheets, etc. as offered on the market, because they may cause jamming of the changer mechanism. -
Page 18: Introduction
Recording general Introduction You will soon discover how easy it is to make your own CDs.Your recorder offers several recording modes: For recording from internal CD-deck: RECORD FAST (high speed digital recording) - fast recording of a disc or programmed tracks. REC LISTEN (normal speed digital recording) - listening to a recording while making it. -
Page 19: How To Record From The Internal Deck
Recording an entire CD EASY JOG STORE/ME NU CANCEL/D ELETE ENTER PROG SHUFFLE DISPLAY SCROLL The M A K E CD recording mode is a fast and easy way to copy an entire CD. During high speed recording the sound is not audible. Important:After this recording the disc is finalized and cannot be recorded on anymore. -
Page 20: Recording A Single Track
How to record from the internal deck Recording a single track EASY JOG ENTER PROG SHUFFLE DISPLAY These recording modes are ideal for recording tracks from several CD’s. If you are making a compilation CD you can do it either at high speed (RECORD FAST) or while listening to the tracks (RECORD LISTEN). -
Page 21: Adjusting Recording Level
Recording from internal deck Set the recording level, if necessary, to make compilations from different discs with equalized volume levels. Pre- recorded CD’s often have different volume levels.When playing back your compilation you could hear these differences in volume between tracks. Amplifying a of digital audio information stream will distort the audio signal.This means that digital signals can only be decreased in volume to obtain equal audio levels for... -
Page 22: How To Record From An External Source
How to record from an external source Recording from LP’s or cassettes EASY JOG ENTER PROG SHUFFLE DISPLAY Make sure that the turntable or cassette deck is connected with its analog out connectors to the amplifier/receiver which is connected to the analog in connectors of your CD-recorder: connection is ANALOG. -
Page 23: Autostart Recording
Autostart recording PROG SHUFFLE DISPLAY This feature enables you to make fast and easy recordings of an external source.The recorder will detect the start of the source and track increments are automatically detected from digital source material.Track increments can be added manually. -
Page 24: Finalizing
Finalizing Finalizing CDR & CDRW discs During finalizing, an index is written to the disc. Finalizing is a simple procedure that is necessary in order - be able to play recordings on a CD PLAYER - avoid further unwanted recordings on a disc, - avoid erasure of tracks on a CDRW, - write CD text on a CDR(W). -
Page 25: Erasing
Erasing CDRW discs content For unfinalized CDRW discs only! You can erase: - Tracks can only be erased from the end. 9 10 With the EASY JOG you can select more then one track to be erased simultaneously. 9 10 Note: It is not possible to erase tracks within the sequence. -
Page 26: Playing
Playing Playing CD’s (Changer mode) Your CD recorder is able to play the two decks sequentially (CHANGER mode).This is the default setting. Select Changer mode using the DJ MODE button. CHANGER appears on the display and lights up. CHANGER On the deck you want to play, press PLAY/PAUSE 2; to start CD play. -
Page 27: Search
Search EASY JOG STORE/M ENU CANCEL/ DELETE ENTER Hold down 5 or 6 (in Play mode). The player first searches backwards or forwards at 10 times normal speed with sound at low volume, then goes to 50 times normal speed with sound muted. Release the button at the desired passage. -
Page 28: Menu Mode
Menu mode Remarks about Menu mode In Menu mode you will have access to a number of features which are not available via the regular buttons (on the deck’s front and the remote control). The TEXT submenus (A & B) allow you to give names to discs and tracks.The disc and track names will be displayed during playback. -
Page 29: A.text Input
A.Text input TEXT EDIT ALBUM ARTIST ALBUM TITLE ARTIST TR N TITLE TR N Your recorder can display CD text information such as artist name, album title etc. that is present on a disc. Only CD players with CD text capability can read and display CD text. -
Page 30: Reviewing Cd Text In Memory
Menu mode C. Reviewing CD text in memory MEMORY VIEW CD 1 CD 2 CD N CD text is stored in the recorder’s memory.When a CDR(W) is finalized, the CD Text will be written on the disc and removed from the recorder’s memory.With the MEMORY VIEW function you can view/delete the CD text in the recorder’s memory for each unfinalized disc.The amount of memory used is displayed each time the tray... -
Page 31: Balance
E. Balance SET BALANCE L 100 R 100 This feature is only active in Record/Standby mode Press STORE/MENU. TEXT EDIT will appear on the display. Rotate the EASY JOG/ENTER button to select the SET BALANCE submenu. SET BALANCE will appear on the display. Press EASY JOG/ENTER to confirm. -
Page 32: Fixing Problems
– the disc is not an AUDIO disc (WRONG DISC) – wrong input source chosen. Input label flashing (CHECK INPUT) – try using a Philips Audio CDR(W) – make sure the recording level is correctly adjusted – switch the POWER ON/OFF button on the front of the recorder off and back on –...