Table of Contents
Advertisement
PENTAX Corporation
2-36-9, Maeno-cho, Itabashi-ku, Tokyo 174-8639, JAPAN
(http://www.pentax.co.jp/)
PENTAX Europe GmbH (European Headquarters)
Julius-Vosseler-Strasse, 104, 22527 Hamburg, GERMANY
(HQ - http://www.pentaxeurope.com)
(Germany - http://www.pentax.de)
PENTAX U.K. Limited
PENTAX House, Heron Drive, Langley, Slough, Berks
SL3 8PN, U.K.
(http://www.pentax.co.uk)
PENTAX France S.A.S.
12/14, rue Jean Poulmarch, 95106 Argenteuil Cedex, FRANCE
PENTAX Benelux B.V.
(for Netherlands)
Spinveld 25, 4815 HR Breda, NETHERLANDS
(http://www.pentax.nl)
(for Belgium & Luxembourg)
Weiveldlaan 3-5, 1930 Zaventem, BELGIUM
(http://www.pentax.be)
PENTAX (Schweiz) AG
Widenholzstrasse 1 Postfach 367 8305 Dietlikon, SWITZERLAND
(http://www.pentax.ch)
PENTAX Scandinavia AB
P.O. Box 650, 75127 Uppsala, SWEDEN
(http://www.pentax.se)
PENTAX Imaging Company
A Division of PENTAX of America, Inc.
(Headquarters)
th
600 12
Street, Suite 300
Golden, Colorado 80401, U.S.A.
(Distribution & Service Center)
16163 West 45
80403, U.S.A.
(http://www.pentaximaging.com)
PENTAX Canada Inc.
1770 Argentia Road Mississauga, Ontario L5N 3S7,
CANADA
(http://www.pentaxcanada.ca)
http://www.pentax.co.jp/english
• Specifications and external dimensions are subject to change without notice.
57515
th
Drive, Unit H Golden, Colorado
Copyright © PENTAX Corporation 2005
01-200505 Printed in Philippines
Digital Camera
Operating Manual
To ensure the best performance from
your camera, please read the Operating
Manual before using the camera.
Advertisement
Table of Contents

Related Manuals for Pentax Optio S5z


Summary of Contents for Pentax Optio S5z
- Page 1 • Specifications and external dimensions are subject to change without notice. 57515 Copyright © PENTAX Corporation 2005 01-200505 Printed in Philippines Digital Camera Operating Manual To ensure the best performance from your camera, please read the Operating Manual before using the camera.
- Page 2 Regarding copyrights Images taken using the PENTAX Digital Camera that are for anything other than personal enjoyment cannot be used without permission according to the rights as specified in the Copyright Act. Please take care, as there are even cases where limitations are placed on taking pictures even for personal enjoyment during demonstrations, performance or of items on display.
-
Page 3: For Safe Use Of Your Camera
FOR SAFE USE OF YOUR CAMERA Sufficient attention has been paid to the safety of this product but please pay particular attention to the warnings indicated by the following symbols during use. Warning These symbols indicate that it is possible that the user may experience serious difficulties if the warnings are not heeded. - Page 4 Caution • Never try to disassemble or short the battery. Also, do not dispose of the battery in fire, as it may explode. • Do not charge any batteries other than rechargeable lithium-ion battery D- LI8. The battery could explode or catch fire. •...
- Page 5 • If lightning should be present during use of the battery charger or AC adapter, unplug the power cord and discontinue use. Continuing to use the product can cause damage to the equipment, fire or electrical shock. • Wipe off the plug of the power cord if it should become covered with dust. This can cause a fire.
-
Page 6: Care To Be Taken During Handling
Care to be Taken During Handling • Take the international warranty card with you when you travel abroad. Also take the Worldwide Service Network that is included in the package. This will be useful if you experience problems abroad. • When the camera has not been used for a long time, confirm that it is still working properly, particularly prior to taking important pictures (such as at a wedding or during travelling). - Page 7 • If the camera is subjected to rapid temperature changes, condensation may form on the inside and outside of the camera. Therefore put the camera in a bag or plastic bag, and take the camera out when the difference in temperature has subsided. •...
-
Page 8: Table Of Contents
Contents FOR SAFE USE OF YOUR CAMERA ... 1 Care to be Taken During Handling ... 4 Contents of the Operating Manual ... 9 Checking the Contents of the Package ... 10 Names of Parts... 11 Names of Operating Parts ... 12 Getting Started Attaching the Strap ... - Page 9 Taking Pictures by the Simplest Procedure (Green Mode) ... 49 Setting the Functions (Program Mode)... 50 Selecting the Picture Mode According to the Shooting Scene (Picture Mode) ... 51 Taking Pictures of Dark Scenes (Night Scene Mode) ... 54 Taking Movies (Movie Mode) ... 55 Taking Panorama Pictures (Panorama Assist Mode)...
- Page 10 Playing Back Movies ... 106 Displaying Shooting Information in Playback Mode ... 108 Nine-Image Display ... 109 Slideshow ... 110 Deleting Images, Movies and Sounds ... 111 Deleting a Single Image, Movie or Sound ... 111 Deleting All Images ... 113 Protecting Images, Movies and Sounds from Deletion (Protect)...
-
Page 11: Contents Of The Operating Manual
Contents of the Operating Manual This operating manual contains the following chapters. 1 Getting Started ––––––––––––––––––––––––––––––––––––––––– This chapter explains what you need to do after purchasing the camera before you start taking pictures. Be sure to read it and follow the instructions. 2 Quick Start ––––––––––––––––––––––––––––––––––––––––––––... -
Page 12: Checking The Contents Of The Package
PC Connection Manual You can transfer images and movies captured with a digital camera to your computer and then organize, display, edit, print, and share them by installing the software recorded on the provided CD-ROM to your computer and connecting your digital camera to your computer with the USB cable. -
Page 13: Names Of Parts
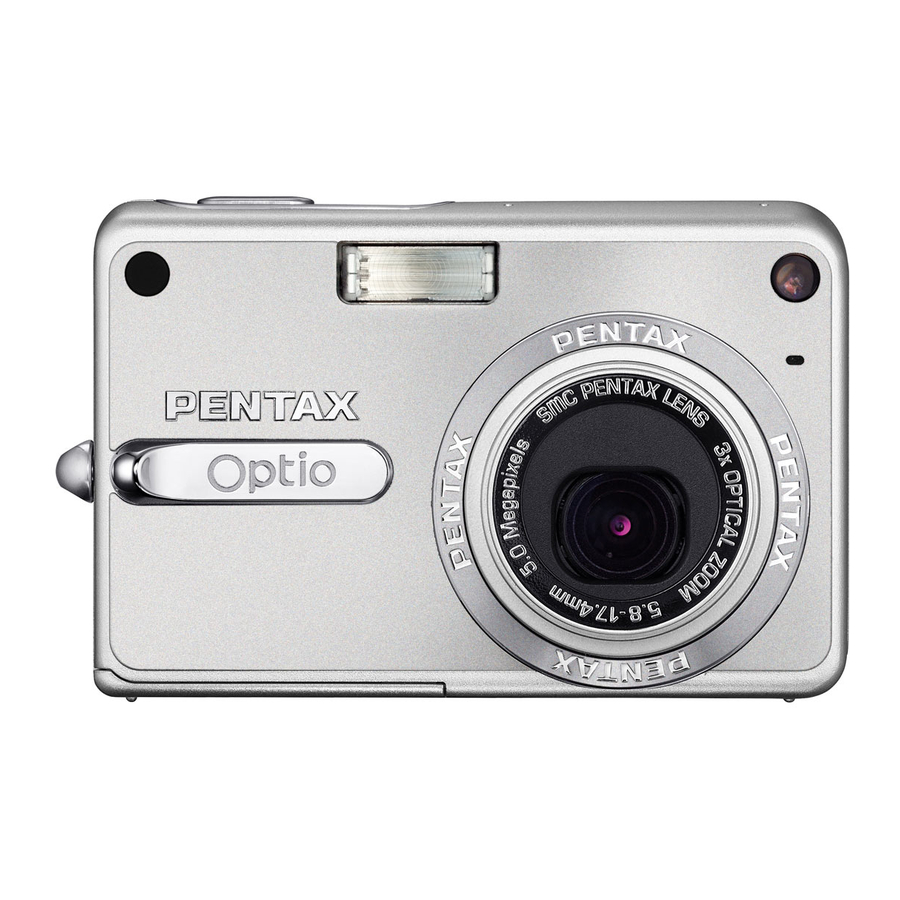
Names of Parts Front Back Shutter release button Power indicator Power switch Flash Self-timer lamp/ Auxiliary AF light Microphone Remote control receiver Lens USB/AV terminal Strap lug DC input terminal Terminal covers Flash status lamp (red) Focus status lamp (green) LCD monitor Speaker Battery/card cover... -
Page 14: Names Of Operating Parts
Names of Operating Parts Four-way controller In this operating manual, the four-way controller is described as shown below. Guide Indications A guide to available button operations appears on the LCD monitor during operation. The buttons are indicated as shown below. Four-way controller (2) Four-way controller (3) Four-way controller (4) -
Page 15: Getting Started
Getting Started Attaching the Strap Pass the narrow end of the strap through the strap lug and pass the other end through the loop. -
Page 16: Powering The Camera
Powering the Camera Battery lock lever Installing the Battery Install the battery provided with the camera. Open the battery/card cover. Slide the battery/card cover in the direction indicated by the arrow and flip the cover open Insert the battery with the monitor while using the side of the battery to press the battery lock lever in the direction indicated by the arrow. -
Page 17: Charging The Battery
Charging indicator Battery charger Charging the Battery Use the battery charger D-BC8 supplied with the camera to charge the battery before using the camera for the first time or when the [Battery depleted] message appears. Connect the AC plug cord to the battery charger. Plug the AC plug cord into the power outlet. - Page 18 • Always charge the battery before using the camera for the first time or when the battery has not been used for a long time. • Do not use the battery charger D-BC8 to charge batteries other than D-LI8 rechargeable lithium-ion batteries, as the charger may overheat or be damaged as a result.
-
Page 19: Charging The Battery Abroad
• Recycling Batteries This symbol indicates that the battery is recyclable. Cover the terminals with insulating tape and take the battery to a store displaying this symbol. Charging the Battery Abroad The battery charger supplied with the camera is designed to switch automatically to the voltage (100-240V) and frequency (50Hz, 60Hz) of the electricity supply in the country or region where used. -
Page 20: Main Socket Types In The Major Countries And Regions Of The World
Main Socket Types in the Major Countries and Regions of the World North America U.S.A., Canada Europe, Iceland, Ireland, Italy, Ukraine, Austria, Former Soviet Netherlands, Kazakhstan, Greece, Sweden, Union Denmark, Germany, Norway, Hungary, Finland, France, Belarus, Belgium, Rumania, Russia U.K. Spain Switzerland, Poland, Portugal Asia... -
Page 21: Using The Ac Adapter (Optional)
To power outlet AC plug cord Using the AC Adapter (optional) If you intend to use the LCD monitor for a long time or connect the camera to a PC, use of the AC adapter D-AC8 (optional) is recommended. Make sure that the camera is turned off and open the terminal cover. - Page 22 Precautions When Using the Battery Charger or AC Adapter To avoid the risk of fire or electric shock when using the battery charger or AC adapter, be sure to read the section on “FOR SAFE USE OF YOUR CAMERA” on page 1. Refer to page 160 for the specifications of the battery charger and AC adapter.
-
Page 23: Installing The Sd Memory Card
Installing the SD Memory Card An SD Memory Card can be used with this camera. Captured images are recorded on the SD Memory Card if a card is inserted or in the built-in memory if no card is inserted. • Make sure that the camera is turned off before inserting or removing the SD Memory Card. -
Page 24: Data Backup
Data Backup Very occasionally, data stored in the built-in memory becomes unreadable. As a backup measure, we recommend that you download important data to a PC or store the data in a medium other than the built-in memory. Precautions When Using an SD Memory Card •... -
Page 25: Image Size And Quality
Image Size and Quality Choose the image size and quality best suited to your purpose. Higher quality levels and numbers of recorded pixels produce clearer images for printing, but the resulting increase in data volume reduces the total number of pictures that can be taken. When you choose high image quality as well as a large image size, it may take ten seconds or more for the camera to finish recording after shooting. - Page 26 Approximate Number of Recordable Images by Size and Quality Quality Level Recorded Pixels 5M (2560×1920) 4M (2304×1728) 3M (2048×1536) 2M (1600×1200) 1024 (1024×768)0 640 (640×480) • The above table indicates the approximate number of images and recording time when using a 128MB SD Memory Card. •...
-
Page 27: Initial Settings (Setting The Display Language And The Date And Time)
Initial Settings (Setting the Display Language and the Date and Time) If the Initial Setting screen or Date Adjust screen appears when you turn the camera on, follow the procedure below to set the display language and/or current date and time. If the Initial Setting screen appears: p.25 - 27 “Setting the Display Language”, “Setting the Date and Time”... -
Page 28: Setting The Date And Time
Press the OK button. Press the four-way controller (3). The frame moves to [W]. Use the four-way controller (45) to choose the desired city (Hometown). Press the four-way controller (3). The frame moves to [DST] (Daylight Saving Time). Use the four-way controller (45) to select O (On) or P (Off). - Page 29 Use the four-way controller (23) to change the month. Change the day and year in the same manner. Next, change the time. If you select [12h] in Step 3, the setting switches between am and pm corresponding to the time. Press the OK button.
-
Page 30: Quick Start
QUICK button LCD monitor The simplest procedure for taking still pictures is described below. The flash fires automatically depending on the light conditions. Press the power switch. The camera turns on. Confirm the subject and shooting information on the LCD monitor. The focus frame in the middle of the LCD monitor indicates the zone of automatic focusing. - Page 31 Using the Shutter Release Button The shutter release button works in a two-step action as follows. Press halfway The focus and exposure are locked when the shutter release button is pressed lightly (halfway). The shutter speed and aperture settings only appear on the LCD monitor when the shutter release button is pressed halfway.
-
Page 32: Playing Back Still Pictures
Playing Back Still Pictures LCD monitor Playing Back an Image You can display the still picture you have just taken. Press the Q Playback button after taking a picture. The image appears on the LCD monitor. Playing Back the Previous or Next Image Still pictures can be played back one at a time, proceeding either forward or backward. -
Page 33: Rotating The Displayed Image
Rotating the Displayed Image You can rotate a displayed image on the LCD monitor. The image will remain rotated when displayed during a slideshow. Press the Q Playback button after taking a picture. The image appears on the LCD monitor. Press the four-way controller (3). -
Page 34: Common Operations
Common Operations Turning the Camera On and Off Press the power switch. The power indicator is illuminated by a green light. The lens extends and the camera turns on in the Capture mode. The camera is ready to take pictures by pressing the shutter release button. -
Page 35: Turning The Camera On In Playback Mode
Turning the Camera On in Playback Mode Press the power switch while pressing the Q Playback button. The power indicator lights green and the camera turns on in the Playback mode with the lens retracted. • Press the Q Playback button to extend the lens and switch to the Capture mode. -
Page 36: Using The Button Functions
Using the Button Functions Capture Mode QUICK/i button Switches to the Green mode, the easiest way to take pictures. ( You can assign a different function to the QUICK button by selecting [Quick Button] on the [A Rec.Mode] menu. (1p.92) w/x Zoom button Changes the size of the subject. -
Page 37: Playback Mode
Playback Mode QUICK/ button Deletes the image displayed on the LCD monitor. ( w/x Zoom button Press w/f in single-image display to switch to nine-image display. Press x/y to return to the previous display. (1p.109) Press x/y to enlarge the image in single-image display. Press w/f to return to the previous display. - Page 38 ) Selects a recorded file before playback. Performs the following operations during playback. If there are no recorded indexes: When ( When ( If there are recorded indexes: When ( previous index. When ( next index. OK/Display button Changes the information displayed on the LCD monitor. ( Returns to a single-image display in nine-image display.
-
Page 39: Voice Recording Mode
Voice Recording Mode Shutter release button When pressed, starts recording, and when pressed again, stops recording. When pressed for more than one second, recording continues for as long as the button is held down and stops when the button is released. Q Playback button Switches to Playback mode. -
Page 40: Setting The Menus
Setting the Menus When you press the MENU button, the menus appear on the LCD monitor. You can set functions, save the settings and change the camera settings on these menus. How to Set the Menus When you are making settings from a menu, a guide to operation appears on the LCD monitor. - Page 41 To Save the Setting and Begin Playback of Images Press the Q Playback button. The setting is saved and the camera returns to playback status. To Save the Setting and Continue with Menu Operations Press the OK button or the four-way controller (4). The setting is saved and the screen returns to Step 3.
-
Page 42: Example Of Menu Operation
Example of Menu Operation MENU button [A Rec.Mode] Menu Rec. Mode Recorded Pixels Quality Level White Balance Focusing Area AE Metering Sensitivity AUTO Exit MENU Rec. Mode Recorded Pixels Quality Level White Balance Focusing Area AE Metering Sensitivity AUTO Exit MENU Rec. -
Page 43: Menu List
Menu List [A Rec.Mode] Menu Yes ··· Adjustable No ··· Any changes made are invalid. You can change the setting on the menu, but any changes you make are invalid in actual operation. Item Description Recorded For selecting the number Pixels of pixels For selecting the image... - Page 44 Item Description Sharpness For setting the sharpness Saturation For setting the saturation Contrast For setting the contrast [B Set-up] Menu Item Format For formatting the SD Memory Card or built-in memory For adjusting the playback volume and setting the type and Sound volume of start-up sound, shutter sound, key operation sound, self-timer sound.
-
Page 45: Operating The Mode Palette
Operating the Mode Palette Once you press the MODE button, the Mode Palette appears on the LCD monitor. You can edit an image or change the settings of the camera. How to operate the Mode Palette The guide display is indicated while using the Mode Palette. Press the MODE button. - Page 46 Icon Item Sunset mode Food mode Pet mode Text mode Sports mode Surf & Snow mode Special Effect mode USER mode Description Lets you reproduce the beautiful colors of the sunrise or sunset. Lets you take appetizing pictures sf prepared food. Lets you take clear pictures of pets to fit the hair color.
-
Page 47: Playback Mode Palette
Playback Mode Palette Slideshow Item Item Description Slideshow For playing recorded images successively Resize For changing the size and quality level of images For trimming images and saving them as separate Trimming images Copy For copying files from the built-in memory to the SD image and Memory Card and vice versa sound... -
Page 48: Taking Pictures
Taking Pictures Taking Pictures Changing the Mode Capture mode is for taking pictures and Playback mode is for playing back or deleting images. Switching between Capture Mode and Playback Mode • To change from Capture mode to Playback mode, press the Q Playback button. - Page 49 Histogram Display The brightness distribution of the image is displayed. The horizontal axis shows the brightness (darkest at the left end and brightest at the right end) and the vertical axis shows the number of pixels. 1 Recorded Pixels 2 Quality Level 3 White Balance 4 AE Metering 5 Sensitivity...
- Page 50 Using Histogram A histogram is a graph showing the brightness of an image on the horizontal axis and the number of pixels on the vertical axis (distribution chart of the brightness). The histogram will help you detect the brightness of the image you have taken.
-
Page 51: Taking Pictures By The Simplest Procedure (Green Mode)
Taking Pictures by the Simplest Procedure (Green Mode) The Green mode lets you take pictures quickly and easily, simply by pressing the shutter release button. In Q (Green) mode, the camera automatically sets all the functions, including the shutter speed and aperture. -
Page 52: Setting The Functions (Program Mode)
Setting the Functions (Program Mode) (Program mode), the camera automatically sets the shutter speed and aperture for taking still pictures. However, you can select other functions such as the Flash mode or Continuous Shooting mode. Press the MODE button in Capture mode. The Mode Palette appears. -
Page 53: Selecting The Picture Mode According To The Shooting Scene (Picture Mode)
Selecting the Picture Mode According to the Shooting Scene (Picture Mode) You can select the Picture mode according to the shooting scene. There are 10 available modes in Picture mode. H Landscape Lets you capture the natural colors of landscape views. I Flower Lets you take brightly colored flower pictures. - Page 54 Press the OK button. Press the shutter release button halfway. The focus frame on the LCD monitor will light green when the camera is in focus. Press the shutter release button fully. The picture is taken. In Picture mode, the EV compensation, saturation, contrast, sharpness and white balance are automatically set to their default settings.
- Page 55 Taking Pictures of Text (Text Mode) This mode allows you to take clear pictures of written text. This is convenient for capturing a digital copy of an important document or enhancing legibility of small print. Press the MODE button in Capture mode. The Mode Palette appears.
-
Page 56: Taking Pictures Of Dark Scenes (Night Scene Mode)
Taking Pictures of Dark Scenes (Night Scene Mode) You can take pictures of dark scenes, such as nightscapes, with the appropriate settings. Press the MODE button in Capture mode. The Mode Palette appears. Use the four-way controller (2345) to select Scene mode). -
Page 57: Taking Movies (Movie Mode)
Taking Movies (Movie Mode) This mode enables you to take movies and sound. Press the MODE button in Capture mode. The Mode Palette appears. Use the four-way controller (2345) to select mode). Press the OK button. The following shooting information appears on the LCD monitor and the camera is ready to take movies. - Page 58 Keeping the Shutter Release Button Pressed If you keep the shutter release button pressed for more than one second, the movie will be taken for as long as you keep the button pressed. Shooting stops when you take your finger off the shutter release button. •...
-
Page 59: Taking Panorama Pictures (Panorama Assist Mode)
Taking Panorama Pictures (Panorama Assist Mode) You can take a number of images and join them together to form a panorama picture. The software supplied with the camera (ACDSee for PENTAX) and a computer are necessary for joining the images. The Panorama Assist mode enables you to overlap the edges of the images so that they are easier to join together later into a panorama picture. - Page 60 Take the first image. Press the shutter release button to take the first image. The right edge of the image appears in half-transparent form on the left of the LCD monitor. Move the camera to the right and take the second image. Move the camera until the half-transparent image and the actual view overlap and press the shutter release button.
-
Page 61: Taking Pictures With Special Effect
Taking Pictures with Special Effect The Special Effect consists of a posterization filter that takes posterization-type pictures, a soft filter that produces soft-contoured pictures, a slim filter that produces a slim effect, and a comment space function that creates a small space in a picture as a comment space. You cannot use the digital zoom in Special Effect mode. - Page 62 Press the OK button. Press the shutter release button halfway. The focus frame on the LCD monitor will light green when the camera is in focus. Press the shutter release button fully. The picture is taken with the Posterization filter. Taking Pictures using the Soft Filter You can take pictures with a soft lens effect.
- Page 63 Taking Pictures with the Slim Filter The screen for setting the slimness level appears when you select the slim filter in Special Effect mode. Use the four-way controller (23) to select O (Slim Filter). Use the four-way controller (45) to set the slimness. –...
- Page 64 Taking Pictures with Comment Space You can take a picture leaving a small space at the right side or at the bottom so that you can comment on it by hand. You can choose a style of the comment space from four types. Use the four-way controller (23) to select leaves 1/8 of a picture at the bottom as a comment space.
-
Page 65: Using Preset Function Settings (User Mode)
Using Preset Function Settings (User Mode) In User mode, you can take pictures using the functions and settings registered in advance in User mode. Press the MODE button in Capture mode. The Mode Palette appears. Use the four-way controller (2345) to select mode). -
Page 66: Using The Self-Timer
Using the Self-Timer In self-timer mode, the picture is taken ten seconds or two seconds after the shutter release button is pressed. Press the four-way controller (2) in Capture mode to display g or r on the LCD monitor. Press the shutter release button halfway. The focus frame on the LCD monitor will light green when the camera is in focus. -
Page 67: Using The Remote Control Unit (Optional)
Using the Remote Control Unit (optional) You can switch the Drive mode to Remote Control mode and take pictures using the remote control unit E or F (optional). Taking Pictures Using the Remote Control Press the four-way controller (2) in Capture mode to display on the LCD monitor. - Page 68 Changing the Magnification Using the Remote Control Unit You can not only change the zoom magnification with the zoom button, but also shoot images with the shutter button using the remote control unit E (optional). Press the four-way controller (2) in Capture mode to or h on the LCD monitor.
-
Page 69: Continuous Shooting (Continuous Shooting Mode)
Continuous Shooting (Continuous Shooting Mode) You can switch the Drive mode to Continuous Shooting mode. Pictures are taken continuously while the shutter release button is pressed. Press the four-way controller (2) in Capture mode to display the LCD monitor. Press the shutter release button halfway. -
Page 70: Using The Zoom To Change The Subject Size
Using the Zoom to Change the Subject Size You can use the zoom to change the size of the subject and take pictures in Tele or Wide mode. Press the zoom button in Capture mode. Tele: makes the subject bigger. Wide: makes the subject smaller. - Page 71 Setting the Digital Zoom The digital zoom is set to O(On) in the default settings. To take pictures using only the optical zoom, set the digital zoom to P(Off). Press the MENU button in Capture mode. The [A Rec.Mode] menu appears. Use the four-way controller (23) to select [Digital Zoom].
-
Page 72: Taking Time-Lapse Movies
Taking Time-lapse Movies This mode lets you take movies at a delayed frame rate so that when you play the movie back, the action appears speeded up. Press the MENU button in Movie mode. The [A Rec.Mode] menu appears. Use the four-way controller (23) to select [Movie]. Press the four-way controller (5). - Page 73 Press the shutter release button fully. Stops recording movie. • Off (×1) is the normal setting for movies (approximately 30 frames per second). Each time ×2 or ×5 is selected, the number of frames taken per second is reduced to 1/2 or 1/5. •...
-
Page 74: Setting The Shooting Functions
Setting the Shooting Functions Selecting the Focus Mode Focus mode Autofocus mode icon) Macro mode Super Macro mode Pan Focus mode Infinity-Landscape mode Manual Focus mode Adjust the focus manually with the four-way controller. Focusing Area mode The position of the autofocus area is changed. Press the four-way controller (5) in Capture mode. - Page 75 Auxiliary AF light • The auxiliary AF light may be activated under low lighting in Autofocus mode. • The auxiliary AF light of this camera conforms to the safety standard (IEC60825-1) for Class 1 LED product. Looking at the light directly will not create safety hazard. However, do not look into the emitter from a very short distance since you may feel dazzlingly.
- Page 76 Changing the Focusing Point In Focusing Area mode, you can change the focusing point by moving the focus frame. (Focusing Area) mode, press the four-way controller (2345). Moves the focus frame [ ] (Focusing area). Press the shutter release button halfway. The focus frame is fixed in its new position.
-
Page 77: Selecting The Flash Mode
Selecting the Flash Mode Flash Modes Auto icon) Flash off Flash on Auto + red-eye reduction Flash On + red-eye reduction • The flash is off when the Capture mode is set to Continuous Shooting, or Infinity-Landscape. • The flash discharges a total of three times, two pre-flashes (It may look like one flash to your eye) and the third time to take the pictures. -
Page 78: Selecting The Recorded Pixels
Selecting the Recorded Pixels You can choose the number of recorded pixels from [5M], [4M], [3M], [2M], [1024] and [640]. The more pixels there are, the larger the picture and the bigger the file size. The data volume also varies depending on the quality level setting (1p.78). - Page 79 Use the four-way controller (23) to change the recording pixels. Press the shutter release button halfway. The camera is ready to take the picture. • The number of recorded pixels is fixed at 5M in the Green mode. • The number of recorded pixels is fixed at 640×480 in the Movie mode.
-
Page 80: Selecting The Quality Level
Selecting the Quality Level You can choose the image compression ratio. The more stars, the clearer the quality and the larger the volume. The Recorded Pixels setting also changes the picture volume (1p.76). Quality Levels C Best Better Good Press the MENU button in Capture mode. The [A Rec.Mode] menu appears. - Page 81 • The Quality Level setting is saved when the camera is turned off. • The quality level is fixed at D (Better) in the Green mode. Image Size and Quality p.23...
-
Page 82: Adjusting The White Balance
Adjusting the White Balance You can select a white balance function best suited to the light conditions at the time of shooting. The Auto adjusts a white balance automatically and reproduces natural colors. The Manual allows you to decide a white balance based on the subject you want to make appear white. - Page 83 Press the four-way controller (5). The White Balance screen appears. Use the four-way controller (2345) to change the setting. Press the shutter release button halfway. The camera is ready to take the picture. Saving the White Balance Manual Setting Place a white material such as a piece of white paper in front of your camera to adjust white balance.
-
Page 84: Changing The Focusing Area
Changing the Focusing Area You can change the autofocus area (Focusing Area). Focusing Area Multiple Spot Press the MENU button in Capture mode. The [A Rec.Mode] menu appears. Use the four-way controller (23) to select [Focusing Area]. Press the four-way controller (5). The pull-down menu appears. -
Page 85: Setting The Light Metering Mode To Determine The Exposure
Setting the Light Metering Mode to Determine the Exposure You can choose which part of the screen to use to measure the brightness and determine the exposure. AE Metering Modes Multi-segment Center-weighted Spot Press the MENU button in Capture mode. The [A Rec.Mode] menu appears. - Page 86 When is selected, the AE metering point moves in correspondence with movement of the focusing area. ( p.74) Saving the AE Metering Mode p.96...
-
Page 87: Setting The Sensitivity
Setting the Sensitivity You can select the sensitivity to suit the brightness of the surroundings. Sensitivity The sensitivity is automatically set in the range from 80 to 200. AUTO • The lower the sensitivity (the lower values), the sharper the image and the less noise. -
Page 88: Setting The Exposure (Ev Compensation)
Setting the Exposure (EV Compensation) You can adjust the overall brightness of the picture. Use this function to take pictures that are intentionally overexposed or underexposed. Press the MENU button in Capture mode. The [A Rec.Mode] menu appears. Use the four-way controller (23) to select [EV Compensation]. -
Page 89: Setting The Auxiliary Af Light
Setting the Auxiliary AF Light The auxiliary AF light is convenient when you shoot a dark subject. The function helps you to focus on the subject under the conditions that the auto focus does not work properly. Press the MENU button in Capture mode. The [A Rec.Mode] menu appears. -
Page 90: Setting The Instant Review Time
Setting the Instant Review Time You can choose the Instant Review time from Off (no display), 0.5 sec., 1 sec., 3 sec., and 5 sec. Press the MENU button in Capture mode. The [A Rec.Mode] menu appears. Use the four-way controller (23) to select [Instant Review]. -
Page 91: Setting The Color Mode (Color Mode)
Setting the Color Mode (Color Mode) You can choose the color from Full color, B & W and Sepia. Press the MENU button in Capture mode. The [A Rec.Mode] menu appears. Use the four-way controller (23) to select [Color Mode]. Press the four-way controller (5). -
Page 92: Registering Frequently Used Functions (Fn Setting)
Registering Frequently Used Functions (Fn Setting) You can register frequently used functions on the four-way controller. Using this function, you can directly set the functions by pressing the four-way controller without displaying the menu in Capture or Playback mode. Press the MENU button in Capture mode. The [A Rec.Mode] menu appears. - Page 93 Use the four-way controller (23) to select a function you want to assign. Press the OK button. Press the shutter release button halfway. The camera is ready to take the picture. This function is activated only when assigning the Fn Setting to the QUICK button.
-
Page 94: Setting The Quick Button
Setting the QUICK Button You can register a function on the QUICK button. The function can be activated simply by pressing the QUICK button. Registering a Function Press the MENU button in Capture mode. The [A Rec.Mode] menu appears. Press the four-way controller (23) to select [Quick Button]. -
Page 95: Setting The Image Sharpness
Setting the Image Sharpness You can choose whether you want the image to have sharp or soft outlines. Press the MENU button in Capture mode. The [A Rec.Mode] menu appears. Use the four-way controller (23) to select [Sharpness]. Use the four-way controller (45) to adjust sharpness. -
Page 96: Setting The Color Saturation
Setting the Color Saturation You can set the color saturation. Press the MENU button in Capture mode. The [A Rec.Mode] menu appears. Use the four-way controller (23) to select [Saturation]. Use the four-way controller (45) to adjust saturation. To reduce the saturation, choose (–) and to increase the saturation, choose (+). -
Page 97: Setting The Image Contrast
Setting the Image Contrast You can set the image contrast. Press the MENU button in Capture mode. The [A Rec.Mode] menu appears. Use the four-way controller (23) to select [Contrast]. Use the four-way controller (45) to adjust contrast. To reduce the contrast, choose (–) and to increase the contrast, choose (+). -
Page 98: Saving The Settings
Saving the Settings Saving the Menu Items (Memory) You can choose whether you want the set values to be saved when the camera is turned off. If you select the status they were in immediately before the camera was turned off. If you select (Off), the settings will be reset to the defaults when the camera is turned off. -
Page 99: Registering Functions In User Mode
• Menu items not included in [Memory] will also be saved in the settings selected on the menus for each function when the camera is turned off. • The zoom position setting in the digital zoom range will not be saved even if [Zoom Position] is set to O(On) in [Memory]. - Page 100 Items Registered in User Mode AE metering Sensitivity Sharpness Saturation Contrast EV compensation Aux. AF Light Color Mode The settings of these items are memorized separately in User mode and Capture mode. These settings are retained until [Reset] is selected in the [B Set- up] menu or the setting is cleared using the QUICK button.
-
Page 101: Returning The Shooting Functions To The Default Settings
Returning the Shooting Functions to the Default Settings This function lets you return all the shooting function settings to the defaults. All the items on the [ focus, and displayed information are reset. For details on Rec. Mode menu, refer to “Menu List” (p.41). Press the QUICK button in Capture mode. -
Page 102: Recording And Playback Of Sound
Recording and Playback of Sound Recording Sound (Voice Recording Mode) You can record sound. The recordable time appears on the LCD monitor according to how much space is available on the SD Memory Card. Press the power switch for more than two seconds, or press the power switch while pressing the OK button. -
Page 103: Playing Back Sound
Playing Back Sound You can play back the recording you made in Voice Recording mode. Press the Q Playback button in the Voice Recording mode. Use the four-way controller (45) to choose the recording to play back. Press the four-way controller (2). Playback starts. -
Page 104: Adding A Voice Memo
Adding a Voice Memo You can add a voice memo to a captured image. Recording a Voice Memo Enter the Playback mode and use the four-way controller (45) to choose the image to which you want to add a voice memo. Press the MODE button. -
Page 105: Playing Back A Voice Memo
Playing Back a Voice Memo Enter the Playback mode and use the four-way controller (45) to choose the still picture with the voice memo that you want to play back. If U appears on the displayed image, a voice memo has been recorded. Press the four-way controller (2). -
Page 106: Playback/Deleting/Editing
Playback/Deleting/Editing Playing Back Images You can play back images recorded on the SD Memory Card when a card is inserted in the camera, or in the built-in memory when no card is inserted. Playing Back Still Pictures Press the Q Playback button. Refer to “Playing Back an Image”... - Page 107 Press the MENU button. Zoom playback ends. Setting the Quick Zoom Function You can display the image at specified magnification simply by pressing x/y on the zoom button once during zoom playback. Press the MENU button in Playback mode. The [B Set-up] menu appears. Use the four-way controller (23) to select [Quick Zoom].
-
Page 108: Playing Back Movies
Playing Back Movies You can play back movies. A guide to operation appears on the LCD monitor during playback. Operations include playback, frame by frame playback (forward or reverse), pause and volume adjustment. Enter the Playback mode and use the four-way controller (45) to choose the movie to play back. - Page 109 No sound is output during fast-rewind and fast-forward playback. Magnifying a Paused Movie You can display a paused movie magnified up to four times. Enter the Playback mode and use the four-way controller (45) to choose the movie to play back. Press the four-way controller (2).
-
Page 110: Displaying Shooting Information In Playback Mode
Displaying Shooting Information in Playback Mode Shooting information can be displayed on the LCD monitor in Playback mode. Pressing the OK button changes the display mode. Normal Display Shooting information is displayed. 1 Voice Memo icon 2 Card/Built-in memory icon 3 Folder name 5 Protect icon 7 Shooting date and time... -
Page 111: Nine-Image Display
Nine-Image Display You can display nine images at the same time. Enter the Playback mode and use the four-way controller (45) to choose an image. Press w/f on the zoom button. A page consisting of nine thumbnail images appears. The displayed images change nine at a time page by page. -
Page 112: Slideshow
Slideshow You can play back all the images on the SD Memory Card or in the built-in memory continuously. Enter the Playback mode and use the four-way controller (45) to choose the image with which to start the slideshow. Press the MODE button. The Mode Palette appears. -
Page 113: Deleting Images, Movies And Sounds
Deleting Images, Movies and Sounds Deleting a Single Image, Movie or Sound You can delete a single image, movie or sound. Once deleted, images, movies or sounds cannot be restored. Enter the Playback mode and use the four-way controller (45) to choose the image, movie or sound to delete. - Page 114 Deleting a Voice Memo only If an image has a voice memo, you can delete the voice memo without deleting the image. Enter the Playback mode and use the four-way controller (45) to choose an image with a voice memo to delete.
-
Page 115: Deleting All Images
Deleting All Images You can delete all the images, movies and sounds at once. Once deleted, images, movies or sounds cannot be restored. Enter the Playback mode and press the QUICK button twice. The Delete All screen appears. Use the four-way controller (2) to select [Delete all]. -
Page 116: Protecting Images, Movies And Sounds From Deletion (Protect)
Protecting Images, Movies and Sounds from Deletion (Protect) You can protect images, movies and sounds from being accidentally deleted. Enter the Playback mode and use the four-way controller (45) to choose the image, movie or sound to protect. Press the MODE button. The Mode Palette appears. - Page 117 Use the four-way controller (23) to select [Protect]. Press the OK button. • Select [Unprotect] in Step 7 to cancel the Protect setting. • If the image is protected, the movie or sound is played back. Protecting All Images, movies and Sounds You can protect all the images, movies and sounds.
-
Page 118: Viewing Images On A Tv
Viewing Images on a TV By using the AV cable, you can capture and play back images on a TV or other equipment with a video IN jack. Make sure that both the TV and the camera are turned off before connecting the cable. Open the terminal cover and connect the AV cable. -
Page 119: Playing Back An Image Using The Remote Control Unit (Optional)
Playing Back an Image Using the Remote Control Unit (optional) When the AV cable is connected to the camera, the image can be displayed using the remote control unit E or F (optional). Press the Q Playback button. Press the Shutter button or the zoom button of the remote control unit. -
Page 120: Setting The Printing Service (Dpof)
Setting the Printing Service (DPOF) You can print the images on the SD Memory Card using a DPOF (Digital Print Order Format) compatible printer or at a printing service. Printing Single Images Set the following items for each image. Copies: Choose the number of copies up to a maximum of 99. Date: Specify whether you want the date imprinted on the print or not. - Page 121 Use the four-way controller (45) to choose the number of copies. Use the four-way controller (3) to select [Date]. Use the four-way controller (45) to choose whether to insert the date or not. O (On) : The date will be imprinted. P (Off) : The date will not be imprinted.
-
Page 122: Printing All Images
Printing All Images Enter the Playback mode and press the MODE button. The Mode Palette appears. Use the four-way controller (2345) to select (DPOF). Press the OK button. Use the four-way controller (3) to select [All Images]. Press the OK button. Use the four-way controller (45) to choose the number of copies. -
Page 123: Direct Printing Using Pictbridge
Direct Printing Using PictBridge By connecting the camera to a printer that supports PictBridge using the USB cable (I-USB17) supplied with the camera, you can print images directly from the camera without using a PC. Select the images you want to print and the number of copies on the camera after it has been connected to the printer. -
Page 124: Printing Single Images
Printing Single Images Use the four-way controller (23) to select [Print One]. Press the OK button. The Print this image screen appears. Use the four-way controller (45) to choose the image to print. Use the four-way controller (23) to choose the number of copies. You can print up to 99 copies. -
Page 125: Printing All Images
Use the four-way controller (45) to choose the paper size. You can choose the print size from among 12 sizes: Setting (printer setting), Card, L, 2L, Postcard, 100×150, 4"×6", 8"×10", Letter, 11"×17", A4, or A3. You cannot select a size that is not available with the printer you are using. -
Page 126: Printing Using The Dpof Settings
Printing Using the DPOF Settings Use the four-way controller (23) to select [Print W/DPOF settings]. Press the OK button. The Print W/DPOF Settings screen appears. Use the four-way controller (45) to check the images and the print settings. Set the number of copies, the setting of the date imprint, and confirm the print setting. -
Page 127: Editing Images
Editing Images Changing the Image Size and Quality By changing the size and quality of a selected image, you can make the file smaller than the original. You can use this function to continue taking pictures when the card or memory is full, by making the images smaller and overwriting the original images to make more space available in the memory. - Page 128 Use the four-way controller (45) to change the size. Press the four-way controller (3). The frame moves to [Quality Level]. Use the four-way controller (45) to change the quality. Press the OK button. Use the four-way controller (23) to select [Overwrite] or [Save as].
-
Page 129: Trimming Images
Trimming Images You can trim a part of a picture and save it as a separate image. Use the four-way controller (45) in Playback mode to select an image to trim. Press the MODE button. The Mode Palette appears. Use the four-way controller (2345) to select Press the OK button. -
Page 130: Editing Pictures With Color Filters
Editing Pictures with Color Filters This function enables you to edit still pictures with color filters. You can choose from eight filters: B&W, Sepia, Red, Pink, Purple, Blue, Green and Yellow. Use the four-way controller (45) in Playback mode to select an image to edit. -
Page 131: Editing Pictures With Brightness Filter
Editing Pictures with Brightness Filter This function enables you to adjust the brightness of still pictures with the brightness filter. Use the four-way controller (45) in Playback mode to choose an image to edit. Press the MODE button. The Mode Palette appears. Use the four-way controller (2345) to select Filter). - Page 132 Use the four-way controller (23) to select [Overwrite] or [Save as]. Press the OK button. The edited image is saved with the same number of recorded pixels and quality level as the original.
-
Page 133: Editing Movies
Editing Movies You can select a frame from a recorded movie to save as a still picture, divide a movie into two or cut-and-stitch movies together. You cannot edit a movie unless the original movie lasts more than five seconds. Use the four-way controller (45) in Playback mode to select a movie to edit. - Page 134 Use the four-way controller (45) to choose the frame you want to save. Press the OK button. The selected frame is saved as a still picture. Press the MENU button. The screen returns to the Movie Edit screen. Dividing a Movie Select [Divide] on the Movie Edit screen.
- Page 135 Cutting and Stitching Movies Select [Cut and Stitch] on the Movie Edit screen. Press the OK button. The screen for choosing a start point to erase appears. Use the four-way controller (45) to choose the start point. Press the OK button. Use the four-way controller (45) to choose the end point.
-
Page 136: Copying Files
Copying Files You can copy image and sound files from the built-in memory to the SD Memory Card and vice versa. This function can only be selected when a card has been inserted in the camera. When files are copied from the built-in memory to the SD Memory Card, all the files are copied at once. - Page 137 To Copy Files from the Built-in Memory to the SD Memory Card Use the four-way controller (23) to select [ OK button. All the files are copied to the SD Memory Card. To Copy Files from the SD Memory Card to the Built-in Memory Use the four-way controller (23) to select [ and press the OK button.
-
Page 138: Settings
Settings Camera Settings Setting Up the Start-up Screen You can display an image recorded with the camera as the start-up screen when the camera is turned on. Press the MODE button in Playback mode. The Mode Palette appears. Press the four-way controller (2345) to choose Screen). - Page 139 • Once the start-up screen has been set, it will not be deleted even if the original image is deleted or the SD Memory Card or built-in memory is formatted. To delete the start-up screen, display the Image select screen. While the image you have selected as a start-up screen is on the screen ([User] is indicated on the upper- right corner of the screen.), press the QUICK button.
-
Page 140: Formatting An Sd Memory Card Or The Built-In Memory
How to recall the [B Set-up] menu Formatting an SD Memory Card or the Built-in Memory Formatting will delete all the data on the SD Memory Card if you are using a card, and all the data in the built-in memory if there is no SD Memory Card inserted. -
Page 141: Changing The Sound Settings
Set-up Format Sound Date Adjust World Time USB Connection PC MENU Exit Changing the Sound Settings You can adjust the playback volume and the volume of operation sounds, such as the start-up sound, shutter sound and operation sound. You can also change the operation sounds. Select [Sound] on the [B Set-up] menu. - Page 142 How to recall the [B Set-up] menu Changing the Sound Use the four-way controller (23) to select [Start-up Sound]. Press the four-way controller (5). The pull-down menu appears. Use the four-way controller (23) to select [1], [2], [3], [4], [5], or [Off].
-
Page 143: Changing The Date And Time
Set-up Format Sound Date Adjust World Time USB Connection PC MENU Exit Changing the Date and Time You can change the initial date and time settings. You can also set the style in which the date appears on the camera. Choose [mm/dd/yy], [dd/mm/yy] or [yy/mm/dd]. - Page 144 How to recall the [B Set-up] menu Press the four-way controller (5). The frame moves to month. Use the four-way controller (23) to change the month. Change the day and year in the same manner. Next, change the time. If you select [12h] in Step 6, the setting switches between am and pm corresponding to the time.
-
Page 145: Setting The World Time
Set-up Format Sound Date Adjust World Time USB Connection PC MENU Exit Setting the World Time The date and time selected in “Initial Settings (Setting the Display Language and the Date and Time)” (p.25) serve as the Home Time setting. You can display the time in a city other than the Home Time city (World Time). - Page 146 How to recall the [B Set-up] menu Press the four-way controller (3). Use the four-way controller (45) to set whether daylight saving time is used or not. Select daylight saving time. Press the four-way controller (3). Use the four-way controller (45) to set your present location.
-
Page 147: Changing The Display Language
Set-up Format Sound Date Adjust World Time USB Connection PC MENU Exit Changing the Display Language You can change the language in which the menus, error messages, etc. are displayed. You can choose from English, French, German, Spanish, Italian, Swedish, Dutch, Russian, Korean, Chinese (traditional and simplified), and Japanese. -
Page 148: Changing The Usb Connection Mode
How to recall the [B Set-up] menu Changing the USB Connection Mode You can change the USB connection mode depending on whether the USB cable is to be connected to a printer (PictBridge) or a computer. Select [USB Connection] on the [B Set-up] menu. Press the four-way controller (5). -
Page 149: Adjusting The Brightness Of The Lcd Monitor
Set-up Format Sound Date Adjust World Time USB Connection PC MENU Exit Adjusting the Brightness of the LCD Monitor You can adjust the brightness of the LCD monitor by five levels. Select [Brightness Level] on the [ Use the four-way controller (45) to adjust the brightness. -
Page 150: Sleep Timeout
How to recall the [B Set-up] menu Sleep Timeout You can set the LCD monitor to turn off automatically when no operation is performed for a fixed time. Select [Sleep Timeout] on the [ Press the four-way controller (5). The pull-down menu appears. Use the four-way controller (23) to select [2 min], [1 min], [30 sec] or [Off]. -
Page 151: Setting Auto Power Off
Set-up Format Sound Date Adjust World Time USB Connection PC MENU Exit Setting Auto Power Off You can set the camera to turn off automatically when no operation is performed for a fixed time. Select [Auto Power Off] on the [B Set-up] menu. Press the four-way controller (5). -
Page 152: Setting The Guide Display
How to recall the [B Set-up] menu Setting the Guide Display You can display the information on the mode you are currently using and the functions that are assigned to the QUICK button, etc., right after starting up the camera in Capture mode or switching to the Capture mode from other modes. -
Page 153: Resetting To Default Settings
Set-up Format Sound Date Adjust World Time USB Connection PC MENU Exit Resetting to Default Settings You can return all the settings other than the date and time and language/ to the default settings. Select [Reset] on the [B Set-up] menu. Press the four-way controller (5). -
Page 154: Appendix
Appendix List of City This is a list of cities which you can choose for the World Time. Region Honolulu North Anchorage America Vancouver San Francisco Los Angeles Calgary Denver Chicago Miami Toronto New York Halifax Mexico City Central and Lima South America... -
Page 155: Optional Accessories
Optional Accessories A number of dedicated accessories are available for this camera. AC adapter D-AC8 USB cable I-USB17 (∗) AV cable I-AVC7 (∗) Camera case O-CC35 Camera case O-CC32 Strap O-ST8 Strap O-ST20 (∗) Leather Strap O-ST24 Sports Strap O-ST30 Remote control unit E (zoom function) Remote control unit F Rechargeable lithium-ion battery D-LI8 (∗) -
Page 156: Messages
Messages Messages such as the following may appear on the LCD monitor during camera operation. Compression error No image and sound Memory full Memory card error Card not formatted Card locked Data being processed Camera cannot play this image and sound Battery depleted Image folder could not be created... - Page 157 This file could not be You are trying to resize, trim, protect an image, or you are processed trying to set an image for DPOF, or you are trying to edit an image with a digital filter or edit a movie while the image or movie cannot be processed with these functions.
-
Page 158: Troubleshooting
Troubleshooting Problem Camera will not Battery is not installed turn on Battery is installed incorrectly Battery power is low No image on LCD monitor is set to the LCD OFF in Voice Recording monitor mode Image is displayed but is hard to see Shutter will not Flash is charging... - Page 159 Problem Cause Subject is not in Subject difficult to focus focus Subject is not in focusing area Subject is too close Focus mode is set on q (Macro) or r (Super Macro) Flash mode is set to Off Set to Auto or b. (p.75) Flash does not discharge The Capture mode is set...
-
Page 160: Main Specifications
Main Specifications Camera Type Fully automatic compact digital still camera with built-in zoom lens Effective Pixels 5.0 megapixels Sensor 5.25 megapixels (total pixels), 1/2.5-inch interline transfer CCD with a primary color filter Recorded Pixels Still Picture Movie Sensitivity Auto, manual (80/100/200/400: Standard Output Sensitivity) File Format Still Picture Movie... - Page 161 Playback Functions Single-frame, 9 frame index, enlargement (max. 8×, scrollable), movie playback, sound playback, histogram display Playback Mode Palette (slideshow, resize, trimming, copy image and sound, color filter, brightness filter, movie edit, voice memo, protect, DPOF, start-up screen) Digital Filter Color filter (B&W, Sepia, Red, Pink, Purple, Blue, Green, Yellow), Brightness filter Focusing System...
-
Page 162: Power Supply
Video Output Format Size Weight Weight When Shooting 120 g (including battery and SD Memory Card) Accessories Power Supply Rated input Rated output External dimensions Weight NTSC, PAL 83 (W) × 55 (H) × 21.5 (D) mm (excluding operating members and projections) 105 g (excluding battery and SD Memory Card) Rechargeable lithium-ion battery, battery charger, AC plug cord, USB cable, software (CD-ROM), AV cable, strap, operating manual... -
Page 163: Warranty Policy
WARRANTY POLICY All PENTAX cameras purchased through authorized bona fide photographic distribution channels are guaranteed against defects of material or workmanship for a period of twelve months from date of purchase. Service will be rendered, and defective parts will be replaced without cost to you within that period, provided the equipment does not show evidence of impact, sand or liquid damage, mishandling, tampering, battery or chemical corrosion, operation contrary to operating instructions, or modification by an unauthorized repair shop. - Page 164 • This warranty policy does not affect the customer’s statutory rights. • The local warranty policies available from PENTAX distributors in some countries can supersede this warranty policy. Therefore, we recommend that you review the warranty card supplied with your product at the time of purchase, or contact the PENTAX distributor in your country for more information and to receive a copy of the warranty policy.
- Page 165 For customers in USA STATEMENT OF FCC COMPLIANCE This device complies with Part 15 of the FCC Rules. Operation is subject to the following two conditions: (1) This device may not cause harmful interference, and (2) this device must accept any interference received, including interference that may cause undesired operation.
-
Page 166: Declaration Of Conformity
The above named party is responsible for ensuring that the equipment complies with the standards of 47CFR §15.101 to §15.109. Product Name: PENTAX Digital Still Camera Model Number: Optio S5z Contact person: Customer Service Manager Date and Place: June, 2005, Colorado... -
Page 167: Index
Index AC Adapter ....19 Auto Power Off ... . . 149 Autofocus mode ... . . 72 Auxiliary AF light . - Page 168 Number of recordable images . . . 16 OK button ... .12 Operating Time ....16 Optional Accessories ..153 Pan Focus mode .
- Page 169 Zoom ..... . 68 Zoom button ..12 Zoom Display ....104...
- Page 170 Memo...
- Page 171 Memo...