Teledyne Trace Oxygen Analyzer 3000TA Quick Start Manual
Teledyne trace oxygen analyzer quickstart guide
Hide thumbs
Also See for Trace Oxygen Analyzer 3000TA:
- Operating instructions manual (75 pages) ,
- How-to (2 pages)

Related Manuals for Teledyne Trace Oxygen Analyzer 3000TA


Summary of Contents for Teledyne Trace Oxygen Analyzer 3000TA
- Page 1 QUICKSTART GUIDE MODEL 3000 TA Trace Oxygen Analyzer Teledyne Analytical Instruments...
- Page 2 Quickstart Guide Trace Oxygen Analyzer Teledyne Analytical Instruments...
-
Page 3: Getting Started
Model 3000TA GETTING STARTED This Quickstart Guide is designed to get you set up and operating your Teledyne Analytical Instruments Analyzer quickly. It shortcuts the details so you can install and use your new analyzer with a minimum of fuss. This Quickstart Guide should be used in conjunction with the Instruction Manual that shipped with your instrument. -
Page 4: Rear Panel (Equipment Interface)
Universal AC power source. Gas Inlet and Outlet: • Inlet, exhaust, zero and span. Remote Probe • Connection: Used for controlling external solenoid valves only. RS-232 Port: Serial digital concentration signal output and control input. • Teledyne Analytical Instruments Trace Oxygen Analyzer... - Page 5 Range ID Contacts: Four separate, dedicated, range relay contacts. Low, Medium, • High, Cal. Remote Span/Zero: Digital inputs for externally controlling calibration. • Network I/O: Serial digital communications for local network access. • Teledyne Analytical Instruments Quickstart Guide...
-
Page 6: Setup And Install
For vacuum service (5-10 in Hg), install the restrictor without the blue dot to the • EXHAUST port. 2. Connect your sample gas to the 3. Connect a vent line to port. SAMPLE IN port. EXHAUST OUT Teledyne Analytical Instruments Trace Oxygen Analyzer... -
Page 7: Electrical Connections
POWER IS APPLIED TO THE INSTRUMENT'S CIRCUITRY AS LONG AS THE INSTRUMENT IS CONNECTED TO THE POWER SOURCE. THE RED SWITCH ON THE FRONT PANEL IS FOR SWITCHING POWER ON OR OFF TO THE DISPLAYS AND OUTPUTS ONLY. Teledyne Analytical Instruments Quickstart Guide... - Page 8 Connect Digital Remote Cal Inputs: • These input terminals accept 0 V (off) or 24 V dc (on) inputs for remote calibration control. Connect Cal Contact: • This relay contact is closed while analyzer is spanning and/or zeroing. Teledyne Analytical Instruments Trace Oxygen Analyzer...
- Page 9 Install the Micro-fuel Cell The Model 3000TA is designed to accept the L2C Micro-fuel Cell or as an option, it can use the B2 series of Micro-fuel Cells by incorporating a spacer adaptor (Teledyne P/N B66378). L2C Micro-fuel Cell 1. Remove power from the instrument.
- Page 10 11. Purge the system using sample or zero gas. 12. Power the system back up. If the installation is carried out quickly enough, the sensor will reach a stable low value less than 1 ppm in approximately 8 hours or less. Teledyne Analytical Instruments Trace Oxygen Analyzer...
-
Page 11: Basic Operation
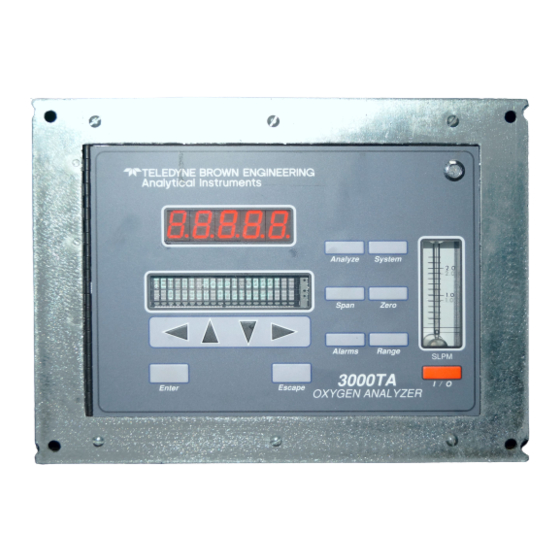
The Enter button is used to accept any new entries on the VFD screen. The Escape button is used to abort any new entries on the VFD screen that are not yet accepted by use of the Enter button. Teledyne Analytical Instruments Quickstart Guide... -
Page 12: Available Functions
The six function buttons are used to control the analyzer. Some functions have submenus that allow additional choices as shown below. Any function can be selected at any time by pressing the appropriate button (unless password restrictions apply). Teledyne Analytical Instruments Trace Oxygen Analyzer... -
Page 13: Password Protection
To install a new password or change a previously installed password, you must key in and Enter the old password first. If the default password is in effect, pressing the Enter button will enter the default TETAI password for you. Press System • Teledyne Analytical Instruments Quickstart Guide... -
Page 14: Calibration Of The Analyzer
0.1 and 2.4 SLPM (0.2 –5 SCFH). TRAK/HLD Auto—Cal PSWD Logout More T E T A I Enter PWD A A A A A Enter PWD Change Password? <ENT>=Yes <ESC>=No Teledyne Analytical Instruments Trace Oxygen Analyzer PSWD... - Page 15 Zero: Settling: AUTO <ENT> To Begin #### PPM Zero Slope=#### ppm/s #### PPM Zero 4 Left=### ppm/s AUTO Zero: Settling: Man <ENT> To Begin #### ppm Zero Slope=#### ppm/s Teledyne Analytical Instruments Quickstart Guide zero settling. Stop when zero settling. Stop when...
-
Page 16: Span Calibration
<ENT> For Next Calib. Holding time Cal hold: 5 min Span Val: 000008.00 <ENT>Span <UP>Mod # #### ppm Span Slope=#### ppm/s Span: Settling:MAN <ENT> For Next AUTO Teledyne Analytical Instruments Trace Oxygen Analyzer span settling. Stop when span settling. Stop when AUTO... -
Page 17: Setting Alarm Parameters
Cal hold: 5 min Span Val: 000008.00 <ENT>Span <UP>Mod # Mod # #### % Span Slope=#### ppm/s AL—1 AL—2 Choose Alarm AL—1 1000 ppm HI Dft—N Fs—N Ltch—N ppm (oxygen). AL–1 #### (Yes/No) (Yes/No) Teledyne Analytical Instruments Quickstart Guide ) of span value. - Page 18 Enter the range function by pressing the Range button. • Use the ◄► arrow keys to move the blinking over • (Yes/No). AL–2 and then press either ▲ two times or ▼ two Dft– L—100 M—1000 H—10000 Mode—AUTO Teledyne Analytical Instruments Trace Oxygen Analyzer AUTO...
-
Page 19: The Analyze Function
Analyze function. Alternatively, you can press the Analyze button at any time to return to analyzing your sample. AUTO L—100 M—1000 H—10000 Mode—FX/LO L—1 M—10 H—100 Mode—FX/MED L—1 M—10 H—100 Mode—FX/HI Teledyne Analytical Instruments Quickstart Guide , or to set the FX/LO FX/MED FX/HI...