Table of Contents
Advertisement
Quick Links
Download this manual
See also:
Service Manual
プラズマディスプレイ用据置きスタンド
組み立て設置工事説明書
組み立て工事前に、この説明書とプラズマディスプレイの取扱説明書をよく
お読みのうえ、正しい取り付け設置を行ってください。
(移動やメンテナンスの際に、必要になる場合がありますので、説明書を保存
していただきますようお願いいたします。 )
Pedestal for Plasma Display
Installation Instructions
Before commencing work, carefully read these Instructions and the Manual for the
plasma display to ensure that fitting is performed correctly.
(Please keep these instructions. You may need them when maintaining or moving.)
Sockel für Plasmadisplay
Installationsanleitung
Vor der Ausführung lesen Sie bitte diese Anleitung und die Bedienungsanleitung für
das Plasmadisplay sorgfältig durch, damit die Anbringung richtig ausgeführt wird.
(Bitte bewahren Sie diese Anleitung auf. Sie kann bei der Wartung oder der
erneuten Anbringung des sockels benötigt werden.)
Vloerstandaard voor plasmascherm
Installatiehandleiding
Lees deze installatiehandleiding en de bedieningshandleiding voor het
plasmascherm zorgvuldig door voordat u begint, zodat de montagewerkzaamheden
op de juiste wijze worden uitgevoerd.
(Bewaar deze handleiding. U hebt de handleiding weer nodig bij onderhoud en
verplaatsing.)
Piedistallo per lo schermo al plasma
Istruzioni per I'installazione
Prima di iniziare il montaggio leggere attentamente queste istruzioni ed il manuale
dello schermo al plasma per poter procedere al montaggio in modo corretto.
(Conservare poi queste istruzioni che si renderanno necessarie per la manutenzione
e l'eventuale spostamento della staffa.)
Piédestal pour l'écran plasma
Manuel d'installation
Avant de commencer le travail, lisez attentivement ces instructions ainsi que le
mode d'emploi de l'écran plasma de manière à réaliser un montage convenable.
(Conservez soigneusement les présentes instructions. Vous pouvez en avoir besoin
pour effectuer un entretien ou si vous désirez déplacer l'applique.)
Pedestal para pantalla de plasma
Model No.
Instrucciones de instalación
TY-ST103PF9
Antes de empezar el trabajo, lea atentamente estas instrucciones y el manual de la
pantalla de plasma para asegurar una instalación correcta.
(Guarde estas instrucciones. Podrá necesitarlas cuando haga trabajos de
mantenimiento o mueva el soporte.)
Bottenplatta för plasmaskärm
Installationsanvinsningar
Innan arbetet påbörjas ska du noga läsa dessa anvisningar och bruksanvisningen
som medföljer plasmaskärmen för att försäkra att arbetet utförs på rätt sätt.
(Bevara dessa anvisningar. Du kan behöva anlita dem på nytt för underhåll eller
flyttning av hållaren.)
Sokkel til plasmaskærm
Monteringsvejledning
Før arbejdet påbegyndes, skal du omhyggeligt læse disse instruktioner og
betjeningsvejledningen til plasmaskærmen for at sikre at opsætningsarbejdet
udføres korrekt.
(Gen disse instruktioner. Du kan få brug for dem ved vedligeholdelse, eller hvis
ophænget skal flyttes.)
Подставка для плазменного дисплея
Инструкция по установке
Перед проведением работ внимательно прочитайте эту Инструкцию и
Руководство для плазменного дисплея, чтобы убедиться в том, что установка
выполняется правильно.
(Сохраните, пожалуйста, эту инструкцию. Она может Вам понадобиться для
технического обслуживания или перемещения.)
Підставка для плазмового дисплея
Інструкції з встановлення
Перед початком робіт уважно прочитайте ці інструкції та інструкції з експлуатації
плазмового дисплея, аби забезпечити правильний монтаж.
(Збережіть ці інструкції, оскільки вони можуть знадобитись Вам, коли виникне
необхідність у технічному обслуговуванні або встановленні дисплея в іншому
місці.)
TQZH775-2
Advertisement
Table of Contents

Related Manuals for Panasonic TY-ST103PF9


Summary of Contents for Panasonic TY-ST103PF9
- Page 1 Pedestal para pantalla de plasma Model No. Instrucciones de instalación TY-ST103PF9 Antes de empezar el trabajo, lea atentamente estas instrucciones y el manual de la pantalla de plasma para asegurar una instalación correcta. (Guarde estas instrucciones. Podrá necesitarlas cuando haga trabajos de mantenimiento o mueva el soporte.)
-
Page 2: Precautions With Regard To Setting Up
Precautions with regard to setting up WARNING Ensure that the installation location is strong enough to support long-term use. • If its strength becomes insufficient over the course of long-term use, the display may topple over, possibly causing injury. Installation and removal should only be carried out by a qualified technician. •... - Page 3 ● Be sure to read and observe the “Precautions with regard to setting up”. PROFESSIONAL INSTALLATION IS REQUIRED. PANASONIC DISCLAIMS ANY PROPERTY DAMAGE AND/OR SERIOUS INJURY, INCLUDING DEATH RESULTING FROM IMPROPER INSTALLATION OR INCORRECT HANDLING.
-
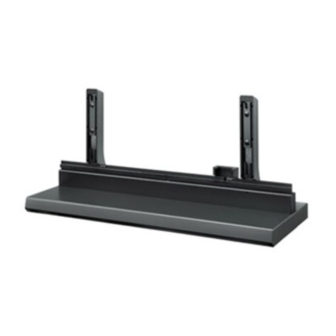
Page 4: Constituent Parts
Constituent parts Each pedestal comes in two separate packages: one contains the frame part, and the other contains the cover part. Check that all the parts are accounted for Frame part and present in their designated quantities. Main parts Metal frame 1 pc Support brackets (left and right) 1 pc each... -
Page 5: Cover Part
Check that all the parts are accounted for Cover part and present in their designated quantities. Main parts Front cover 1 pc Rear cover 1 pc Light shield 1 pc Support covers 2 pcs Wiring cord cover 1 pc (The left and right support covers are identical.) Accessory parts Light shield mounting screws... -
Page 6: Assembling The Metal Frame
Assembly 1. Assembling the metal frame ● Check which side of the metal frame is the front and which side is the rear. The rear side is the one with the guide pins for the rear cover (to be positioned on the rear side of the plasma display). - Page 7 3. Use the perpendicularity adjustment triangle to adjust the supports so that they are Supports perpendicular to the metal frame, and secure the supports using the support mounting hexagon bolts (4 sets at the left and 4 sets at the right) in the numerical order shown in the illustration.
-
Page 8: Mounting The Light Shield
Assembly 2. Mounting the light shield ● From this point on, the front cover and rear cover in the L i g h t s h i e l d separate package are assembled. mounting screws Check the parts list for the covers. (M5×35) 1. -
Page 9: Wiring The Equipment To Be Connected
Getting the hexagon bolts ready (4 sets each of support mounting hexagon bolts Get the hexagon bolts ready by passing them through the spring washers and flat washers in this order. Caution Grounding plates Use a tightening torque of 7 Nm to 9 Nm for the hexagon bolts. -
Page 10: Mounting The Rear Cover And Wiring Cord Cover
Assembly 5. Mounting the rear cover and wiring cord cover Caution Mount the rear cover and wiring cord cover in such a way that the wires will not be pinched. 1. Raise the rear cover slightly, align it with the left and right of the metal frame, and push it in until it will go no further. -
Page 11: Concerning The Steps Taken To Prevent Toppling
7. Concerning the steps taken to prevent toppling ● Measures to prevent the pedestal and the plasma display from toppling over include the following three methods. Select the method best suited to the installation location. 1. Securing with anchor bolts 2. - Page 12 Assembly 5. Use the rear cover mounting screw (x1) to secure the rear cover. 6. When securing the pedestal using only anchor bolts, proceed to Step 8 “Mounting the front cover”. Rear cover mounting screw (M5×35) 2. Securing with wires or chains 1.
- Page 13 8. Mounting the front cover 1. Raise the front cover slightly, align it with the left and right of the metal frame, and push it in until it will go no further. Front cover 2. From the left and right sides of the rear cover, mount the front cover using the front and rear cover mounting screws (2 at the left and 2...
- Page 14 梱包図(フレーム部)/ Packing instruction (Frame part) / Verpackungsanleitungen (Rahmen-Teil) / Uitpakinstructies (Onderdelen van het frame) / Istruzioni per l’imballaggio (Parte del telaio) / Instructions d’emballage (Cadre) / Instrucciones de embalaje (Parte del bastidor) / Förpackningsanvisningar (Ramdel) / Indpakningsinstruktion (Skærmdel) / Инструкция об упаковке (Рамка) / Інструкція...
- Page 15 梱包図(カバー部)/ Packing instruction (Cover part) Verpackungsanleitungen (Deckel-Teil) / Uitpakinstructies (Onderdelen van de afdekking) / Istruzioni per l’imballaggio (Parte coperchio) / Instructions d’emballage (Caches) / Instrucciones de embalaje (Parte de la cubierta) / Förpackningsanvisningar (Höljen) / Indpakningsinstruktion (Dækseldel) / Инструкция об упаковке (Покрытие) / Інструкція...
- Page 16 Enhet : mm Forankringsboltafstand Unité : mm Расположение анкерных болтов Единицы : мм Крок анкерних болтів Величина : мм 1659.4 (65.3) 1512 (59.5) 2270 (89.4) 198 (7.8) 2414 (95.0) 129 (5.1) Web Site : http://panasonic.net M0906A-2088 (PBS) © Panasonic Corporation 2006...