Table of Contents
Advertisement
OWNER'S MANUAL
R9
Make sure to read the "Safety Instruction" carefully before starting to use this product.
Please keep this Owner's Manual within easy reach of the user. As the product is only intended
for domestic use such as household cleaning, it must not be used for commercial,
experimental or industrial purposes. Make sure to fully charge the product's battery before first
use of the product after purchasing it.
www.lg.com
Copyright © 2018 LG Electronics Inc. All Rights Reserved
MFL69826103
MFL69826103W
MFL69826103
Advertisement
Table of Contents

Related Manuals for LG CordZero R9


Summary of Contents for LG CordZero R9
- Page 1 Make sure to fully charge the product's battery before first use of the product after purchasing it. www.lg.com Copyright © 2018 LG Electronics Inc. All Rights Reserved MFL69826103 MFL69826103W MFL69826103...
-
Page 3: Table Of Contents
Control Panel .................... 17 Choosing a Cleaning Mode ..............19 Choosing an Auxiliary Function ..............21 SMART FUNCTIONS .............22 Using LG SmartThinQ Application ............22 Using the Smart Diagnosis Function ............25 MAINTENANCE ..............27 Regular Cleaning ..................27 TROUBLESHOOTING ............34 Before Calling for Service ................. -
Page 4: Safety Instruction
SAFETY INSTRUCTION Information Safety Instruction The following safety guidelines are intended to prevent unforeseen risks or damage from unsafe or incorrect operation of the appliance. The guidelines are separated into ‘WARNING’ and ‘CAUTION’ as described below. This symbol is displayed to indicate matters and operations that can cause risk. - Page 5 •Place the cords from other appliances out of the area to be cleaned. •If the supply cord is damaged, it must be replaced by authorized LG Electronics service center or dealer for assistance in order to avoid a hazard. •Never use this vacuum cleaner with the battery or the Home Station from any other products.
- Page 6 •Do not apply heat or shock to the battery. •For your safety, do not remove the battery from the vacuum cleaner. If you need to replace the battery of the vacuum cleaner, take it to the authorized LG Electronics service center or dealer for assistance.
- Page 7 Operation •Do not touch the power cord and plug with a wet hands. •Pull it out by grabbing the plug, not the cord, when pulling out the power plug. •Do not to touch the prongs with your fingers, when pulling out the power plug.
- Page 8 •Ensure that liquids do not seep into the vacuum cleaner. If liquid gets inside of the vacuum cleaner, turn off the power supply and take it to the authorized LG Electronics service center or dealer for assistance. •Remove thin mats or carpets that may be damaged.
-
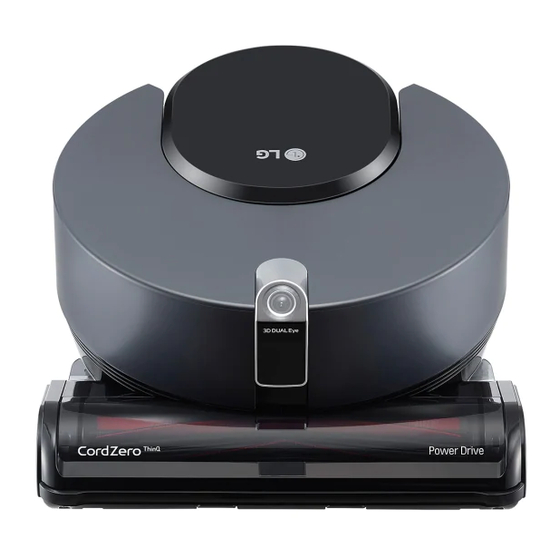
Page 9: Before Using The Robot Cleaner
BEFORE USING THE ROBOT CLEANER Parts Front View Control Panel Nozzle 3D DUAL Eye Bottom View Brush Cliff Detection Sensors Charging Terminals Top Cover Release Button Brush Release Button Ventilation Port... - Page 10 Rear View Top Cover Cyclonic Mesh Filter Dust Suction Port Dust Bin Release Button Dust Sensors Dust Bin HEPA Filter Pre-Filter Main Power Switch Pre-Filter Case Home Station Charging Terminals Cord Keeper...
-
Page 11: Accessories
Accessories Accessories will vary depending on the model purchased. Remote Control Batteries for Remote Control (AAA) Remote Control Station Pre-Filter... -
Page 12: Getting Started
Getting Started Turning off the Standby Power Supply Inserting Batteries into the Press and hold the Start/Stop button for 3 Remote Control seconds or press the Power button on the remote control. Release the tab at the back of the remote •... - Page 13 Installing the Home Station Wrap the unwanted length of power cable around the cord keeper to prevent the Robot Cleaner wheels from rolling over the cable. Remove the protective film attached to the Home Station, the Robot Cleaner, and the nozzle.
-
Page 14: Charging
Charging Battery Level Indicator Notes for Use • The battery level is indicated on the Control Panel, as follows. • If the charging terminals are dirty or covered − The remaining battery level is displayed in 3 or obstructed with foreign material, the Robot stages ( ) according to the Cleaner may not be charged normally. - Page 15 • If the cleaning mode has been changed while charging, the Robot Cleaner will not resume cleaning. • If the Robot Cleaner is registered in the LG SmartThinQ application, the Robot Cleaner finishes charging between 9 PM and 6 AM, the Robot Cleaner not resume cleaning.
-
Page 16: Operation
OPERATION Notes for Use Before Cleaning • Check the following items before use: Before Starting − Remove cables or long strings from the floor. • The cleaning time may decrease depending − Roll up or remove thin mats or carpets with on conditions of use or selected auxiliary a pile longer than 20 mm. -
Page 17: Control Panel
• Press the Home button to charge the network. battery. The Robot Cleaner will return to • The Wi-Fi Connection blinks while the Home Station. connecting the Robot Cleaner in the LG SmartThinQ application. • Using the LG SmartThinQ application to schedule a cleaning time. - Page 18 Remote Control NOTE • The Power button will only operate when the Main Power Switch is turned on. • The Language button will only operate when the Robot Cleaner is charging on the Home Station. Power Button Mode Button Start/Stop Button Repeat Button Language Button Lock 3D DUAL Eye Button...
-
Page 19: Choosing A Cleaning Mode
Choosing a Cleaning Mode Edge Mode Getting Started The Robot Cleaner moves in zigzag movements around the whole house and cleans thoroughly Select a cleaning mode on the control panel or including the edges up to the wall. When a wall on the remote control. - Page 20 Manual Mode Spiral Spot Mode You can move the Robot Cleaner manually by The Robot Cleaner cleans a 1.5 m × 1.5 m pressing the directional buttons on the remote sized space with stronger suction power. It is control. convenient to use this mode for cleaning a •...
-
Page 21: Choosing An Auxiliary Function
Choosing an Auxiliary Turbo Function Function The Robot Cleaner suction power is increased. Use this function for cleaning where strong These functions can allow the Robot Cleaner to suction power is necessary. clean more effectively by using the auxiliary • To activate the Turbo function, press the functions. -
Page 22: Smart Functions
Check the distance between the appliance manual. and the wireless router (WLAN network). • LG SmartThinQ is not responsible for any • If the distance between the appliance and network connection problems or any faults, the wireless router is too far, the signal malfunctions, or errors caused by network strength becomes weak. - Page 23 • The Home Guard position uses the Home model. station as the starting point (left and right sides: 1.5 m, front side: 3 m). • Follow the guide of the LG SmartThinQ application for details to use the Smart Functions. Home Guard...
- Page 24 In addition to the source code, all referred license terms, warranty disclaimers and copyright notices are available for download. LG Electronics will also provide open source code to you on CD-ROM for a charge covering the cost of performing such distribution (such as the cost of media, shipping, and handling) upon email request to opensource@lge.com.
-
Page 25: Using The Smart Diagnosis Function
Getting Started The Robot Cleaner uses this Smart Diagnosis function to run a self-diagnosis. If any irregularity is found from the diagnosis, please contact the authorized LG Electronics service center. Turn on the Main Power Switch of the Robot Cleaner and then dock the Robot Cleaner on to the Home Station. - Page 26 • If there is a problem with the sensor or the motor or the problem cannot be solved through the Smart Diagnosis, contact the authorized LG Electronics service center. • Extremely shiny surfaces may cause the sensors to react and result in an operational...
-
Page 27: Maintenance
MAINTENANCE Regular Cleaning Cleaning the Dust Bin Notes for Use Press the Top Cover Release (PUSH) button to open the top cover and then pull • Turn off the Main Power Switch on the Robot the dust bin upward. Cleaner before cleaning the Robot Cleaner. •... - Page 28 Use a dry cloth to rotate the end of Cyclonic Rotate the Pre-Filter Case to the Mesh Filter to the unlocked position unlocked position to separate it from the and then separate it. dust bin. Press and lift hook up to take out the Pre-Filter Thoroughly clean out the dust particles on the Cyclonic Mesh Filter, with a vacuum...
- Page 29 Cleaning the HEPA Filter Wipe the dust bin with a soft cloth or wash it under running water. Separate the dust bin from the Robot • Dry it complerely before using. Cleaner body and then pull out the HEPA Filter Case After cleaning the dust bin, assemble the Separate the HEPA Filter from the HEPA...
- Page 30 Cleaning the Brush After the HEPA Filter has dried, insert the filter in the HEPA Filter Case and close the cover. Place a soft cloth on the floor and place the Robot Cleaner upside down on top of the cloth. Push the Brush Release Button separate the brush case from the nozzle.
- Page 31 NOTE Insert the brush into the brush case, starting from its right side. • If the brushes have become bent, wrap it in a wet towel and wait until they have straightened out. Allow it to dry completely before reassembling. −...
- Page 32 Cleaning the Sensors and the Clean the cliff detection sensors and the charging terminals of the Robot Cleaner Charging Terminals using a cotton swab or a soft cloth. Place a soft cloth on the floor and place the Robot Cleaner on top of the cloth. Clean the 3D DUAL Eye of the Robot Cleaner using a soft cloth.
- Page 33 Failure to do so may cause an electric shock or injury. CAUTION • If the sensors or the charging terminals is damaged, discontinue use and contact an LG Electronics service center. • Do not wipe the product with a volatile solvent or an organic solvent (thinner, solvent, acetone, etc.) Doing so will cause product...
-
Page 34: Troubleshooting
TROUBLESHOOTING Before Calling for Service If following symptoms appear while using the Robot Cleaner, check it one more time. It may not be a failure. Problem Cause Solution • Turn on the Main Power Is the Main Power Switch of Switch at the back of the the Robot Cleaner turned off? Robot Cleaner. - Page 35 Problem Cause Solution Is the dust bin attached to • Attach the dust bin correctly. the Robot Cleaner correctly? Is the HEPA Filter or the • Attach the the HEPA Filter or Pre-Filter attached to the dust the Pre-Filter correctly. bin correctly? Is the brush contaminated •...
-
Page 36: Specifications
Approximately 60 minutes (Turbo function) Home Station Input 220-240 V~ 50 Hz 70 W Output DC 25.6 V 2.4 A Lithium-ion Battery Voltage / Maximum Current DC 21.6 V / 5200 mAh Rating 6 × 2 cells Cell Manufacturer LG Chem... - Page 37 Memo...
- Page 38 Memo...