Table of Contents
Advertisement
Digital Video
Cassette Recorder
Operating Instructions
Before operating the unit, please read this manual thoroughly,
and retain it for future reference.
Mode d'emploi
Avant d'utiliser cet appareil, veuillez lire attentivement ce mode
d'emploi et conservez-le pour toute référence ultérieure.
Owner's Record
The model and serial numbers are located on the bottom. Record
the serial number in the space provided below. Refer to these
numbers whenever you call upon your Sony dealer regarding this
product.
Model No. DSR-V10
Serial No.
DSR-V10
©1998 by Sony Corporation
Model No. AC-V700
Serial No.
3-862-931-12 (2)
Advertisement
Table of Contents

Related Manuals for Sony DVCAM DSR-V10


Summary of Contents for Sony DVCAM DSR-V10
-
Page 1: Operating Instructions
Owner’s Record The model and serial numbers are located on the bottom. Record the serial number in the space provided below. Refer to these numbers whenever you call upon your Sony dealer regarding this product. Model No. DSR-V10 Serial No. - Page 2 English WARNING To prevent fire or shock hazard, do not expose the unit to rain or moisture. This symbol is intended to alert the user to the presence of uninsulated “dangerous voltage” within the product’s enclosure that may be of sufficient magnitude to constitute a risk of electric shock to persons.
-
Page 3: Table Of Contents
Table of contents Before you begin Using this manual 4 Checking supplied accessories 6 Identifying the parts 7 Basic operations Installing the AC adaptor/charger 11 Inserting a cassette 12 Playing back a tape 13 Various playback modes 15 Playing back a dual soundtrack tape 16 Playing back a tape repeatedly (Auto Repeat) 17 Advanced operations Using alternative power sources 18... -
Page 4: Before You Begin Using This Manual
Before you begin Using this manual Welcome! Congratulations on your purchase of this Sony “Video Walkman” VCR. As you read through this manual, buttons and settings on the VCR are shown in capital letters. e.g., Set the POWER switch to ON. - Page 5 MISE AU REBUT DES BATTERIES AU LITHIUM- ION AUX ENDROITS RECOMMANDES. Vous pouvez rapporter les batteries au lithium-ion dans un centre de Service Sony ou dans un point de ramassage. Remarque: Dans certain pays, il est interdit de jeter les batteries au lithium-ion avec les ordures ménagères ou dans les...
-
Page 6: Checking Supplied Accessories
Checking supplied accessories Check that the following accessories are supplied with your VCR. 1 AC-V700 AC adaptor/charger (1) (p. 11, 19) The shape of the plug varies from region to region. 2 DK-415 connecting cord (1) (p. 11) 3 A/V connecting cable (1) (p. 31, 34, 36) 4 S video cable(1) (p. -
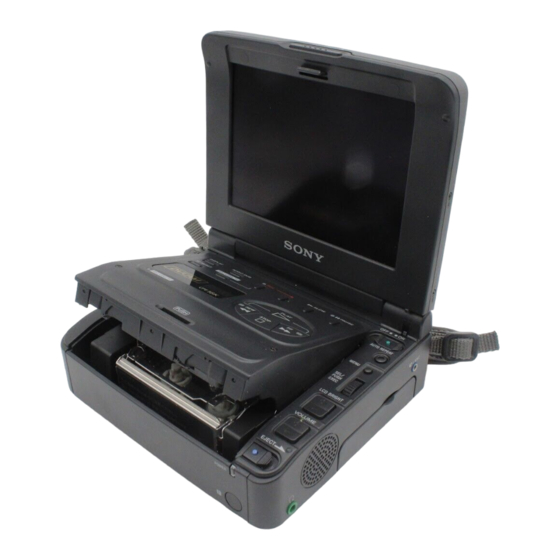
Page 7: Identifying The Parts
Identifying the parts 1 LCD screen 2 LCD BRIGHT buttons (p. 13) 3 VOLUME buttons (p. 13) 4 EJECT knob (p. 12) 5 Cassette compartment (p. 12) 6 POWER lamp (p. 13) 7 Remote sensor Aim a Remote Commander (not supplied) here for remote control. - Page 8 Identifying the parts !∞ !§ DISPLAY AUDIO DUB !¶ TC RESET REC ORG.TC !• !ª REC ORG.TC @º !∞ r REC (recording) buttons and lamp (p. 36) !§ AUDIO DUB button (p. 39) !¶ DISPLAY button (p. 13) !• TC RESET button (p. 37) !ª...
- Page 9 Slide up to release the terminal cover when attaching an accessory (not supplied). #¶ DV IN/OUT jack (p. 33, 40) This “i.LINK” mark is a trademark of Sony Corporation and indicates that this product is in agreement with IEEE 1394-1995 specifications and their revisions.
- Page 10 Identifying the Parts Operation indicators 1 Tape transport mode indicator 2 Cassette Memory indicator (p. 4) 3 DVCAM indicator 4 Warning indicator (p. 70) 5 BRT (bright) indicator (p. 13)/VOL (volume) indicator (p. 13) 6 Time code indicator / Self-diagnosis display (p.
-
Page 11: Basic Operations Installing The Ac Adaptor/Charger
Basic operations Installing the AC adaptor/charger Use the supplied AC adaptor/charger. (1)Set the mode change switch to VCR/ CAMERA. (2)Connect the connecting cord to the DC OUT jack on the AC adaptor/charger. (3)Connect the power cord to a wall outlet. (4)While pressing the connecting plate of the connecting cord, slide it to the left so that it attaches to the battery mounting surface... -
Page 12: Inserting A Cassette
Inserting a cassette You can use mini DVCAM cassette with logo* only. Make sure that the power source is installed. (1)While pressing PUSH OPEN, open the LCD panel. (2)While pressing the small blue button, slide EJECT to the right. The cassette compartment automatically lifts up and opens. -
Page 13: Playing Back A Tape
Playing back a tape (1)While pressing the small green button on the POWER switch, set it to ON. The POWER lamp (green) on the front lights (2)Press 0 to rewind the tape. (3)Press · to start playback. (4)Adjust the volume using VOLUME. You can also monitor the picture on a video monitor, after connecting the VCR to a video monitor or another VCR. - Page 14 You can operate this VCR using a Remote Commander supplied with a Sony product. Set COMMANDER in the menu system according to the remote control code of the Sony product. Note on the beep sound A beep sounds when you turn the power on.
-
Page 15: Various Playback Modes
Playing back a tape Various playback modes To view a still picture (playback pause) Press P during playback. The PAUSE lamp (orange) lights up. To resume playback, press P or ·. To locate a scene (picture search) Keep pressing 0 or ) during playback. To resume normal playback, release the button. -
Page 16: Playing Back A Dual Soundtrack Tape
Playing back a tape Playing back a dual soundtrack tape When you play back a dual soundtrack tape, select the desired sound in the menu. (1)Press MENU to display the menu. (2)Turn the control dial to select HiFi SOUND, then press the control dial. (3)Turn the control dial to select desired sound, then press the control dial. -
Page 17: Playing Back A Tape Repeatedly (Auto Repeat)
Playing back a tape Playing back a tape repeatedly (Auto Repeat) You can play back all or part of the tape repeatedly. (1)Press AUTO REPEAT. The AUTO REPEAT button lights up in orange. (2)Press 0 to rewind the tape to the beginning. Playback starts. -
Page 18: Advanced Operations Using Alternative Power Sources
Battery pack NP-F730, pack NP-730H, NP-F750, NP-F930, NP-F950 In the car 12 V or Sony DC adaptor/charger 24 V car DC-V700 battery Note on power sources Disconnecting the power source or removing the battery pack during recording or playback may damage the inserted tape. -
Page 19: Using The Battery Pack
(not supplied). If you use any other battery pack to operate your VCR, the VCR may not operate or the battery life may be shortened. “InfoLITHIUM” is a trademark of Sony Corporation. Charging the battery pack (1)Set the mode change switch to CHARGE. - Page 20 Using alternative power sources Charging time Battery pack Charging time * NP-F730 250 (190) NP-F730H/F750 270 (210) NP-F930 330 (270) NP-F950 360 (300) Numbers in parentheses indicate the time for a normal charge. (Normal charge) * Approximate number of minutes to charge an empty battery pack fully using the supplied AC adaptor/charger.
- Page 21 While pressing BATT, slide the battery pack to the right. Using a car battery Use the Sony DC adaptor/charger DC-V700 (not supplied). Connect the car battery cord to the cigarette lighter socket of a car (12 V or 24 V).
-
Page 22: Changing The Mode Settings
Changing the mode settings You can change the mode settings in the menu system to further enjoy the features and functions of the VCR. (1)Press MENU to display the menu. (2)Turn the control dial to select the desired item, then press the control dial. Only the selected item is displayed. - Page 23 Sélection du réglage de mode pour chaque paramètre COMMANDER <VTR1-6/OFF> •Sélectionnez VTR1 - 6 si vous utilisez la télécommande fournie avec un appareil Sony. •Sélectionnez OFF si vous n’utilisez pas de télécommande ou pour empêcher que l’appareil soit actionné par d’autres télécommandes.
- Page 24 Changing the mode settings LCD COLOR* Select this item and change the level of the indicator by turning the control dial to adjust the color intensity of the picture. LCD HUE* Select this item and change the level of the indicator by turning the control dial to adjust the hue of the picture.
-
Page 25: Searching A Scene
Sony digital video camera recorder, you can search a scene with a date. You can also search a photo (still picture) recorded by the Sony digital video camera recorder. Refer to the operating instructions of the digital camera recorder for details. - Page 26 Searching a scene Notes •The interval of the boundaries between the dates needs more than two minutes. The VCR may not search if the beginning of the recorded date is too close to the next one. •The short cursor on the screen suggests the date selected in the previous time.
-
Page 27: Searching For A Photo - Photo Search/Photo Scan
Searching a scene Searching for a photo - photo search/photo scan You can search for the recorded still picture - Photo Search function. There are two modes in Photo Search: •Using cassette memory, you can select the recorded date displayed. •Without using cassette memory. - Page 28 Searching a scene Searching for a photo without using cassette memory - photo search You can use this function whether the tape has cassette memory or not. MENU CM SEARCH (1)Set the POWER switch to ON. (2)Press MENU to display the menu. (3)Turn the control dial to select the CM SEARCH, then press the control dial.
- Page 29 Searching a scene Scanning photo - photo scan You can use this function whether the tape has cassette memory or not. (1)Set the POWER switch to ON. (2)Press SEARCH MODE on the Remote Commander repeatedly until the photo scan indicator appears. (3)Press = or +.
-
Page 30: Displaying Recording Data - Data Code Function
– data code function Using the Remote Commander supplied with a Sony digital video camera recorder, you can display recording data (date/time or various settings when recorded) on the LCD screen during playback (Data Code). The Data Code is also displayed on the video monitor. -
Page 31: Watching On A Video Monitor
Watching on a video monitor Connect this VCR to another VCR or video monitor to watch the playback picture on the video monitor. Open the jack cover. Connect this VCR to the LINE IN inputs on the video monitor or VCR connected to the video monitor, using the supplied A/V connecting cable. - Page 32 Watching on a video monitor To display indicators on the video monitor Set DISPLAY to V-OUT/LCD in the menu and press DISPLAY. To turn off, press DISPLAY again. To connect to a VCR or video monitor without video/audio input jacks Use the RFU-95UC RFU adaptor (not supplied).
-
Page 33: Editing Onto Another Tape
Editing onto another tape You can create your own video program by editing with any other DVCAM, mini DVCAM, h 8 mm, H Hi8, j VHS, k S-VHS, VHSC, K S-VHSC or l Betamax VCR that has audio/video inputs. You can edit with little deterioration of picture and sound quality when using the DV cable. - Page 34 Editing onto another tape Using the A/V connecting cable or S video connecting cable Set the input selector on the VCR to LINE. : Signal flow/Sens du signal Notes on editing when using the A/V connecting cable •Press DISPLAY, DATA CODE and SEARCH MODE on the Remote Commander (not supplied) to turn off the display indicators.
- Page 35 Editing onto another tape Starting editing (1)Insert a blank tape (or a tape you want to record over) into the (recording) VCR, and insert your recorded tape into this VCR. (2)Play back the recorded tape on this VCR until you locate the point where you want to start editing, then press P to set this VCR in playback pause mode.
-
Page 36: Recording From A Vcr Or Tv
Recording from a VCR or TV You can record a tape from another VCR or a TV program from a TV that has video/audio outputs. Connect this (recording) VCR to the (playback) VCR or TV. Turn down the volume of this VCR while editing. -
Page 37: Recording From A Vcr Or Tv
Recording from a VCR or TV Notes on connection •If the (recording) VCR is a monaural type, connect the yellow plug of the A/V connecting cable for video to the VCR. Connect only the white or red plug for audio to the VCR. If you connect the white plug, the sound is L (left) signal. -
Page 38: Audio Dubbing
•Si vous ajoutez un nouveau son sur une cassette enregistrée sur un autre magnétoscope (y compris sur un DSR-V10) ou un caméscope, la qualité sonore risque de ne pas être aussi bonne que si la cassette avait été enregistrée sur ce magnétoscope. - Page 39 Audio dubbing Adding an audio sound on a recorded tape (1)Insert your recorded tape into the VCR. (2)Set the POWER switch to ON. (3)On this VCR, press · to set it to playback mode, and then locate the point where the recording should begin.
-
Page 40: Duplicating The Orignal Tape
Duplicating the original tape You can copy the tape with the time code recorded. This function is useful to make a working tape from the original. Connecting VCRs Use this VCR as the recorder. Connect this VCR and the playback VCR at the DV IN/OUT jacks using the supplied DV cable. - Page 41 Duplicating the original tape To stop duplicating Press π. Note that this VCR may keep recording only the playback picture. Notes •This function works only when the DVCAM format playback signal is input through the DV IN/OUT jack. •The picture may not be recorded at the very beginning of recording.
-
Page 42: Informations Supplémentaires
Additional information Compatibility of DVCAM and DV formats DVCAM format is developed as a more reliable and higher end format than consumer DV format. Here are explained about DVCAM and DV formats: the differences, compatibility, and limitations on editing. Differences between DVCAM and DV formats Item Paramètre... -
Page 43: Compatibility Of Dvcam And Dv Formats
Compatibility of DVCAM and DV formats DVCAM and DV cassettes Both DVCAM and DV cassettes can be used on DVCAM or DV video equipment. The recording format of picture is defined according to recorder’s format as described below. Recorder’s format Format de l’enregistreur DVCAM This VCR complies with DVCAM format. - Page 44 Compatibility of DVCAM and DV formats Compatibility on editing using DV connectors When this VCR is connected to other DVCAM or DV video equipment using DV connectors, the recording format of edited tapes is defined according to recorder’s format as described below.
- Page 45 Compatibility of DVCAM and DV formats Limitations on editing You will find the following limitations when editing. •Due to the difference of a track pitch, you cannot record or edit on DV-formatted tapes using DVCAM video equipment. •Depending on signal conditions, you may not be able to record or edit on DVCAM-formatted tapes.
-
Page 46: Usable Cassettes And Playback Modes
This VCR can read and write data such as dates of recording or titles, etc. to this memory. Tapes with cassette memory have Memory) mark. Sony recommends that you use a tape having mark to enjoy this VCR fully. When you play back... - Page 47 Usable cassettes and playback modes Notes on the mini DVCAM Cassette To prevent accidental erasure Slide out the protect tab on the cassette so that the red portion is visible. [a] When affixing a label on the mini DVCAM cassette Be sure to affix a label on only the location as illustrated below so as not to cause malfunction of the VCR.
-
Page 48: Charging The Vanadium-Lithium Battery In The Vcr
Charging the vanadium-lithium battery in the VCR Your VCR is supplied with a vanadium-lithium battery installed so as to retain the menu settings, regardless of the setting of the POWER switch. The vanadium-lithium battery is always charged as long as you are using the VCR. The battery, however, will get discharged gradually if you do not use the VCR. -
Page 49: Resetting The Date And Time
Resetting the date and time The date and time are set at the factory. Set the time according to the local time in your country. If you do not use the VCR for about a year, the date and time settings may be released (bars may appear) because the vanadium-lithium battery installed in the VCR will have been discharged. - Page 50 Resetting the date and time To correct the date and time setting Repeat steps 2 to 6. The year indicators changes as follows: 1998 1999 ... 2000 ... Note on the time indicator The internal clock of this VCR operates on a 12- hour cycle.
-
Page 51: Notes On "Infolithium" Battery Pack
The “InfoLITHIUM” battery pack is a lithium battery pack which can exchange data with compatible video equipment about its battery consumption. Sony recommends that you use the “InfoLITHIUM” battery pack with video equipment having the When you use this battery pack with video... - Page 52 Notes on “InfoLITHIUM” battery pack To obtain more accurate remaining battery indication •If the indication seems incorrect, use up the battery pack and then recharge it fully (Full charge ). Note that if you have used the battery in a hot or cold environment for long time, or you have repeated charging many times, the battery pack may not be able to show the correct time even after being fully charged.
-
Page 53: Maintenance Information And Precautions
Maintenance information and precautions Moisture condensation If the VCR is brought directly from a cold place to a warm place, moisture may condense inside the VCR, on the surface of the tape, or on the head drum. In this condition, the tape may stick to the head drum and be damaged or the VCR may not operate correctly. -
Page 54: Maintenance Information And Precautions
LCD screen If [a] or [b] happens, clean the video heads with the Sony DVM12CL cleaning cassette (not supplied). Check the picture and if the above problem persists, repeat the cleaning. (Do not repeat cleaning more than 5 times in one session.) - Page 55 8,4 V (adaptateur/chargeur CA) ou 7,2 V (batterie). •Si quoi que ce soit venait à pénétrer dans le châssis, débranchez le magnétoscope et faites-le vérifier par le revendeur Sony avant de le remettre en service. •Evitez les manipulations brutales et les chocs mécaniques.
- Page 56 – Extremely hot or cold – Dusty or dirty – Very humid – Vibrating If any difficulty should arise, unplug the unit and contact your nearest Sony dealer. Informations d’entretien et précautions Adaptateur/chargeur CA Charge •Utilisez uniquement une batterie ion lithium.
-
Page 57: Using Your Vcr Abroad
Using your VCR abroad Each country or area has its own electric and TV color systems. Before using your VCR abroad, check the following points. Power sources You can use your VCR in any country or area with the supplied AC adaptor/charger within 100 V to 240 V AC, 50/60 Hz. -
Page 58: Trouble Check
English Trouble check If you run into any problem using the VCR, use the following table to troubleshoot the problem. Should the difficulty persist, disconnect the power source and contact your Sony dealer or local authorized Sony service facility. Power Symptom The power is not on. - Page 59 Clean the gold-plated connector. (p. 47) Cause and/or corrective actions • The video heads may be dirty. m Clean the heads using the Sony DVM12CL (not supplied) cleaning cassette. (p. 54) • The video heads may be dirty. m Clean the heads using the Sony DVM12CL (not supplied) cleaning cassette.
- Page 60 Trouble check Others Symptom While editing using the DV connecting cable, recording picture cannot be monitored. The VCR becomes warm. No function works though the power is The numbers or letters of 5 characters is displayed as a counter. AC adaptor/charger Symptom The VCR/CAMERA or CHARGE lamp does not light.
- Page 61 The problem is with the AC adaptor/ charger. Please contact your nearest Sony dealer in connection with the product with the problem. * If you use a battery pack which you have just bought or which has been left unused for a long time, the CHARGE lamp may flash at the first charging.
-
Page 62: Self-Diagnosis Display
C:21:ππ C:22:ππ C:23:ππ C:31:ππ C:32:ππ E:61:ππ E:62:ππ If you are unable to resolve the problem, contact your Sony dealer or local authorized Sony service facility. LCD screen Self-diagnosis display •C:ππ:ππ You can service the VCR yourself. •E:ππ:ππ Contact your Sony dealer or local authorized Sony service facility. -
Page 63: Dépannage
Si vous rencontrez des problèmes dans le cadre de l’utilisation de votre magnétoscope, consultez le guide de dépannage suivant pour tenter de remédier aux problèmes survenus. Si les difficultés persistent, déconnectez la source d’alimentation et consultez votre revendeur Sony ou un centre de service après-vente Sony agréé. - Page 64 Cause et/ou mesures correctives • Les têtes vidéo sont peut-être encrassées. m Nettoyez les têtes au moyen d’une cassette de nettoyage DVM12CL Sony (non fournie). (p. 54) • Les têtes vidéo sont peut-être encrassées. m Nettoyez les têtes au moyen d’une cassette de nettoyage DVM12CL Sony (non fournie).
- Page 65 Dépannage Autres Symptômes En cours de montage au moyen d’un câble de connexion DV, impossible de contrôler l’image d’enregistrement. Le magnétoscope s’échauffe. Aucune fonction n’est opérationnelle alors que le magnétoscope est sous tension. Une série de cinq caractères (chiffres et lettres) est affichée à...
- Page 66 Le problème se situe au niveau de l’adaptateur/chargeur CA. Consultez votre revendeur Sony en relation avec l’appareil posant un problème. * Si vous utilisez une batterie que vous venez d’acheter ou qui est restée inutilisée pendant une longue période, il se peut que le témoin CHARGE clignote après la première charge.
-
Page 67: Ecran D'autodiagnostic
C:21:ππ C:22:ππ C:23:ππ C:31:ππ C:32:ππ E:61:ππ E:62:ππ Si vous ne parvenez pas à résoudre le problème, consultez votre revendeur Sony ou un centre de service après-vente Sony agréé. Ecran LCD Ecran d’autodiagnostic •C:ππ:ππ Vous pouvez réparer vous-même le magnétoscope. •E:ππ:ππ... -
Page 68: Specifications
DC OUT: 8.4 V, 2.0 A in operating mode Battery charge terminal: 8.4 V, 1.4 A in charge mode Application Sony battery pack NP-F730, NP-730H, NP-F750, NP-F930, NP-F950 lithium ion type Operating temperature 32°F to 104°F (0°C to 40°C) Storage temperature –4°F to +140°F (–20°C to +60°C) -
Page 69: Spécifications
DC OUT: 8,4 V, 2,0 A en mode de fonctionnement Borne de charge de batterie: 8,4 V, 1,4 A en mode de charge Application Batterie ion lithium Sony NP-F730, NP-730H, NP-F750, NP-F930, NP-F950 Température de service 0 à 40 °C (32 à 104 °F) Température de stockage... -
Page 70: Warning Indicators
Warning indicators If the indicators flash on the LCD screen, check the following: : you can hear the beep sound when BEEP is set to ON in the menu system. !º 1 The battery is weak or dead. Slow flashing: The battery is weak. Fast flashing: The battery is dead. - Page 71 Chargez la pile au vanadium-lithium. (p. 48) 9 Une autre défaillance s’est produite. Déconnectez la source d’alimentation et consultez votre revendeur Sony ou un centre de service après-vente agréé. 0 La batterie n’est pas de type “InfoLITHIUM”.
- Page 72 DISPLAY ... 13 Dragonne ... 9 Ejection (6) ... 12 Enregistrement du code temporel ... 40 Exploration des photos ... 29 Sony Corporation Printed in Japan F, G Full charge ... 19 Hand strap ... 9 HiFi SOUND ... 16 House current ...