
Related Manuals for Sony MHC-WZ88D


Summary of Contents for Sony MHC-WZ88D
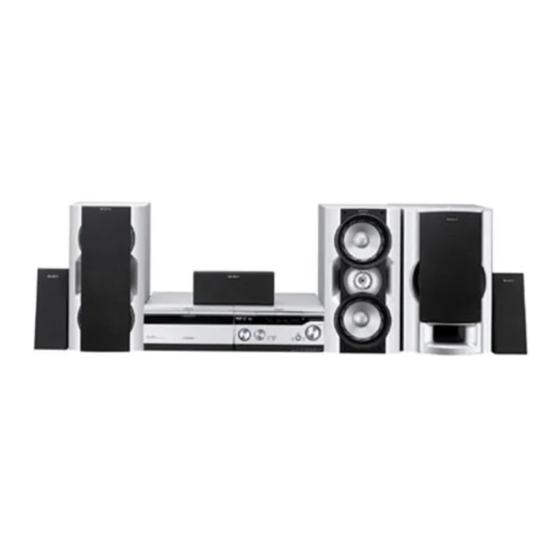
- Page 1 2-584-017-11(2) Mini Hi-Fi Component System Operating Instructions MHC-WZ88D ©2005 Sony Corporation...
- Page 2 For Australian model only NERGY registered mark. As an E ® partner, Sony Corporation has determined that this product meets the E guidelines for energy efficiency. The following caution label is located inside the apparatus.
-
Page 3: Table Of Contents
Table of Contents About this manual ... 5 Playable discs... 5 Getting Started Hooking up the system... 9 Positioning the speakers... 12 Setting the clock... 13 Performing QUICK SETUP ... 14 Using the THEATRE SYNC function ... 16 Changing the format of video signals from COMPONENT VIDEO OUT jacks ... - Page 4 Tape – Recording Recording your favorite disc onto a tape... 62 — CD Synchro Recording Recording onto a tape manually ... 63 — Manual Recording Sound Adjustment Adjusting the sound ... 64 Selecting the sound field... 65 Selecting the preset effect ... 66 Adjusting the graphic equalizer and storing the user equalizer setting ...
-
Page 5: About This Manual
About this manual • This manual mainly explains operations using the remote, but the same operations can also be performed using the buttons on the unit having the same or similar names. • The English on-screen display is used for illustration purposes only. - Page 6 Region code of DVD VIDEOs you can play back on this system Your system has a region code printed on the back of the unit and will only play back DVD VIDEOs labeled with identical region code. DVD VIDEOs labeled back on this system.
- Page 7 Notes about CD-R/CD-RW/ DVD-R/DVD-RW/DVD+R/ DVD+RW • In some cases, CD-Rs, CD-RWs, DVD-Rs, DVD-RWs, DVD+Rs or DVD+RWs cannot be played back on this system depending upon the recording quality or physical condition of the disc, or the characteristics of the recording device. Furthermore, the disc may not be played back if it has not been correctly finalized.
-
Page 8: About The Super Audio Cd
• CD-Rs/CD-RWs recorded in Multi Session that have not ended by “closing the session” are not supported. • With DATA CD or DATA DVD, the system will only play back DivX video files even if it contains MP3 audio tracks or JPEG image files. -
Page 9: Getting Started
Getting Started Hooking up the system Do the following procedures 1 to 7 to hook up your system using the supplied cords and accessories. AM loop antenna FM lead antenna To front speaker (right) To surround speaker (right) To surround speaker (left) Preparation Place the components as shown below. - Page 10 Speakers Black (#) Black (#) 3 Connect the FM and AM antennas. Set up the AM loop antenna, then connect AM loop antenna Extend the FM lead antenna horizontally 4 Connect the video input jack of your TV to the VIDEO OUT jack with the supplied video cord.
- Page 11 Operating a Sony TV You can use the following buttons to operate a Sony TV. These buttons have been marked in orange. To use these buttons, hold down TV before pressing the button you want. Hold down TV and press Turn the TV on or off Switch the TV’s input...
-
Page 12: Positioning The Speakers
Attaching the speaker pads Attach the supplied speaker pads to the bottom of the speakers to stabilize the speakers and to prevent them from slipping. Positioning the speakers Place the front speakers at an angle of 45 degrees from your listening position. -
Page 13: Setting The Clock
Place the sub woofer if you have connected an optional sub woofer. To obtain a better bass reproduction, we recommend you to place the sub woofer on a solid floor where resonance is unlikely to occur. Notes • Do not place the surround speakers on top of a TV. This may cause distortion of the colors in the TV screen. -
Page 14: Performing Quick Setup
Performing QUICK SETUP Before using the system, you can make the minimum basic adjustments (LANGUAGE SETUP, SCREEN SETUP, SPEAKER SETUP) in QUICK SETUP. After performing QUICK SETUP, the system is ready for playback. To perform further speakers settings, see “Setting the speakers”... - Page 15 Press repeatedly to select the front speaker distance from the listening position, then press ENTER. You can set from 1.0 to 7.0 meters. Press repeatedly to select the center speaker distance from your listening position, then press ENTER. You can set from 0.0 to 7.0 meters. The setting range changes depending on the front speaker setting.
-
Page 16: Using The Theatre Sync Function
0.5 (Default) Notes • This function can only be performed with Sony TV series. • If the distance between the TV and this system is too far, this function may not work. Install the system near the TV. -
Page 17: Changing The Format Of Video Signals From Component Video Out Jacks
Changing the format of video signals from COMPONENT VIDEO OUT jacks Progressive is the method for displaying TV images which reduces flickering and sharpens the image. To use this method, you need to connect to a TV that can accept progressive signals. -
Page 18: Disc - Playback
Disc – Playback Loading a disc Use the buttons on the unit for the operation. Press Z. The disc tray slides out. Load a disc with the label side facing up on the disc tray. When you play back an 8 cm disc such as a CD single, place it on the... - Page 19 When playing an MP3 audio track: Elapsed playing time Track number When playing a DivX video file on a DATA DVD (except for Latin American models): Elapsed playing time Press FUNCTION +/– repeatedly until “DVD” appears in the display (or press DVD on the unit).
-
Page 20: Resuming Playback From The Point Where You Stopped The Disc
Resuming playback from the point where you stopped the disc — Resume Play This system memorizes the point where you stopped the disc so you can resume playback from that point. Resume Play is not canceled when you turn off the system except for MP3 audio tracks, JPEG image files and DivX video files. -
Page 21: Creating Your Own Program
Creating your own program — Program Play You can make a program of up to 99 steps in the order you want them to be played back. Press DISPLAY once or twice. The Control Menu appears in the on-screen display. Press repeatedly to select (PROGRAM), then press... -
Page 22: Playing In Random Order
To change a program step Follow steps 1 to 3 of “Creating your own program (Program Play)”. Press repeatedly to select the program step you want to change. Then, press Follow step 5 to program a new track. To delete a program step Follow steps 1 to 3 of “Creating your own program (Program Play)”. -
Page 23: Playing Repeatedly
Notes • You cannot use this function with VIDEO CDs and Super VCDs during PBC playback. • Shuffle Play is canceled when: – you open the disc tray. – you turn off the system. – you disconnect the AC power cord (mains lead). –... - Page 24 x When playing a VIDEO CD, AUDIO CD or Super Audio CD when Program Play is off • OFF: does not play repeatedly. • DISC: repeats all tracks on the current disc. • TRACK: repeats the current track. x When playing a VIDEO CD, AUDIO CD or Super Audio CD when Program Play is activated •...
-
Page 25: Playing Dvd Videos Using The Menu
Playing DVD VIDEOs using the menu Some DVD VIDEOs have menus to help you enjoy the DVD VIDEOs. You can play back DVD VIDEOs using these menus on the TV screen. Using TOP MENU A DVD VIDEO is divided into long sections of picture or music feature called “title”. -
Page 26: Selecting A Playback Area For Super Audio Cd
Selecting a playback area for Super Audio CD Selecting a playback area on a 2 channel and multi-channel Super Audio CD Some Super Audio CDs consist of a 2 channel playback area and a multi-channel playback area. You can select the playback area you want to listen to. -
Page 27: Playing Video Cds With Pbc Functions (Ver. 2.0)
Playing VIDEO CDs with PBC functions (Ver. 2.0) — PBC Playback You can use the PBC (Playback Control) menu on your TV screen to enjoy the disc’s interactive software. The menu format and structure may differ depending on each disc. Press H (or hH on the unit) to start playing a VIDEO CD with PBC functions. -
Page 28: About Mp3 Audio Tracks And Jpeg
About MP3 audio tracks and JPEG image files What is MP3/JPEG? MP3 is an audio compression technology that satisfies the ISO/MPEG regulations. JPEG is an image compression technology. Discs that the system can play back For details on DATA CDs (CD-ROMs/CD-Rs/ CD-RWs) that the system can play back, see “Example of discs that this system cannot playback”... - Page 29 Notes • Depending on the software you use to create the DATA CD, the playback order may differ from the illustration above. • The playback order above may not be applicable if there are more than 200 albums and 300 files in each album.
-
Page 30: Playing Data Cds With Mp3 Audio Tracks And Jpeg Image Files
Playing DATA CDs with MP3 audio tracks and JPEG image files MP3 audio tracks and JPEG image files recorded on DATA CDs (CD-ROMs/CD-Rs/ CD-RWs) can be played back on this system. Playing an album of MP3 audio tracks or JPEG image files Load a DATA CD on the disc tray. - Page 31 Playing an MP3 audio track Load a DATA CD with MP3 audio tracks on the disc tray. The list of albums appears in the on-screen display. Press repeatedly to select the album you want, then press ENTER. The list of MP3 audio tracks of the selected album appears in the on-screen display.
- Page 32 Press to select the image you want to view and press ENTER. To play back the next or previous JPEG image file Press repeatedly during the slideshow. To play back the next album of JPEG image files You can select the next album by pressing repeatedly until the last file of the current album.
-
Page 33: Playing Mp3 Audio Tracks And Jpeg Images Files As A Slideshow With Sound
Playing MP3 audio tracks and JPEG images files as a slideshow with sound You can play back a slideshow with sound by first placing both MP3 audio tracks and JPEG image files in the same album on a DATA CD. Load a DATA CD on the disc tray. - Page 34 Tips • You can also change the slideshow speed (page 34) and effect (page 34) while playing JPEG image files. • If you want to play back a slideshow to the same audio track, set the track to Repeat Play (page 23). Specifying the slideshow speed (JPEG image files only)
-
Page 35: Enjoying Divx ® Videos
Press repeatedly to select the setting you want. The default setting is underlined. • MODE 1: The image sweeps in from top to bottom of the screen. • MODE 2: The image sweeps in from left to right of the screen. •... -
Page 36: Playing Data Cds And Data Dvds With Divx Video Files
DivX video files that the system can play back The system can play back files which have the extension “.AVI” or “.DivX” that contain data in DivX format. Notes • The system may not play back a DivX video file when the file has been combined from two or more DivX video files. - Page 37 Playing an album of DivX video files Load a DATA CD or DATA DVD with DivX video files on the disc tray. The list of the albums appears in the on-screen display. During playback of an album, the album title is shaded. 3 ( 3 ) S U M M E R 2 0 0 3 N E W Y E A R ’...
-
Page 38: Searching For A Particular Point On A Disc
To play back the next or previous DivX video file Press . or > (or .m or M> on the unit) repeatedly during playback. To play back the next album of DivX video files You can select the next album by pressing > (or M>... -
Page 39: Freeze Frame
Notes • For DATA CDs, you can search for a particular point only on an MP3 audio track. • Depending on the DVD VIDEO/VIDEO CD, you may not be able to do some of the operations described. • Depending on the disc, the actual speed may differ. Tips •... -
Page 40: Searching For A Title/Chapter/Track/Scene/ Index/Album/File
Searching for a title/ chapter/track/scene/ index/album/file You can search a title (DVD VIDEO, DVD-RW in VR (Video Recording) mode), chapter (DVD VIDEO, DVD-RW in VR mode), track (AUDIO CD, VIDEO CD, MP3 audio track), scene (VIDEO CD), index (VIDEO CD, Super Audio CD), album (MP3 audio track, JPEG image file, DivX video file) and file (JPEG image file, DivX video file). - Page 41 Press ENTER. “** (**)” changes to “– – (**)”. 1 2 ( 2 7 ) ( 3 4 ) DVD VIDEO 1 : 3 2 : 5 5 Press repeatedly or the numeric buttons to select the title, chapter, track, scene, index, album or file number you want to search for.
-
Page 42: Searching By Scene
Searching by scene — Picture Navigation You can view the first scene of each track of a VIDEO CD or each chapter or title of a DVD VIDEO so that you can find the track, chapter or title you want quickly. Press PICTURE NAVI once to select “TRACK VIEWER”... -
Page 43: Disc - Various Functions
Disc – Various Functions Selecting the audio format When playing a DVD VIDEO or a DivX video file recorded in multiple audio formats, you can select the audio format you want. If the DVD VIDEO is recorded with multilingual tracks, you can also change the language. - Page 44 Displaying the audio information of the disc (DVD VIDEO and DivX videos file only) When you press AUDIO repeatedly during playback, the audio signal format of the current track is displayed in the on-screen display. x When playing a DVD VIDEO For example, in Dolby Digital format, multiple signals ranging from monaural to 5.1 channel signals can be recorded on a DVD VIDEO.
-
Page 45: Changing The Angles
Changing the angles You can change the viewing angle while playing a DVD VIDEO on which various angles (multi- angles) for a scene are recorded. For example, while playing a scene of a train in motion, you can display the view from the front of the train, the left window of the train, or from the right window without having the train’s movement interrupted. -
Page 46: Adjusting The Delay Between The Picture And Sound
Adjusting the delay between the picture and sound — A/V SYNC When the sound does not synchronize with the pictures on the screen, you can adjust the delay between the picture and sound. Press DISPLAY once or twice when playback is stopped. The Control Menu appears in the on-screen display. - Page 47 Press repeatedly to select (PARENTAL CONTROL), then press ENTER. The options for “PARENTAL CONTROL” appear in the on-screen display. 1 2 ( 2 7 ) 1 8 ( 3 4 ) 1 : 3 2 : 5 5 PLAYER PASSWORD Press repeatedly to select “ON t”, then press ENTER.
- Page 48 Limiting playback for children — PARENTAL CONTROL (DVD VIDEO only) You can limit the playback of some DVD VIDEOs according to a predetermined level such as the age of the users. The “PARENTAL CONTROL” function allows you to set a playback limitation level.
- Page 49 Press repeatedly to select “LEVEL”, then press ENTER. The options for “LEVEL” are displayed in the on-screen display. PARENTAL CONTROL LEVEL: STANDARD: Press repeatedly to select the level you want, then press ENTER. Parental Control setting is completed. PARENTAL CONTROL LEVEL: STANDARD: The lower the value, the stricter the...
-
Page 50: Changing The Password
Changing the password Press DISPLAY when playback is stopped. The Control Menu appears in the on-screen display. Press repeatedly to select (PARENTAL CONTROL), then press ENTER. The options for “PARENTAL CONTROL” appear in the on-screen display. Press repeatedly to select “[PASSWORD t]”, then press ENTER. -
Page 51: Setting The Language
Press repeatedly to select the setup item from the displayed list: “LANGUAGE SETUP”, “SCREEN SETUP”, “CUSTOM SETUP”, or “SPEAKER SETUP”. Then press ENTER. The setup item is selected. Example: SCREEN SETUP Selected item SCREEN SETUP TV TYPE: COLOR SYSTEM: SCREEN SAVER: BACKGROUND: JACKET PICTURE 4:3 OUTPUT:... - Page 52 Setting the TV screen — SCREEN SETUP Choose the settings according to the TV you connected. Select “SCREEN SETUP” in the Setup menu. For details, see “Using the DVD setup menu” (page 50). The default settings are underlined. SCREEN SETUP TV TYPE: COLOR SYSTEM: SCREEN SAVER:...
- Page 53 x BACKGROUND Selects the background color or picture to be displayed on the TV screen. The background color or picture is displayed when playback is stopped or while playing an AUDIO CD, Super Audio CD and MP3 audio tracks. JACKET The jacket picture (still picture) PICTURE appears, but only when the jacket...
-
Page 54: Setting The Speakers
x PAUSE MODE (DVD VIDEO and DVD-RW in VR (Video Recording) mode only) Select the picture in pause mode. AUTO The picture, including subjects that move dynamically, is output with no jitter. Normally select this position. FRAME The picture, including subjects that do not move dynamically, is output in high resolution. - Page 55 To return to the default setting when changing a setting Press CLEAR before you press ENTER. However, note that you cannot return the setting of “SIZE” to default setting. Note You cannot perform SPEAKER SETUP when you connect headphones or microphones to the unit. x SIZE When you connect or disconnect the center speaker, surround speakers or sub woofer or...
- Page 56 x LEVEL (FRONT) You can vary the level of the front speakers, center speaker and sub woofer as follows. Be sure to set “TEST TONE” to “ON” for easy adjustment. The items that are set to “NONE” in “SIZE” cannot be selected. Set this between –6.0 dB and 0.0 dB 0.0 dB in 1.0 dB increments.
- Page 57 Press ENTER when you have finished making the adjustment. Repeat steps 8 to 10 to adjust the speaker level for other speakers. Press Press repeatedly to select “LEVEL (SURROUND)”, then press ENTER. Repeat steps 8 to 11 to adjust the speaker level for other speakers.
-
Page 58: Tuner
Tuner Presetting radio stations You can preset up to 20 FM stations and 10 AM stations. You can then tune in any of those stations simply by selecting the corresponding preset number. Automatic tuning preset You can automatically tune in all of the stations that can be received in your area and then store the frequency of your favourite stations manually. - Page 59 Press ENTER. A preset number flashes in the display. The stations are stored from preset number 1. Preset number STEREO TUNED Press PRESET +/– repeatedly to select the preset number you want. Press ENTER. “Complete!” appears in the display. The station is stored.
-
Page 60: Listening To The Radio
Listening to the radio You can listen to a radio station either by selecting a preset station, or by manually tuning in the station. Listening to a preset radio station — Preset Tuning Before tuning to preset stations, be sure to preset them first (see “Presetting radio stations”... -
Page 61: Tape - Playback
Tape – Playback Loading a tape Use the buttons on the unit for the operation. Press Z A or Z B. Load a tape into deck A or B. With the side you want to play back or record facing forward Push the center of the tape lid to close the deck. -
Page 62: Tape - Recording
Searching for the beginning of a track (AMS*) During playback, press . or > on the unit) repeatedly for M> the number of songs you want to skip forward (or backward). The search direction, + (forward) or – (backward), and the number of songs being skipped (1~9) appears in the display. -
Page 63: Recording Onto A Tape Manually
Notes • You can only record the tracks on the CD layer of a Super Audio CD when you make CD Synchro Recording. • You cannot listen to other sources while recording. • When you press CD SYNC, the sound field is automatically changed to LINK if the headphones are not connected and HP 2CH if the headphones are connected. -
Page 64: Sound Adjustment
Notes • When you press REC PAUSE/START, the sound field is automatically changed to LINK if the headphones are not connected and HP 2CH if the headphones are connected. • You cannot listen to other sources while recording. • When you connect or disconnect a microphone or headphones during recording, the sound may cut off for a moment. -
Page 65: Selecting The Sound Field
Selecting the sound field You can take advantage of the surround sound simply by selecting one of the sound fields. They bring the exciting and powerful sound of movie theaters into your home. Press SOUND FIELD. The last selected sound field appears in the display. -
Page 66: Selecting The Preset Effect
HP 2CH: The normal sound field for headphones. HP VIRTUAL: The sound field for headphones with virtual surround effect. This sound field is only effective when you play back multi channel sources. Notes • For some discs, the surround effect may not be as much as expected. -
Page 67: Adjusting The Graphic Equalizer And Storing The User Equalizer Setting
Adjusting the graphic equalizer and storing the user equalizer setting You can adjust the sound by raising or lowering the level of specific frequency band, then store it in the user equalizer setting in the memory. Use the buttons on the unit for the operation. Press EQ SELECT. - Page 68 Start singing along with the music and adjust the microphone volume by turning MIC LEVEL on the unit. To adjust the microphone echo Turn ECHO LEVEL on the unit to adjust the echo effect. To cancel the echo effect, turn ECHO LEVEL on the unit to “MIN”.
- Page 69 Adjusting the pitch of the music (DVD VIDEO, DVD-RW in VR mode, VIDEO CD, AUDIO CD, MP3 audio tracks, DivX video files only) You can adjust the pitch of the music to suit your vocal range. You can adjust the key higher or lower in 14 halftone steps.
- Page 70 Dolby Digital Karaoke Format (DVD VIDEO only) The Dolby Digital format, which reproduces surround sound using 5 channels, can also contain the “Dolby Digital Karaoke” format which is specialized for karaoke. In the Dolby Digital Karaoke format discs, guide melody and guide vocal tracks are recorded in addition to the accompaniment.
-
Page 71: Mixing And Recording Sounds
Notes • You cannot change the vocal for DVD VIDEOs with 1 guide vocal recorded. • When playing a DVD VIDEO, the function only works for Dolby Digital Karaoke format. • The “VOCAL SELECT” setting is automatically changed to default setting when you: –... - Page 72 Notes • During DVD function, the Karaoke Mode is automatically turned on when you connect an optional microphone to the MIC 1 or MIC 2 jack. To sing along with the original source, press KARAOKE MODE once to turn off the Karaoke Mode.
-
Page 73: Timer
Timer Falling asleep to music — Sleep Timer You can set the system to turn off after a certain time, so that you can fall asleep to music. Press SLEEP repeatedly. Each time you press the button, the minute display (the turn-off time) changes cyclically as follows: 90 min t 80 min t 70 min t …... -
Page 74: Timer Recording Radio Programs
Press ENTER. The type of timer (“PLAY TIMER”), followed by the start time, the stop time and the music source appears in the display in sequence before the original display returns. Press ?/1 to turn off the system. Other operations Do this Check the setting Press TIMER MENU. - Page 75 Load a recordable tape into deck B. Make sure the tape is in the front side. Press DIRECTION on the unit repeatedly to select “g” to record on one side or “j” (or “RELAY”) to record on both sides. When recording from the reverse side, press FUNCTION +/–...
-
Page 76: Display
Display Turning off the display — Power Saving Mode The demonstration display and the clock display can be turned off to minimize the amount of power consumed during standby mode (Power Saving Mode). Press DISPLAY repeatedly while the system is turned off until the demonstration display and the clock display disappears. - Page 77 x When playing a Super VCD without PBC function Elapsed playing time of the current track t 2)5) Title of the disc x When playing a Super VCD or VIDEO CD with PBC function Elapsed playing time of the current scene t 2)6) Title of the disc x When playing MP3 audio tracks on a...
-
Page 78: Viewing Information About The Disc In The On-Screen Display
Viewing information about the disc in the on-screen display You can check the elapsed playing time and remaining time of the current title, chapter, or track, and the total playing time of the disc. You can also check the DVD-TEXT, CD-TEXT, disc title, album title, track title and file title. -
Page 79: Checking The Date Information Of Jpeg Image Files
To turn off the Control Menu Press DISPLAY repeatedly until the Control Menu disappears from on-screen display. Notes • Only alphabet letters, numbers and some symbols can be displayed. • Depending on the type of disc being played back, the system can only display a limited number of characters. -
Page 80: Optional Components
The effects may be limited or noise may occur depending on the connected sub woofer or the type of music being played back. For details, consult your nearest Sony dealer. D VIDEO OUT jack Use a video cord (supplied) to connect a TV to this jack. -
Page 81: Listening To Audio From A Connected Component
E S VIDEO OUT jack Use an S video cord (not supplied) to connect a TV to this jack. You can enjoy higher quality video images. F COMPONENT VIDEO OUT jacks Use component video cords (not supplied) to connect a TV or projector to these jacks. If your TV accept progressive format signals, you must use this connection and press PROGRESSIVE on the unit repeatedly to select “P AUTO”... -
Page 82: Recording Audio Signal From A Connected Component
Recording audio signal from a connected component Connect the audio cords. See “Hooking up optional components” on page 80. Start recording manually. See “Recording onto a tape manually” on page 63. Recording audio signal on a connected component Recording the audio signal on a connected component Connect the audio cords. -
Page 83: Connecting External Antennas
Connecting external antennas Connect an external antenna to improve the reception. FM antenna Connect an optional FM external antenna. You can also use the TV antenna instead. AM antenna Connect a 6 to 15 meter insulated wire to the AM antenna terminal. Leave the supplied AM loop antenna connected. -
Page 84: Troubleshooting
Find your problem in the troubleshooting checklist below and take the indicated corrective action. If the problem persists after doing all of the above, consult your nearest Sony dealer. When the ?/1 indicator flashes Immediately unplug the power cord and check the following items. - Page 85 The timer does not function. • Check the timer setting and set the correct time (pages 73 and 74). • Cancel the Sleep Timer function (page 73). • You cannot select the Play Timer and the Timer Recording at the same time. The remote does not function.
- Page 86 Disc player The disc tray does not open and “LOCKED” appears in the display. • Consult your nearest Sony dealer. The disc tray does not close. • Load the disc correctly. • Always close the tray by pressing Z on the unit.
- Page 87 The JPEG image file cannot be played back. • Recording was not performed according to the ISO 9660 Level 1, Level 2, or Joliet in the expansion format. • The JPEG image file does not have the extension “.JPG” or “.JPEG”. •...
-
Page 88: Tape Deck
Picture noise appears. • Clean the disc. • If video signal from your system has to go through your VCR to your TV, the copy-protection applied to some DVD VIDEO programs could affect the picture quality. If you still experience problems after checking your connections, connect your unit directly to your TV’s S Video input (page 10). - Page 89 Optional components There is no sound. • Refer to General item “There is no sound.” (page 84) and check the condition of the system. • Connect the component properly (page 80) while checking: – if the cords are connected properly. –...
-
Page 90: Self-Diagnosis Function
E XX To prevent a malfunction, the (XX is a number) system has performed the self- diagnosis function. t Contact your nearest Sony dealer or local authorized Sony service facility and give the 5-character service number. Example: E 61 10... - Page 91 Tape No Tab You cannot record the tape because the tab has been removed from the tape. No Tape There is no tape in the tape deck. Timer OFF TIME NG! The on time and off time of Play Timer or Timer Recording is the same.
-
Page 92: Additional Information
• Before you move the unit, make sure that all discs are removed from the unit. If you have any questions or problems concerning your system, please consult your nearest Sony dealer. - Page 93 Notes on discs • Before playing, clean the disc with a cleaning cloth. Wipe the disc from the center out. • Do not use solvents such as benzene, thinner, commercially available cleaners or anti-static spray intended for vinyl LPs. • Do not expose the disc to direct sunlight or heat sources such as hot air ducts nor leave it in a car parked in direct sunlight.
-
Page 94: Specifications
NTSC Russian models Other models NTSC, PAL Tape deck section Recording system 4-track 2-channel stereo Frequency response 50 – 13,000 Hz (±3 dB), using Sony TYPE I tape Wow and flutter ±0.15% W.Peak (IEC) 0.1% W.RMS (NAB) ±0.2% W.Peak (DIN) - Page 95 Tuner section FM stereo, FM/AM superheterodyne tuner FM tuner section Tuning range 87.5 – 108.0 MHz Antenna FM lead antenna Antenna terminals 75 ohms unbalanced Intermediate frequency 10.7 MHz AM tuner section Tuning range Latin American model: 530 – 1,710 kHz (with the tuning interval set at 10 kHz) 531 –...
- Page 96 General Power requirements Argentina models: Australian model: Saudi Arabian model: Thai model: Other models: Power consumption Dimensions (w/h/d) DVD player/Tuner: Amplifier/Tape deck: Mass DVD player/Tuner: Amplifier/Tape deck: Supplied accessories: Design and specifications are subject to change without notice. 220 V AC, 50/60 Hz 230 –...
-
Page 97: Guide To The Control Menu Display
Guide to the Control Menu display Use the Control Menu to select a function and to view related information. Press repeatedly to turn on, turn off or change the Control Menu display as follows: Control Menu display 1 Control Menu display 2 (appears for certain discs only) Control Menu display off Control Menu display The Control Menu display 1 and 2 will show different items depending on the disc type. - Page 98 List of Control Menu items Item Item Name, Function, Relevant Disc Type TITLE/SCENE/TRACK Selects the title, scene, or track to be played. CHAPTER/INDEX Selects the chapter or index to be played. INDEX Displays the index and selects the index to be played. TRACK Selects the track to be played.
- Page 99 Item Item Name, Function, Relevant Disc Type SETUP QUICK Setup Use QUICK SETUP to choose the desired language of the on-screen display, the aspect ratio of the TV, the audio output signal, and the size of the speakers you are using. CUSTOM Setup In addition to the Quick Setup setting, you can adjust various other settings.
-
Page 100: Dvd Setup Menu Item List
DVD setup menu item list You can set the following items with the DVD setup menu. The default settings are underlined. LANGUAGE SETUP (page 51) Select the language you want to use from the displayed language list. MENU Select the language you want to use from the displayed language list. - Page 101 SETUP (page 14, 50, 89) QUICK CUSTOM RESET The default setting varies depending on the area. Except for Latin American and Russian models. Latin American models only. Except for Latin American models.
-
Page 102: Language Code List
Language code list For details, see page 51. The language spellings conform to the ISO 639:1988 (E/F) standard. Code Language 1027 Afar 1028 Abkhazian 1032 Afrikaans 1039 Amharic 1044 Arabic 1045 Assamese 1051 Aymara 1052 Azerbaijani 1053 Bashkir 1057 Byelorussian 1059 Bulgarian 1060... -
Page 103: Glossary
Glossary Album Section of a music or picture piece on a DATA CD or DATA DVD containing MP3 audio tracks, JPEG image files and DivX image files. Chapter Subdivision of a title on a DVD VIDEO. A title is composed of several chapters. DivX ®... - Page 104 DVD VIDEO A disc that contains up to 8 hours of moving pictures even though its diameter is the same as an AUDIO CD. The data capacity of a single-layer and single- sided DVD VIDEO, at 4.7 GB (Giga Byte), is 7 times that of an AUDIO CD.
- Page 105 Parental Control A function of the DVD VIDEO to limit playback of the disc by the age of the users according to the limitation level in each country. The limitation varies from disc to disc; when it is activated, playback is completely prohibited, violent scenes are skipped or replaced with other scenes and so on.
- Page 106 Track Sections of a picture or a music piece on an AUDIO CD, VIDEO CD or DATA CD. Each track is assigned a track number enabling you to locate the track you want. Structure of DVD Title VIDEO or DVD-RW in VR mode Chapter Structure of...
-
Page 107: List Of Button Locations And Reference Pages
List of button locations and reference pages How to use page 107 and 108 Use these pages to find the location of buttons and other parts of the unit and the remote that are mentioned in the text. Unit ALPHABETICAL ORDER A –... -
Page 108: Remote Control
VOLUME +/– qk (56, 57, 73, 84) -/-- 9 (11) 10/0 8 Sony Corporation Printed in Malaysia SYMBOLS ?/1 (power) wk (11, 13, 14, 74, 75, 84) x (stop) qg (19, 20, 27, 30–33, 37, 46, 59, 61, 75, 86)