Sony CMT-CP1 Operating Instructions Manual
Micro hi fi component system
Hide thumbs
Also See for CMT-CP1:
- Operating instructions manual (37 pages) ,
- Service manual (46 pages)
Table of Contents
Advertisement
3-865-909-14(1)
Micro HiFi
Component
System
Operating Instructions
Owner's Record
The model and serial numbers are located on the rear of the system. Record the
serial number in the space provided below. Refer to them whenever you call upon
your Sony dealer regarding this product.
Model No. CMT-CP1
Serial No.
CMT-CP1
©1998 by Sony Corporation
Advertisement
Table of Contents

Related Manuals for Sony CMT-CP1


Summary of Contents for Sony CMT-CP1
-
Page 1: Operating Instructions
The model and serial numbers are located on the rear of the system. Record the serial number in the space provided below. Refer to them whenever you call upon your Sony dealer regarding this product. Model No. CMT-CP1 Serial No. - Page 2 WARNING To prevent fire or shock hazard, do not expose the system to rain or moisture. To avoid electrical shock, do not open the cabinet. Refer servicing to qualified personnel only. Do not install the appliance in a confined space, such as a bookcase or built-in cabinet.
-
Page 3: Table Of Contents
Table of Contents Getting Started Step 1: Hooking up the system ... 4 Step 2: Setting the time ... 6 Step 3: Presetting radio stations — Preset ... 7 Connecting optional components ... 8 Basic Operations Playing a CD — Normal Play ... 11 Recording from a CD to a tape —... -
Page 4: Getting Started Step 1: Hooking Up The System
Getting Started Step 1: Hooking up the system Follow steps 1 through 4 of the procedure below to hook up your system using the supplied cords and accessories. Right speaker Connect the speakers. Connect the right and left speaker cords to the SPEAKER terminals of the same color. - Page 5 Jack type B Extend the FM wire antenna E N N A N T horizontally For models with a voltage selector, set VOLTAGE SELECTOR to the local power line voltage. VOLTAGE SELECTOR 110V~120V 220V~240V Connect the power cord to a wall outlet.
-
Page 6: Step 2: Setting The Time
Step 2: Setting the time Before you can use the system’s timer functions, set the internal clock. The clock uses a 24-hour system on the European model, and a 12-hour system on other models. The 24-hour system is used here for illustration purposes. -
Page 7: Step 3: Presetting Radio Stations
Step 3: Presetting radio stations — Preset The system can store a total of 30 preset stations (20 for FM and 10 for AM). This section explains how to tune in stations and preset them. TUNER/ BAND Press TUNER. “TUNER” appears. Press TUNER BAND (or TUNER/BAND on the remote) to select FM or AM. -
Page 8: Connecting Optional Components
Step 3: Presetting radio stations (continued) To tune in a weak station In step 3, press TUNING MODE (or TUNING/PLAY MODE on the remote) repeatedly until “AUTO” and “PRESET” disappear, then press TUNING +/– (or j/J on the remote) repeatedly to tune in the station. -
Page 9: Connecting Headphones
Connecting an MD deck for digital recording By connecting an MD deck to the system with a commercially available optical cable, you can make a digital recording from a CD. To the digital input connector on the MD deck Connecting a VCR You can connect a VCR to the system with a commercially available audio cord. - Page 10 Connecting optional components (continued) Jack type B 75-ohm coaxial cable (not supplied) E N N A N T AM antenna For the AM antenna, use a 6- to 15-meter (20- to 50-foot), horizontally extended insulated wire, with one end connected to the AM ANTENNA terminals as shown below.
-
Page 11: Basic Operations
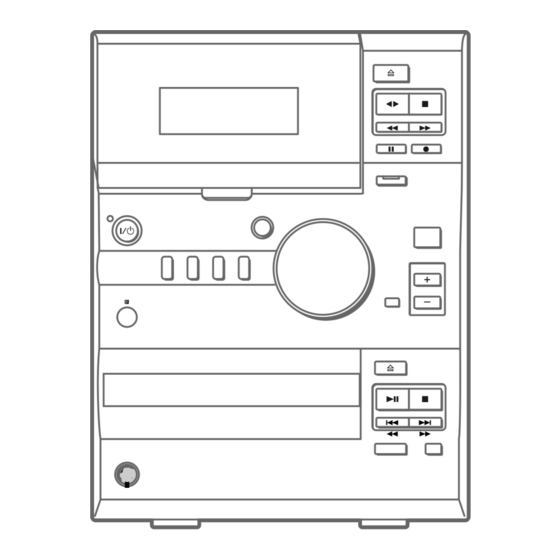
Basic Operations Playing a CD — Normal Play Do the procedure below to play a CD starting from the first track. To turn on the system, press ?/1. (Power) VOLUME CD .m/>M CD H Press CD EJECT A and place a CD on the disc tray. -
Page 12: Recording From A Cd To A Tape - Cd Synchro Recording
Playing a CD (continued) Do this Stop playback Press CD x (or x on the remote). Pause Press CD u (or X on the remote). Press again to resume playback. Select a track During playback or pause, press CD . (or l on the remote) or CD >... - Page 13 Press TAPE EJECT A and insert a recordable tape into the cassette holder. With the side you want to record on facing towards you EJECT CD–SYNC STANDBY VOLUME MD/VIDEO TAPE TUNER Press CD EJECT A and place a CD on the disc tray. ST AN DB TU NE R ?/ 1...
-
Page 14: Listening To The Radio - Preset Tuning
Listening to the radio — Preset Tuning Presetting radio stations in the system’s memory in advance makes it easy to tune in those stations later (see “Step 3: Presetting radio stations” on page 7). To turn on the system, press ?/1. (Power) TUNER/ BAND... -
Page 15: Recording From The Radio
Tips • If you press TUNER BAND (or TUNER/BAND on the remote) when the power is off, the system automatically turns on and tunes in the station last received (One Touch Play). • To switch to the radio while listening to another source, press TUNER BAND (or TUNER/BAND on the remote) (Automatic Source Selection). - Page 16 Recording from the radio (continued) Press TUNER BAND (or TUNER/BAND on the remote) to select FM or AM. Press TUNING MODE (or TUNING/PLAY MODE on the remote) repeatedly until “PRESET” appears. Press TUNING +/– (or j/J on the remote) repeatedly to display the preset number of the desired station.
-
Page 17: Playing A Tape
Playing a tape The system can play three types of tapes: Type I (normal), Type II (CrO ) and Type IV (metal). The system automatically detects the tape type so there is no need to specify it. To turn on the system, press ?/1. (Power) TAPE X VOLUME... -
Page 18: The Cd Player
Playing a tape (continued) Do this Stop playback Press TAPE x (or x on the remote). Pause Press TAPE X (or X on the remote). Press again to resume playback. With the tape stopped‚ Fast-forward or rewind press TAPE M (or J on the remote) or TAPE m (or j on the remote). -
Page 19: Playing Cd Tracks Repeatedly
Playing CD tracks repeatedly — Repeat Play The Repeat Play function lets you playback a single track or all the tracks on a CD repeatedly in Normal Play. You can also use Repeat Play function while in Shuffle Play or Program Play. -
Page 20: Shuffle Play
Playing CD tracks in random order — Shuffle Play You can use this function to playback all the tracks on a CD in random order. CD H Press CD. “CD” appears. To cancel Shuffle Play Press PLAY MODE (or TUNING/PLAY MODE on the remote) repeatedly until “SHUFFLE”... -
Page 21: Playing Cd Tracks In A Favorite Order
Playing CD tracks in a favorite order –– Program Play You can make a program of up to 24 tracks on a CD in any order that you want. After setting the order, you can also make a synchronized tape recording of the tracks (see page 23). -
Page 22: The Tape Deck Recording To A Tape Manually
Playing CD tracks in a favorite order (continued) Do this Add a track to the Do steps 3 and 4 with end of the program Program Play stopped. Erase the entire Press CD x (or x on the program remote) with Program Play stopped. -
Page 23: Recording Your Favorite Cd Tracks To A
Press TAPE EJECT A and insert a recordable tape. Press the button of the source you want to record from. • CD: To record from the CD • TUNER: To record from the radio • MD/VIDEO: To record from optional component Press REC z (or z REC on the remote). - Page 24 Recording your favorite CD tracks to a tape (continued) Press CD EJECT A and place a CD. Press CD EJECT A again to close the disc tray. Press TAPE EJECT A and insert a recordable tape. Press CD. “CD” appears. Press PLAY MODE (or TUNING/PLAY MODE on the remote) repeatedly until “PGM”...
-
Page 25: Other Features Generating A More Dynamic Sound
Other Features Generating a more dynamic sound The Dynamic Sound Generator (DSG) automatically enhances your music to produce a more powerful sound. , Press DSG. To cancel the DSG Press DSG again. Using the Radio Data System (RDS) (European model only) What is the Radio Data System? Radio Data System (RDS)* is a broadcasting... -
Page 26: Falling Asleep To Music - Sleep Timer
Falling asleep to music — Sleep Timer The Sleep Timer function lets you specify a sleep time, after which the system stops playing and turns off automatically. You can thus fall asleep to music. SLEEP Press SLEEP. Each time you press this button, the sleep time changes as follows: AUTO t 90min t 80min t 70min 10min ... - Page 27 Prepare the music source you want to listen to when the system turns • CD: Place a CD. To start playing from a specific track, make a program (see “Playing CD tracks in a favorite order” on page 21). • Tape: Insert a tape with the side you want to play on facing towards you.
-
Page 28: Timer-Activated Recording Of Radio
Timer-activated recording of radio programs — REC Timer Set the REC Timer to make the system start recording from a preset radio station at a specified time (see “Step 3: Presetting radio stations” on page 7). To use this function, make sure that you have set the system clock correctly (see “Step 2: Setting the time”... - Page 29 Set the stopping time by repeating step 6. The starting time, the stopping time, “TUNER”, and the preset station appear in turn, then the original display returns. Press ?/1 to turn off the system. When recording starts, the volume level is automatically set to the minimum.
-
Page 30: Additional Information Precautions
• When moving the system, remove any disc that may be on the disc tray. If you have any questions or problems concerning your system, please consult your nearest Sony dealer. Notes on CDs • Before playing a CD, clean the CD surface with a cleaning cloth. -
Page 31: Troubleshooting
2 Find your problem in the troubleshooting checklist below and take the indicated corrective action. If the problem persists after doing all of the above, consult your nearest Sony dealer. General There is no sound from the speakers. •Adjust VOLUME (or press VOL + on the remote). -
Page 32: Tape Deck
Troubleshooting (continued) The remote does not work. •There is an obstacle between the remote and the system. •You are not pointing the remote in the direction of the system’s sensor. •The batteries in the remote have run down. Replace the batteries. •Make sure that the batteries are inserted correctly. -
Page 33: Specifications
Tuner There is a severe hum or noise (“TUNED” or “STEREO” flashes). • Adjust the antenna. • The signal strength is too weak. Connect an external antenna (see page 9). • Make sure that the antenna is connected properly. • Do not bend or roll up the antenna. •... - Page 34 2 Hz - 20 kHz (±0.5 dB) Mass General 4-track 2-channel stereo Power requirements 50 - 13,000 Hz (±3 dB), North American model: using a Sony TYPE I European model: cassette Other models: 50 - 14,000 Hz (±3 dB), using a Sony TYPE II cassette ±0.15% W.
-
Page 35: Index
Index Adjusting the volume 12, 14, 18 AMS 12 Antennas 4, 9, 10 Automatic Source Selection 12, 15, 18 Batteries 5 CD player 11, 12, 18 Clock setting 6 Connecting. See Hooking up D, E, F Daily Timer 26 Generating a more dynamic sound 25 H, I, J, K, L, M Hooking up... - Page 36 Sony Corporation Printed in Korea...