Table of Contents
Advertisement
Quick Links
Download this manual
See also:
User Manual
Advertisement
Table of Contents

Related Manuals for Drill Master XP


Summary of Contents for Drill Master XP
- Page 1 THE DRILL BIT SHARPENER USER GUIDE USER GUIDE GET SHARP BACK TO WORK AND GET ⚠ Caution! To reduce risk of injury, the user must read and understand this instruction manual before using product. Save these instructions for future reference.
-
Page 2: Table Of Contents
Contents English .....................2 General Safety Rules ..............4 ® Drill Doctor Getting to Know Your ........Identifying Basic Drill Bits ............Anatomy of a Drill Bit ............... Aligning the Drill Bit ..............Sharpening the Drill Bits ............Identifying Correctly Sharpened Drill Bit ......Split Points ................... - Page 3 Thank you ® Drill Doctor for purchasing a . It is sure to become a valuable tool because you will always have sharp drill bits before a project, during a project, and after a project. As president of this company, I am very proud of the quality of our products—and I am equally proud of the ®...
-
Page 4: General Safety Rules
General Safety Rules WARNING! Read and understand all instructions. Failure to follow all instructions listed may result in electric shock, fi re and/or serious injury. The term “power tool” in all warnings listed herein refers to your corded power tool. WARNING! CHOKING HAZARD! Small Parts –... - Page 5 b) Avoid body contact with earthed or grounded surfaces, such as pipes, radiators, ranges and refrigerators. There is an increased risk of electric shock if your body is earthed or grounded. c) Do not abuse the cord. Never use the cord for carrying, pulling or unplugging the power tool.
- Page 6 USA Only This tool is intended for use on a circuit that has an outlet that looks like the one illustrated in Fig. A. It has a grounding plug that looks like the one in Fig. B. A temporary adapter, which looks like the adapter illustrated in Fig.
- Page 7 part of the power tool may result in personal injury. f ) Do no overreach. Keep proper footing and balance at all times. This enables better control of the power tool in unexpected situations. Nonslip footwear is recommended. g) Dress properly. Wear closed, non-flammable protective clothing.
- Page 8 tools. Such preventative safety measures reduce the risk of starting the power tool accidentally. f ) Store idle power tools out of reach of children and do not allow persons unfamiliar with the power tool or these instructions to operate the power tool. Power tools are dangerous in the hands of untrained users.
- Page 9 Specific Safety Rules WARNING! ALWAYS use proper safety glasses. Everyday eyeglasses are NOT safety glasses. Also use face of dust mask if operation is dusty. ALWAYS wear certified safety equipment: • ANSI Z87.1 eye protections (CAN/CSA Z94.3) • ANSI 512.6 (53.19) hearing protection •...
- Page 10 Save These Instructions Minimum Gauge Cord Sets Volts Total Length of Cord in Feet 0-25 26-50 51-100 101-200 115V (0 - 7.6m) (7.6 - 15.2m) (15.2 - 30.4m) (30.4 - 60.9m) 0-50 51-100 101-200 201-300 230V (1 - 15.2m) (15.2 - 30.4m) (30.4 - 60.9m) (60.9 - 91.4m) Ampere Rating...
- Page 11 DECLARED DUAL-NUMBER NOISE EMISSION VALUES in accordance with ISO 4871 Declared noise emmision value. = L + K, where the maximum K = 3.0 dB (per ISO 11201) Manufacturer: DAREX, LLC Model: DDXP Rated Input: 92w Hz: 50 Source: 230VAC A-weighted emission sound pressure level, LpA (ref.
-
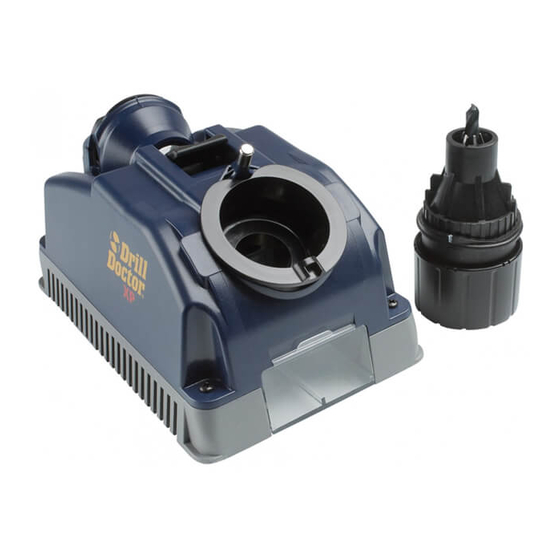
Page 12: Getting To Know Your Drill Doctor
® Getting to Know Your Drill Doctor Bit Clamp Arms Power Switch and Power Cord Drill Stop Drill Bit Alignment Button Cam Pin Sharpening Port Splitting Guide Split Point Port Wheel Split Point Guide Rails Access Cover Diamond Sharpening Wheel (Inside) Chuck Jaws Masonry Bit Alignment Marks... -
Page 13: Identifying Basic Drill Bits
Identifying Basic Drill Bits The Drill Doctor® is most efficient when used to resharpen a drill bit’s original point angle. With its standard Diamond Sharpening Wheel it will sharpen high-speed steel, cobalt, TiN-coated, carbide and masonry drill bits. It has been designed and engineered to sharpen three of the most common drill bit types: Standard Point This general-purpose point (normally... -
Page 14: Aligning The Drill Bit
Aligning the Drill Bit This makes sure that the Drill Doctor creates the right geometry. It also sets the depth of the bit so that only a small amount of the tip is taken off during sharpening. Insert bit in Chuck and tighten Insert the bit into the Chuck Jaws and close the Jaws just to the point where... - Page 15 2. Adjust Bit Position Look at the bit and make sure the Bit Clamp Arms are in the bit’s narrowest spot (the flutes). If they aren’t, turn the bit until it is. This is an important step to proper alignment. Bit Clamp Arms Drill Stop 3.
-
Page 16: Sharpening The Drill Bits
Sharpening the Bit Before sharpening you should know: Keep the Chuck in constant contact with the Cam Pin as you • sharpen—push the Chuck straight into the Port. Only light pressure is required. • z) as you complete • You will hear a grinding noise each half-turn. -
Page 17: Identifying Correctly Sharpened Drill Bit
Identifying Correctly Sharpened Drill Bits (and what to do with those that aren’t!) Correctly Sharpened Bits Cutting Heel Chisel Edge The entire surface from the Cutting Point Edge to the Heel will have a finely ground surface without ridges or indentations. -
Page 18: Split Points
Split Points Split point drill bits prevent walking on the material before they begin to cut. This feature is described as self-centering. The need to center punch is effectively eliminated. A standard drill bit chisel point has to wear an area in the middle of the hole to be drilled before the cutting edges will remove material. -
Page 19: Identifying Correctly Split Drill Bits
4. Split the point Splitting Port Press Chuck slowly and firmly into the Splitting Port. Remove the chuck, rotate one-half turn, and repeat. Check the tip of the bit carefully to determine that both sides of the bit are split equally. Compare it to this illustration. -
Page 20: Grit Tube Attachment
Oversplit Solution Too much material removed. Reinsert the chucked bit into the Sharpening Port and remove enough of the tip until the split tip looks like the correctly split bit above. Split lines are joined in the center and Chisel Edge has been removed. -
Page 21: Sharpening Bits Of Different Lengths, Diameters, And Types
Chisel Edge that is clean and straight and the entire surface from the Cutting Edge to Heel is finely ground. Large Drill Bits The Model XP sharpens bits from 3/32” to 1/2”. You can also purchase the optional Large Bit Chuck that sharpens bits up to 3/4”. -
Page 22: Masonry Drill Bits
Masonry Drill Bits To sharpen a masonry bit, you do not turn the Chuck. Instead you insert the Chuck until it touches the wheel, remove, and repeat on the other side. 1. Align the bit with the Masonry Sharpening Marks Insert the bit into the Chuck and line Masonry up the carbide insert on the tip of... -
Page 23: Using The Variable Alignment To Adjust Chisel And Relief Angle
Using the Variable Alignment to Adjust the Chisel and Relief Angles The Model XP enables you to adjust the Chisel and Relief Angles of your drill bit. The Chisel and Relief Angles have a direct effect on the performance of your drill. By increasing the Relief Angle, you can increase the speed of the drill in softer materials. - Page 24 2 . Insert Chuck into Alignment Port To adjust the Chisel and Relief Angles, simply align the bit as usual with the following adjustment: To increase relief, insert the Chuck into the Alignment Port so that the Align- ment Guides (raised fins) are notched into one of the slots towards the (+) symbol.
-
Page 25: Questions And Answers
Questions and Answers 1. Question: Why was my drill bit sharpened improperly? Answer: The most common cause of improper sharpening is improper drill bit alignment. Key causes are: • Chuck not inserted into the Sharpening Port correctly. Ensure the Alignment Guides (raised fins) are fitted into the correct alignment slot. - Page 26 4. Question: What can I do about flat spots on the bit point between the Cutting Edge and the Heel? Answer: The flat spots on a sharpened bit are the result of an incomplete or paused half-turn of the Chuck in the Sharpening Port. To correct, apply light, inward pressure and rotate the Chuck smoothly while sharpening.
- Page 27 7. Question: Why is my split point uneven? Answer: You may have used uneven pressure during the splitting process. To correct an uneven point split, insert the Chuck into the Split- ting Port and split both sides again. Repeat until the split sides are equal.
-
Page 28: Drill Doctor Maintenance
Drill Doctor Maintenance ® After sharpening 20 to 25 drill bits, the drill bit grinding dust will accumulate in the grinding compartment. Grinding particles will promote wear in the Sharpening Port and Chuck, so cleaning on a consistent basis can add life to your machine. Before any maintenance or cleaning is performed, be sure to disconnect your Drill Doctor. - Page 29 Determining if Replacing the Diamond Grinding Wheel Is Required You can double the life of the Diamond Sharpening Wheel by re- versing it before you replace it. The Sharpening Wheel supplied with the Drill Doctor is designed to give you long and trouble free ®...
- Page 30 3. With Phillips-head screw- driver, remove the two screws and wheel retainer. 4. Remove worn wheel by twist- ing slightly and lifting wheel off hub. Install new wheel and reinstall wheel retainer and screws. Don’t over-tighten mounting screws. Remove the wrench and replace the Wheel Access Cover before turning on the machine.
-
Page 31: Accessories
Accessories Order accessories by contacting us at the phone number listed on the back cover, or at the retailer where you purchased your Drill Doctor 3/32” to 3/4” Large Bit Chuck Part # DA70100PF 3/32” to 1/2” Left-handed Bit Chuck (for 3/32”-1/2”... -
Page 32: Warranty
Drill Doctor Warranty ® Darex, LLC warranties your Drill Doctor to be free of defects due to workmanship or design for 3 years from the date of purchase. For warranty service, contact your dealer with sales receipt. www.drilldoctor.com... - Page 33 www.drilldoctor.com...
- Page 34 THE DRILL BIT SHARPENER DAREX, LLC P.O. BOX 730 210 E. Hersey St. Ashland, OR 97520 Phone 1-800-597-6170 541-552-1377 www.DrillDoctor.com Drill Doctor ® is a registered trademark of DAREX, LLC PP41121KF Rev 0 8/18...