Advertisement
Quick Links
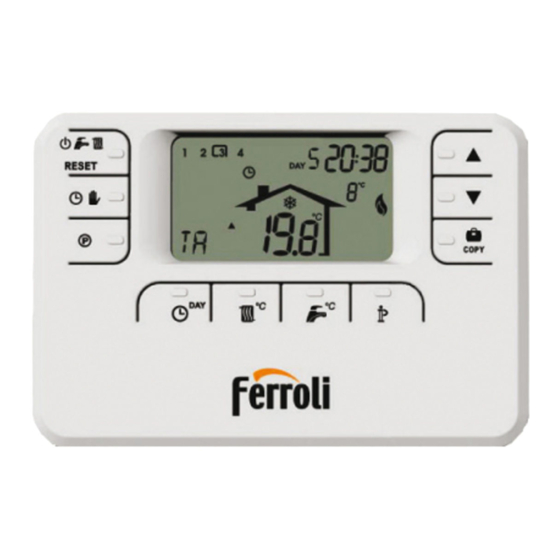
OVERVIEW OF RF REMOTE CONTROL
21
22
14 15 16
1
2
3
23
20
4
1
OFF, summer-winter mode/reset faults selection
button
2
Automatic/manual heating mode button
3
Heating - DHW programming button
4
Time and day setting button
5
Heating temperature adjustment button
6
DHW temperature adjustment button
7
User information/settings button
8
Holiday function button/copy heating - DHW programme
day
9
Manual room temperature decrease button
10 Manual room temperature increase button
11 Heating programme time bands
12 Day of week
13 Hours and minutes
14 OFF mode
OVERVIEW OF RF BRIDGE
1
2
CONFIGURE AND ACTIVATE THE REMOTE CONTROL IN 6 EASY STEPS
Step 1. Installation check (RF BRIDGE)
Make sure the RF bridge is electrically fed through the connection with the boiler card. The left LED must activate 3 fast blinks
every 2 seconds.
Step 2. Battery installation (RF REMOTE CONTROL)
Note: Follow the instructions in only if installing the RF Remote Control for the fi rst time
or if the RF Remote Control display activates the symbol
Otherwise go straight to Step 3: Correct setting of time and day.
To install the batteries:
1. Remove the front cover by prising with a screwdriver at points A and B as shown in the fi gure, to access the batteries.
2. Insert the two 1.5V AA LR6 alkaline batteries supplied with the RF Remote Control, making sure to fi t them in the right
direction (indicated inside the front part).
3. Refi t the front part of the RF Remote Control. (Make sure to centre the front part on the rear part to ensure correct insertion
of the contacts).
4. Wait: fi nding synchronism between RF Remote Control and RF Bridge. The operation ends when the symbol (
the RF Remote Control display stops fl ashing. Otherwise remove the batteries from the RF Remote Control and repeat Steps
1 and 2: if necessary, bring the RF Remote Control nearer the RF Bridge to obtain more reliable RF communication.
Step 3. Setting the time and day
1. Press the button
. The day starts fl ashing: use the
1 is Monday and DAY 7 is Sunday.
2. Press the button
. The hours start fl ashing: use the
3. Press the button
. The minutes starts fl ashing: use the buttons
59.
4. Press the button
.
Step 4. Setting the automatic weekly programme
Once the time and day have been set, the Remote Control will follow the preset automatic programme. The heating programme
provides for 6 daily time bands for temperature levels, numbered from 1 to 6. The time bands can be set between 00:00 and
24:00 in 10 minute increments. Each temperature level can be set between 7°C and 32.5°C in 0.1°C increments. Therefore any
combination of time and temperature during the day can be programmed, and different for each day of the week. The preset
automatic programme is:
From Monday to Friday
Band 1
Start time
06:30
Temperature level
21°C
From Saturday to Sunday
Band 1
Start time
08:00
Temperature level
21°C
11
17
19 12 13
26
18
27 28
5
6
7
15 Heating manual mode
16 Heating automatic mode
17 Holiday function
18 Burner on and current power level
19 Summer mode
20 DHW mode
21 Winter mode
22 Heating mode
23 Fault
24 Room temperature
25 Room antifreeze
26 External temperature (only with optional external probe
connected)
27 Batteries fl at
28 Flashing: Finding synch.
Fixed: RF communication ok
3
1 - Left LED
2 - TEST mode button
3 - Right LED
or if the display is off (no symbols or numbers appear).
A
B
buttons to set the correct day of the week, where DAY
buttons to set the correct hours from 00 to 23.
to set the correct minutes from 00 to
Band 2
Band 3
Band 4
Band 5
08:00
12:00
14:00
18:00
18°C
21°C
18°C
21°C
Band 2
Band 3
Band 4
Band 5
10:00
12:00
14:00
18:00
21°C
21°C
21°C
21°C
Follow the instructions given below to modify the preset automatic programme.
1. Press the button
. If DHW programming is enabled, select the radiator symbol with the buttons
with the button
. The 6 daily time bands fl ash and number 1 of DAY 1 is shown in a box to indicate that time band 1
of Monday can be modifi ed.
2. Press the button
. The hours and minutes start fl ashing: use the buttons
in 10 minute increments. By keeping the button pressed the hours and minutes will change rapidly.
10
3. Press the button
. The room temperature inside the house starts fl ashing: use the buttons
temperature level in 0.1°C increments. By keeping the button pressed the temperature will change rapidly.
9
4. Press the button
. The 6 daily time bands fl ash.
5. Then press the button
8
6. The remaining time bands can be displayed by selecting bands 3, 4, 5 or 6 with buttons
7. The programme setting for the following day can now be selected:
a. Press the button
to display DAY 2. The Tuesday programme can be modifi ed by repeating steps 2 to 6.
25
b. To copy the Monday programme to Tuesday, press the button
of the week, press the button
24
Important! When setting the programme make sure each band has a different start time.
Monday
Start time
Temperature level
Tuesday
Start time
Temperature level
Wednesday
Start time
Temperature level
Thursday
Start time
Temperature level
Friday
Start time
Temperature level
Saturday
Start time
Temperature level
Sunday
Start time
Temperature level
Step 5. Operation mode selection
OFF mode selection - If you are going away for prolonged period (also see Holiday Function) or if you simply want to switch off
the heating, press the button
only if the room temperature falls below 5°C: freezing protection function. If equipped with a hot water tank, the boiler will not
deliver domestic hot water; instant-type hot water boilers will deliver hot water.
Summer mode selection - To switch off the heating while maintaining the domestic hot water function, press the button
and the symbol
is displayed. The heating is switched off, and switched on again only if the room temperature falls below 5°C:
freezing protection function. Whatever the type of boiler, it will deliver hot water.
Winter mode selection - To reactivate heating and restore the previously set operation mode, press the button
and the symbol
will appear on the display. Whatever the type of boiler, it will deliver hot water.
Heating automatic operation (in Winter mode) - Press the button
on the display. The Remote Control will function according to the automatic weekly programme, displaying
the 6 time bands: the time band active at that moment is displayed in a box. If the box is not shown, this
means that the current time is between 00:00 hours and the start of time band 1.
Set temperature level exclusion - In automatic mode the room temperature value can be temporarily changed by pressing the
buttons
in 0.1°C increments. By keeping the button pressed the temperature will change rapidly. The exclusion function,
indicated on the display by the symbol
Heating manual operation (in Winter mode) - To use the Remote Control at a fi xed room temperature level,
press the button
and the symbol
Then set the room temperature value by pressing the buttons
button pressed the temperature will change rapidly. Manual mode will be maintained until another operation
mode is selected.
Step 6. Heating - DHW temperature adjustment
Heating - Press the button
buttons
in 1°C increments. Press any button to exit the menu.
DHW (domestic hot water) - Press the button
adjustable using the buttons
) shown on
SPECIAL FUNCTIONS
Holiday Function
The Holiday Function is used to switch off heating (also domestic hot water production for boilers with a storage tank) for a given
period of time, from 1 hour to 45 days, adjustable in 1 hour increments. This makes it possible to save energy when away from
home, whereas the previously set operation mode resumes as soon as the Holiday function ends. Heating is activated only if the
room temperature falls below 5°C: freezing protection function.
Follow the instructions given below to activate and set the Holiday function.
1. Press the button
. The symbol
remaining before the end of the Holiday function.
2. Use the buttons
to extend the time remaining until the end of the Holiday function in 1 hour increments (-00:01
means 1 hour; -45:00 means 45 days). By keeping the button pressed the time and days will change rapidly.
3. During the Holiday function the display will continue to show the time remaining until the end of the function.
To cancel the Holiday function press the button
mode.
Band 6
22:30
16°C
Band 6
22:30
16°C
EN
to display time band 2 of Monday, modifi able by repeating steps 2 to 4.
. To copy the same programme also to the other days
repeatedly.
Personal programme note
Band 1
Band 2
Band 3
Band 1
Band 2
Band 3
Band 1
Band 2
Band 3
Band 1
Band 2
Band 3
Band 1
Band 2
Band 3
Band 1
Band 2
Band 3
Band 1
Band 2
Band 3
and the symbol
is displayed. The heating is switched off, and switched on again
flashing, will be cancelled at the next time band change.
appears on the display (the 6 time bands are not displayed).
: the display shows the current heating circuit water temperature setting, adjustable using the
: the display shows the current domestic hot water temperature setting,
in 1°C increments. Press any button to exit the menu.
starts fl ashing and the hours and minutes become -00:01, which is the time
or any other button associated with a different operation
and confi rm
to change the time band start time
to change the
and repeating step 5.
Band 4
Band 5
Band 6
Band 4
Band 5
Band 6
Band 4
Band 5
Band 6
Band 4
Band 5
Band 6
Band 4
Band 5
Band 6
Band 4
Band 5
Band 6
Band 4
Band 5
Band 6
again
and the symbol
will appear
in 0.1°C increments. By keeping the
Advertisement

Related Manuals for Ferroli ROMEO W RF


Summary of Contents for Ferroli ROMEO W RF
- Page 1 Follow the instructions given below to modify the preset automatic programme. OVERVIEW OF RF REMOTE CONTROL 1. Press the button . If DHW programming is enabled, select the radiator symbol with the buttons and confi rm 14 15 16 19 12 13 27 28 with the button .
- Page 2 Temperature unit of measure selection USER PARAMETER EDITING Sliding Temperature - Compensation curve Follow the instructions given below to use the Remote Control in °C or in °F. 1. Keep the button pressed for 3 seconds. 2. The display shows the CU parameter. By installing the external probe (optional), the control system can work with a Sliding Temperature.