
Related Manuals for Genie AWP-19


Summary of Contents for Genie AWP-19
- Page 1 Technical Publications ® Operator's Manual Fourth Edition, First Printing Part No. 33424...
-
Page 2: Table Of Contents
Tilt-back Operation Instructions ........ 14 Maintenance Inspection ........... 16 Decals ..............18 Specifications ............21 ® Copyright © 1993 by Genie Industries Third Edition: First Printing, March 1993 Second Printing, June 1994 Fourth Edition: First Printing, July 1994 Genie® is a registered trademark... -
Page 3: Safety Rules
You inspect the entire machine for possible damage and test all machine functions for proper operation. The first time this machine is set up for use, a breather cap is installed (see Breather Cap , page 8). Part No. 33424 Genie AWP... - Page 4 Do not push the Genie AWP from the platform side of the machine. Do not raise platform unless machine is on firm, level surface.
- Page 5 Do not alter or disable 3-wire grounded plugs. Keep away from machine if it contacts energized power lines or becomes electrically charged. Personnel on ground or in platform must not touch or operate machine until energized power lines are shut off. Part No. 33424 Genie AWP...
- Page 6 Immediately tag and remove from service a damaged or malfunctioning machine. Be sure all maintenance has been performed as specified in this manual and the Genie AWP service manual. Be sure all decals are in place and legible.
- Page 7 Explosion Hazards Batteries emit explosive gas. Keep sparks, flames and lighted tobacco away from battery. Charge batteries in a well-ventilated area. Do not disconnect charger DC output wires from battery when charger is on. Part No. 33424 Genie AWP...
-
Page 8: Controls
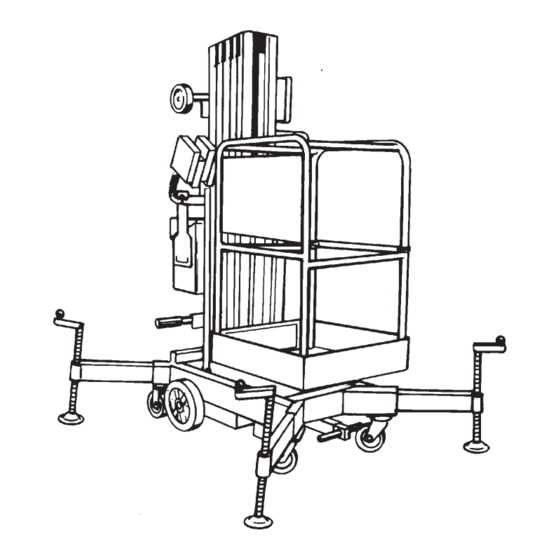
Operator’s Manual Fourth Edition Controls Ground Controls ® Platform Controls 1 Outrigger interlock display lights (four) 2 Key switch 3 Emergency stop button 4 Power light 5 Control activate button 6 Up/Down switch Genie AWP Part No. 33424... -
Page 9: Legend
23 Loading stop bracket 13 Platform Ground controls 24 Retaining pin 14 Platform entry mid-rail Hydraulic power unit (Genie AWP 30 & 36) 15 AC outlet Manual lowering valve 25 Tilt-back frame 16 Platform controls (Genie AWP 30 & 36) -
Page 10: Pre-Operation Inspection & Function Tests
Perform quarterly and annual machine machine is set up for inspections. Keep records for three years. use, the pipe plug in the See the Genie AWP service manual for details. hydraulic reservoir should be removed and permanently replaced with a breather cap. - Page 11 9 Twist to release the red Emergency Stop button Result: Platform should descend. at the platform controls. 10 Push in the red Emergency Stop button at the ground controls to the position. Part No. 33424 Genie AWP...
-
Page 12: Operating Instructions
2 Chock wheels to prevent machine from rolling. 3 Remove key to secure from unauthorized use. 4 DC models: Disconnect battery pack and recharge battery. Genie AWP Part No. 33424... -
Page 13: Battery And Charger Instructions
Manual charger models: If ampere meter drops to 3A or less within the first 15 minutes, Use only Genie authorized battery and charger. the battery is fully charged and the battery CSA applicable model: charger should be turned off. -
Page 14: Transport Instructions
Machine must be securely fastened to transport vehicle. Be sure to lock both swivel casters on tilt-back frame (Genie AWP-30 & 36). Genie AWP-19 & 24 Do not transport with the tilt-back frame in the lowered position. - Page 15 Be sure both stop bracket lock pins are fully engaged. Be sure both tilt-back frame swivel casters are locked. 9 Slide out T-handle until lock pin snaps into place. 10 Two people should lift T-handle to tilt machine onto loading surface. Part No. 33424 Genie AWP...
-
Page 16: Tilt-Back Operation Instructions
Lifting force necessary requires two people. 3 Lower tilt-back frame and guide the tilt-back strut into the strut socket. Tilt-back Frame The Genie AWP-30 & 36 have a tilt-back frame which allow the machine to roll through a standard doorway. - Page 17 2 Carefully pull down T-handle until machine rests at mid-tilt position. 3 Two people should lower the machine with the T-handle until base casters are in contact with ground. 4 Return sliding T-handle to stowed position. Part No. 33424 Genie AWP...
-
Page 18: Maintenance Inspection
Immediately tag and remove from service a damaged or malfunctioning machine. Repair any machine damage or malfunctions before operating machine. 6 11 Genie AWP Part No. 33424... - Page 19 Check cables and wiring for frays, abrasion or physical damage. Notes: Perform quarterly (or every 150 hours) and annual machine inspections. Keep records for three years. See the Genie AWP service manual for details. Inspected By Date Serial No.
-
Page 20: Decals
Label - Fuses (AC models only) 18 31067 Notice - Operating Instructions 31074 Label - ANSI/Patents 19 27870 - Genie AWP-19, 24 & 30 only Notice - Maximum Capacity, 300 lbs. 33598 Label - Interlock Display 27869 - Genie AWP-36 only Notice - Maximum Capacity, 250 lbs. - Page 21 Notice - Battery Charger Instructions 34 28372 Caution - Quick Disconnect 35 28398 Danger - Battery Safety (manual charger) 36 27856 Caution - Component Damage (manual charger) 37 27853 Notice - Battery Charger Instructions AWP-19 & 24 Part No. 33424 Genie AWP...
- Page 22 Operator’s Manual Fourth Edition DECALS AWP-30 & 36 Battery Pack - Automatic Charger Battery Pack - Manual Charger *This decal is visible when battery pack cover is raised. Genie AWP Part No. 33424...
-
Page 23: Specifications
81 x 81 in 164 x 146.5cm 164 x 146.5cm 190.5 x 185.5cm 205 x 205cm Continuous improvement of our products is a Genie policy. Product specifications are subject to change without notice or obligation. Part No. 33424 Genie AWP... - Page 24 U.S.A. 18340 NE 76th Street P.O. Box 69 Redmond, Washington 98073-0069 Europe Market Place Southwell, Nottinghamshire NG25 OHE England...