Table of Contents
Advertisement
Quick Links
Advertisement
Table of Contents

Related Manuals for Watchguard WGAP864


Summary of Contents for Watchguard WGAP864
- Page 1 Watchguard WGAP864 Quick Installation Guide v1.12 – Revised 13 February 2018...
-
Page 3: Table Of Contents
Hardware Installation...............................1 Wiring Diagram..............................1 Warm up...................................2 Keys...................................2 Beeps................................2 Installer Menu..............................2 Watchguard Pre-delivery Configuration........................3 User Codes................................3 Zone Types..............................3 Time and Delay..............................3 Programmable Outputs (LOCATION 390-414).................... 3 Trouble Display (Location 16)........................3 Step 1 - Registering a keypad........................... 4 Step 2 - Setting Date and Time..........................4... -
Page 4: Introduction
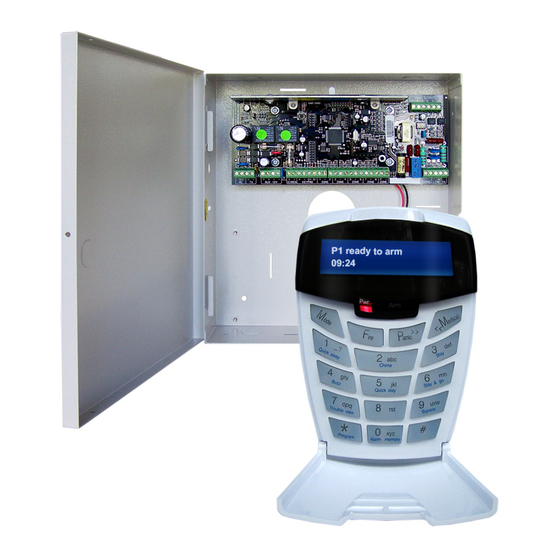
Introduction WGAP864 is a professional alarm panel. It covers hundreds of features and thousands of installation combinations. This Quick Installation Guide summarizes the most commonly used features for installers. Please refer to the Installer Manual for those functions not mentioned in this guide for more detailed information. -
Page 5: Warm Up
Warm up Keys Key *: Functions as <ENTER>. Key #: Functions as “Go back/Exit”. Panic >>: Functions as “skip next”. << Medical: Functions as “skip previous”. Always press the key firmly and not too fast. Half-second per keystroke is perfect for the keypad to response. -
Page 6: Watchguard Pre-Delivery Configuration
Watchguard Pre-delivery Configuration Installer Code 1479 Primary Entry 30 seconds User Codes Time and Delay Delay Primary Exit Delay 30 seconds User 2 7925 Siren Timeout 2 minutes User 1 (Master Code) 1835 User 3 8462 Daylight Saving Disabled User 4... -
Page 7: Step 1 - Registering A Keypad
Step 1 - Registering a keypad After all wiring has been completed, power up the control panel. If a keypad is un-registered, the second line of the LCD will show “Unreg”. You need to register the keypad first. 1. Press the [#] key. 2. -
Page 8: Step 4 - Exit Delay (Location 230)
The LCD will show “Updating Panel Please Wait…” and exit the installer menu. For New South Wales, Victoria, South Australia, Tasmania, and the Australian Capital Territory: Enter: 1479* 25* 10* 26* 7* 27* 1* 28* 4* 29* 7* 30* 1* 31* 60* # Explanation: See table below 1479* is used to enter INSTALLER MENU, # at the end is used to exit the INSTALLER MENU. -
Page 9: Step 7 - Setting Zones Types (Location 1)
Step 7 - Setting Zones Types (Location 1) There are 8 zones for each partition. We use partition 1 in this example; settings for other partitions are similar. The pre-delivery values of the zones is shown below. It should satisfy most installations. -
Page 10: Step 8 - Managing User Codes
Step 8 - Managing User Codes There are 128 user codes. We suggest to use up to 5 user codes (Master Code + User 2 - 4) because the user code must be unique for each user, if there are too many users, it will be more difficult for administration. - Page 11 Example: Change user codes 6567 to 3721 Enter: [* HOLD ] 1835* 1* 6567* 3721* ## Deleting User Code Press and hold * button to enter User Menu. When you see Action Master Code + * Enter 1835* Add User Code User Code + * Input the user code you want to delete.
-
Page 12: Programmable Outputs
13.6VDC and a maximum output current of 50mA. Programmable outputs are primarily connected to trigger external device inputs but not to drive external devices. The Watchguard Relay Board (P/N: WGAPARB) must be used for connecting, LEDs, sirens, bus-wired peripherals, etc. -
Page 13: Step 11 - Setting Communication Delay And Number Of Dial Attempts Numbers
Step 11 - Setting Communication Delay and Number of Dial Attempts Numbers By default, the alarm panel will dial the phone numbers stored at location 51-54(Telephone Number 1-4) after 20 seconds when it is triggered. It attempts to dial maximum of 6 times. If the alarm condition is cancelled within this time, it will not report.