Table of Contents
Advertisement
Owner's
Manual
Manual de lnstrucciones
Manuel d'instructions
SEWING MACHINE
MAQUINA
DE COSER
MACHINE
A COUDRE
Model
}
Modelo
Mod61e
385.12102
CAUTION:
Before using this sewing
machine, read this manual
and follow all Safety Rules
and Operating Instructions.
• Safety Instructions
• Warranty
• Specifications
• Operation
• Care and Maintenance
• Troubleshooting
Sears,
Roebuck
and Co., Hoffman
Estates,
IL 60179
U.S.A.
Advertisement
Table of Contents

Related Manuals for Kenmore 385.12102


Summary of Contents for Kenmore 385.12102
- Page 1 SEWING MACHINE MAQUINA DE COSER MACHINE A COUDRE CAUTION: Before using this sewing machine, read this manual and follow all Safety Rules and Operating Instructions. Sears, Roebuck and Co., Hoffman Owner's Manual Manual de lnstrucciones Manuel d'instructions Modelo Model Mod61e •...
- Page 2 Do not reach for a sewing machine that has fallen into water. Unplug immediately. 4. Do not place or store this sewing machine where it can fall or be pulled into a tub or sink. Do not place or drop it into water or other liquid°...
- Page 3 INSTRUCCIONES Su mdquina de coser estd diseSada y construida s61opars uso dom_stico. Lea todas las instrucciones antes de usar esta mdquina de coser. PELIGRO-Para reducir el riesgode descarga elc_ctrica: La m_quina nunca se debe desatender cuando se ha conectado, Siempre debe desconectada de la toms el_ctrica tan pronto termine de usarla y antes de limpiarla. Siernpre debe desconectada antes de cambiar la bombilla, Reemplazar la bombilla con una del mismo tipo de 15 voltios.
- Page 4 & reau. Rapportez la machine au magaein Sears le plus proche pour une v6rification, une r_paration, un r_glage _lectrique ou m_caniqueo N'utilisez jamais une machine dont les ouvertures de ventilation sont obstru_es. Maintenez les ouTes d'a_ration libres de route accumulation de charpie, de poussi_re et de fibres de tissu.
- Page 5 GARANTIA COMPLETA PeR 2 ANOS EN EQUIPO ELECTRICO DE LA MAQUINA DE COSER Durante 2 aSos desde la feeha de la compra, Sears ofrece,libra de costo,reparar los defectos en material o de manufactura que puedanpresentarseen el equipoeI_ctrioo de la mdquinade coser,incluyendo componentes elactricos, motor,cenexionesel_ctrioas,...
- Page 6 item Sewing speed (Maximum): Stitch length: Stitch width: Stitch package (Stitch functions): (Built-in stitches): Machine dimensions: Weight (Net): F Artfculo Ve!ocidad de costura(Mdxima): Longitudde puntada: Anchode puntada: N_merode puntadas (Funcionamiento de puntades): (Integradas): Dimensiones de la mfiquina: Paso: Description Vitesse de couture (Maximum): Longueur du point: Largeur du point: Ensemble de points (points de couture):...
-
Page 7: Table Of Contents
SECTION !. NAMES OF PARTS Portable Case or Cabinet ... 2 Names of Parts ... Available Accessories and Attachments ... 4 SECTION IL GETTING READY TO SEW Connecting Machine to Power Supply ... 6 For Your Safety ... 6 Operating Instructions ... Controlling Sewing Speed ... - Page 8 SECCION I. NOMBRE DE t.AS PARTES Gabineteo estucheport_til... Nombre de las partes Accesodos y refacciones disponibles ... 5 SECCION IL PREPARACION DE LA MAQUINA PARA COSER Conexi6n de la mdquina a la red el_ctdca ... Para eu seguridad ... Instrucciones pare la operaci6n ... Control de la velocidad de costura ...
-
Page 9: Monogramas
PARTIE I. IDENTIFICATION DES PI_:CES DE LA MACHINE Mallette de transport et meuble ... 3 Identification des pi_ces ... 3 Accessoires disponibles ... 5 PARTIE II. PRI_PAREZ-VOUS A COUDRE Branchez la machine au secteur .: ... Consignee de s_curit8 ... 7 Consignee d'utilisation Contr61ez la vitesse de couture ... -
Page 10: Portable Case Or Cabinet
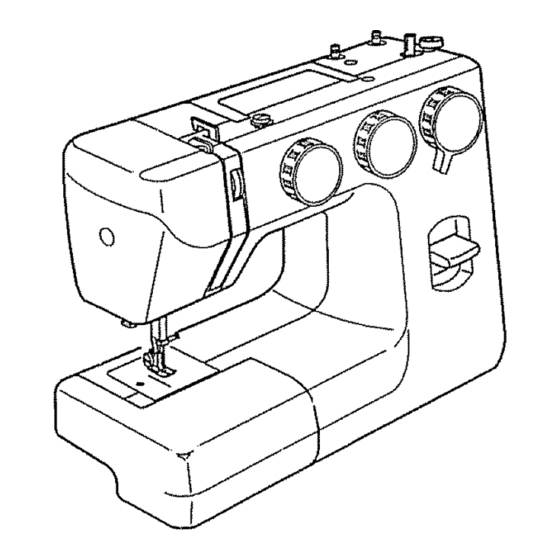
SECTION I. NAMES OF PARTS Portable Case or Cabinet A full line of sewing machine cabinets and carrying cases is available through your nearest Sears retail store or general catalog, Names of Parts (D Reverse stitch control (_) Needle positions selector dial... -
Page 11: Gabineteo Estucheport_Til
SECCiON 1. NOMBRE DE LAS PARTES Gabinete o estuche portdtii En su tienda Sears rn&s cereana a su dorniciEose cuenta con una Ifnea cornpleta de gabinetes para su mdquina de coser Kenrnore. Nombre de las partes Control de puntada reversa... -
Page 12: Available Accessories And Attachments
Available Accessories and Attachments All parts listed may be ordered from any Sears store or service center, WHEN ORDERING REPAIR PARTS, ALWAYS FOLLOWING INFORMATION: 1,. PART NUMBER 24 PART DESCRIPTION 3. MODEL NUMBER 4. NAME OF ITEM (SEWING MACHINE) If the parts you need are not stocked locally, your order will be electronically transmitted to a Sears Repair Parts Distribution Center for expedited handling. -
Page 13: Accesodos Y Refacciones Disponibles
Accesorlos y refacclones disponibles Todaslas partes listadasse pueden ordenarde cualqufer tienda de Searsm o centre de serviciode Sears. CUANDO ORDENE REPUESTOS, PRORORCIONE LA SIGUIENTE INFORMACION: 1. NUMERO DE LA PARTE 2. DESCRIPCION DE LA PARTE 3_NUMERO DEL MODELO 4. NOMBRE DELARTICULO (MAQUINA DE COSER) -
Page 14: Section Il Getting Ready To Sew
Do not modify the plug in any way." "Foot Controller Model YC-482J-1 or TJC-150 for use with Sewing Machine Model 385.12102XX." XXX - represents numbers 000 through 999, Controlling Sewing Speed Sewing speed can be varied by the foot control. -
Page 15: Seccion Il Preparacion De La Maquina Para Coser
SECCION IL PREPARACION MAQUINA PARA COSER Conexidn de la mdquina a la red eldctrica (_) Clavija de lama de corriente (_) lnterruptor de corriente (_) Red e!_ctrica (_) Enchufede la m_quina (_) Clavija de la m&quina (_) Bombilla Antes de enchufar el cable de conexi6na la redde corrienteasegOrese de qua el voltajay la frecuenciade la m_iquina,mostredos en la placa de identificaci6n, coincidan con los de la redde suministro an su hogar, 1. -
Page 16: Setting Spool Pins
Setting Spool Pins (_) Spool pin The spool pins are used for holding the spools of thread when feeding thread to the machine. To use, pull up the spool pins. Push down for storage. Presser Foot Lifter Presser foot lifter _) Normal up position (_) Highest position The presser foot lifter raises and lowers your presser foot°... -
Page 17: Ajustede Los Porta-Carretes
Ajustede los porta-carretes Porta=carrete Los porta-carrstes se utilizanpara sostenerlos carretesde hilo y alimentarasf a la m_quina con et hilo. Para usarse, hale hacia arribalos portacarretes. Pars gua_arlos oprfmaloshacia absjo. Palanca de eleva¢i6n del prensatelas (_) Palanca de elevaci6n dei prensatelas Posici6n elevada normal _) Posici6n m_s aits La palanca de elevaci6n del prensatelas se emplea para subir... -
Page 18: Free-Arm Sewing
Free-arm Sewing . For free-arm sewing 1. Grip the extension table with your index finger and thumb. 2. Pull gently to the lefL The extension table will snap out° o For flat-bed sewing 1. Insert the tab and the pin into their catches. 2. -
Page 19: Braze Para Costura Tubular
Brazo para costura tubular Pare costura tubular 1. Sujete la extensi6n con los dodos putgar e indice 2oDeje suavemente hacia la izquierda. La extensi6n quedar& fuera, o Pare costura plane 1. Mete las salientes en la ranura, como se ilustra. 2. -
Page 20: Selecting Needle And Thread
Selecting Needle and Thread For general sewing use needle size 11 or 14. A fine thread and needle should be used for sewing lightweight fabrics so the fabric will not be marred. Heavy fabrics require a needle large enough to pierce the fabric without fraying the needle thread°... -
Page 21: Selecci6N De Aguja E Hilo
Selecci6n de aguja y hilo Para la costurageneral se utilizanagujas dal tamafio 11 o 14. Los hilosy agujas delgadosdaberdn utilizarsepare cosertejidos ligerosevitando asf que _stos se puedan echar a pettier. Los tejidos gruesoscon una aguja Io suficientamentegruesacome para qua puedapenetrar el tejidosin qua el bilede la agujasa deshilache. En el juego de agujashay una aguja de cada tamafio 11, 14, 16, 18, y una de tal6n azul del tamar o 11oCuandocosatejidos de puntoy sint_tices, e rnpleela aguja detal6n azulpara evitarlosfallos de puntada_ Pareciertostiposde tajidosdeberdnutUizarse agujasespeciales. -
Page 22: Choix De I'aiguille Et Du Fil
Choix de I'aiguille et du fil Pour les coutures normales, utilisez une aiguille n°11 ou 14. On devrait utiliser du fil fin et une aiguitle fine avec les tissus i_gers pour ne pas les endommagero Les tissus Iourds n_cessitent une aiguille assez grosse pour percer le tissu sans effilocher le fil de I'aiguilleo Dens un jeu d'aiguilles, il y a une aiguilte de cheque diam_tre 11, 14, 16, t 8 et une aiguiIle &... - Page 23 (blank page) (p_gina blanca) (page blanche)
-
Page 24: Bobbin Winding
Bobbin Winding = Removing bobbin case Remove the extension table from the machine by pulling it to the leftoOpen the shuttle cover 0 by pulling down the embossed part on the left of the cover, Raise the needle to its highest position by rotating the handwheel toward you_ (D Shuttle cover Bobbin case... -
Page 25: Embobinado De La Canilla
Embobtnado de ia caniHa ° Cdmo sacar el portacanillas Retirela extensi6ndesr_z_ndola hacia la izquierda.Abra la tape lanzadera(Djalando hacIa abajo la parts hueco del lado izquierdode la tapa. Levante la aguje hastala posicionm_.salta, gtrandoel volantehacia ustedo (D Tapa (_) PortacaniUas Pare retirarel portacani!las_) de la lanzadera, jaie et ret_n del portacanillas para abrir_ Deje recto hacia afuera el portacanitlas de la lanzadera. -
Page 26: Bobbin Winding
Bobbin Winding (continued) Push the bobbin to the right, With free end of the thread held in your hand, depress the foot control. Stop the machine when it has made a few turns, and cut the thread close to the hole in the bobbin. Depress the foot control again.. -
Page 27: Remplir La Canette
Embobinado de la canilla (continuacidn) Empuje la cani!la a la derechao Sujete el final del hilo con los dedoe y piss el pedal de control. Cuando haya dado unas cuantas vueltas, pare ta mdquina y carte el bile qua sale de la canilla.. Piss nuevamenteel pedalde control.Cuando la canillaest_ Ilena dejard de girar autom&ticamente_ Empujeel eje de! devanadorhacia la izquierda para... -
Page 28: Inserting Bobbin
• Inserting the bobbin Place a bobbin in the bobbin case making sure thread feeds clockwise coming from the bobbin. Draw the thread through the slot of case. Continue to draw the thread under the tension spring and through the opening. Pull out about 4"... -
Page 29: Colocaci6N De La Canilla
. Colocac|dn de la canil|a Coloquela canilla en el portacaniUas asegurdndosequa el hilose ailmentsen el sentido a las agujasdel relojy salga de la bobinao [] Tire del hiloa trav6s de la ranura, Contin_le tirandodel hilo debajo dal resortstensory a trav6sde la abedura, Deje sobresaliraproximadamente 10 cm (4") de hilo. -
Page 30: Threading The Machine
Threading the Machine • Threading the machine Raise the thread take-up lever to its highest position by turning the handwheel counterclockwise, you. Raise the presser foot lifter. ° Place a spool on the spool pin, with thread coming off as shown. Draw the end of thread around the upper thread guide.. -
Page 31: Enhebrado Del Hilo De La Aguja
Enhebrado del hilo de la aguja • Enhebrado del hilo de la aguja Suba el tirahilos haste su posici6n m_s a_ta girando el volante en el sentido contrario alas agujas det reloj,, Levante la palanca de elevaci6n del prensatelaso Coloque un carrete en el portacarretes come se muestra. -
Page 32: Adjust The Needle Thread Tension For Straight Stitch
Adjust the Needle Thread Tension for Straight Stitch • Correct tension (_) Needle thread (Top thread) _) Bobbin thread (Bottom thread) ® To loosen ® To tighten straight stitch has threads locked between two The ideal layers of fabric, as illustrated (magnified to show detail). If you look at the needle thread and bobbin thread of a seam, notice that there are no gaps_ Each stitch is smooth and even.. -
Page 33: Ajuste De La Tensi6N Del Hiio De La Aguja Para Puntada Recta
Ajuste de la tensi6n del hilo de la aguja pars puntada recta . Tensi6n corrects Hilo de la aguja (Hilo superior) (_) Hilo de la canilta(Hilo inferior) (_) Para aflojar Para apretar La puntada recta ideal cierralos hilosentre tas dos telas tal come seve en la figura (ampliada)o Si obserca la parte superiore inferiorde lacostura, se dardcuentade qua no hayhilosflojos o apratados.Todaslas puntadas... -
Page 34: Adjust The Needle Thread Tension For Zigzag Stitch
Adjust the Needle Thread Tension Stitch For an ideal zigzag stitch, the bobbin thread does not show on the right side (top side) of the fabric and needle thread shows slightly on the wrong side (bottom side). See the illustrations for COtTectappearance. To match this appearance, adjust the needle tension. -
Page 35: Ajuste De La Tension Del Hilo De La Aguja Para Puntada Zig-Zag
Ajuste de la tensi6n del hilo de la aguja para puntada zig,,zag En la puntada zig-zag ideal, el htlo de la caniliano aparecerd en la parts de arriba de la tela y el hiIo de la agujase ver6 ligeramente en la parts de abajo de ta tela. Vea el aspecto correcto en las ilustraciones siguienteso Para igualar esta apariencia, ajuste la tensi6ndel hilo de la aguja. -
Page 36: Selecting Needle Position
Selecting Needle Position (_) Setting mark ® Needle position selector dial Turn the handwheel toward you until the needle comes above the fabric. Turn the needle position dial to set left, middle or right needle position. Stitch Length Selection (_) Setting mark Turn the stitch length dial to get the desired stitch length_ The larger the number, the longer the stitch°... -
Page 37: Saleccionando La Posici6N De La Aguja
Seleccionando la posici6n de la aguja O Mamasde ajuste Dial posicionadorde la aguja Gire el volantemanualhaeia usted,hastaqua la agujasale a la telao Gire el dial poslclonadorde la aguja a la poslci6nizquterda, centroo derecha. Selecclonando la longitud de las puntadas (_ Mamas de ajuste Gire el dial de iongitudde puntada para consegulela |ongitud deeeada. -
Page 38: Section Lu. Straight Stitch Sewing
SECTION Ill. STRAIGHT Straight Stitch C) Needle position setector dial: _EE)_CE)(C3_) (_) Stitch length dial: (_) Stitch width dial: (_) Needle thread tension: NOTE: When using the straight stitch foot, make sure to set the needle positions selector at CE)(Oenter needle position) and stitch width at "0"o Otherwise the needle may strike the sewing foot and possibly break. -
Page 39: Seccion Ill Costura De Puntada Recta Puntedarecta
SECCION ill. COSTURA DE PUNTADA RECTA Puntada recta Selector de posici6n de la aguja: (O)C!_D(O) (_) Dial de iongitud de puntada: (_) Dial de anchura de puntada: Tensi6ndel bile de la aguja: NOTA: Cuandouse el prensatelaspara puntadarectaaseg_reae de ajustar el selectorde posicionde la aguja en ¢3_Dy el dial de anchura an "0"oDe Io contrario,la aguja chocar&... -
Page 40: Topstitching
Topstitchlng (D Needle positions selector dial: (_::::::)) _ Stitch length dial: (_) Stitch width dial: (_) Needle thread tension: NOTE: When using the straight stitch foot, make sure to set the needle positions selector atc_ position) and stitch width at "0". Otherwise the needle may strike the sewing foot and possibly break. -
Page 41: Costuraa Ia Vista
Costura a la vista Selector de posici6n de la aguja: (_) Dial de tongitud de puntada: Dial de anchura de puntada: (_) Tensi6n del hito de _aaguja: NOTA: Cuando use el prensatelas pars puntada recta aseg_rese de ajustar eLselector de posici6n de ta aguja en _ y diat de anchura en "0". -
Page 42: To Sew
Zipper Sewing (Continued) • TO sew (D Zipper teeth (_) Zipper tape ® Wrong side (Bottom side) of fabric Fold back the left seam allowance. Turn under the right seam allowance to form a 1/8" (0.2 to 0°3 cm) fold. Place the zipper teethO next to this fold and pin in place.. -
Page 43: Para Coser
Gesture de cremalleras (continuaci6n) • Pare coser (_) Dientes de la cremallera Cinta de la crema!lera (_) Parte de abajo de ta tela Doble la tela superior de la costura izquierda hacia arriba todo Io posible_ Deble la tela inferior hacia abajo de forma qua sobresalga de 0.2 a 0_3cm (1/8") ala tela superior. -
Page 44: Using The Darning Plate
Using the Darning Plate Sometimes when you sew, you want to control the fabric yourself, The Darning Plate covers the feed dogs so that they do not touch the fabric. To put on the Darning Plate: 1, Position the darning plate with the 3 pins on the bottom. 2. -
Page 45: Usando La Place Para Zurcir
Usando la placa para zurcir A veces cuando cosa, usted querr& contralor la tela. para zurcir cubre el mecanismo de transports para qua este, no toque la tela, Para colocar la placa para zumir: 1. Sit,Is la placa con las 3 clavijas hacia abajo. 2. -
Page 46: Basic Zigzag
SECTION IV. ZIGZAG STITCHES Basic Zigzag Needle positions selector dial: (,__7_)_((2_) Stitch length dial: @ Stitch width dial: ® Needle thread tension: The zigzag stitch is one of the most common and versatile stitches. It can be a utility stitch for button sewing, bt_onhole making, hemming, overcasting, mending and daming. -
Page 47: Seccion Iv. Puntadas De Zig-Zag Puntadade Zigzag
SECCgON IV. PUNTADAS Puntada de zig-zag @Selector de posioi6n deIoaguia: (_) Dial de Iongitud de puntada: (_) Dial de anchura de puntada: (_) Tensi6ndel hilo de la aguja: La puntada de zig_zag es una de las puntadasm&s comunes y m&s vats&tiles, Es una puntada de sarvicio pare pager botones, hacer ojales, para dobladillos, puntada sobrepuesta, para remendar y pare zurcir. -
Page 48: Monogramming
Monogramming (_) Needle positions selector dial: (_)(:3D(_) (_) Stitch length dial: ® Stitch width dial: Needle thread tension: Attach a piece of stabilizer on the wrong side ('bottomside) of the fabric° Draw letters on the fabric with tailor's chalk° Form each pattern with satin stitch, adjusting stitch width°... -
Page 49: Monogramas 4
Monogramas O So!octet de poeici6n delaag j : (_) Dial do longitud de puntada: Dial de anchura de puntada: (_ Tensi6ndel hilo de Is aguja: Coloque la entretela per la parte de abajo de ta tela, Dibuje Iss letrassobra la tela utilizando tiza do costura. Formecads modeloajuetando el anchodo la puntada, Aplicaciones Selectorde poeici6n de la aguja: (QZ_D)CED((Z_) -
Page 50: Bar Tacking
Bar Tacking Needle positions selector dial: (O)(3D(C_) _) Stitch length dial: (_) Stitch width dial: Needle thread tension: This is similar to a very short satin stitch and is used to reinforce points of strain such as corners, pockets and straps of lingedeo Sew four (4) to six (6) stitches. -
Page 51: Puntada De Refuerzo
Puntada de refuerzo (_)Selector de posioi6n de laaguja: (_) Dial de Iongitud de puntada: (_) Dial de anchura de puntada: (_ Tensi6n del hito de la aguja: Esta puntada es similar a una puntada de realce muy corta y se utiliza para reforzar los puntos qua reciben el mayor esfuerzo, como esquinas o botsillos y las tiras en ropa inteiior,. -
Page 52: Decorative Stitches
Decorative Stitches (D Needle positions selector dial: (_E:::))(:::_ ((:::_) (_) Stitch length dial: (_) Stitch width dial: (_) Needle thread tension: HOW tO SeW (_) Stitch width lever Example: sewing results at left needle position (A) Turn the stitch width dial from "0" to "5" and "5" to "0" evenly. -
Page 53: Puntadas Decorativas
OJal Incorporado (_ Selsctorde posici6nde la aguja: _) Dial de longitudde puntada: (_) Dial de anchurade puntada: (_) Tensi6n del hilo de la aguja: o Para coser Palanca de anchura de puntada Ejernplo: r esultados con laaguja en la posici6nizquierda (A) Gire el dial de anchurade puntada de "0"... -
Page 54: Button Sewing
Bu_on Sewing (_ Needle positions selector dial: (_) Stitch length dial: (_) Stitch width dial: _) Needle thread tension: ® Darning plate: A pin can be placed on top of the foot to form a shank. Set the Needle position selector at "_:3"° Align both holes of the button with the slot of the foot and place the left hole of the button just below the needle point.. -
Page 55: Cosido De Botones
Cosido de botones Selectorde posici6n de la aguja: (_) Dial de Iongitud de puntada: (_) Dial de anchura de puntada: (_ Tensi6n del hilo de la aguja: (_) Placapara zurcic Un alfiler puede ser colocadosobre el pie para formar el talloo Co!oque el selector de pesici6n de la agujaa"... -
Page 56: Section V. Buttonhole
SECTION V. BUTTONHOLE Buttonhole (_) Needle positions selector dial: Stitch length dial: ® Stitch width dial: Needle thread tension: Stitch width dial setting: (A) Set the dial at "2" for line-tack (B) Set the dial at "5" for bar-tack (Bar-tack) Pull 6"... -
Page 57: Seccion V. Ojales Pare Coser
SECCION V. OJALES Pare coser (_) Selectorde postciSn de la aguja: (_) Dial de Iongitudde punteda: (_) Dial de anchurade puntada: (_) Tensi6ndel hllo de la aguja: Posici6ndel dial de anchura: (A) SitL1e el dial a "2" para rematar los labios laterales. -
Page 58: Buttonhole
Buttonhole (Continued) (Bar-tack) Raise the needle, set the stitch length dial at "0" and stitch width dial at "5". Sew 5 stitches of the bar-tack and stop the machine with the needle in the left position. Leave the needle at the left needle position in the fabric and raise the presser foot so that you can turn the fabric 180 degrees. - Page 59 Ojales (continuaci6n) (Presil_a) Levants la aguja, sitl_e st dial de Iongitud de puntada a "0" y el dial de anchura a "5". Cosa ias 5 puntadas de la presilla y pare la m_.quina con la aguja en la posici6n izquierda.. Deje la aguja en la tela en la posici6nizquierday lavante eT pie prensatelas para poder girar la tela 180 grados.
-
Page 60: Section Vl Care Of Your Machine
SECTION VL CARE OF YOUR MACHINE Replacing the Light Bulb The sewing light is located behnd the face plate. To change the bulb, take the face plate off the sewing machine by removing the set screw. *Unplug the power supply before changing the bulb. eTo remove ... -
Page 61: Cambiando La Bombilla
SECCION VI. MANTENIMIENTO LA MAQUilNA Cambiando la bombilla La luzde costurasa encuentradetrdsde la placa frontal Para cambiar la bombilla,desmonta la placa frontal de la m&quina de coserquitando el tomillofijador. * Desconactela m_quinade coser de la toma de corriente antesde cambiarla bombillao =Para quitar:empuje y gire a la iqzuierda =Para poner:empuje y gire a la derecha CUIDADO: La bombilla puede estar CALIENTE. -
Page 62: Dismantling And Assembling The Shuttle Race
Dismantling and Assembling the Shuttle Race NOTE: Turn off the power switch or unplug the machine. (_) Bobbin case (_) Levers 1_) Shuttle race cover 1_ Shuttle _) Shuttle race Raise the needle to its highest position and open the hook cover. -
Page 63: Desmontado Y Montando La Lanzadera De Recorrido O55 Para Montar La Lanzadera
Desmontado y rnontando la ianzadera de recorrido NOTA: Apague la m&quina o descon6etela I_ Caja de la canilla Palaneas (_) Placa della lanzadera de recorrido Lanzadera 1_) Recorrido de la lanzadera Levante la aguja basrasu posici6n m&s aita y abra la ptaca de acceso a la canilla°... -
Page 64: Oiling The Machine
Oiling the Machine Oil the points as shown at least once a year. Use good quality sewing machine oil. One or two drops of oil is st_icient. otherwise it may stain fabdc,. In case machine is not used for an extended time, oil it before sewing. -
Page 65: Lubricacisn De La M_Quina
Lubricaci6n de la mdquina Lubrique la m_quina, Ios puntos ilustrados per lo menos una vez al Bile. Una o dos gotas de aceite ser_ suficiente. EIimine el exceso de aceite, de otro mode podr(a manchar la tela_ En case de que la m&quina no se use durante un perfodo largo, lubrl°quela antes de iniciar la costura_ Utilice aceite... -
Page 66: Troubleshooting
Troubleshooting Condition The needle thread The needle thread is not threaded properly. breaks. The needle thread tension is too tight., 3. The needle is bent or blunt, 4. The needle is incorrectly inserted. 5o The needle thread and the bobbin thread are not set properly under the presser foot when sewing is starting,, 6o The fabric is not drawn to the rear when sewing is finished 7. -
Page 67: Soluciones Pare Probtemas De Funcionamiento
Soluciones para problemas de funcionamiento Condicion 1_El hito de la aguja no se ha enhebrado correctamente.. Se rompe el hilo de 2. La tensiSn del hiio de la aguja es excesivao la aguja. & La aguja est_i despuntada o dobladao 4o La aguja no eat&... -
Page 68: En Cas De Probt6Me
En cas de problems Pmbl_rne Le fil d'aiguille se 1, Le fil d'aiguiUe n'est pas passd correctemsnL caese. 2. La tension du fil d'aiguitle est tropforte. 3, L'aiguitle est tordueou dmoussde° 4. L:eiguiile est maf install6e. 5. Le fil d'aiguilleet celui de la canettene sent pes passds correctementsousle pied presseurau debutde la couture. - Page 69 Sears Parts and Repair Center in your area: Call 24 hours a day, 7 days a week 1-800-488-1222 For information on purchasing a Sears Maintenance Agreement or to inquire about an existing Agreement: Call 9 am - 5 pm, Monday - Saturday 1-800-827-6655 "HomeCentral...