Advertisement
918-I
OPERATOR'S
MANUAL
WARNING!
Read this Operator's Manual
carefully before using this
tool. Failure to understand
and follow the contents of
this manual may result in
electrical shock, fire and/or
serious personal injury.
Heavy Duty
Roll Grooving
Machine
99 Washington Street
Melrose, MA 02176
Phone 781-665-1400
Toll Free 1-800-517-8431
Visit us at www.TestEquipmentDepot.com
Advertisement
Table of Contents

Related Manuals for RIDGID 918-i


Summary of Contents for RIDGID 918-i
- Page 1 918-I Heavy Duty Roll Grooving Machine OPERATOR’S MANUAL WARNING! Read this Operator’s Manual carefully before using this tool. Failure to understand and follow the contents of 99 Washington Street this manual may result in Melrose, MA 02176 electrical shock, fire and/or Phone 781-665-1400 serious personal injury.
-
Page 2: General Safety Information
918-I Heavy Duty Roll Grooving Machine General Safety Information • When operating a tool outside, use an outdoor extension cord marked “W-A” or “W”. These cords Read and understand all instructions. WARNING! are rated for outdoor use and reduce the risk of elec- Failure to follow all instructions listed trical shock. -
Page 3: Specific Safety Information
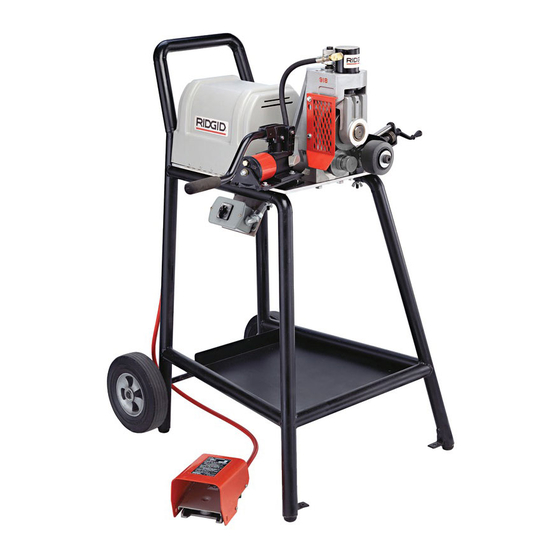
If clothing should become caught in the machine, it will con- The RIDGID 918-I Roll Groover forms rolled grooves in tinue to wind up, pulling you into the machine. Because the... - Page 4 918-I Roll Groover Only drive roll. • 918-I Groover with 2″ – 6″ Drive Shaft and Groove The 918-I Roll Groover includes two (2) groove and drive shaft sets that can groove the following pipe: •...
-
Page 5: Machine Inspection
8. Place the pump mounting plate over the hole and slot 3. Inspect the power cord and plug for damage. If the on the left side of the 918-I (left side as you look at the plug has been modified, is missing the grounding front of the 918-I). -
Page 6: Machine And Work Area Set-Up
9. Check the groove and drive rolls to insure they are the 3. Place machine on a flat, level surface. Be sure the correct size. groover and stands are stable. See Assembly In - structions for bolting 918-I stand to shop floor. Ridge Tool Company... - Page 7 3. All internal or external weld beads, flash or seams must be ground flush at least 2 inches back from pipe end. NOTE! Do not cut flats on gasket seat area. Figure 4 – Close-up of Release Lever on 918-I Pump Ridge Tool Company...
- Page 8 5. Slightly offset pipe and pipe stand (approximately 3. Back the depth adjustment knob off one turn. degree) toward operator (Figure 7) . Figure 6 – Leveling Pipe on Pipe Support and 918-I Roll Groover Figure 8 – Close-up of Depth Adjustment Knob Being...
- Page 9 918-I Heavy Duty Roll Grooving Machine Do not reach inside of pipe. Keep hands Grooving Short Lengths of Pipe WARNING away from sharp edges and burrs on end of pipe. Without Stabilizer NOTE! Do not overfeed upper groove roll. Maintain con- 1.
- Page 10 Figure 14 – Loosen and Remove Drive Shaft Retaining Nut 3. Installing Solid Drive Shaft aligning hex with opening in coupling. • Install new drive shaft through the 918-I housing and Figure 11 – Loosen Set Figure 12 – Remove Groove...
- Page 11 918-I Heavy Duty Roll Grooving Machine • Tighten groove roll set screw into detent on upper • Pull the drive shaft assembly forward. Remove roll shaft. drive shaft bearing retaining nut and the front half of the coupling (Figure 16) . Reinsert drive shaft .
- Page 12 Only the following RIDGID products have WARNING from the operator. been designed to function with the 918-I Roll Groover. Other accessories suitable for use with other tools may • Loosen groove roll set screw (Figure 11) . Grasp become hazardous when used on this Roll Groover.
- Page 13 918-I Heavy Duty Roll Grooving Machine Table I. Standard Roll Groove Specifications NOTE! All Dimensions are in Inches. NOM. PIPE MIN. GASKET GROOVE GROOVE NOM. PIPE DIAMETER WALL SEAT WIDTH DIAMETER GROOVE SIZE O.D. TOL. THK. +.015/-.030 +.030/-.015 O.D. TOL.
- Page 14 918-I Heavy Duty Roll Grooving Machine Table III. Troubleshooting PROBLEM CAUSE CORRECTION Incorrect size of grooving and driving rolls. Install correct size of grooving and driving rolls. Rolled groove too narrow or too wide. Mismatched grooving and driving rolls. Match grooving and driving rolls.
- Page 15 918-I Heavy Duty Roll Grooving Machine Table III. Troubleshooting (cont.) PROBLEM CAUSE CORRECTION Pipe raises or tends to tip groover over back- Not level. Adjust stands to level pipe. wards. Pump not delivering oil, Pump release valve open. Close release valve.
-
Page 16: Maintenance Instructions
Removing the Base Unit From the Stand 1. Unplug the 918-I from the power source. 2. Remove the four bolts that hold the base unit plate to the stand (Figure 19) . -
Page 17: Service And Repair
Service and repair work on this Roll Groover must be performed by qualified repair personnel. Machine should be taken to a RIDGID Independent Authorized Service Center or returned to the factory. All repairs made by Ridge service facilities are warranted against defects in material and workmanship. - Page 18 99 Washington Street Melrose, MA 02176 Phone 781-665-1400 Toll Free 1-800-517-8431 Visit us at www.TestEquipmentDepot.com Printed in U.S.A. 11/12 999-998-676.10 EC39404 Rev. B...