Sennheiser RS 5000 Manual
Hide thumbs
Also See for RS 5000:
- Faq (4 pages) ,
- Safety manual (66 pages) ,
- Instruction manual (43 pages)
Table of Contents
Advertisement
RS_5000_570727_0117_PRT.book Seite 1 Montag, 10. Oktober 2016 2:52 14
Information on this manual
This manual describes how to put your RS 5000 into
operation and gives an overview of its most important
functions. Also observe the safety guide enclosed with
the product and the detailed instruction manual which
can be downloaded at www.sennheiser.com/download.
Contents
Information on this manual ................................................... 1
Package contents ..................................................................... 2
Product overview ..................................................................... 3
Overview of the acoustic signals/beeps ............................. 5
Putting the RS 5000 into operation ...................................... 6
Setting up the transmitter .................................................... 6
Connecting the transmitter to an audio source ................ 6
Connecting the transmitter to the mains ........................ 10
Charging the rechargeable battery ................................... 11
rechargeable battery ........................................................... 12
Using the charging reminder function ............................. 13
Selecting the ear pads ......................................................... 13
Using the RS 5000 .................................................................. 14
Switching the wireless headphone system on ................ 14
Switching the wireless headphone system off ............... 15
Wearing the stethoset receiver ......................................... 15
Adjusting the volume .......................................................... 16
Adjusting the balance .......................................................... 17
function ................................................................................... 20
RS 5000 ................................................................................... 22
Using additional functions ................................................... 24
Pairing one or several stethoset receivers with the
transmitter ............................................................................. 24
Advanced settings ................................................................ 24
Restoring the factory default settings ............................. 28
If a problem occurs ... ............................................................. 30
Leaving the range of the transmitter ............................... 32
Specifications .......................................................................... 33
Information on this manual EN
LED ................................................................ 5
LED .......................................................... 5
RS 5000
| 1
Advertisement
Table of Contents

Related Manuals for Sennheiser RS 5000


Summary of Contents for Sennheiser RS 5000
-
Page 1: Table Of Contents
RS_5000_570727_0117_PRT.book Seite 1 Montag, 10. Oktober 2016 2:52 14 Information on this manual EN Information on this manual This manual describes how to put your RS 5000 into operation and gives an overview of its most important functions. Also observe the safety guide enclosed with the product and the detailed instruction manual which can be downloaded at www.sennheiser.com/download. -
Page 2: Package Contents
The instruction manual in other languages can be downloaded as a PDF file at www.sennheiser.com/download. A list of accessories can be found on the RS 5000 prod- uct page at www.sennheiser.com. For information on suppliers, contact your Sennheiser partner. To find a Sennheiser partner in your country, search at www.sennheiser.com. -
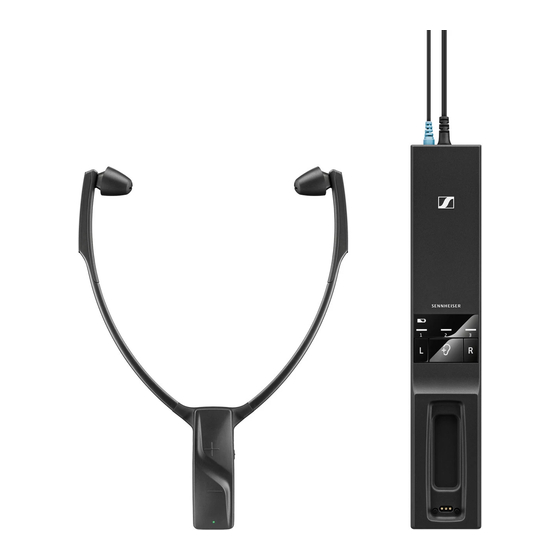
Page 3: Product Overview
Overview of the RR 5000 stethoset receiver Ear pads, replaceable Ear bows with on/off function Volume buttons – Receiver status LED (see page 5) Speech intelligibility button marking for the right ear and marking for the left ear Built-in rechargeable battery Charging contacts RS 5000... - Page 4 (marked pink) for connecting a digital audio source (optical) 5V DC 1A socket (marked yellow) for connecting the power supply unit Analog 3.5 mm In audio input (marked blue) for connecting an analog audio source (3.5 mm jack socket) RS 5000...
-
Page 5: Receiver Status Led
5 beeps mission range (see page 32). when changing the The maximum or minimum volume is volume reached (see page 16). when changing the The maximum or minimum balance setting is balance setting reached (see page 17) RS 5000... -
Page 6: Putting The Rs 5000 Into Operation
RS_5000_570727_0117_PRT.book Seite 6 Montag, 10. Oktober 2016 2:52 14 EN Putting the RS 5000 into operation Putting the RS 5000 into operation Setting up the transmitter Choose a suitable place near your sound source. Separate the transmitter from other wireless devices in the room by at least 50 cm/20”... - Page 7 RS_5000_570727_0117_PRT.book Seite 7 Montag, 10. Oktober 2016 2:52 14 Putting the RS 5000 into operation EN Connection Color on possibilities of trans- Connection cable the audio source mitter Optical Optical digital cable pink (digital) 3.5 mm jack Stereo audio cable...
- Page 8 RS_5000_570727_0117_PRT.book Seite 8 Montag, 10. Oktober 2016 2:52 14 EN Putting the RS 5000 into operation Connect the optical digital cable to the pink Digital Optical digital audio input of the transmitter and to the optical output of your audio source.
- Page 9 RS_5000_570727_0117_PRT.book Seite 9 Montag, 10. Oktober 2016 2:52 14 Putting the RS 5000 into operation EN Some TV models mute the loudspeakers when you connect the transmitter to the 3.5 mm headphone socket. Other TV models have their own menu for adjusting the volume of the headphone socket.
-
Page 10: Connecting The Transmitter To The Mains
RS_5000_570727_0117_PRT.book Seite 10 Montag, 10. Oktober 2016 2:52 14 EN Putting the RS 5000 into operation Connection possibility D: SCART socket (analog) Plug the SCART adapter* onto the stereo audio cable. Connect the stereo audio cable to the blue 3.5 mm jack socket of the transmitter. -
Page 11: Charging The Rechargeable Battery
RS_5000_570727_0117_PRT.book Seite 11 Montag, 10. Oktober 2016 2:52 14 Putting the RS 5000 into operation EN Charging the rechargeable battery A complete charging cycle takes about 3 hours. Before using the receiver for the first time, charge its rechargeable battery for a complete charging cycle without interruption. -
Page 12: Displaying The Remaining Operating Time Of The Rechargeable Battery
RS_5000_570727_0117_PRT.book Seite 12 Montag, 10. Oktober 2016 2:52 14 EN Putting the RS 5000 into operation Battery Meaning A charging error/battery error has Battery LED flashes occurred (see page 23). rapidly Always store the stethoset receiver in the transmitter’s charging compartment to ensure that it is fully charged when needed. -
Page 13: Using The Charging Reminder Function
RS_5000_570727_0117_PRT.book Seite 13 Montag, 10. Oktober 2016 2:52 14 Putting the RS 5000 into operation EN Using the charging reminder function When the stethoset receiver is switched off and the transmitter automatically switches off (standby mode), the Battery will flash back and forth for 10 minutes to remind you to charge the stethoset receiver. -
Page 14: Using The Rs 5000
RS_5000_570727_0117_PRT.book Seite 14 Montag, 10. Oktober 2016 2:52 14 EN Using the RS 5000 Using the RS 5000 Switching the wireless headphone system on WARNING Danger of hearing damage due to high volumes! This stethoset receiver allows you to set higher vol- umes than conventional devices. -
Page 15: Switching The Wireless Headphone System Off
RS_5000_570727_0117_PRT.book Seite 15 Montag, 10. Oktober 2016 2:52 14 Using the RS 5000 EN Switching the wireless headphone system off Take the stethoset receiver off so that the ear bows fold inwards. The stethoset receiver automatically switches off after 20 seconds. The Receiver status LED goes off. -
Page 16: Adjusting The Volume
RS_5000_570727_0117_PRT.book Seite 16 Montag, 10. Oktober 2016 2:52 14 EN Using the RS 5000 – you feel a gentle pressure on your ears. The ear pads adapt to your ear form. If you find the ear pads uncom- fortable, try the ear pads for smaller ears (Package con- tents, see page 13) –... -
Page 17: Adjusting The Balance
RS_5000_570727_0117_PRT.book Seite 17 Montag, 10. Oktober 2016 2:52 14 Using the RS 5000 EN Adjusting the balance The Balance buttons allow for left/right volume adjustment. Adjust the balance so that you hear equally well with both ears. The balance setting is stored on the stethoset receiver. -
Page 18: Selecting A Hearing Profile For Sound Enhancement
RS_5000_570727_0117_PRT.book Seite 18 Montag, 10. Oktober 2016 2:52 14 EN Using the RS 5000 Selecting a hearing profile for sound enhancement The hearing profiles alter the sound of the audio signal in order to especially improve the speech intelligibility. The pro- files are used to specifically change certain frequency ranges by e.g. - Page 19 RS_5000_570727_0117_PRT.book Seite 19 Montag, 10. Oktober 2016 2:52 14 Using the RS 5000 EN Hearing profile LED Meaning pres file sion Low-frequency tones are slightly boosted to provide a warm, full segment lit sound. High-frequency tones are reproduced less piercing and clanking.
-
Page 20: Activating/Deactivating The Speech Intelligibility Function
RS_5000_570727_0117_PRT.book Seite 20 Montag, 10. Oktober 2016 2:52 14 EN Using the RS 5000 Press the Hearing profile button on the transmitter for 2 seconds to select the next hearing profile. Press the Hearing profile button again for 2 seconds to switch to the next hearing profile. - Page 21 RS_5000_570727_0117_PRT.book Seite 21 Montag, 10. Oktober 2016 2:52 14 Using the RS 5000 EN Speech Application intelligibility Advantage function Sportscasts activated The presentation muffled by background noise in the stadium is easier to under- stand. Music deactivated No speech, the speech intel- ligibility function is not needed.
-
Page 22: Cleaning And Maintaining The Rs 5000
RS_5000_570727_0117_PRT.book Seite 22 Montag, 10. Oktober 2016 2:52 14 EN Cleaning and maintaining the RS 5000 Cleaning and maintaining the RS 5000 CAUTION Liquids can damage the electronics of the product! Liquids entering the housing of the product can cause a short- circuit and damage the electronics. -
Page 23: Replacing The Stethoset Receiver's Rechargeable Battery
Danger of damage to the product! During the warranty period, the rechargeable batteries must only be replaced or removed by an authorized Sennheiser ser- vice partner, otherwise the warranty will be null and void. Contact your Sennheiser service partner if the rechargeable batteries need to be replaced or removed.