Table of Contents
Advertisement
Quick Links
Advertisement
Table of Contents

Related Manuals for Salton JVPM1B


Summary of Contents for Salton JVPM1B
- Page 1 READ AND SAVE THESE INSTRUCTIONS Pod Coffee Maker...
-
Page 2: Important Safeguards
IMPORTANT SAFEGUARDS When using electrical appliances, basic safety precautions should always be followed, including the following: • Read all instructions. • Do not touch hot surfaces. Use handles or knobs. • To protect against fire, electric shock, do not place cord, plugs, or appliance in water or other liquid. -
Page 3: Additional Important Safeguards
ADDITIONAL IMPORTANT SAFEGUARDS WARNING: This appliance generates heat and escaping steam during use. Use proper precautions to prevent the risk of burns, fires, or other injury to persons or damage to property. • All users of this appliance must read and understand this Owner’s Manual before operating or cleaning this appliance. - Page 4 POLARIZED PLUG: This appliance has a polarized plug, (one blade is wider than the other). To reduce the risk of electric shock, this plug is intended to fit into a polarized outlet only one way. If the plug does not fit fully in the outlet, reverse the plug. If it still does not fit, contact a qualified electrician.
-
Page 5: Parts Identification
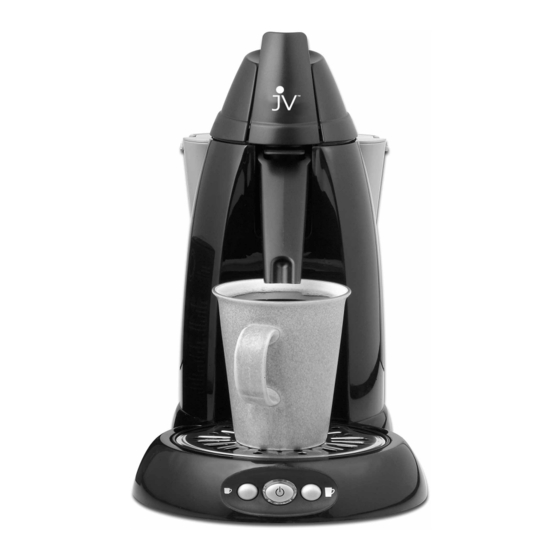
Your product may vary slightly from illustration. Parts Identification (To order, see page 14.) Pod Holder (P/N 31159B, 31159W) Pod Chamber (P/N 31163) Adjustable Brew Spout (P/N 31156B, 31156W) Drip Tray (P/N 31157) Over Flow Tray (P/N 31158B, 31158W) Control Panel 5-ounce Serving Power Light/ Indicator Button... - Page 6 Before Using Your Pod Coffee Maker Become familiar with all parts of the appliance. Keep your Pod Coffee Maker clean Clean and descale your Pod Coffee Maker on a regular basis. See “Cleaning and Descaling”, pages 11-12. We recommend cleaning the Water Tank and the Adjustable Brew Spout as well as the Pod Holder and Pod Chamber, before using for the first time.
- Page 7 2. Fill the Water Tank with fresh water up to the ‘Max’ line, and fit back into the Base (down and in) until it “snaps” into place, see Figure 4. 3. Lift Lid by pulling out on the Lever. Top will pop up. Push back so Lid is in fully raised position, see Figure 5.
- Page 8 5. Make sure the mouth of the Pod Chamber is inside the Adjustable Brew Spout. Do not place a coffee pod in chamber. See Figure 6. 6. Place the Pod Holder so it sits securely on top of the Pod Chamber, see Figure 7.
-
Page 9: Brewing Coffee
9. Press the Power Light/Indicator Button to turn power on, then simultaneously press the 5-Ounce Serving and 8-Ounce Serving Buttons, see Figure 8. The water from the Water Tank will cycle through the coffee maker. NOTE: If unit goes unused for 3 or more days, please repeat above process (steps 1-9). - Page 10 6. Place one coffee pod inside the Pod Holder. Press lightly on the coffee pod to make sure it sits evenly in the Pod Holder. See Figures 9 and 10 for correct pod insertion. CAUTION: Use only pre-measured coffee pods in your Pod Coffee Maker.
-
Page 11: Care And Cleaning
You may leave your coffee maker on if you intend to brew another cup of coffee. The coffee maker will turn off automatically after one hour. Helpful Hints for Brewing Fresh Water For optimal results, use fresh water daily. If you haven’t used your machine for a few days, follow steps 1-9 in section “Before Using Your Pod Coffee Maker”... - Page 12 4. Remove the Drip Tray and Overflow Tray, see Figure 11. 5. Clean the Water Tank, Pod Holder, Pod Chamber, Adjustable Brew Spout, Drip Tray and Overflow Tray with hot water. If nec- essary, use a little dish soap. Note: The Pod Holder, the Drip Tray, Overflow Tray and the Adjustable Brew Spout may be washed in the dishwasher (top shelf only).
-
Page 13: Troubleshooting
Troubleshooting Should a problem occur, you may be able to find an answer in the text below. If the text proves unhelpful or if you require further information, please contact Consumer Service. 1. The coffee is too weak. Check the following: •... - Page 14 Clean all removable parts (Adjustable Brew Spout, Pod Holder, Pod Chamber) as described on pages 11-12. For any other problem please contact Consumer Service, 1-800-577-1557 or email us at Salton@Saltonusa.com. To Order Coffee Pods It’s easy to order pods. Just log onto our dedicated website, www.juanvaldezpods.com, and order online.
-
Page 15: Important Notice
Thank You LIMITED ONE YEAR WARRANTY Warranty: This product is warranted by Salton, Inc. to be free from defects in materials or workmanship for a period of (1) year from the original purchase date. This product warranty covers only the original consumer purchaser of the product. - Page 16 Macon, MO 63552 Limitation of Remedies: No representative or person is authorized to assume for Salton, Inc. any other liability in connection with the sale of our products. There shall be no claims for defects or failure of performance or...