
Related Manuals for Rimage 110705-000


Summary of Contents for Rimage 110705-000
- Page 1 Liberty Printer User Guide 110705-000 Revision E Use this manual to help you Identify parts of the printer • • Print discs Configure the Liberty printer driver •...
-
Page 2: Notice For Canada
Liberty Printer – Model CDPR3 Notice for USA Tested to Comply with FCC Standards FOR HOME OR OFFICE USE. This device complies with part 15 of the FCC Rules. Operation is subject to the following two conditions: (1) This device may not cause harmful interference, and (2) this device must accept any interference received, including interference that may cause undesired operation. - Page 3 Rimage Corporation reserves the rights to make improvements to the equipment and software described in this document at any time without any prior notice. Rimage Corporation reserves the right to revise this publication and to make changes from time to time in the content hereof without obligation of Rimage Corporation to notify any person or organization of such revisions or changes.
- Page 4 State of Minnesota, without giving effect to conflict of law rules. Rimage must receive written notice of any claimed failure to perform or defect within five (5) days after such failure or defect is first observed. For warranty service, call Rimage at (952) 946-0004.
-
Page 5: Table Of Contents
Rimage Liberty Printer Limited 12 Month Warranty... iv Safety Precautions... vi Chapter 1 – Overview ------------------------------------------------------------------------------------------------ 7 Overview... 7 Chapter 2 – User Guide -------------------------------------------------------------------------------------------- 8 Liberty Parts ... 8 Operator Panel... 9 Software ... 9 Label Design Requirements ... 10 Masking and Printing Hub Area... -
Page 6: Safety Precautions
Safety Precautions This manual and the indications on the product allow proper and safe operation. The indication marks below help protect you and other persons from injury, and equipment from damage. To ensure safety, please read the precautions in the online User Guide manual and familiarize yourself with their meaning before using the equipment. -
Page 7: Chapter 1 - Overview
The printer requires Windows 2000 Professional or Windows XP operating system. This manual describes the operation of your Rimage Liberty printer and it covers all the options in the printer driver. The installation of the print driver is located on the “Liberty Printer QuickStart”. Follow the... -
Page 8: Chapter 2 - User Guide
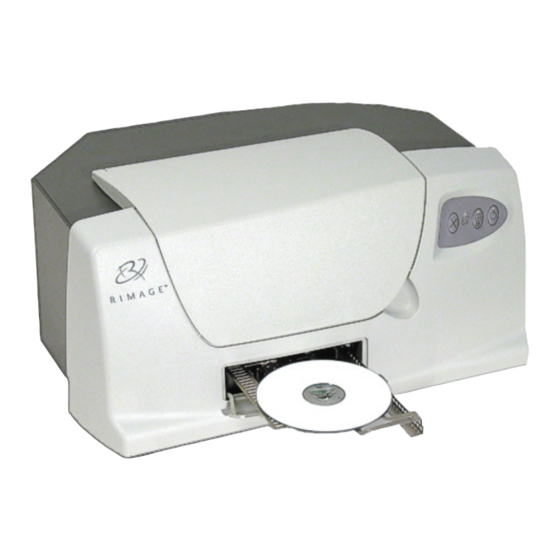
Chapter 2 – User Guide Liberty Parts This section shows the main Liberty printer parts. 1 – Cover 2 – Operator Panel 3 – Printer Tray... -
Page 9: Operator Panel
Software The Rimage software suite comes with a label editor called “CD Designer” which is installed on your system. Rimage recommends using CD Designer to design your labels. If you have another software application that you prefer, you can create the label image and print directly to the Liberty printer. -
Page 10: Label Design Requirements
You can mask the outer non-printable area and print, or not print in the hub area. Set these options in the “Run Masker” option in the printer driver. Refer to page 23. To print in the hub area, see on page 23. -
Page 11: Printing Discs
Most Windows’ applications that can print to a standard paper printer can print to the Liberty printer. Since the disc is a round object, Rimage recommends using the included CD Designer application. If you have a favorite graphic program, you can use it to design and print your labels. - Page 12 6. Place the disc you want to print on the printer tray so that the printable surface is facing up. The three holding pins must come up through the disc center hole.
- Page 13 Rimage Status Monitor 7. Press the Disc Button on the operator panel until the printer tray moves in. The printer will print the disc, and opens the tray when the printing is done. 8. Remove the printed disc. 9. Repeat steps 3 – 8 as needed to print the number of copies required.
-
Page 14: Ink Cartridge Status
Rimage ink cartridges are not licensed for modification. • Note: You can only use authentic Rimage ink cartridges in the Liberty printer. Align Ink Cartridges For optimal print quality, align the ink cartridges using the steps below. 1. Windows 2000 – Select the Windows Start button and select Settings|Printers. - Page 15 If the buttons are grayed out, the tray controller must be started. For Windows 2000, s Windows’ Start|Programs|Rimage|Utilities|Disc Color Tray Controller to start the Rimage Tray Controller. For Windows XP, select Windows’ Start|All Programs|Rimage|Utilities|Disc Color Tray Controller to start the Rimage Tray Controller. dialog displays.
- Page 16 8. When prompted, press the Disc button on the printer to close the tray and start the printing test. 9. There are four pattern groups (A, B, C, D) printed on the disc. Each group has a numbered index, shown as a set of numbers from 1 to 21. Locate the two lines that make the straightest line and enter the matching index value for each lettered group.
- Page 17 13. Close the Align Cartridges window. 14. Close the Printing Preference window. 15. Press the Disc button to close the printer tray. If the printer tray does not close, close the tray controller application and open it again. Wait for the tray controller to initialize,...
-
Page 18: Change Printer Driver Settings
You can change the printer driver properties to select print quality, print orientation, ink volume, or other image adjustments. 1. On the menu, point to Start 2. Right-click the printer you want to change on the shortcut menu, and then left-click Printing Preferences box opens. 3. At the... - Page 19 4. Select the tab. Features 5. Select to open the Advanced Features dialog displays. Advanced Features 6. Adjust the if desired. Drag the slider to the left for lighter images (less Ink Volume ink) or to the right for denser images (more ink). Select Dry Time Low Memory Mode dialog.
- Page 20 • Factory Settings defaults. Select OK to accept all the changes, or select Cancel to ignore the changes. Note: The Help function does not apply to this printer. Print in Grayscale Saturation print colors as various shades of gray. uses the tri-color ink cartridge to print high quality uses the black ink cartridge to print in grayscale.
-
Page 21: Advanced Tab
) - displays the Handler name and version number. Tray Controller Handler Loader - displays the Rimage Desktop autoloader it is physically attached to and the version and serial number of the autoloader. The Liberty Printer should display “Not attached” since a Rimage autoloader is not attached. -
Page 22: Printing
If selected, causes the printer not to wait for the activation of the front panel Disc button before printing. Then, when a job is sent, the printer will move the disc in for printing as soon as it detects the presence of a disc on the tray. -
Page 23: Maintenance
Run Masker The Rimage Raster Masker displays allowing you to adjust the mask (non-printable area) settings for the selected media type ( only). This works well when Standard CD/DVD 120 mm you do not want the edges printed. If you print on the edges of a disc where there is not printable surface, the ink will smear or run. -
Page 24: Center Image
3. Right-click on Disc Color Printer and select Printing Preferences. 4. Select the Advanced tab and select the Center Image button. 5. Select the Print Test Pattern button and the printer tray opens. 6. Place a full sized disc (120mm) on the printer tray. - Page 25 Tray Bracket Edge as shown here. 1 – Position Lines 2, 3, 4 – Tray Bracket Edge 9. Select the Print Test Pattern button again. 10. When prompted, press the Disc button to close the printer tray. 11. When done printing, remove the disc.
- Page 26 0.5 units. The Horizontal value from above would be about –1.2. 14. Select the Save Settings button. 15. To verify that the new values corrected the offset, place a new disc on the printer tray. 16. Select the Print Test Pattern button.
-
Page 27: Diagnostics
Test Tray Sensors The tray sensors function is for use only by, or at the direction of, Rimage Service personnel. Contact Rimage Corporation for additional information. Clean Cartridges This function is used to clean or open the ink nozzles. The nozzles may become clogged from dry ink. -
Page 28: Tray Controller
PC is connected to the printer and the Tray Controller is running. Tray Controller Help This section is a helpful procedure if the printer tray did not come out after pressing the disc button. Make sure the USB cable is plugged in at the printer and the PC. - Page 29 6. Select the Windows Start menu and select |Programs|Rimage|Utilities| and select Disc Color Printer Tray Controller. 7. After the tray controller has completed the initialization, try opening the printer tray again by pressing the disc button.
-
Page 30: Appendix A
Appendix A PC Requirements The PC must meet the following specifications to run the Liberty printer and the CD Designer Software Suite (or other) label design software application. Processor (Minimum) Memory (Minimum) Video CD-ROM Drive Hard Drive Space USB Ports...