Table of Contents
Advertisement
Available languages
Available languages
Advertisement
Chapters
Table of Contents

Related Manuals for Omron HEM-741CREL


Summary of Contents for Omron HEM-741CREL
-
Page 1: Automatic Inflation
INSTRUCTION MANUAL AUTOMATIC INFLATION BLOOD PRESSURE MONITOR HEM-741CREL Model... -
Page 2: Table Of Contents
TABLE OF CONTENTS Introduction …………………………………………………………… 3 Important Safety Notes ……………………………………………… 4 Know Your Unit ……………………………………………………… 5 A Few Words About Blood Pressure ……………………………… 6 Suggestions Before Taking A Measurement ………………………… 7 Battery Installation/Replacement …………………………………… 8 Care and Maintenance ……………………………………………… 9 How To Apply The Arm Cuff ……………………………………... -
Page 3: Introduction
The measurement reading is clearly displayed on a large digital panel. The ReliOn HEM-741CREL digital blood pressure monitor uses the oscillometric method of blood pressure measurement. This means the monitor detects your blood’s movement through your brachial artery and converts the movements into a digital reading. -
Page 4: Important Safety Notes
Do not use a cellular phone near the unit. It may result in operational failure. Changes or modifications not approved by the ReliOn Healthcare will void the user warranty. Do not disassemble or attempt to repair the unit or components. -
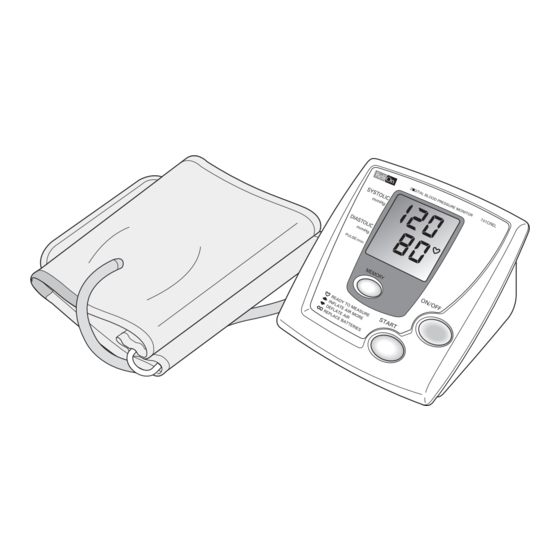
Page 5: Know Your Unit
Systolic Blood Pressure Display Diastolic Blood Pressure /Pulse Display Air Jack Air Plug Arm Cuff KNOW YOUR UNIT Heart Symbol Cuff Tube Cuff Tab AC Adapter Jack ON/OFF Button START Button MEMORY Button... -
Page 6: A Few Words About Blood Pressure
A FEW WORDS ABOUT BLOOD PRESSURE The 6th report of the Joint National Committee on Prevention Detection, Evaluation and Treatment of High Blood Pressure (JNCVI) from the National Institutes of Health developed the following classification. However, it is only a general guideline because blood pressure depends on our age, morbidity, and treatment strategy by a physician. -
Page 7: Suggestions Before Takinga Measurement
SUGGESTIONS BEFORE TAKING 1. Avoid eating, smoking, and exercising for 30 minutes before taking a measurement. Rest for at least 15 minutes before taking the measurement. 2. Stress raises blood pressure. Avoid taking measurements during stressful times. 3. Remove tight-fitting clothing from your left arm. 4. -
Page 8: Battery Installation/Replacement
BATTERY INSTALLATION / REPLACEMENT 1. Slide the battery cover off in the direction of the arrow. 2. Install 4 “AA” size batteries so + (positive) and – (negative) polarities match the polarities of the battery compartment as indicated. 3. Replace the battery cover. NOTE: If the Low Battery Indicator appears on the display, replace all four batteries. -
Page 9: Care And Maintenance
CARE AND MAINTENANCE To keep your digital blood pressure monitor in the best condition and protect the unit from damage follow the directions listed below: Clean the monitor with a soft dry cloth. Do not use any abrasive or volatile cleaners. Do not attempt to clean the cuff. Never immerse the monitor or any components in water. -
Page 10: How To Apply The Arm Cuff
HOW TO APPLY THE ARM CUFF 1. If the cuff is assembled correctly, the sewn hook material will be on the outside of the cuff loop and the metal D-ring will not touch your skin. 2. Pass the end of the cuff furthest from the tubing through the metal D-ring to form a loop. -
Page 11: How To Apply The Arm Cuff
HOW TO APPLY THE ARM CUFF 4. Pull the cuff so that the top and bottom edges are tightened evenly around your arm. 5. When the cuff is positioned correctly, press the sewn hook material FIRMLY against the pile side of the cuff. 6. -
Page 12: How To Take A Measurement
HOW TO TAKE A MEASUREMENT Be sure to read “How to Apply the Arm Cuff” before taking a measurement. 1. Press the ON/OFF button. a) All display symbols appear for approximately one second. This is the initial LCD test. b) The display symbols disappear and the Deflation Indication symbol ( c) When the monitor completes the necessary preparations before measurement, the Heart Symbol... -
Page 13: How To Take A Measurement
HOW TO TAKE A MEASUREMENT 3. When the correct pressure value is reached, the cuff starts to deflate automatically. As the cuff deflates, decreasing numbers appear on the display. The Heart Symbol ) flashes at every heartbeat. 4. When the measurement is complete, the Heart Symbol ( flashing and your blood pressure and pulse... -
Page 14: How To Use The Memory Function
HOW TO USE THE MEMORY FUNCTION This monitor has a memory capable of storing fourteen (14) sets of readings. Every time you complete the measurement, the monitor automatically stores the blood pressure reading and pulse rate. • Push the MEMORY button to recall stored readings while the Heart Symbol ( ) is displayed. -
Page 15: Error Indicators
ERROR INDICATORS Error Symbol Cause Cuff under-inflated. Movement during Measurement No pulse or blood pressure reading due to very weak artery pulse. Cuff over-inflated (more than 300 mmHg). Batteries have run down. Correction Remove arm cuff. Wait 2-3 minutes and take another measurement. -
Page 16: Fcc Statement
FCC STATEMENT Note: POTENTIAL FOR RADIO/TELEVISION INTERFERENCE (for U.S.A. only) This product has been tested and found to comply with the limits for a Class B digital device, pursuant to part 15 of the FCC rules. These limits are designed to provide reasonable protection against harmful interference in a residential installation. -
Page 17: Warranty Information
WARRANTY INFORMATION Your ReliOn HEM-741CREL Automatic Blood Pressure Monitor, excluding the monitor cuff, is warranted to be free from defects in materials and workmanship appearing within 2 years, when used in accordance with the instructions provided with the monitor. The monitor cuff is warranted to be free from defects in materials and workmanship appearing within one year, when the monitor is used in accordance with the instructions provided with the monitor. - Page 18 Canada) (Outside of the USA and Your HEM-741CREL Automatic Blood Pressure Monitor, excluding the monitor cuff, is warranted to be free from defects in materials and workmanship appearing within 2 years, when used in accordance with the instructions provided with the monitor. The monitor cuff is warranted to be free from defects in materials and workmanship appearing within one year, when the monitor is used in accordance with the instructions provided with the monitor.
-
Page 19: Specifications
Arm Circumference Range: Contents: UPC Code: NOTE: These specifications, to improve performance, are subject to change without notice. SPECIFICATIONS ReliOn HEM-741CREL LCD Digital Display Pressure: 0 to 280 mmHg Pulse: 40-180/min. Pressure: ±3mmHg or 2% of reading Pulse: ±5% of reading... - Page 20 Manufactured by: OMRON HEALTHCARE, INC. 300 Lakeview Parkway Vernon Hills, Illinois 60061 www.omronhealthcare.com Copyright © 2003 Omron Healthcare, Inc. Made in China 741CRELINST Rev...
- Page 21 MANUEL D’INSTRUCTIONS MONITEUR DE TENSION ARTÉRIELLE À GONFLAGE AUTOMATIQUE HEM-741CREL Modèle...
- Page 22 TABLE DES MATIÈRES Introduction ... 3 Importantes remarques sur la sécurité ... 4 Connaissez votre appareil ... 5 Quelques mots sur la tension aetérielle ... 6 Conseils avant de mesurer la tension artérielle ... 7 Installation/Remplacement des piles ... 8 Entretien et nettoyage ...
-
Page 23: Introduction
Il n’est pas nécessaire d’utiliser un stéthoscope pour un moniteur oscillométrique et pour cette raison, il est facile à utiliser. Le moniteur de tension artérielle à gonflage automatique ReliOn HEM-741CREL est prévu pour une utilisation à la maison. CONSERVEZ CES INSTRUCTIONS INTRODUCTION... -
Page 24: Importantes Remarques Sur La Sécurité
Ne l’utilisez pas sur les nouveaux-nés. N’utilisez pas de téléphone cellulaire à proximité de l’appareil. Cela risquerait de provoquer une panne. Les modifications non approuvées par ReliOn Healthcare annulent la garantie de l’utilisateur. Ne démontez pas ou n’essayez pas de réparer l’appareil ou ses composants. -
Page 25: Connaissez Votre Appareil
CONNAISSEZ VOTRE APPAREIL Affichage de la tension artérielle maximale Affichage de la tension artérielle minimale et du pouls Prise d’alimentation en air Prise d’air Brassard Symbole de cœur Bouton MEMORY Tuyau du brassard Languette du brassard Prise d’adaptateur ca Bouton ON/OFF Bouton START... -
Page 26: Quelques Mots Sur La Tension Aetérielle
QUELQUES MOTS SUR LA TENSION ARTÉRIELLE Le 6ème rapport du Comité national mixte sur la détection de la prévention, l’évaluation et le traitement de tension artérielle élevée (JNCVI) des National Institutes of Health a établi la classification suivante. Toutefois, il ne s’agit que de principes directeurs généraux, car la tension artérielle dépend de votre âge, état de santé... - Page 27 CONSEILS AVANT DE PRENDRE UNE MESURE 1. Évitez de manger, fumer et faire du sport pendant au moins 30 minutes avant d’effectuer une mesure. Reposez-vous pendant au moins 15 minutes avant d’effectuer une mesure. 2. Le stress fait monter la tension artérielle. Évitez de prendre des mesures pendant des périodes de stress.
-
Page 28: Installation/Remplacement Des Piles
INSTALLATION /REMPLACEMENT DES PILES 1. Retirez le couvercle du compartiment des piles en le glissant dans la direction de la flèche. 2. Installez quatre piles de taille «AA» de façon à ce que les polarités + (positive) et – (négative) correspondent aux polarités du compartiment de piles, comme indiqué. -
Page 29: Entretien Et Nettoyage
ENTRETIEN ET NETTOYAGE Pour garder votre moniteur numérique de tension artérielle dans le meilleur état de marche possible et bien le protéger, suivez les instructions ci-dessous: Nettoyez le moniteur avec un chiffon doux et sec. N’utilisez pas d’abrasif ni de produit de nettoyage volatile. N’essayez pas de nettoyer le brassard. -
Page 30: Mise En Place Du Brassard
MISE EN PLACE DU BRASSARD 1. Si le brassard est assemblé correctement, le velcro cousu doit être sur l’extérieur de la boucle de brassard et l’anneau en D métallique ne doit pas toucher la peau. 2. Passez l’extrémité du brassard opposée au tube par l’anneau en D métallique de façon à... - Page 31 MISE EN PLACE DU BRASSARD 4. Tirez sur le brassard de façon à ce que les bords inférieur et supérieur soient serrés uniformément autour de votre bras. 5. Une fois le brassard correctement positionné, appuyez FERMEMENT le velcro cousu contre le velours du brassard.
- Page 32 COMMENT PRENDRE UNE MESURE Veuillez lire «Mise en place du brassard» avant de prendre une mesure. 1. Appuyez sur le bouton ON/OFF. a) Tous les symboles d'affichage apparaissent pendant environ une seconde. C’est l’essai initial de l’écran à cristaux liquides. b) Les symboles d’affichage disparaissent et le symbole de dégonflage ( c) Lorsque le moniteur termine les préparations...
- Page 33 COMMENT PRENDRE UNE MESURE 3. Lorsque la valeur de pression correcte est atteinte, le brassard commence à se dégonfler automatiquement. Alors que le brassard se dégonfle, des chiffres décroissants s'affichent à l' écran. Le symbole de cœur ( clignote à chaque battement de cœur. 4.
-
Page 34: Emploi De La Fonction Mémoire
EMPLOI DE LA FONCTION MEMOIRE Ce moniteur est doté d'une mémoire capable de stocker quatorze (14) groupes de mesures. Chaque fois que vous terminez la mesure, le moniteur stocke automatiquement la tension artérielle et le pouls. • Appuyez sur le bouton MEMORY pour rappeler les mesures stockées pendant que le symbole de cœur ( ) est affiché. -
Page 35: Indicateurs D'erreur
INDICATEURS D’ERREUR Symbole d’erreur Cause Brassard insuffisamment gonflé. Mouvement pendant la mesure. Aucune mesure de pouls ou de tension artérielle en raison d’un pouls très faible. Brassard trop gonflé (plus de 300 mmHg). Les piles sont déchargées. Correction Enlevez le brassard. Patientez 2 à... -
Page 36: Déclaration Fcc
DÉCLARATION FCC Remarque: RISQUE DE PARASITES RADIO-TÉLÉVISION (pour les États-Unis uniquement). Ce produit a été testé et évalué conforme aux limites pour un appareil numérique de classe B, conformément à la partie 15 du èglement de la FCC. Ces limites sont conçues pour assurer une protection raisonnable contre les parasites dans une installation résidentielle. -
Page 37: Information Concernant La Garantie
INFORMATION CONCERNANT Votre moniteur de tension artérielle automatique HEM-741CREL, à l'exception du bracelet du moniteur, est garanti comme étant exempt de tout défaut de matériel et de fabrication pouvant apparaître au cours de 2 années, lorsqu’il est utilisé conformément aux instructions qui l'accompagnent. - Page 38 Garanties Limitées (En dehors des Etats-Unis et du Canada) Votre moniteur de tension artérielle automatique HEM-741CREL, à l'exception du bracelet du moniteur, est garanti comme étant exempt de tout défaut de matériel et de fabrication pouvant apparaître au cours de 2 années, lorsqu’il est utilisé conformément aux instructions qui l'accompagnent.
-
Page 39: Spécifications
Contenu: Code UPC: REMARQUE: Ces spécifications sont sujettes à modification sans préavis, pour améliorer la performance. SPÉCIFICATIONS ReliOn HEM-741CREL Affichage numérique à cristaux liquides Pression: 0 à 280 mmHg Pouls: 40-180/min. Pression: ±3 mmHg ou 2 % de la mesure Pouls: ±5 % de la mesure... - Page 40 Manufacturé par: OMRON HEALTHCARE, INC. 300 Lakeview Parkway Vernon Hills, Illinois 60061 www.omronhealthcare.com Copyright © 2003 Omron Healthcare, Inc. Hecho en China 741CRELINST Rev...