Omron HEM-712C Instruction Manual
Automatic inflation blood pressure monitor
Hide thumbs
Also See for HEM-712C:
- Instruction manual (56 pages) ,
- Manual del instrucción (14 pages) ,
- Getting started manual (1 page)
Table of Contents
Advertisement
Available languages
Available languages
Advertisement
Chapters
Table of Contents

Related Manuals for Omron HEM-712C


Summary of Contents for Omron HEM-712C
- Page 1 INSTRUCTION MANUAL AUTOMATIC INFLATION BLOOD PRESSURE MONITOR HEM-712C Model...
-
Page 2: Table Of Contents
TABLE OF CONTENTS Introduction …………………………………………………………… 3 Important Safety Notes ……………………………………………… 4 Know Your Unit ……………………………………………………… 5 Suggestions Before Taking A Measurement ………………………… 6 Battery Installation/Replacement …………………………………… 7 Care and Maintenance ……………………………………………… 8 How To Apply The Arm Cuff …………………………………… 9-10 How To Take A Measurement …………………………………... -
Page 3: Introduction
Thank you for purchasing the Omron HEM-712C Automatic Inflation Blood Pressure Monitor. Fill-in for future reference DATE PURCHASED: ______________ SERIAL NUMBER: ________________ Staple your purchase receipt here. This completely automatic instrument quickly measures your blood pressure and pulse rate. The measurement reading is clearly displayed on a large digital panel. -
Page 4: Important Safety Notes
Do not use on infants. Do not use a cellular phone near the unit. It may result in operational failure. Changes or modifications not approved by Omron Healthcare will void the user warranty. Do not disassemble or attempt to repair the unit or components. -
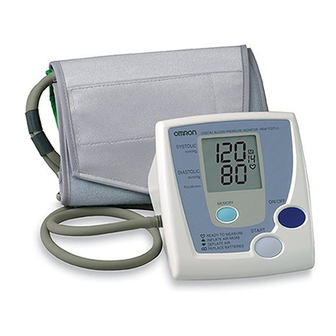
Page 5: Unit Overview
Systolic Blood Pressure Display Diastolic Blood Pressure /Pulse Display Air Jack Air Plug Arm Cuff KNOW YOUR UNIT Heart Symbol Cuff Tube Cuff Tab AC Adapter Jack ON/OFF Button START Button MEMORY Button... -
Page 6: Suggestions Before Takinga Measurement
SUGGESTIONS BEFORE TAKING 1. Avoid eating, smoking, and exercising for 30 minutes before taking a measurement. Rest for at least 15 minutes before taking the measurement. 2. Stress raises blood pressure. Avoid taking measurements during stressful times. 3. Remove tight-fitting clothing from your left arm. 4. -
Page 7: Battery Installation/Replacement
BATTERY INSTALLATION / REPLACEMENT 1. Slide the battery cover off in the direction of the arrow. 2. Install 4 “AA” size batteries so + (positive) and – (negative) polarities match the polarities of the battery compartment as indicated. 3. Replace the battery cover. NOTE: If the Low Battery Indicator appears on the display, replace all four batteries. -
Page 8: Care And Maintenance
CARE AND MAINTENANCE To keep your digital blood pressure monitor in the best condition and protect the unit from damage follow the directions listed below: Clean the monitor with a soft dry cloth. Do not use any abrasive or volatile cleaners. Do not attempt to clean the cuff. Never immerse the monitor or any components in water. -
Page 9: How To Apply The Arm Cuff
HOW TO APPLY THE ARM CUFF 1. If the cuff is assembled correctly, the sewn hook material will be on the outside of the cuff loop and the metal D-ring will not touch your skin. 2. Pass the end of the cuff furthest from the tubing through the metal D-ring to form a loop. -
Page 10: How To Apply The Arm Cuff
HOW TO APPLY THE ARM CUFF 4. Pull the cuff so that the top and bottom edges are tightened evenly around your arm. 5. When the cuff is positioned correctly, press the sewn hook material FIRMLY against the pile side of the cuff. 6. -
Page 11: How To Take A Measurement
HOW TO TAKE A MEASUREMENT Be sure to read “How to Apply the Arm Cuff” before taking a reading 1. Press the ON/OFF button. a) All display symbols appear for approximately one second. This is the initial LCD test. b) The display symbols disappear and the Deflation Indication symbol ( c) When the monitor completes the necessary preparations before measurement, the Heart Symbol... - Page 12 HOW TO TAKE A MEASUREMENT 3. When the correct pressure value is reached, the cuff starts to deflate automatically. As the cuff deflates, decreasing numbers appear on the display. The Heart Symbol ) flashes at every heartbeat. 4. When the measurement is complete, the Heart Symbol ( flashing and your blood pressure and pulse...
-
Page 13: How To Use The Memory Function
HOW TO USE THE MEMORY FUNCTION This monitor has a memory capable of storing fourteen (14) sets of readings. Every time you complete the measurement, the monitor automatically stores the blood pressure reading and pulse rate. • Push the MEMORY button to recall stored readings while the Heart Symbol ( ) is displayed. -
Page 14: Error Indicators
ERROR INDICATORS Error Symbol Cuff under-inflated. Cause Movement during Measurement No pulse or blood pressure reading due to very weak artery pulse. Cuff over-inflated (more than 300 mmHg). Batteries have run down. Correction Remove arm cuff. Wait 2-3 minutes and take another measurement. -
Page 15: Fcc Statement
FCC STATEMENT Note: POTENTIAL FOR RADIO/TELEVISION INTERFERENCE (for U.S.A. only) This product has been tested and found to comply with the limits for a Class B digital device, pursuant to part 15 of the FCC rules. These limits are designed to provide reasonable protection against harmful interference in a residential installation. -
Page 16: Warranty Information
WARRANTY INFORMATION Your HEM-712C Automatic Blood Pressure Monitor, excluding the monitor cuff, is warranted to be free from defects in materials and workmanship appearing within 2 years, when used in accordance with the instructions provided with the monitor. The monitor cuff is warranted to be free from defects in materials and workmanship appearing within one year, when the monitor is used in accordance with the instructions provided with the monitor. -
Page 17: Warranty Information
Canada) (Outside of the USA and Your HEM-712C Automatic Blood Pressure Monitor, excluding the monitor cuff, is warranted to be free from defects in materials and workmanship appearing within 2 years, when used in accordance with the instructions provided with the monitor. The monitor cuff is warranted to be free from defects in materials and workmanship appearing within one year, when the monitor is used in accordance with the instructions provided with the monitor. -
Page 18: Specifications
Arm Circumference Range: Contents: UPC Code: NOTE: These specifications, to improve performance, are subject to change without notice. SPECIFICATIONS HEM-712C LCD Digital Display Pressure: 0 to 280 mmHg Pulse: 40-180/min. Pressure: ±3mmHg or 2% of reading Pulse: ±5% of reading... -
Page 19: Notes
NOTES... - Page 20 Made in China Manufactured by: OMRON HEALTHCARE, INC. 300 Lakeview Parkway Vernon Hills, Illinois 60061 www.omronhealthcare.com Copyright © 2003 Omron Healthcare, Inc. HEM-712CINST Rev B...
- Page 21 MANUAL DE INSTRUCCIONES MONITOR DE PRESIÓN ARTERIAL DE INFLADO AUTOMÁTICO HEM-712C Modelo...
- Page 22 TABLA DE CONTENIDO Introducción ………………………………………………………… 3 Observaciones importantes sobre seguridad …………………… 4 Conozca la unidad ………………………………………………… 5 Sugerencias preliminares para medir la presión arterial ………… 6 Instalación y recambio de pilas …………………………………… 7 Cuidado y mantenimiento…………………………………………… 8 Cómo colocar el brazalete ……………………………………… 9-10 Cómo medir la presión arterial ………………………………...
-
Page 23: Introducción
Los monitores oscilométricos no necesitan un estetoscopio, lo cual facilita su uso. El Monitor de presión arterial de inflado automático Omron HEM-712C está diseñado para uso residencial. GUARDE ESTAS INSTRUCCIONES INTRODUCCIÓN... -
Page 24: Observaciones Importantes Sobre Seguridad
No utilice teléfonos celulares cerca del aparato, ya que podría ocasionar desperfectos en el funcionamiento. Todo cambio o modificación que no se encuentre aprobado por Omron Healthcare provocará la anulación de la garantía del usuario. No desarme ni intente reparar la unidad ni sus componentes. -
Page 25: Conozca La Unidad
CONOZCA LA UNIDAD Visualización de la presión arterial sistólica Visualización de la presión arterial diastólica y del pulso Entrada del tubo de aire Conector del tubo de aire Brazalete Símbolo del corazón Tubo del brazalete Borde del brazalete Entrada para el transformador de CA Botón de... -
Page 26: Sugerencias Preliminares Para Medir La Presión Arterial
SUGERENCIAS PRELIMINARES PARA MEDIR LA PRESIÓN ARTERIAL 1. Evite comer, fumar y hacer ejercicios físicos 30 minutos antes de medir la presión arterial. Decanse al menos 15 minutos antes de realizar la medición. 2. El estrés aumenta la presión arterial. Evite medir su presión arterial cuando esté... -
Page 27: Instalación Y Recambio De Pilas
INSTALACIÓN Y RECAMBIO DE LAS PILAS 1. Retire la tapa del compartimiento para pilas en la dirección que indica la flecha. 2. Coloque 4 pilas “AA” de modo que las polaridades positiva (+) y negativa (–) coincidan con las del compartimiento. 3. -
Page 28: Cuidado Y Mantenimiento
CUIDADO Y MANTENIMIENTO Para conservar su monitor digital de presión arterial en prefecto estado y protegerlo contra daños, siga las instrucciones que se detallan a continuación: Limpie el monitor con un paño suave y seco. No utilice limpiadores abrasivos ni volátiles. No intente limpiar el brazalete. Nunca sumerja el monitor ni ninguno de sus componentes en agua. -
Page 29: Cómo Colocar El Brazalete
CÓMO COLOCAR EL BRAZALETE 1. Si el brazalete está armado correctamente, el cierre tipo Velcro quedará en la parte externa del brazalete y el anillo metálico en "D" no estará en contacto con la piel. 2. Pase el extremo del brazalete que esté más alejado del tubo a través del anillo metálico en “D”... - Page 30 CÓMO COLOCAR EL BRAZALETE 4. Tire del brazalete de manera tal que los extremos superior e inferior queden ajustados en forma pareja alrededor del brazo. 5. Cuando el brazalete se encuentre en la posición correcta, presione el lado áspero del Velcro FIRMEMENTE contra su lado suave.
-
Page 31: Cómo Medir La Presión Arterial
CÓMO MEDIR LA PRESIÓN ARTERIAL Antes de medir la presión arterial, recuerde leer la sección “Cómo colocar el brazalete”. 1. Pulse el botón ON/OFF (Encendido/Apagado). a) Todos los símbolos aparecen en el visor durante aproximadamente un segundo. Ésta es la prueba inicial del visor. b) Los símbolos del visor desaparecen y el símbolo indicador de desinflado ( c) Cuando el monitor termina de prepararse para... - Page 32 CÓMO MEDIR LA PRESIÓN ARTERIAL 3. Cuando el brazalete logra el valor adecuado, comienza a desinflarse automáticamente. A medida que se desinfla, aparecen números decrecientes en el visor. El símbolo del corazón ( titila con cada latido. 4. Cuando la medición ha finalizado, el símbolo del corazón ( ) deja...
-
Page 33: Cómo Utilizar La Función De Memoria
CÓMO UTILIZAR LA FUNCIÓN El monitor tiene una memoria que puede almacenar catorce (14) series de mediciones. Cada vez que se completa una medición, el monitor guarda automáticamente los valores de pulso y las mediciones de presión arterial. • Pulse el botón MEMORY (Memoria) para recuperar mediciones guardadas mientras aparece el ( •... -
Page 34: Indicadores De Error
INDICADORES DE ERROR Símbolo de error Causa Brazalete inflado insuficientemente. Movimiento durante la medición No se pueden realizar mediciones de presión arterial ni de pulso debido a que el pulso arterial es muy débil. Pulsera inflada excesivamente (supera los 300 mmHg) Pilas agotadas. -
Page 35: Declaración De La Fcc
DECLARACIÓN DE LA FCC Nota: POSIBILIDAD DE INTERFERENCIA EN RADIO / TELEVISIÓN (para los EE.UU. únicamente). Las pruebas a las que se sometió este producto comprobaron que cumple con las limitaciones establecidas para dispositivos digitales Clase B, de conformidad con la sección 15 de las Normas FCC. El propósito de estas limitaciones es brindar protección razonable contra interferencias perjudiciales en el hogar. -
Page 36: Información Acerca De La Garantía
Para obtener servicios cubiertos por la garantía, envíe el monitor y todos los componentes junto con el comprobante de compra, una nota que explique el problema y $5.00 en concepto de gastos de seguro y envío de retorno a: Omron Healthcare, Inc. Attn: Repair Department 300 Lakeview Parkway Vernon Hills, IL 60061 Recuerde incluir el número de modelo de su unidad, su nombre y su número de teléfono... - Page 37 Garantías limitadas (fuera de los EEUU y Canadá) Su Monitor automático de presión arterial, modelo HEM-712C, sin incluir el brazalete, está garantizado contra defectos de material y mano de obra que surjan en un periodo de 2 años, cuando se lo emplee según las instrucciones suministradas junto con el monitor.
-
Page 38: Especificaciones
(9'' y 13'') Contenido: Código UPC: NOTA: Estas especificaciones técnicas, destinadas a mejorar el funcionamiento, están sujetas a cambios sin previo aviso. HEM-712C Visor digital LCD Presión: 0 a 280 mmHg Pulso: 40 a180/min. Presión: ±3 mmHg o 2% de la medición Pulso: ±5% de la medición... -
Page 39: Notas
NOTAS... - Page 40 Hecho en China Fabricado por: OMRON HEALTHCARE, INC. 300 Lakeview Parkway Vernon Hills, Illinois 60061 www.omronhealthcare.com © 2003 Omron Healthcare, Inc. HEM-712CINST Rev B...