Table of Contents
Advertisement
Advertisement
Table of Contents

Related Manuals for Hitachi AX-M76E


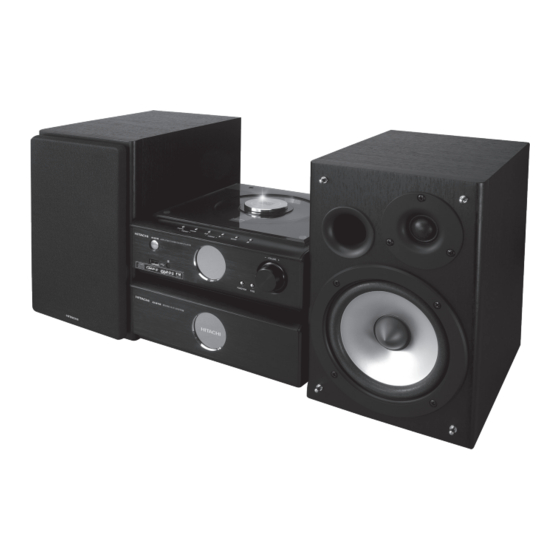
Summary of Contents for Hitachi AX-M76E
- Page 1 Instruction Manual AX-M76E Micro Hi-Fi System...
-
Page 2: Table Of Contents
Contents Safety Warnings ........................6 Unpacking ..........................8 Control Locations .........................9 The CD Player ..............................9 The Amplifier ..............................9 The Remote Control ..........................10 Installation of Battery ......................11 Handling the Remote Control ......................11 Handling the Battery ..........................12 Connections ........................13 Connecting the Speakers ........................13 Connecting the FM Aerial........................ - Page 3 Setting the Clock Automatically ..................22 Setting the Clock Manually ....................22 Setting the Sleep Timer ......................22 To confirm the sleep time........................22 To cancel the sleep timer setting ......................23 Setting the Daily on Timer ....................23 To confirm the daily time ........................23 To cancel the daily timer setting ......................
- Page 4 SOME DOS AND DON’TS ON THE SAFE USE OF EQUIPMENT This equipment has been designed and manufactured to meet international safety standards but, like any electrical equipment, care must be taken if you are to obtain the best results and safety is to be assured. read the operating instructions before you attempt to use the equipment.
- Page 5 Used correctly, domestic batteries are a safe and dependable source of portable power. Problems can occur if they are misused or abused – resulting in leakage or, in extreme cases, re or explosion. Here are some simple guidelines to safe battery use designed to eliminate any such problems.
-
Page 6: Safety Warnings
Safety Warnings • Read all the instructions carefully before Ventilation using the unit and keep them for future • To prevent the risk of electric shock or fire reference. hazard due to overheating, ensure that • Retain the manual. If you pass the unit curtains and other materials do not obstruct onto a third party make sure to include this the ventilation vents. - Page 7 Supervision Service • Children should be supervised to ensure • To reduce the risk of electric shock, do not that they do not play with the unit and the remove screws. The unit does not contain remote control. any user-serviceable parts. Please leave all maintenance work to qualified personnel.
-
Page 8: Unpacking
Thank you for purchasing your new HITACHI Micro Hi-Fi System. We recommend that you spend some time reading this instruction manual so that you fully understand all the operational features it offers. You will also find some hints and tips to help you resolve any issues. -
Page 9: Control Locations
Control Locations The CD Player Standby USB Port Remote Sensor VFD(Vacuum Fluorescent Display) Display Lens Function Preset Equalizer Volume Control Knob Disc Door Previous/Search Backward Channel Select Backward – PRESET 10. Next/Search Forward Channel Select Forward PRESET + 11. Play/Pause Tuning Backward –... -
Page 10: The Remote Control
The Remote Control Standby CD Function Tuner Function Random Intro Dimmer DIM Preset Equalizer P-EQ Clock Next Preset + 10. Search Backward Tuning Backward 11. Previous Preset – 12. Play/Pause 13. Album Up ALB + 14. Album Down ALB – 15. -
Page 11: Installation Of Battery
Installation of Battery Unscrew the screw at the back of the remote control. Remove the insulating mylar strip from the battery if the battery is being used for the first time. It is located at the bottom back side of the remote control. Pull out the battery compartment with your fingernails. -
Page 12: Handling The Battery
Handling the Battery • Improper or incorrect use of batteries may cause corrosion or battery leakage, which could cause fire, personal injury or damage to property. • Install the battery correctly by following the polarity ( + and – ) indications in the battery compartment. -
Page 13: Connections
Connections Make all connections before plugging the system into an AC power outlet. Connecting the Speakers Connect the speaker cords between the terminals as shown below. Connect the cords with black sleeves at the ends and tracer marks to the (-) (G) terminals and cords with red sleeves at the ends and tracer marks to the (+) (L) (R) terminals. -
Page 14: Connecting Auxiliary Equipment
Connecting Auxiliary Equipment Connect the AUX INPUT sockets on this unit to the line output sockets on the auxiliary equipment as illustrated below. The CD player Auxiliary equipment Connect the LINE OUT sockets on this unit to the auxiliary input sockets on the auxiliary equipment as illustrated below. -
Page 15: Eco-Power/Standby Features
ECO-Power/Standby Features This unit features a ECO-Power Standby mode. Press the Standby button to enter standby mode. To save energy consumption, the clock will not be displayed. If you want to display the clock during standby mode, you can press the Clock button. The clock display will disappear after 90 seconds. -
Page 16: Listening To Radio Broadcasts
Listening to Radio Broadcasts You can listen to FM stations. Stations can be tuned in manually, automatically, or from preset memory storage. Before listening to the radio, please check that the FM antenna is correctly connected and adjusted for length and direction or that the unit is connected to an external FM antenna. Tuning in a Station Repeatedly press the function button (FUNCTION) on the front of the product or press the tuner function button (... -
Page 17: To Change The Fm Reception Mode
Press the memory button (PROG) on the remote control to store the station. After 1 second, the display returns to the broadcast frequency display. Repeat above steps 1 to 3 for each station you want to store in memory with a preset number. -
Page 18: Cd Operation
CD Operation CD Playing Repeatedly press the function button (FUNCTION) on the front of the product until “DISC” is displayed or press the CD function button ( ) on the remote control to select tuner function. Press the open/close button ( ) to open the disc door and place the disc on the disc tray (with the printed side up). -
Page 19: Random Play (Cd And Mp3 Discs)
Random Play (CD and MP3 discs) The CD can be played randomly. Random play begins by pressing the random button (RANDOM) on the remote control in stop mode. Playing the Beginning (Intro) of each Track In stop mode, press the intro button (INTRO) on the remote control to play the beginning of each track consecutively. -
Page 20: Mp3 Disc Playing
MP3 Disc Playing When selecting tracks the player will automatically display the album and track number. For example: track number 21 may be from album 3, track 7. Press the button to open the disc door and place the MP3 disc on the disc tray. Press the CD display button (DISPLAY) on the remote control, ID3 information (song title and artist) will be displayed or “NO ID3”... -
Page 21: Use The Usb
Use the USB By connecting an USB mass storage device (including USB flash memory, USB flash players or memory cards) to this unit, you can enjoy the device’s stored music through the powerful speakers of Hi-Fi system. Insert the USB device’s USB plug into the socket on the front of unit. -
Page 22: Setting The Clock Automatically
Setting the Clock Automatically Tune into a RDS station and wait for a few minutes. To confirm, press the clock button. Setting the Clock Manually The built-in clock shows the time on the display. In standby mode, long press the clock button (CLOCK), the VFD will display SET CLOCK and 24HR indicator will blink. -
Page 23: To Cancel The Sleep Timer Setting
To cancel the sleep timer setting Repeatedly press the sleep/timer button (SLEEP/TIMER) on the remote control until the “OFF” is displayed. Turning off the system also cancels the sleep timer. Setting the Daily on Timer You can use the setting timer to make the unit automatically turn on at a certain time everyday from standby. -
Page 24: Maintenance
Maintenance Cleaning the Unit Ensure the unit is fully unplugged from the mains socket before cleaning. • To clean the unit, wipe the case with a slightly moist, lint-free cloth. • Do not use any cleaning fluids containing alcohol, ammonia or abrasives. •... -
Page 25: Troubleshooting
Troubleshooting If you are having a problem with your system, check this list for a possible solution before calling for service. If you cannot solve the problem from the hints given here, or the system has been physically damaged, call a qualified person, such as your dealer, for service. Symptom Possible Cause Action... -
Page 26: Specifications
Specifications AX-M76E Model System Specification Power Requirements AC 230V/50Hz FM Tuning Range 87.5~108 MHz Power Consumption 60W (ECO standby <0.5W) Output Power 45W x 2 ≤ 0.7% Dimensions (CD) 218(W) x 75(H) x 225(D) mm (Amplifier) 218(W) x 80(H) x 215(D) mm... - Page 28 Importer: Elkjøp, Solheimsveien 6-8, PB 153, NO 1471 Lørenskog, Norge Norge: 815 32 000 Sverige: 0771 115 115 Danmark: 70 80 70 70 Suomi: 020321321 Manufacturer: Hitachi Europe Ltd., Whitebrook Park, Lower Cookham Road, Maidenhead, Berkshire SL6 8YA U.K. IB-AX-M76E-GB-130802V5...