Table of Contents
Advertisement
TopPage
[1]
PRODUCT OUTLINE . . . . . . . . . . . . . . . . . . . . . . . . . . . . . . . . . . . . . . . . . . . . . . . 1-1
[2]
SPECIFICATIONS . . . . . . . . . . . . . . . . . . . . . . . . . . . . . . . . . . . . . . . . . . . . . . . . . 2-1
[3]
CONSUMABLE PARTS . . . . . . . . . . . . . . . . . . . . . . . . . . . . . . . . . . . . . . . . . . . . . 3-1
[4]
EXTERNAL VIEW AND INTERNAL STRUCTURE . . . . . . . . . . . . . . . . . . . . . . . . 4-1
[5]
ADJUSTMENTS . . . . . . . . . . . . . . . . . . . . . . . . . . . . . . . . . . . . . . . . . . . . . . . . . . . 5-1
[6]
SIMULATION . . . . . . . . . . . . . . . . . . . . . . . . . . . . . . . . . . . . . . . . . . . . . . . . . . . . . 6-1
[7]
TROUBLESHOOTING . . . . . . . . . . . . . . . . . . . . . . . . . . . . . . . . . . . . . . . . . . . . . . 7-1
[8]
FIRMWARE UPDATE . . . . . . . . . . . . . . . . . . . . . . . . . . . . . . . . . . . . . . . . . . . . . . . 8-1
[9]
MAINTENANCE . . . . . . . . . . . . . . . . . . . . . . . . . . . . . . . . . . . . . . . . . . . . . . . . . . . 9-1
[10] DISASSEMBLY AND ASSEMBLY . . . . . . . . . . . . . . . . . . . . . . . . . . . . . . . . . . . . 10-1
[11] OPERATIONAL DESCRIPTIONS. . . . . . . . . . . . . . . . . . . . . . . . . . . . . . . . . . . . . 11-1
[12] ELECTRICAL SECTION. . . . . . . . . . . . . . . . . . . . . . . . . . . . . . . . . . . . . . . . . . . . 12-1
[13] OTHERS . . . . . . . . . . . . . . . . . . . . . . . . . . . . . . . . . . . . . . . . . . . . . . . . . . . . . . . . 13-1
Parts marked with "
" are important for maintaining the safety of the set. Be sure to replace these parts with
specified ones for maintaining the safety and performance of the set.
SERVICE MANUAL
DIGITAL FULL COLOR
MULTIFUNCTIONAL SYSTEM
MX- C250/C250E
MX- C250F/C250FE
MX- C300F/C300W
MX- C300WE
MODEL
CONTENTS
SHARP CORPORATION
CODE: 00ZMXC250/S4E
This document has been published to be used
for after sales service only.
The contents are subject to change without notice.
Advertisement
Table of Contents
Troubleshooting

Related Manuals for Sharp MX-C250


Summary of Contents for Sharp MX-C250
-
Page 1: Table Of Contents
" are important for maintaining the safety of the set. Be sure to replace these parts with specified ones for maintaining the safety and performance of the set. This document has been published to be used SHARP CORPORATION for after sales service only. The contents are subject to change without notice. - Page 2 CONTENTS NOTE FOR SERVICING SIMULATION 1. Precautions for servicing ......i 1. General and purpose ......6-1 2.
-
Page 3: Note For Servicing
Do not install the machine at the following sites. The machine has got sharp edges inside. Be careful not to Place of high temperature, high humidity, low tempera- damage fingers when servicing. - Page 4 If there are optional paper desks and the copier desks speci- fied, it is recommendable to use them. When using the optional desk, be sure to fix the adjuster and lock the casters. MX-C250 NOTE FOR SERVICING - ii...
- Page 5 Be careful not to attach fingerprints, oil, grease, or other for- eign material on the transfer belt and the transfer roller. (Developer unit) Be careful not to attach fingerprints, oil, grease, or other for- eign material on the developer unit. MX-C250 NOTE FOR SERVICING - iii...
-
Page 6: Product Outline
RSPF *The same speed in both Color/Monochrome. The same speed in both A4/LTR. 3. Option list Model Name Model name MX-C250, MXC250E, MX-C250F, MX-C250FE, MX-C300E, MX-C300F, MX- C300W, MX-C300WE Feeding equipment 500-SHEET Paper Feed Unit MX-CS11 Sharpdesk 1 License Kit... -
Page 7: Specifications
Lead edge/Rear edge total : 8mm or less RSPF (default) (default) FRONT/REAR total : 8mm or less Transmission Resolution Refer to Image Transmission Feature. Image loss Lead edge/Rear edge/Front/Rear:4mm or less (dpi) Exposure Lamp * No margin print function not provided. MX-C250 SPECIFICATIONS 2 – 1... - Page 8 Type of document that may with cut or paste, document printed with ink not be used ribbon, and perforated document except for the document having wide width for 2 holes, 3 holes, or 4 holes MX-C250 SPECIFICATIONS 2 – 2...
- Page 9 Tab Paper Glossy Paper User Setting 1-7 Envelope Type Type Size Monarch 98x191 Com10 105x241 110x220 162x229 Custom Size AB System (mm) Inch System (inch) Min. Max. Min. Max. 5_1/2 Multi Bypass Tray 3_5/8 8_1/2 MX-C250 SPECIFICATIONS 2 – 3...
- Page 10 Multi Bypass Tray 3_5/8 8_1/2 I. Operation panel Form LCD with backlight Color Monochrome Number of display dots 192x73 dots LCD driving display area (WxD) 63 x 65mm LCD Backlight White LED LCD Contrast adjustment Angle/position adjustment MX-C250 SPECIFICATIONS 2 – 4...
-
Page 11: Copy Functions
CD-ROM X 10.2 X 10.3 X 10.4 CD-ROM X 10.5 CD-ROM Web*2 X 10.6 CD-ROM Web*2 X 10.7 CD-ROM Web*2 X 10.8 CD-ROM Web*2 *1: For fax model only *2: Timing is to be determined MX-C250 SPECIFICATIONS 2 – 5... -
Page 12: Scanner/Fax Function
USER / ABCD / EFGHI / JKLMN / OPQRST / UVWXYZ) One-touch key Group dial Redial Last destination only, one-address only) Selection from the LDAP server USB memory Scan Chain Dial Yes (by the Pause key) MX-C250 SPECIFICATIONS 2 – 6... - Page 13 Dual Page Scan send The sender name is added to the inbounding file name Combined pages send Information about the MFP that transfers the data is added Divide send by size limit to the transferred data MX-C250 SPECIFICATIONS 2 – 7...
-
Page 14: Report/List Function
Recovery time from Pre-heat 10sec 10sec Polling Memory Send mode Sleep mode transition time 15min 15min Polling Memory Reception Confidential Send Recovery time from Sleep 20sec 20sec mode Confidential Reception Relay Broadcast transmission request Relay Broadcast Send MX-C250 SPECIFICATIONS 2 – 8... -
Page 15: Dimensions And Weight
Outer dimensions (WxDxH) 98mm 421mm Full dimensions of the main unit 640mm 640mm Weight Main unit MX-C250/ (developer and E:27.3kg C300E:28.1kg toner cartridge MX-C250F/ MX-C300F/W/ included) FE:27.5kg WE:28.3kg Ambient conditions Humidity (RH) 10°C 30°C 35°C Temperature MX-C250 SPECIFICATIONS 2 – 9... -
Page 16: Consumable Parts
Toner Cartridge (Color) x1 MX-C30CT-C/M/Y Life: A4 5% document Develop Cartridge (Black) Develop Cartridge (Black) x1 MX-C30CV-B Develop Cartridge (Color) Develop Cartridge (Color) x1 MX-C30CV-C/M/Y BK : 75K Drum Cartridge Drum Cartridge x1 MX-C30DR CL : 45K MX-C250 CONSUMABLE PARTS 3 – 1... -
Page 17: Maintenance Parts List
To check the developer/drum life, use SIM22-01. Oversea (Except China) China Rotations 575k 575k Total Prints (Std) 75k(BK) / 45k(CL) Total Prints (Max) 75k(BK) / 45k(CL) MX-C250 CONSUMABLE PARTS 3 – 2... -
Page 18: Production Number Identification
B. Developing unit : Unit code/Model name : Color code (Black: BK /Cyan: CY /Magenta: MA /Yellow: YE) : Destination : Skating : Production place : Production date (YYYYMMDD) : Serial number : Version MX-C250 CONSUMABLE PARTS 3 – 3... -
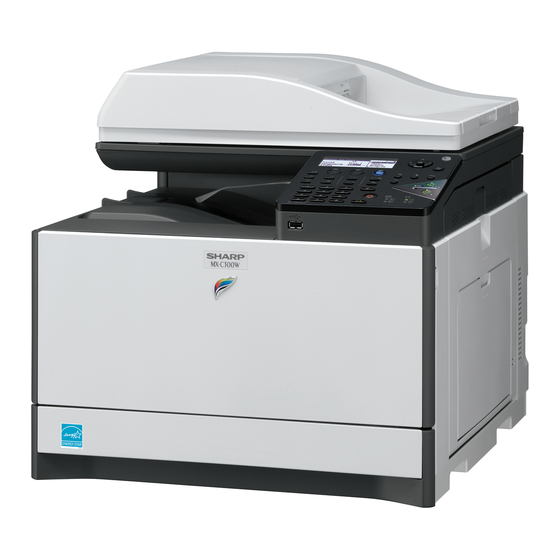
Page 19: External View And Internal Structure
Connect to your computer to this port to use the printer and scanner functions. LAN connector Connect the LAN cable to this connector when the machine is used on a network. Bypass tray extension Open this tray when loading paper in the bypass tray. MX-C250 EXTERNAL VIEW AND INTERNAL STRUCTURE 4 – 1... -
Page 20: B. Document Feeder And Document Glass
Roller rotating knob Rotate to remove misfed paper. Paper tray right side cover Open this to remove a paper misfeed in trays. Duplex conveyor cover Open this cover to remove a misfeed. MX-C250 EXTERNAL VIEW AND INTERNAL STRUCTURE 4 – 2... -
Page 21: C. Operation Panel
Blinks when a fax cannot be printed because there is no paper or otherwise. Lights steadily when there is an unsent fax. Printer mode indicators ONLINE indicator Print data cannot be received when this lamp is lit. DATA indicator Blinks when print data is being received. Lights steadily during printing. MX-C250 EXTERNAL VIEW AND INTERNAL STRUCTURE 4 – 3... -
Page 22: D. Operation Panel
Blinks when a fax cannot be printed because there is no paper. Lights steadily when there is an unsent fax. Printer mode indicators ONLINE indicator Print data cannot be received when this lamp is lit. DATA indicator Blinks when print data is being received. Lights steadily during printing. MX-C250 EXTERNAL VIEW AND INTERNAL STRUCTURE 4 – 4... -
Page 23: E.spf
Picks up a document and feeds it to the document feed roller. (2)Detector Signal name Name Type Function/Operation SPED Document sensor Light transmission Detects document empty SPPD1 Paper transport detector 1 Light transmission Detects paper pass MX-C250 EXTERNAL VIEW AND INTERNAL STRUCTURE 4 – 5... -
Page 24: F.rspf
Document transport sensor 1 Transmission type Detects paper pass. SPPD2 Document transport sensor 2 Transmission type Detects paper pass SPED Document sensor Transmission type Detects document empty in the RSPF paper feed tray. MX-C250 EXTERNAL VIEW AND INTERNAL STRUCTURE 4 – 6... -
Page 25: G. Sensor, Detector
Detects rotation and the phase of the OPC drum (CL). Detects toner supply from the toner cartridge. 13 TCS_C Toner sensor ( C ) Magnetic sensor Detects the toner density (C). MX-C250 EXTERNAL VIEW AND INTERNAL STRUCTURE 4 – 7... - Page 26 Non-contact thermistor Detects the surface temperature at the center section of the fusing roller. 24 TH_US Fusing temperature sensor (Sub) Thermistor Detects the surface temperature at the edge section of the fusing roller. MX-C250 EXTERNAL VIEW AND INTERNAL STRUCTURE 4 – 8...
-
Page 27: H. Switch
LSU laser. Detects open/close of the front door. Opens/closes the power lines of the DSW_F Front door open/close switch Micro switch fusing section, the motors, and the LSU laser. MX-C250 EXTERNAL VIEW AND INTERNAL STRUCTURE 4 – 9... -
Page 28: I. Clutches And Solenoids
13 SRVC Paper exit clutch Electromagnetic clutch Controls Up/Down of the paper exit roller of RSPF. 14 SPUS Paper feed roller solenoid Solenoid Controls Up/Down of the paper feed roller of RSPF. MX-C250 EXTERNAL VIEW AND INTERNAL STRUCTURE 4 – 10... -
Page 29: J. Motors
Polygon motor DC brush-less motor Drives the polygon mirrors to reflect the twin laser beams per color. Scans the laser beams with SCN motor NE Drives the CIS unit. Stepping Motor MX-C250 EXTERNAL VIEW AND INTERNAL STRUCTURE 4 – 11... -
Page 30: K. Rollers
Separation roller (Paper feed Apply the pressure to the paper feed roller in reverse direction and prevents the paper tray 1) from feeding it in layered condition. MX-C250 EXTERNAL VIEW AND INTERNAL STRUCTURE 4 – 12... -
Page 31: L. Lamps
Discharges electric charges on the OPC drum.(K) DL_C Discharge lamp(C) Discharges electric charges on the OPC drum.(C) DL_M Discharge lamp(M) Discharges electric charges on the OPC drum.(M) DL_Y Discharge lamp(Y) Discharges electric charges on the OPC drum.(Y) MX-C250 EXTERNAL VIEW AND INTERNAL STRUCTURE 4 – 13... -
Page 32: M. Fans And Filters
Ozone fan 1 Filters the ozone generated from the image process section. PSFM Power cooling fan motor Cools the power supply. Ozone Filter Absorbs ozone being discharged from the image process unit. MX-C250 EXTERNAL VIEW AND INTERNAL STRUCTURE 4 – 14... -
Page 33: N.pwb
Connects the network with the wireless connection. (Only wireless LAN model) 17 USB CN PWB Connects Wireless LAN PWB. (Only wireless LAN model) 18 USB I/F PWB Connects with the USB port on the front of the machine. MX-C250 EXTERNAL VIEW AND INTERNAL STRUCTURE 4 – 15... -
Page 34: O. Fuses/Thermostats
AC/DC power PWB F7002 Fuse AC250V 20A AC/DC power PWB F7003 Fuse AC250V T4AH AC/DC power PWB F7004 Fuse AC250V T2AL AC/DC power PWB F7201 Fuse DC450V 3.15A AC/DC power PWB MX-C250 EXTERNAL VIEW AND INTERNAL STRUCTURE 4 – 16... -
Page 35: Adjustments
RSPF mode (Copy/Scan/FAX) density adjustment (No need to adjust 46-9 normally) Automatic color balance adjustment by the user (Color balance automatic 26-53 adjustment ENABLE setting and adjustment) Copy gamma, color balance adjustment for each dither (Automatic 46-54 adjustment) MX-C250 ADJUSTMENTS 5 – 1... -
Page 36: Details Of Adjustment
2 M_GB_C C charging/grid bias set 150 - 850 value at middle speed 3 M_GB_M M charging/grid bias set 150 - 850 value at middle speed MX-C250 ADJUSTMENTS 5 – 2... - Page 37 This adjustment is needed in the following situations: * When the high voltage PWB is replaced. * U2 trouble has occurred. Enter the SIM 8-6 mode. Sim08-06 THV OUTPUT 1. TC1 2. TC2 3. TC2 CLEAN MX-C250 ADJUSTMENTS 5 – 3...
- Page 38 The color image density sensor detects color image density and image registration on front frame side, the black image density sensor detects black image density and image reg- istration on rear frame side. That is, two functions is assigned to each one sensor. MX-C250 ADJUSTMENTS 5 – 4...
-
Page 39: Lsu Unit
* When the primary transfer unit is replaced. 12 P_R BELT MIN Minimum value of belt base detection level The image skew adjustment (LSU unit) is performed by changing the parallelism of the LSU unit scan laser beams for the OPC drum. MX-C250 ADJUSTMENTS 5 – 5... - Page 40 0326FCZZ/UKOG-0326FC11) by folding the chart in half, and check that they are proper. [Check with the servicing color test chart (UKOG-0326FCZZ/ UKOG-0326FC11)] In the copy color balance check with the servicing color test chart, check to insure the following conditions. MX-C250 ADJUSTMENTS 5 – 6...
- Page 41 Registrations (one point for the main scanning, and one Color texts are clearly reproduced. point for the sub scanning) are not shifted. The background density is not so light. The resolution of 5.0 can be seen. MX-C250 ADJUSTMENTS 5 – 7...
- Page 42 When using the servicing color test chart, fold or separate the There are no white and black streaks. chart. The background density is not so light. There are 8 void areas. The black low-density gradation is copied slightly. MX-C250 ADJUSTMENTS 5 – 8...
- Page 43 Execute SIM50-22 to check to confirm that C, M, and Y (SKEW) result in "OK" being displayed on the operation panel. Image registration adjustment is done automatically and SKEW _C, M, Y value is displayed. MX-C250 ADJUSTMENTS 5 – 9...
- Page 44 "0" as the center reference, and check the bal- ance in shifts of the color image line positions in the positive and the negative directions. The balance in the R side must be the same as that in the F side. MX-C250 ADJUSTMENTS 5 – 10...
- Page 45 * After performing this adjustment, perform SIM50-22 image regis- tration adjustment. * When the LSU (writing) unit is replaced. * When each unit is replaced or fixed. * When the void amount is changed by the maintenance MX-C250 ADJUSTMENTS 5 – 11...
- Page 46 Rear edge void area More than 2.0mm less than 3.5mm MAIN- Printing off center adjustment 1 - 99 (total of X/Y is less than 8.0mm) value (ADU) FRONT/REAR void total of less than +/- 8.0mm area MX-C250 ADJUSTMENTS 5 – 12...
- Page 47 Then, press [EXECUTE] key. The adjustment pattern is printed. Repeat procedures 3) - 6) until the conditions of procedure 5) are satisfied. Check that the adjustment pattern image is printed in the cor- rect position. MX-C250 ADJUSTMENTS 5 – 13...
- Page 48 * When the developing unit or the OPC drum unit is removed from SKEW_K -99.9 - 99.9 (Cyan) the machine. Print skew amount calculation result SKEW_C -999 - 999 (Cyan) Print skew amount calculation result SKEW_C(DIF) (Cyan) (Difference from the previous -1999 - 1999 adjustment value) MX-C250 ADJUSTMENTS 5 – 14...
- Page 49 (Yel- low laser writing position R side) OPC drum phase adjustment value PHASE 0 - 359 (BK to CL) OPC drum phase adjustment value PHASE before 0 - 359 (BK to CL) MX-C250 ADJUSTMENTS 5 – 15...
- Page 50 Measure the slant (skew) of the vertical side for the horizontal side of paper as shown in the figure. If the above distance is 0.5mm or less, there is no need to adjust. If the above condition is not satisfied, perform the following procedure. MX-C250 ADJUSTMENTS 5 – 16...
- Page 51 The verti- obtained. cal direction in the above figure is that in the main scanning direction, and the horizontal direction is that in the sub scan- ning direction. MX-C250 ADJUSTMENTS 5 – 17...
- Page 52 If shift is in the arrow mark X2 and Y2, decrease the adjust- (Cyan laser writing position R side) ment value. Registration adjustment value sub REGIST_SUB_ (Reference adjustment value) scanning direction (Magenta drum -> 1.0 - 199.0 Black drum) MX-C250 ADJUSTMENTS 5 – 18...
- Page 53 This adjustment must be performed in the following cases: * When the copy magnification ratio in the copy image main scan- ning direction is not properly adjusted. * When the scanner motor is replaced. * U2 trouble has occurred. MX-C250 ADJUSTMENTS 5 – 19...
- Page 54 When the adjustment value is increased, the copy magnifica- tion ratio in the sub scanning direction is increased. When the adjustment value is changed by 1, the copy magnifi- cation ratio is changed by about 0.1%. MX-C250 ADJUSTMENTS 5 – 20...
- Page 55 * When U2 trouble occurs. SCAN sub scanning mag- CIS(SUB) nification ratio adjustment 1 - 99 * When the copy magnification ratio of the RSPF mode copy (CIS) image in the sub scanning direction is not proper. MX-C250 ADJUSTMENTS 5 – 21...
- Page 56 Make a copy of the adjustment chart (made by yourself) in the * When the scanner (reading) section is replaced. adjustment mode (document table). * When U2 trouble occurs. * When the RSPF section is disassembled. * When the RSPF unit is replaced. MX-C250 ADJUSTMENTS 5 – 22...
- Page 57 SPF front surface image off- 1 - 99 plate. center adjustment SPF back surface image off- Place white paper on the document table so that the scale lead SPF(REAR) 1 - 99 center adjustment edge can be seen. MX-C250 ADJUSTMENTS 5 – 23...
- Page 58 +/- 1.0mm 1 to 99 adjustment Image loss REAR area adjustment adjustment Side image Off-cen- OFFSET_ OC document off- SIDE loss 0 - 99 ter adjust- 1 to 99 +/- 1.0mm center adjustment adjustment ment MX-C250 ADJUSTMENTS 5 – 24...
- Page 59 Set the lead edge image loss adjustment values (LEAD EDGE (SIDE1/SIDE2) on the front surface and the back surface to the following values. (Standard set value) TRAIL EDGE (SIDE 1): 40 Lead edge image loss set value (Front surface) MX-C250 ADJUSTMENTS 5 – 25...
- Page 60 (Since the following items affect the color balance/density If the above condition is not satisfied, perform the following directly, they must be adjusted or set before execution of the procedure. image quality adjustments.) The following adjustment items must be adjusted properly. MX-C250 ADJUSTMENTS 5 – 26...
- Page 61 Make a copy of the gray test chart (UKOG-0162FCZZ) and a copy of the servicing color test chart (UKOG-0326FCZZ/UKOG- 0326FC11), and check that they are proper. a. Note for execution of the color balance and density check in the color copy mode MX-C250 ADJUSTMENTS 5 – 27...
- Page 62 There are no white and black streaks. There are 8 void areas. Color texts are clearly reproduced. Registrations (one point for the main scanning, and one point The background density is not so light. for the sub scanning) are not shifted. MX-C250 ADJUSTMENTS 5 – 28...
- Page 63 When using the servicing color test chart, fold or separate the There are no white and black streaks. chart. The background density is not so light. There are 8 void areas. The black low-density gradation is copied slightly. MX-C250 ADJUSTMENTS 5 – 29...
- Page 64 If the SIT chart is not available, execute SIM 63-5 to set the CIS gamma to the default. In this case, however, the adjust- ment accuracy is lower when compared with the adjustment method using the SIT chart. MX-C250 ADJUSTMENTS 5 – 30...
- Page 65 The color balance adjustment (automatic adjustment) is used to adjust the copy/printer density of each of Cyan, Magenta, Yellow, and Black automatically. When this adjustment is executed, the color balance adjustments of all the copy/printer modes are revised. MX-C250 ADJUSTMENTS 5 – 31...
- Page 66 The high density process control is performed, and the color Sim46-24 ENG HT AUTO ADJ patch image (adjustment pattern) is printed out. (A4/11" x 8.5" paper is automatically selected.) Sim46-24 ENG HT AUTO ADJ EXEC Press OK Key EXEC Press OK Key MX-C250 ADJUSTMENTS 5 – 32...
- Page 67 The initial setting of the halftone image correction is per- If the color balance is improper, execute the automatic color bal- formed. ance adjustment in advance, and execute this adjustment for better The halftone image correction is performed. efficiency. MX-C250 ADJUSTMENTS 5 – 33...
- Page 68 Adjustment procedure MX-C250 ADJUSTMENTS 5 – 34...
- Page 69 Make a copy of the servicing color test chart (UKOG- 0326FCZZ/UKOG-0326FC11) and a user's document accord- ing to necessity in the normal copy mode, the text/Printed Photo mode (Manual) to check the adjustment result. (Refer to the item of the copy color balance/density check.) MX-C250 ADJUSTMENTS 5 – 35...
- Page 70 If the copy color balance and density are not adjusted to the specified level, there may be another cause. Troubleshoot the cause, and repair or perform proper treat- ments, and try all the procedures of the print image adjustment from the beginning. MX-C250 ADJUSTMENTS 5 – 36...
- Page 71 Gamma default setting for the copy mode 46-52 heavy paper and the image process mode (dither) Used to reset the copy color balance adjust- 46-54 ment (auto adjustment for each dither) *1: Only the changed scanner target value is related. MX-C250 ADJUSTMENTS 5 – 37...
- Page 72 * When there is necessity to change the density gradient of the copy by each the copy mode individually. * When there is necessity to change all copy density by each the copy mode individually. MX-C250 ADJUSTMENTS 5 – 38...
- Page 73 Display/Item Content Set value Default COLOR COPY AE reactive control 0 - 250 (COLOR COPY) MONO COPY AE reactive control (MONO 0 - 250 COPY) AE reactive control (FAX) 0 - 250 MX-C250 ADJUSTMENTS 5 – 39...
- Page 74 * When there is request from the user. * When the RSPF unit is disassembled. a. Adjustment procedure * The CIS unit has been replaced. Enter the SIM 46-23 mode. * U2 trouble has occurred. * When the MFP PWB is replaced. MX-C250 ADJUSTMENTS 5 – 40...
- Page 75 2) on the document table so that the tint color on the printed patch image (adjustment pattern) are on the left side. Place 5 sheets of white paper on the printed patch image (adjustment pattern). MX-C250 ADJUSTMENTS 5 – 41...
- Page 76 Adjustment value can be set in the range of 1 to 255. When the auto color balance adjustment is done by SIM 46-24, The adjustment value in this mode becomes 128. Use SIM46-52 to reset the adjustment values to the default values. MX-C250 ADJUSTMENTS 5 – 42...
- Page 77 A. Sim67-34 PRT MAX DENSITY Normally, the hole on the fusing paper guide standard fixing position is used to fix the fusing paper guide. 1: CMY PROIBIT _ 0_ 2: K PROHIBIT MX-C250 ADJUSTMENTS 5 – 43...
-
Page 78: Simulation
CAUTION: Do not turn OFF the power when the machine is in the simulation mode. If the power switch should be turned OFF in the simula- tion mode, a malfunction may result. In this case, turn OFF/ON the main power source. MX-C250 SIMULATION 6 – 1... - Page 79 In the power OFF/ON type <Exclusion type> simulation, OFF/ON You have to exit message is simulation mode displayed by the before entering into SYSTEM this mode for self SETTINGS key. printing type. If there is no item. MX-C250 SIMULATION 6 – 2...
-
Page 80: List Of Simulation Codes
Developing/Transfer/Cleaning) matic adjustment) Used to display the operation data of the toner supply quantity. (Not used in the market.) Process Used to display the toner density correction data. (Not used in the market.) Process MX-C250 SIMULATION 6 – 3... - Page 81 Used to set the development bias correction level in the continuous printing operation. Used to display the identification information of the developing unit. Developing system Used to set the calibration data of the color image sensor (image registration sensor F). MX-C250 SIMULATION 6 – 4...
- Page 82 Test print. (Self print) (Color mode) Test print. (Self print) (Monochrome mode) Printer test print. (Self print) Printer test print. (Self print) (PCL) Printer test print. (Self print) (PS) Used to set the display of key standby time. MX-C250 SIMULATION 6 – 5...
- Page 83 Used to adjust the density in the low density section. Printer Used to reset the printer color balance adjustment (adjustment for each dither) to the default value. (The set values of SIM67-33 are set to the default values.) MX-C250 SIMULATION 6 – 6...
-
Page 84: Details Of Simulation
Color 600DPI Single MONO300S Monochrome 300DPI Single MONO600S Monochrome 600DPI Single RSPF COLOR300S Color 300DPI Single COLOR600S Color 600DPI Single MONO300D Monochrome 300DPI duplex MONO600D Monochrome 600DPI duplex COLOR300D Color 300DPI duplex COLOR600D Color 600DPI duplex MX-C250 SIMULATION 6 – 7... - Page 85 Turn on RGB mixed color light- chrome Operation/Procedure COLOR Turn on the lamp for color Turn on RGB color lighting in 1) Select the item to be operation checked with 10 keys.. order. 2) Press [OK]/[START] key. MX-C250 SIMULATION 6 – 8...
- Page 86 The aging operation condition set by this mode is maintained here- after unless the power is turned off or the setting is changed. Setting Setting Item/Display Content range value AGING Aging operation setup INTERVAL Intermittent setup MISFEED JAM detection enable/disable DISABLE setup MX-C250 SIMULATION 6 – 9...
- Page 87 M GB_K K grid bias set value at middle speed 150-850 M GB_C C grid bias set value at middle speed 150-850 M GB_M M grid bias set value at middle speed 150-850 MX-C250 SIMULATION 6 – 10...
- Page 88 Operation/Procedure of the target color. 1) Press [OK]/[START] key to execute cancellation of the trouble. TNM_K Toner motor K TNM_C Toner motor C TNM_M Toner motor M MX-C250 SIMULATION 6 – 11...
- Page 89 Other Function (Purpose) Used to output various adjustment/setting Color other coun- OTHER (COL) Self print quantity data (simulations, FAX soft switch counter), the firmware version, the counter list and the process control data. Section MX-C250 SIMULATION 6 – 12...
- Page 90 Number of day that used Fusing MX-C250FE unit MACHINE MX-C300 Main unit FUS UNIT LIFE Fusing unit life meter MX-C300E FUS UNIT Fusing unit remaining day MX-C300F REMAINDER MX-C300W MX-C300WE STANDARD Reversing single pass feeder NONE/STAN- DARD STANDARD MX-C250 SIMULATION 6 – 13...
- Page 91 Developer cartridge life meter (Y) OZONE FILTER Number of day that used Toner car- DV CTRG(Y) Developer cartridge remaining tridge REMAINDER day(Y) OZONE FILTER Ozone filter life meter LIFE OZONE FILTER Toner cartridge remaining day REMAINDER MX-C250 SIMULATION 6 – 14...
- Page 92 (After completion of mainte- nance, clear the counters.) Section Operation/Procedure 1) Select the item to be cleared with 10 keys. 2) Press [OK]/[START] key. 3) Press [OK]/[START] key. MX-C250 SIMULATION 6 – 15...
- Page 93 1) Select the item to be cleared with 10 keys. PRINT FAX Print quantity counter 2) Press [OK]/[START] key. 3) Press [OK]/[START] key. The target counter is cleared. NOTE: When SIM22-1 is executed, this counter is also cleared automatically. MX-C250 SIMULATION 6 – 16...
- Page 94 207. The sensor output level is higher then 177, EE-EU EU error or the control voltage level is lower than 52. EE-EC EC error The sensor output level is out of 128+/- 3. MX-C250 SIMULATION 6 – 17...
- Page 95 (middle speed) Current TSG cumulative drive area TSG_ENV correction value (middle speed) DELTA_TSG Average coverage area DELTA_TSG Operation voltage correction value Operation voltage target value (Mid- TSG_TOTAL dle speed) TCS_AVE. Toner sensor output average value MX-C250 SIMULATION 6 – 18...
- Page 96 The selected set content is saved. Default Item Display Content value Copy toner save mode is inhibited. COPY Copy toner save mode is allowed Printer toner save mode is inhib- ited. PRINT Printer toner save mode is allowed. MX-C250 SIMULATION 6 – 19...
- Page 97 The selected set content is saved. Setting Item Display Content range Print Enable/Disable setting when the maintenance timing is M LIFE OVER over (Print Continue) (0: CONTINUE Print Enable/Disable setting 1: STOP) when the maintenance timing is over (Print Stop) MX-C250 SIMULATION 6 – 20...
- Page 98 2 (Machine Stop) U.K. 0 (Displayed) 0 (Displayed) 2 (Machine Stop) AUS. 0 (Displayed) 0 (Displayed) 2 (Machine Stop) AB_A 0 (Displayed) 0 (Displayed) 2 (Machine Stop) CHINA 0 (Displayed) 0 (Displayed) 1 (Not Stop) MX-C250 SIMULATION 6 – 21...
- Page 99 TONER DELIVERY 0 - 1 0: Comprehensive transport off Setting of toner comprehensive transport CONTROL 1: Comprehensive transport on TONER DELIVERY 1 - 15 The threshold setting of toner comprehensive transport INTERVAL MX-C250 SIMULATION 6 – 22...
- Page 100 1) Enter the set value with 1 keys. 2) Press [OK]/[START] key. The set value in step 1) is saved. Display Contents Setting range MAINTE- Maintenance alert trans- 0 - 1 NANCE ALERT mission permission setting MX-C250 SIMULATION 6 – 23...
- Page 101 Heater lamp upper TH_LM Fusing lower thermister (main) HL_LM Heater lamp lower TH_E Fusing thermister (external heat roller) HL_E Heater lamp (external heat roller) Group Destination Group A Japan China AB_B Group B U.S.A. Canada Inch MX-C250 SIMULATION 6 – 24...
- Page 102 Fusing lower thermister (main) HL_LM Heater lamp lower TH_E Fusing thermister (external heat roller) HL_E Heater lamp (external heat roller) Group Destination Group A Japan China AB_B Group B U.S.A. Canada Inch Group C Europe U.K. AB_A MX-C250 SIMULATION 6 – 25...
- Page 103 Fusing lower thermister HL_LM Heater lamp lower TH_E Fusing thermister (external heat roller) HL_E Heater lamp (external heat roller) Group Destination Group A Japan China AB_B Group B U.S.A. Canada Inch Group C Europe U.K. AB_A MX-C250 SIMULATION 6 – 26...
- Page 104 Fusing lower thermister HL_LM Heater lamp lower TH_E Fusing thermister (external heat roller) HL_E Heater lamp (external heat roller) Group Destination Group A Japan China AB_B Group B U.S.A. Canada Inch Group C Europe U.K. AB_A MX-C250 SIMULATION 6 – 27...
- Page 105 Fusing lower thermister HL_LM Heater lamp lower TH_E Fusing thermister (external heat roller) HL_E Heater lamp (external heat roller) Group Destination Group A Japan China AB_B Group B U.S.A. Canada Inch Group C Europe U.K. AB_A MX-C250 SIMULATION 6 – 28...
- Page 106 Fusing lower thermister HL_LM Heater lamp lower TH_E Fusing thermister (external heat roller) HL_E Heater lamp (external heat roller) Group Destination Group A Japan China AB_B Group B U.S.A. Canada Inch Group C Europe U.K. AB_A MX-C250 SIMULATION 6 – 29...
- Page 107 Fusing lower thermister HL_LM Heater lamp lower TH_E Fusing thermister (external heat roller) HL_E Heater lamp (external heat roller) Group Destination Group A Japan China AB_B Group B U.S.A. Canada Inch Group C Europe U.K. AB_A MX-C250 SIMULATION 6 – 30...
- Page 108 / disenable setting P_R_GRND F sensor basis material reading abnor- mality Control the detection of TN EMP toner drop amount when REG_F_LED_ADJ Registration sensor F adjustment abnor- installed new cartridge mality enable / disenable setting MX-C250 SIMULATION 6 – 31...
- Page 109 M high density process control abnormality Simplified process control half- 1 - 255 Y_HV _ERR Y high density process control abnormality K_HT TARGET tone-patch transition judgment LOWER 1 to high density process control TIMEOUT_ERR Time out lower limitation 1 (K-patch) MX-C250 SIMULATION 6 – 32...
- Page 110 GB Y TN HUD play humidity AD 0 - 1023 DATA value OTHER 1/21 TC TMP Transfer display 1 - 9 AREA temperature area Transfer display TC TMP temperature AD 0 - 1023 DATA value MX-C250 SIMULATION 6 – 33...
- Page 111 EV M MD M low speed MD M REV EV REV LD 7/21 EV L MD Y 13/21 MD Y REV EV REV LD EV M MD Y MD Y REV EV REV LD EV L MX-C250 SIMULATION 6 – 34...
- Page 112 0 - 255 REV DL GET(K) target density EV L level (K) 19/21 MD Y Development REV DL ADK_CL( characteristics -999 - 999 EV M gradient coeffi- MD Y cient (C) REV DL EV L MX-C250 SIMULATION 6 – 35...
- Page 113 0 - 255 process control 0 - 255 patch data 2_C3 patch data 1_C1 High density High density process control 0 - 255 process control 0 - 255 patch data 2_C4 patch data 1_C2 MX-C250 SIMULATION 6 – 36...
- Page 114 0 - 255 0 - 255 patch data patch data 3_M1 4_M3 High density High density process control process control 0 - 255 0 - 255 patch data patch data 3_M2 4_M4 MX-C250 SIMULATION 6 – 37...
- Page 115 CYCL Purpose control when recovered from power ON, preheating / 0 - 255 sleep mode. Function (Purpose) Used to display the output level of the tem- perature and humidity sensor. Process (OPC drum, development)/Fusing/ Section MX-C250 SIMULATION 6 – 38...
- Page 116 Automatic calibration reference value tone process control. Automatic calibration reference value (half CALIB VALUE PRC Process Section tone process control) Operation/Procedure 1) Press [OK]/[START] key. The correction data of the half tone process control are cleared. MX-C250 SIMULATION 6 – 39...
- Page 117 Inhibit the previous density correction. Key operation dis- play REFRESH Select of YES/NO of the manual pro- 0 - 1 MODE(*1) cess control key with key operation Key operation NO display MX-C250 SIMULATION 6 – 40...
- Page 118 RG_PERM_TIMER Span setting from execution Disable to Enable 0 - 15 (HOUR) ting RG_HOUR_TIMER Span setting of timer execution 0-15 (Above)+(MINUTE) RG_BW_SYNC Setting of Enable/Disable of the registration adjustment after a monochrome job MX-C250 SIMULATION 6 – 41...
- Page 119 MC bias correction in the M color developing unit identifica- MUL_MC_ADJ continuous printing is DVCH_AD_M 0 - 255 tion number AD value enabled / disabled. Y color developing unit identification DVCH_AD_Y 0 - 255 number AD value MX-C250 SIMULATION 6 – 42...
- Page 120 PRINTED 1 - 99 copy) text/printed many monochrome jobs.) PHOTO photo The process control is executed in Exposure adjust- NOR- PHOTO- the normal frequency. ment (monochrome 1 - 99 GRAPH copy) photograph MX-C250 SIMULATION 6 – 43...
- Page 121 TEXT/ ment (monochrome DESTINATION Destination setting (0 : PRINTED 1 - 99 scanner)) text/printed MODE Japan, 1 : Overseas) PHOTO photo LOW Exposure adjust- PHOTO- ment (monochrome 1 - 99 GRAPH scanner)) photo- graph LOW MX-C250 SIMULATION 6 – 44...
- Page 122 MAGENTA maximum 0 - 999 TARGET TEXT PRT(SLOPE) Character edge / photo density correction mode gamma skew TEXT PRT (INTER- Scanner target value for YELLOW MAX adjustment CEPT) YELLOW maximum 0 - 999 TARGET density correction MX-C250 SIMULATION 6 – 45...
- Page 123 When the adjustment value of item 1 is increased and Adjustment/Setup Purpose the adjustment value of item 2 is decreased, the copy density is Function (Purpose) Used to adjust the FAX send image density. decreased. (Fine) Section MX-C250 SIMULATION 6 – 46...
- Page 124 HEAVYPAPER M Copier heavy paper M 3) Press [OK]/[START] key. HEAVYPAPER Y Copier heavy paper Y The color balance adjustment is automatically performed. DITHER1 K Color error diffusion K DITHER1 C Color error diffusion C MX-C250 SIMULATION 6 – 47...
- Page 125 1 - 99 (Main scan) RSPF document front sur- SPF (SUB) face magnification ratio 1 - 99 (Sub scan) RSPF document back sur- SPFB (MAIN) face magnification ratio 1 - 99 (Main scan) MX-C250 SIMULATION 6 – 48...
- Page 126 FRONT/REAR void 1 - 99 REAR area adjustment Off-center OFSET_ OC document off- 1 - 99 adjustment center adjustment Magnifica- SCAN_ SCAN sub scanning tion ratio cor- SPEED_ magnification ratio 1 - 99 rec-tion adjustment (CCD) MX-C250 SIMULATION 6 – 49...
- Page 127 Back surface doc- ument scan posi- Item 3 - 8: When the adjustment value is increased, the image loss SIDE2 1 - 99 tion adjustment is increased. (CIS) Item 1 - 8: 1 step = 0.1mm change MX-C250 SIMULATION 6 – 50...
- Page 128 1 - 99 UB_Y YELLOW Registration adjustment value OFFSET_M main scanning direction offset 1 - 99 AIN_Y_F value YELLOW (FRONT) Registration adjustment value OFFSET_M main scanning direction offset 1 - 99 AIN_Y_R value YELLOW (REAR) MX-C250 SIMULATION 6 – 51...
- Page 129 0 - 359 Print skew amount calculation result (BK to CL) SKEW_C(DIF) (Cyan) (Difference from the previous -1999 - 1999 OPC drum phase adjustment value adjustment value) PHASE before 0 - 359 (BK to CL) MX-C250 SIMULATION 6 – 52...
- Page 130 DATA_S AIN_K_ The pitch data number are Main UB_C_F There is no pitch data. F_any not the specified value. Sub scan- scanning _all 20 ning direc- direction tion CY F BK F side side MX-C250 SIMULATION 6 – 53...
- Page 131 _MAIN_ direction adjust- Y_R 107 YE F side Main ment error scanning Data num- direction ber error DATA_M YE R side AIN_Y_ There is no pitch data. Main R_all 85 scanning direction YE R side MX-C250 SIMULATION 6 – 54...
- Page 132 (After a job) range value POS LV RSPF front surface opti- 0 - 1 0:Weak MANUAL SPF reading position 0-99 mum scan position detec- 1:Middle ADJUST VALUE adjustment (Manula adjust- (0.1mm unit) tion level setting 2:Strong ment) MX-C250 SIMULATION 6 – 55...
- Page 133 When the laser power is increased, the print density is When the operation is completed normally, "COMPLETE" is increased and the line width of line images are increased. displayed. In case of an abnormal end, "ERROR" is displayed. MX-C250 SIMULATION 6 – 56...
- Page 134 DUTY select low (M) 1 BIT LOW(Y speed (Y) Laser DUTY 0 - 255 DUTY select mid- Laser DUTY 0 - 255 LOW(Y dle speed (Y) DUTY select low 1 BIT LOW(B speed (BW) MX-C250 SIMULATION 6 – 57...
- Page 135 3) Press [OK]/[START] key. The set value in step 2) is saved. 2) Press [OK]/[START] key. The print image skew adjustment pattern is printed. MX-C250 SIMULATION 6 – 58...
- Page 136 3) Press [OK]/[START] key. The set value in step 2) is saved. Item/Dis- Default Contents Range play value R-Ratio Red mixing ratio (R) 0-100 G-Ratio Green mixing ratio (G) 0-100 B-Ratio Blue mixing ratio (B) 0-100 MX-C250 SIMULATION 6 – 59...
- Page 137 16 gradations are printed. (16 x (Other dither) 16 patch print) Print is made from 255 grada- tions, and 0-254 gradations are printed. 4-point dot print (main scan) LSU-ASIC Slant line MX-C250 SIMULATION 6 – 60...
- Page 138 1/4 of the sub (sub scan) scanning paper size. All background Half tone (half tone) (MFP ASIC 256 gradations after pro- pattern cess) (Other dither) 4-point dot print (main scan) LSU-ASIC Slant line MX-C250 SIMULATION 6 – 61...
- Page 139 <Print pattern of Item A> Pattern No. Content 256 gradations pattern (COLOR) 256 gradations pattern (B/W) 256 gradations pattern (COLOR) (Y-M-C-K continuous) Half tone pattern (COLOR) Half tone pattern (B/W) 4-color background, dot print (Sub scanning) MX-C250 SIMULATION 6 – 62...
- Page 140 BW TONER SAVE Monochrome printing 0 - 1 0 (OFF) Black 0 - 1 Cyan 0 - 1 Magenta 0 - 1 Yellow 0 - 1 <Print pattern of Item A> Pattern No. Content COLOR Continuous COLOR,B/W MX-C250 SIMULATION 6 – 63...
- Page 141 Operation panel section Section Operation/Procedure 1) Select an item to be set with Arrow keys. 2) Enter the set value with 10 keys. 3) Press [OK]/[START] key. The set value in step 2) is saved. MX-C250 SIMULATION 6 – 64...
- Page 142 01011001 Section Belgium 00001111 Operation/Procedure Luxembourg 01101001 1) When the machine enters Simulation 66-08, the following Netherlands 01111011 screen is displayed. Finland 00111100 2) Select an item to be set with 10 keys. Sweden 10100101 MX-C250 SIMULATION 6 – 65...
- Page 143 Purpose Function (Purpose) Used to send the DTMF signal to the line and the speaker. Section Operation/Procedure 1) Select an item to be set with 10 keys. 2) Determine the setting values with [OK]/[START] key. MX-C250 SIMULATION 6 – 66...
- Page 144 Range Default Default value value POINT1 Point 1 0 - 255 POINT2 Point 2 0 - 255 POINT3 Point 3 0 - 255 POINT4 Point 4 0 - 255 POINT5 Point 5 0 - 255 MX-C250 SIMULATION 6 – 67...
- Page 145 CMY engine highest 1: DISABLE) density correction mode : Disable K engine highest density correction K PROHIBIT mode : Enable (0: ENABLE 0 - 1 K engine highest 1: DISABLE) density correction mode : Disable MX-C250 SIMULATION 6 – 68...
-
Page 146: Soft Switch (Detail Of Sim. 66-1)
1 <First digit> can be registered are as fol- lows. 0 - 9 / * (a) / # (b) / – (pause) (c) / Not used for this digit and after (d) / Any is OK (f). MX-C250 SIMULATION 6 – 69... - Page 147 0 1 1 0 700ms 0 1 1 1 800ms 1 0 0 0 900ms 1 0 0 1 Adjustment value Upper limit of call signal ON time Setting range 1000ms to Two states input 4000ms MX-C250 SIMULATION 6 – 70...
- Page 148 Setting range Two states input 15 - 90s (5s intervals) 5 - 6 Timer T2 timer setting 7 - 8 Timer T4 timer setting Timer during automatic operation (+1.5 seconds at times of manual operation) MX-C250 SIMULATION 6 – 71...
- Page 149 Echo suppressor tone setting 0 : OFF 1 : ON Setting Training 0 : Short training 1 : Long training 5, 6 Phase-C head dummy data send 0.2s time 0.3s 0.4s 0.5s 7, 8 Not used MX-C250 SIMULATION 6 – 72...
- Page 150 1dBm 0 0 1 2dBm 0 1 0 3dBm 0 1 1 4dBm 1 0 0 5dBm 1 0 1 6dBm 1 1 0 7dBm 1 1 1 6 - 8 Not used Not used MX-C250 SIMULATION 6 – 73...
- Page 151 Speaker volume of line monitor 0 : Use volume 1 1 : Use volume 2 (Small) FAX initial setting Speaker volume of line monitor 0 : Use volume 2 1 : Use volume 3 (Middle) MX-C250 SIMULATION 6 – 74...
- Page 152 FAX initial setting/ Pause time setting (between dials) Setting range Adjustment value 1 - 15s (4 - 15s only for South Africa ) 7, 8 FAX initial setting Speaker volume when on-hook No sound Small Middle Large MX-C250 SIMULATION 6 – 75...
- Page 153 1 0 1 1 1 0 FAX initial setting Data printing hold key operation 0 : Prohibited 1 : Permitted 5 ,6 Not used 7, 8 FAX initial setting Paper size setting 8.5 inch Do not set MX-C250 SIMULATION 6 – 76...
- Page 154 5s intervals X (ms) = (N*5) + 30 FAX initial setting Selection of date and transmis- 0 : OFF 1 : ON Two states input sion source print 6 - 8 Not used MX-C250 SIMULATION 6 – 77...
- Page 155 1 1 0 1 - 42 dot 1 1 1 0 - 49 dot 1 1 1 1 Not used 1 - 4 Adjustment value Signal sending level 0 - 15 dBm 5 - 8 Not used MX-C250 SIMULATION 6 – 78...
- Page 156 Minimum cycle of CI signal CI signal maximum cycle +1 to Two states input 255 ms(1ms interval) 1 - 8 Adjustment value Maximum cycle of CI signal 12 to 254 ms(1ms interval) Two states input MX-C250 SIMULATION 6 – 79...
- Page 157 Timeout value used by the answer- Setting range Two states input ing modem from the beginning of 0 - 26s the +FRH=FSKL command to the +A8I:0 indicator 7 - 8 Setting Threshold of Packet error ratio Not used 100% 33.3% MX-C250 SIMULATION 6 – 80...
- Page 158 U68 Reg. ITC3 Receive Overload 0 : Normal receive input level. 1 : Excessive receive input level. U68 Reg. ITC3 Billing Tone 0 : No billing tone. Billing tone detected Detected (cleared by writing 0). MX-C250 SIMULATION 6 – 81...
- Page 159 1 1 1 1 - 4 Guaranteed V.34 preamble dura- Setting value Two states input tion for primary channel +50ms 5 - 8 Guaranteed V.34 preamble dura- Setting value Two states input tion for control channel +50ms MX-C250 SIMULATION 6 – 82...
- Page 160 Does not retrain receiving 1 times Data ratio : More than 14400bps 2 times 3 times Primary channel fall back when 0 : Does not fall back 1 : Fall back V.34 is received Not used MX-C250 SIMULATION 6 – 83...
- Page 161 1 : Silicon DAA-RGDT sig- AGC lock 0 : Not used at this moment 1 : Not used at this moment V.17 Tap hold 0 : Not used at this moment 1 : Not used at this moment MX-C250 SIMULATION 6 – 84...
- Page 162 Luxemburg Middle East Belgium A B C D E F G H I J K L M N O P Q R S T U V W X Y Z a b c d e MX-C250 SIMULATION 6 – 85...
- Page 163 A B C D E F G H I J K L M N O P Q R S T U V W X Y Z a b c d e MX-C250 SIMULATION 6 – 86...
- Page 164 A B C D E F G H I J K L M N O P Q R S T U V W X Y Z a b c d e SW10 SW11 SW12 SW13 SW14 SW15 SW16 SW17 MX-C250 SIMULATION 6 – 87...
- Page 165 A B C D E F G H I J K L M N O P Q R S T U V W X Y Z a b c d e SW18 SW19 SW20 SW21 SW22 SW23 SW24 SW25 MX-C250 SIMULATION 6 – 88...
- Page 166 A B C D E F G H I J K L M N O P Q R S T U V W X Y Z a b c d e SW26 SW27 SW28 SW29 SW30 SW31 SW32 SW33 MX-C250 SIMULATION 6 – 89...
- Page 167 A B C D E F G H I J K L M N O P Q R S T U V W X Y Z a b c d e SW34 SW35 SW36 SW37 SW38 SW39 SW40 SW41 MX-C250 SIMULATION 6 – 90...
- Page 168 A B C D E F G H I J K L M N O P Q R S T U V W X Y Z a b c d e SW42 SW43 SW44 SW45 SW46 SW47 SW48 SW49 MX-C250 SIMULATION 6 – 91...
- Page 169 A B C D E F G H I J K L M N O P Q R S T U V W X Y Z a b c d e SW50 SW51 SW52 SW53 SW54 SW55 SW56 SW57 MX-C250 SIMULATION 6 – 92...
- Page 170 A B C D E F G H I J K L M N O P Q R S T U V W X Y Z a b c d e SW58 SW59 SW60 SW61 SW62 SW63 SW64 SW65 MX-C250 SIMULATION 6 – 93...
- Page 171 A B C D E F G H I J K L M N O P Q R S T U V W X Y Z a b c d e SW66 SW67 SW68 SW69 SW70 SW71 SW72 SW73 MX-C250 SIMULATION 6 – 94...
- Page 172 A B C D E F G H I J K L M N O P Q R S T U V W X Y Z a b c d e SW74 SW75 SW76 SW77 SW78 SW79 SW80 SW81 MX-C250 SIMULATION 6 – 95...
- Page 173 A B C D E F G H I J K L M N O P Q R S T U V W X Y Z a b c d e SW82 SW83 SW84 SW85 SW86 SW87 SW88 SW89 MX-C250 SIMULATION 6 – 96...
- Page 174 A B C D E F G H I J K L M N O P Q R S T U V W X Y Z a b c d e SW90 SW91 SW92 SW93 SW94 SW95 SW96 SW97 MX-C250 SIMULATION 6 – 97...
- Page 175 A B C D E F G H I J K L M N O P Q R S T U V W X Y Z a b c d e SW98 SW99 SW100 SW101 SW102 SW103 SW104 SW105 MX-C250 SIMULATION 6 – 98...
- Page 176 A B C D E F G H I J K L M N O P Q R S T U V W X Y Z a b c d e SW106 SW107 SW108 SW109 SW110 SW111 SW112 SW113 MX-C250 SIMULATION 6 – 99...
- Page 177 A B C D E F G H I J K L M N O P Q R S T U V W X Y Z a b c d e SW114 SW115 SW116 SW117 SW118 SW119 SW120 SW121 MX-C250 SIMULATION 6 – 100...
- Page 178 A B C D E F G H I J K L M N O P Q R S T U V W X Y Z a b c d e SW122 SW123 SW124 SW125 SW126 SW127 SW128 SW129 MX-C250 SIMULATION 6 – 101...
- Page 179 A B C D E F G H I J K L M N O P Q R S T U V W X Y Z a b c d e SW130 SW131 SW132 SW133 SW134 SW135 SW136 SW137 MX-C250 SIMULATION 6 – 102...
- Page 180 A B C D E F G H I J K L M N O P Q R S T U V W X Y Z a b c d e SW138 SW139 SW140 SW141 SW142 SW143 SW144 SW145 MX-C250 SIMULATION 6 – 103...
- Page 181 A B C D E F G H I J K L M N O P Q R S T U V W X Y Z a b c d e SW146 SW147 SW147 SW148 SW149 SW150 MX-C250 SIMULATION 6 – 104...
-
Page 182: Troubleshooting
The content is displayed. Others Warning A consumable Trouble/Warning part has reached its lifetime Trouble Replace or supply Troubleshoot the cause. the consumable part. Repair Cancel the self-diagnostic message with the diagnostic (test commands). Reset Standby state MX-C250 TROUBLESHOOTING 7 – 1... - Page 183 E7 (80) cation trouble tion error MFPC Scanner section Scanner trouble breakdown (motor, L1 (00)L3 (00) lens, copy lamp) CIS breakdown CIS trouble E7 (10, 11, 14) (shading, etc.) RSPF/DF break- SPF/DF trouble U5 (40) down MX-C250 TROUBLESHOOTING 7 – 2...
- Page 184 (2) Trouble detection sequence and trouble cancel sequence when turning on the power (3) How to cancel the error code Simulation Error Code SIM14 U1, H3, H4, H5 SIM16 Power OFF - ON Other errors MX-C250 TROUBLESHOOTING 7 – 3...
- Page 185 Fusing section high temperature trouble (TH_US) MFPC Fusing section low temperature trouble (TH_UM_AD2) MFPC 5 times continuous POD1 not-reach jam MFPC Fusing low temperature recovery trouble (TH_UM_AD2). MFPC Scanner feed trouble MFPC Scanner return trouble MFPC MX-C250 TROUBLESHOOTING 7 – 4...
- Page 186 Scanner memory shortage CE-12 LADP address number is over CE-13 USB memory is not installed CE-14 USB memory write protect CE-15 Out if USB memory space CE-16 USB memory I/O error CE-17 USB memory other error MX-C250 TROUBLESHOOTING 7 – 5...
- Page 187 Check the CIS unit. Check & Remedy Use SIM61-1 to check the operation of the LSU. Check the AFE PWB. Check the PWB and connection of the harness in Check the MFP PWB. the LSU. Replace the LSU. MX-C250 TROUBLESHOOTING 7 – 6...
-
Page 188: Fax Reception Image Data Error
Check & Remedy Check fixation of the MFPC PWB MFPC PWB trouble. Replace the MFPC PWB. Check & Remedy Replace the discharge lamp PWB (K). Check the harness and the connector. Replace the MFPC PWB. MX-C250 TROUBLESHOOTING 7 – 7... - Page 189 Check connection of the connectors and the Check & Remedy Replace the toner density sensor. harness. Harness and connector connection trouble. Replace the MFPC PWB. Replace the developing unit. Replace the LSU. Replace the MFPC PWB. MX-C250 TROUBLESHOOTING 7 – 8...
- Page 190 Replace the toner drive clutch. MFPC PWB trouble. Replace the toner density sensor. Check & Remedy Replace the toner cartridge. Connector/harness trouble. Replace the MFPC PWB. Replace the MFPC PWB. Replace the toner cartridge. Replace the developing unit. MX-C250 TROUBLESHOOTING 7 – 9...
-
Page 191: Improper Toner Cartridge Detection
Replace the lift-up unit. Connection trouble of the connector and the Replace the MFPC PWB. harness. Fusing unit not installed. Check & Remedy Replace the thermister. Replace the MFPC PWB. Harness and connector connection trouble. MX-C250 TROUBLESHOOTING 7 – 10... - Page 192 Harness and connector connection trouble. Check connection of the connector and the Replace the power unit. harness. Replace the power unit. Replace the interlock switch. Use SIM5-2 to check the flashing operation of the heater lamp. MX-C250 TROUBLESHOOTING 7 – 11...
- Page 193 Check & Remedy Use Sim6-1 to check the operation of the fusing Check/replace the connector or the harness. motor. Replace the fusing motor. Replace the MFPC PWB. Check connection of the connector and the harness. MX-C250 TROUBLESHOOTING 7 – 12...
-
Page 194: Fusing Cooling Fan Trouble
Use SIM16 to cancel the error. harness. Replace the MFPC PWB. Replace the polygon motor. Replace the LSU. U5-40 SPF connection trouble Cause Hardware trouble Check & Remedy Check the operation of the SPF and the control circuit MX-C250 TROUBLESHOOTING 7 – 13... - Page 195 OPU communication trouble (time- out) Cause Command size error from MCU to OPU Check & Remedy Check connector connection and harness of OPU PWB and MCU PWB Replace OPU PWB or MCU PWB Check ground point Power off/on MX-C250 TROUBLESHOOTING 7 – 14...
- Page 196 : Added code indicating that the memory and its peripheral must be focused for check in case of an error. : Added code indicating that doubtful sections are in a wider range such as the memory, PWB's, etc. -: Added code without generating MX-C250 TROUBLESHOOTING 7 – 15...
-
Page 197: Jam And Troubleshooting
NG. - Check the installing state of the MFPC PWB to insure that there is no abnormality. - Replace the HDD. - Replace the FAX control PWB. - Replace the MFPC PWB. MX-C250 TROUBLESHOOTING 7 – 16... -
Page 198: Image Send Communication Report Code
PPS-EOM PIP, PIN PPS-MPS, PPS-NULL RTN, RTP PRI-Q No signal, DCN EOR-Q PPS-PRI-Q V.8 Phase-1 V.8 Phase-1 V.8 Phase-2 V.8 Phase-2 V.8 Phase-3 V.8 Phase-3 For report codes 16 - 31, V.34 MODE COMMUNICATION. MX-C250 TROUBLESHOOTING 7 – 17... - Page 199 In confidential sending, the remote party does not have confidential function. <Send> remote party) (Including other company's machines) The NSF signal has not "Confidential function" bit. The NSF is not a Sharp machine. (Confidential not received) In confidential sending, DCN is received for NSS. <Send> (Confidential BOX NO NG) In confidential reception, a confidential box number which is not registered is specified.
-
Page 200: Dial Tone
Check to confirm that the continuous buzzer sound is heard when the on-hook key is pressed. (Press the on-hook key again to cancel the buzzer sound.) If facsimile communication cannot be executed normally through the IP telephone line, try the general telephone line. MX-C250 TROUBLESHOOTING 7 – 19... -
Page 201: Firmware Update
- Store the firmware data (xxx .sfu) to the media or USB memory beforehand. - The media used for the update must have a minimum of 32MB of storage capacity. - The USB thumb drive equipped with the security (secure) function cannot be used. MX-C250 FIRMWARE UPDATE 8 – 1... - Page 202 Are you sure ? EXEC 4) Press [OK] button or [Start] button. Then, the machine is restarted and the download of the firmware file starts. * At this moment, do not disconnect the USB memory. Downlode mode MX-C250 FIRMWARE UPDATE 8 – 2...
-
Page 203: Maintenance
(the machine enters the print (copy) ready state). Trouble counter and JAM counter reset (SIM24-01) Copy/printer color balance adjustment (SIM46-24) (When the auto color calibration (auto color balance adjustment) is not exe- cuted according to the guidance) MX-C250 MAINTENANCE 9 – 1... - Page 204 - When the drum cartridge is replaced with a new one, the print counter, the accumulated traveling distance counter, the accumulated rotation number counter, and the usage day counter are automatically cleared, and the above display disappears. - The above display disappears when the counters are cleared. MX-C250 MAINTENANCE 9 – 2...
- Page 205 When the Toner collection container is replaced, the display disappears. H. Other (Ozone Filter) Display condition Print JOB Enable/Disable Display content SIM26-38-A Counter name Counter value Set value No relation Ozone filter counter When 75K rotations is Enable reached. MX-C250 MAINTENANCE 9 – 3...
-
Page 206: Maintenance List
Replace at 150K or 2 year of use. section Other Process registration sensor Clean when the Fusing unit and the Drum cartridge is replaced. Ozone filter Replace at 75K MX-C250 MAINTENANCE 9 – 4... - Page 207 100K or when one year has elapsed since the start of use. Separation roller Torque limiter Transport rollers Transport paper guides Discharge brush Apply to the specified area when checking. FLOIL GE- Gears MX-C250 MAINTENANCE 9 – 5...
- Page 208 300 K Remark calling Paper feed roller Replace when the RSPF feed counter reaches 100K or parts are worn. Paper pickup roller Each transport roller Scan plate Paper exit roller Discharge brush OC mat Gears Belts MX-C250 MAINTENANCE 9 – 6...
- Page 209 300 K Remark calling Paper feed roller Replace when the SPF feed counter reaches 100K or parts are worn. Paper pickup roller Each transport roller Scan plate Paper exit roller Discharge brush OC mat Gears MX-C250 MAINTENANCE 9 – 7...
- Page 210 When calling 75 K 150 K 225K 300 K Remark Air cleaning on SELFOC lens part. Table glass, SPF glass Grease the indicated place with MOLYKOTE EM50-L when Rail checking. Drive belt Drive gears / pulley MX-C250 MAINTENANCE 9 – 8...
- Page 211 Unit name When 75 K 90 K 135 K 150 K 180K 225 K 270 K 300 K Remarks calling Developing unit (monochrome) Developing unit (color) MX-C250 MAINTENANCE 9 – 9...
- Page 212 6) Connect the connector of the developing unit. * When removing the MG cover, lift up the MG cover above by pressing Refer to the Note4 described at the end of this procedure. the pawl. MX-C250 MAINTENANCE 9 – 10...
- Page 213 Developer MG Roller while tilting the DV Unit 45 degrees to re attract the Developer back to the MG Roller. (F/R both side) * When installing the DV Unit with Developer on the seal, the drum unit can become damaged. MX-C250 MAINTENANCE 9 – 11...
- Page 214 When 75 K 90 K 135 K 150 K 180K 225 K 270 K 300 K Remarks calling OPC drum unit (monochrome) OPC drum unit (color) MX-C250 MAINTENANCE 9 – 12...
- Page 215 When 75 K 150 K 225K 300 K Remark calling Primary transfer unit Primary transfer unit Replace at 150K or 2 year of use. Secondary transfer unit Secondary transfer roller Replace as needed MX-C250 MAINTENANCE 9 – 13...
- Page 216 : Clean : Replace : Adjust ✩: Lubricate Unit name Part name When 75 K 150 K 225K 300 K Remark calling Dust-proof glass Replace as needed Others LSU cleaning unit MX-C250 MAINTENANCE 9 – 14...
- Page 217 : Clean : Replace : Adjust ✩: Lubricate Part name When 75 K 150 K 225K 300 K Remark calling Paper feed roller Separation roller Replace at 100K of each counter or 1 year of use. Torque limiter Sensors MX-C250 MAINTENANCE 9 – 15...
- Page 218 Part name When 75 K 150 K 225K 300 K Remark calling PS auxilrary roller Transport rollers Paper guides Discharge brush Gears Apply to the specified area when checking. FLOIL GE-676 Paper dust removing unit MX-C250 MAINTENANCE 9 – 16...
- Page 219 75 K 150 K 225K 300 K Remark calling Gears (grease) Apply to the specified area when checking. FLOIL G-313S Shaft earth sections Apply to the specified area when checking. FLOIL GE-676 conduction grease Belts Sensors MX-C250 MAINTENANCE 9 – 17...
- Page 220 ✕: Check (Clean, replace, or adjust according to necessity.) O: Clean : Replace : Adjust ✩: Lubricate Part name When 75 K 150 K 225K 300 K Remark calling Fusing unit Replace at 150K or 2 year of use. MX-C250 MAINTENANCE 9 – 18...
- Page 221 Part name When 75 K 150 K 225K 300 K Remark calling Process registration sensor Clean when the Fusing unit and the Drum cartridge is replaced. Ozone filter Replace at 75K MX-C250 MAINTENANCE 9 – 19...
-
Page 222: Disassembly And Assembly
Rear cabinet upper NE 3) Remove a screw and unhook pawls. Then, remove the Left Rear cabinet NE cabinet NE. Paper exit tray rear connection cabinet Right cabinet rear NE Upper cabinet right NE MX-C250 DISASSEMBLY AND ASSEMBLY 10 – 1... - Page 223 Press pawls and pull the Operation base plate NE toward you. Open the RSPF unit and place the operation panel shown in the figure. Disconnect the harness of the USB I/F PWB and remove the operation base plate NE. MX-C250 DISASSEMBLY AND ASSEMBLY 10 – 2...
- Page 224 Open the right door. Remove the Right cabinet rear NE and the Upper cabinet right (6) Paper exit tray rear connection cabinet Remove the Paper exit tray left cabinet NE. Remove the rear connection cabinet. MX-C250 DISASSEMBLY AND ASSEMBLY 10 – 3...
- Page 225 Remove the ribbon cable and the Operation panel unit. 3) Remove the RSPF cable from the MFP PWB and the screw fix- ing the RSPF cable. Remove the RSPF/SPF unit from the main unit. MX-C250 DISASSEMBLY AND ASSEMBLY 10 – 4...
- Page 226 5) Remove the earth cable and the MFP PWB shield. 7) Remove the scanner unit. 6) Remove the SCN harness NE/CIF FFC NE from the MFPC PWB. * Remove the FFC by releasing the lock of the FFC connector. MX-C250 DISASSEMBLY AND ASSEMBLY 10 – 5...
- Page 227 NOTE: Regardless of the installation of the toner cartridge, remove the toner cartridges when transferring the main unit. NOTE: When transferring to other place, be sure to remove the toner cartridges. (The toner cartridges could have clog- ging symptom.) MX-C250 DISASSEMBLY AND ASSEMBLY 10 – 6...
- Page 228 When pulling out and pushing in the developing unit, put your hand beneath the unit and slide it horizontally along the guide. When pushing in the developing unit, connect the connector of the developing unit firmly. MX-C250 DISASSEMBLY AND ASSEMBLY 10 – 7...
- Page 229 At the time, be careful not to touch the OPC drum surface. Be careful to keep Primary Transfer Unit free of any foreign materials or objects. MX-C250 DISASSEMBLY AND ASSEMBLY 10 – 8...
- Page 230 When the connection part of the connector is lifted up as shown in the figure, the connector is unlocked. It is necessary to remove the FFC with releasing the lock of the connector. MX-C250 DISASSEMBLY AND ASSEMBLY 10 – 9...
- Page 231 Do not pull out the FFC with rotating <Top View> Tab for positioning FFC Interfere Guide for positioning the connector Remove the humidity sensor cover Remove the screws and pull out the LSU unit. MX-C250 DISASSEMBLY AND ASSEMBLY 10 – 10...
- Page 232 Remove the manual paper feed unit. (2) Paper exit unit Open the right door unit. Remove the right door unit . Remove the connecting parts of the manual paper feed tray and remove it. MX-C250 DISASSEMBLY AND ASSEMBLY 10 – 11...
- Page 233 4) Remove the screws and the harness. Then, remove the fusing unit. Remove the FFCs from MFPC unit by referring the following procedures. * It is necessary to remove the FFC by releasing the lock of the FFC connector. MX-C250 DISASSEMBLY AND ASSEMBLY 10 – 12...
- Page 234 Remove the MFPC frame. (3) AC DC PWB Open the front cover. Remove the paper exit tray. Remove the AC DC PWB with the stubby driver. . Remove the MFPC PWB from the MFPC PWB frame. MX-C250 DISASSEMBLY AND ASSEMBLY 10 – 13...
- Page 235 Tab for positioning FFC Guide for positioning the connector Connector F F C Hook NG : Do not pull out the FFC with rotating <Top View> Tab for positioning FFC Interfere Guide for positioning the connector MX-C250 DISASSEMBLY AND ASSEMBLY 10 – 14...
- Page 236 It is necessary to remove the FFC with releasing the lock of the connector. (6)FAN IF PWB Remove the MFPC unit. Remove the FAN IF PWB. MX-C250 DISASSEMBLY AND ASSEMBLY 10 – 15...
-
Page 237: Disassembly And Assembly Of Each Unit
Regarding the connection part (A), remove the FFC by referring the following procedure. Lifting up the lock lever as the OK state shown in the figure. It is necessary to remove the FFC with releasing the lock of the con- nector. MX-C250 DISASSEMBLY AND ASSEMBLY 10 – 16... - Page 238 NOTE: Use enough care not to put finger prints on the LCD sur- face. Remove the screws and remove the LCD PWB. (2) KEY-LED PWB Remove the KEY-LED PWB. Remove the screws, remove the protection mylar and KEY- LED PWB. MX-C250 DISASSEMBLY AND ASSEMBLY 10 – 17...
- Page 239 Open the upper door cabinet R and the paper tray R NE. 5) Remove the paper feed shaft. Remove the Rear cabinet R. 6) Remove the Paper feed roller and the Pick up roller. MX-C250 DISASSEMBLY AND ASSEMBLY 10 – 18...
- Page 240 Remove the E-rings, the pulley, the coupling and the bearing. Remove the transport roller unit, and remove the transport Remove the discharge brush. roller. Remove the couplings. (4) Transport auxiliary roller Remove the paper feed shaft unit. Remove the transport auxiliary roller MX-C250 DISASSEMBLY AND ASSEMBLY 10 – 19...
- Page 241 Paper exit roller BC paper exit roller Discharge brush OC mat (1) Pick up roller, Paper feed roller Open the upper door cabinet R and the paper tray R NE. Remove the Rear cabinet R. MX-C250 DISASSEMBLY AND ASSEMBLY 10 – 20...
- Page 242 5) Remove the resin ring, remove the pin and the coupling assem- bly. Remove the PS roller . 6) Remove the paper feed shaft. Remove the motor fixing plate. 7) Remove the Paper feed roller and the Pick up roller. MX-C250 DISASSEMBLY AND ASSEMBLY 10 – 21...
- Page 243 Remove the E ring, the gear and the bearing. Remove the discharge brush. 10) Remove the Lower transport roller NOTE: When putting the discharge brush, put it with fitting to the alignment line. MX-C250 DISASSEMBLY AND ASSEMBLY 10 – 22...
- Page 244 Remove the E ring. Remove the Paper exit roller and the BC paper exit roller. Remove the BC paper exit roller. (5) Transport auxiliary roller (Upper door cabinet) Remove the rear cabinet of the RSPF unit. MX-C250 DISASSEMBLY AND ASSEMBLY 10 – 23...
- Page 245 4 and 5 pawls outside. Name Drive belt Glass Rail CIS unit 2) Check the tension and wear of the drive belt shown in the figure. (1)Drive belt 1) Remove the scanner upper cover NE. . MX-C250 DISASSEMBLY AND ASSEMBLY 10 – 24...
- Page 246 If the grease is put on the drive belt, clean drive the belt. Remove the FFC from the CIS unit. (3)Glass Remove the glass from the upper cover by removing the doule-sided tapes. Remove the glass. MX-C250 DISASSEMBLY AND ASSEMBLY 10 – 25...
- Page 247 Turn the felt part of the cleaning stick downward and insert it to the space shown in the figure. Move the cleaning stick back and forth twice or third and clean the glass of the LSU unit. MX-C250 DISASSEMBLY AND ASSEMBLY 10 – 26...
- Page 248 Remove the separation roller and the torque limiter. (1) Paper feed roller 1) Remove the maintenance cover. Remove the E ring, and remove the paper feed roller. (2) Separation roller, Torque limiter Remove the separation roller cover MX-C250 DISASSEMBLY AND ASSEMBLY 10 – 27...
- Page 249 Remove the E rings and the 25P pulleys, and remove the belt. Remove the right door auxiliary roller pressure SP. Remove the E rings and the belt idle bearings. Remove the transport auxiliary roller 1 from the shaft. MX-C250 DISASSEMBLY AND ASSEMBLY 10 – 28...
- Page 250 Remove the knob. a.Paper exit auxiliary roller Remove the knob, the earth plate, E rings and pressure springs. Remove the paper exit gear unit, and remove the paper exit roller unit. MX-C250 DISASSEMBLY AND ASSEMBLY 10 – 29...
- Page 251 Remove the knob. NOTE: When replacing the discharge brush, put it with aligning the alignment line. NOTE: When replacing the discharge brush, clean up dirt and adhesive material on the surface of the plate. MX-C250 DISASSEMBLY AND ASSEMBLY 10 – 30...
-
Page 252: Operational Descriptions
LCD-PWB, KEY-LED PWB and operation keys. Because of the touch panel function is not equipped; the operation is executed by key on the operation panel. And also, the adjustment of LCD brightness by hardware (volume and so on) is not equipped. MX-C250 OPERATIONAL DESCRIPTIONS 11 – 1... -
Page 253: Spf/Rspf Section
Picks up a document and feeds it to the document feed roller. Signal name Name Type Function/Operation SPED Document sensor Light transmission Detects document empty SPPD1 Paper transport detector 1 Light transmission Detects paper pass MX-C250 OPERATIONAL DESCRIPTIONS 11 – 2... - Page 254 SPPD1 Document transport sensor 1 Transmission type Detects paper pass. SPPD2 Document transport sensor 2 Transmission type Detects paper pass SPED Document sensor Transmission type Detects document empty in the RSPF paper feed tray. MX-C250 OPERATIONAL DESCRIPTIONS 11 – 3...
- Page 255 204.6mm 204.6mm SPPD1 SPPD1 SPF transportation sensor SPF transportation sensor Moter is stopped in 255mm transportation Moter is stopped in 255mm transportation after the last paper passes SPPD1. after the last paper passes SPPD1. MX-C250 OPERATIONAL DESCRIPTIONS 11 – 4...
- Page 256 (depending on paper size) the paper exit rollers reverse rotation (Switch back) and the original re-enters the paper path at the upper transport area. Side two of the original is now ready to be scanned. MX-C250 OPERATIONAL DESCRIPTIONS 11 – 5...
-
Page 257: Scanner Section
Home position sensor Detects the home position of the CIS Scanner motor Drives the carriage unit. AFE PWB Transfers the analog signal to the digital signal. CIS unit Scanner lamp and the light-receiving sensor MX-C250 OPERATIONAL DESCRIPTIONS 11 – 6... - Page 258 (software). Zooming in the main scanning direction is not performed optically, but performed with the image process technology (by the software). MX-C250 OPERATIONAL DESCRIPTIONS 11 – 7...
-
Page 259: Manual Paper Feed Section
On / OFF control of the feed roller is carried out by the Man- ual Feed Clutch This model does not have an automatic paper size detection func- tion in Multi-purpose tray. MX-C250 OPERATIONAL DESCRIPTIONS 11 – 8... -
Page 260: Paper Registration Section
Transfer Belt to the Timing of the paper making its way to the Primary and Secondary Transfer section. Start stop movement is controlled by the PS Clutch (RRC). Drive for the Registration roller comes from FUM, the Fusing Motor. MX-C250 OPERATIONAL DESCRIPTIONS 11 – 9... -
Page 261: Paper Feed Tray Section
The paper feed roller feeds paper to the paper transport section. At that time, the separation roller rotates to prevent double-feed. To prevent a double feeding, the separation roller apply counter force to the paper from bottom side. MX-C250 OPERATIONAL DESCRIPTIONS 11 – 10... -
Page 262: Paper Exit Section
MX-C250 OPERATIONAL DESCRIPTIONS 11 – 11... -
Page 263: Duplex Section
ADU section. The ADU drive rollers are driven by the Fuser motor transporting the paper to the registra- tion section MX-C250 OPERATIONAL DESCRIPTIONS 11 – 12... -
Page 264: Lsu Section
Adjusts laser skew in the main scanning direction for the OPC drum. BD mirror Guides laser beams to the BD (Beam Detector). LSUcnt PWB To covert the image data sent from MFPC-PWB to switching data and transfer it to LD-PWB. MX-C250 OPERATIONAL DESCRIPTIONS 11 – 13... - Page 265 Effective scan width 220mm Resolution 600dpi Beam diameter Main / Sub scan = 50 - 80m Laser power Max. 0.3mw LD wavelength 780 - 800nm Number of mirrors 4 surfaces Rotation speed 32776rpm 2beam/color x4 colors MX-C250 OPERATIONAL DESCRIPTIONS 11 – 14...
-
Page 266: Opc Drum Section
Main charger applying voltage (CL) The main charger is charged to generate negative electric charges. MC-K Main charger applying voltage (K) Name Function/Operation OPC drum unit (Y, M, C, K) Latent electrostatic images are formed. MX-C250 OPERATIONAL DESCRIPTIONS 11 – 15... - Page 267 OPC drum. Electric charges remain at a position where laser beam are not radiated. As a result, latent electrostatic images are formed on the OPC drum surface. MX-C250 OPERATIONAL DESCRIPTIONS 11 – 16...
-
Page 268: Toner Supply Section
This model is judging the toner supplying based on the print pixel counts and process control data. When toner density is judged low, the toner clutch is activated supplying toner, by an auger, from the toner cartridge to the developer unit MX-C250 OPERATIONAL DESCRIPTIONS 11 – 17... -
Page 269: Developing Section
Mixing roller Mixes and charges developer and toner. Doctor Maintains the quantities of toner and developer on the DV roller at constant crush height. Toner filter (K, M, C, Y) Prevents toner splash and vacuum. MX-C250 OPERATIONAL DESCRIPTIONS 11 – 18... - Page 270 In this machine, the toner density is detected by the toner sensor, but the toner supply operation is not controlled only by the toner density detection result. The toner density control is performed according to the process control data. MX-C250 OPERATIONAL DESCRIPTIONS 11 – 19...
-
Page 271: Transfer Section
Transfers toner images on the transfer belt to paper. Connected to GND to flow the secondary transfer high current. Paper separation electrode Applies a high negative voltage to discharge paper which is positively charged after transfer operation. MX-C250 OPERATIONAL DESCRIPTIONS 11 – 20... - Page 272 Free position: All the OPC drums are separated Constant voltage from the transfer belt. power Monochrome print mode: Only the K OPC drum is in close contact with the transfer belt. MX-C250 OPERATIONAL DESCRIPTIONS 11 – 21...
-
Page 273: Fusing Section
HL-PWB. In case of abnormal high temperature of fuser roller (heat roller) is occurred, the thermostat becomes OFF condition, physically cuts off the power line of heater lamp. MX-C250 OPERATIONAL DESCRIPTIONS 11 – 22... - Page 274 F. Manual pressure release The pressure of the heat roller is reduced by lowering the levers of the fusing unit. When running envelopes and during long periods of machine non use, the levers should be lowered. MX-C250 OPERATIONAL DESCRIPTIONS 11 – 23...
-
Page 275: Fan And Filter Section
Cools the LSU. PSFM LSUFM FUFM OZFM1 The machine is provided with the following filter to remove ozone generated in the process section. Name Function/Operation Ozone filter Absorbs ozone generated in the image process section. MX-C250 OPERATIONAL DESCRIPTIONS 11 – 24... -
Page 276: Electrical Section
13.Aug Service Manual MX-C250 [12] ELECTRICAL SECTION 1. Block diagram A. System block diagram MX-C250 ELECTRICAL SECTION 12 – 1... - Page 277 B. MFPC PWB FAX Modem LSU Unit PCU Motor&Sencer/HV Unit V Unit IF etc. Unit Unit Conector Conector Conector SPI1CS PI1CS SPI1CS MX-C250 ELECTRICAL SECTION 12 – 2...
- Page 278 C. SCN PWB MX-C250 ELECTRICAL SECTION 12 – 3...
- Page 279 D. LSU PWB MX-C250 ELECTRICAL SECTION 12 – 4...
- Page 280 E. FAX PWB MX-C250 ELECTRICAL SECTION 12 – 5...
-
Page 281: Power Line Diagram
¨ ¨ ¤ ¤ ¥ ¥ ¥ ¥ ¤ § ¤ § £ £ £ £ ¢ ¢ ¢ ¢ ¤ ¤ MX-C250 ELECTRICAL SECTION 12 – 6... -
Page 282: System Diagram
B. AC power system diagram Sleep Mode etc. 1TURC MPFC PORC 1.5V ADUC 3.3V CPUC1 MHPS 3.3V SCOV (RSPF ONLY) SPPD2 (RSPF ONLY) SPPD1 SPED SPUS (RSPF ONLY) SPFM SRVC (RSPF ONLY) USB2 2.0 HOST USB2. 0 DEVICE MX-C250 ELECTRICAL SECTION 12 – 7... -
Page 283: Actual Wiring Chart
3. Actual wiring chart A. MFPC, LSU, FAX, USB B to B B to B MX-C250 ELECTRICAL SECTION 12 – 8... - Page 284 B. Scanner, RSFP/SFP, Operational panel MX-C250 ELECTRICAL SECTION 12 – 9...
- Page 285 C. Process, Developer, Right door, Paper feed, Paper exit MX-C250 ELECTRICAL SECTION 12 – 10...
- Page 286 D. Drive unit, Paper feed, HV, Fusing unit MX-C250 ELECTRICAL SECTION 12 – 11...
- Page 287 E. Power supply (AC, DC) MX-C250 ELECTRICAL SECTION 12 – 12...
-
Page 288: Signal List
Fixing Motor FUM_D Fixing Motor Drive Control Motor On CN22 MFPC Fixing Motor FUM_LD Detect Fixing Motor Lock Detect:Lock CN22 MFPC Fixing Motor HUD_M_ANI Humidity of Manual bypass (Analog) CN31 MFPC Right Door Unit:HUD_M MX-C250 ELECTRICAL SECTION 12 – 13... - Page 289 SPFM_XB phase /B OFF phase /B ON CN19 MFPC Control Phase XB Unit:xSPF Motor TCS_C Detect Cyan Toner Concentration (Analog) CN32 MFPC DV Unit TCS_K Detect Black Toner Concentration (Analog) CN32 MFPC DV Unit MX-C250 ELECTRICAL SECTION 12 – 14...
- Page 290 Magenta Toner Concentration TSG_M (Analog) CN32 MFPC DV Unit Sensor Control Yellow Toner Concentration Sen- TSG_Y (Analog) CN32 MFPC DV Unit sor Control Tray2 Sensor Data(CSSELA,B,C (Select Sensor Y_CS2 CN36 MFPC 2nd Cassette(Option) Code Select) Data) MX-C250 ELECTRICAL SECTION 12 – 15...
-
Page 291: Others
Conduction grease (FLOIL GE-676) UKOG-0012QSZZ Other shaft Grease (FLOIL G-313S) UKOG-0307FCZZ Grease (JFE552) UKOG-0235FCZZ Stearic acid powder UKOG-0312FCZZ OPC drum Grease (FLOIL GP-501MR) UKOG-0013QSZZ RSPF paper feed roller shaft Grease (MOLYKOTE X5-6020) UKOG-0158FCZZ Grease (MOLYKOTE BR-2 Plus) UKOG-0097FCZZ MX-C250 OTHERS 13 – 1... - Page 292 © COPYRIGHT XXXX BY SHARP CORPORATION Since the melting-point of lead-free solder is about 220°C, which is about 40°C higher than that of conventional lead solder, and its soldering capacity is inferior to conventional one, it is apt to keep the soldering iron in contact with the PWB for longer time. This may cause land ALL RIGHTS RESERVED.
- Page 293 CAUTION FOR BATTERY REPLACEMENT (Danish) ADVARSEL ! Lithiumbatteri – Eksplosionsfare ved fejlagtig håndtering. Udskiftning må kun ske med batteri af samme fabrikat og type. Levér det brugte batteri tilbage til leverandoren. (English) Caution ! Danger of explosion if battery is incorrectly replaced. Replace only with the same or equivalent type recommended by the manufacturer.
- Page 294 SHARP CORPORATION Business Solutions CS Promotion Center II Yamatokoriyama, Nara 639-1186, Japan First Edition 2013 September Latest Edition 2013 October...