Table of Contents
Advertisement
Quick Links
10. 1 " DVD/HDMI/USB REAR SEAT ENTERTAINMENT SYSTEM
PKG-RSE3HDMI
INSTALLATION MANUAL
Please read before installing this equipment.
ALPINE ELECTRONICS MARKETING, INC.
1-7 Yukigaya-Otsukamachi, Ota-ku
Tokyo 145-0067, Japan
Tel.: 03-5499-4531
ALPINE ELECTRONICS OF AMERICA, INC.
19145 Gramercy Place
Torrance, California 90501 U.S.A.
Tel.: 1-800-ALPINE-1 (1-800-257-4631)
ALPINE ELECTRONICS (BENELUX) GmbH
Leuvensesteenweg 510-B6,
1930 Zaventem, Belgium
Tel.: 02-725 1315
DIGITAL VIDEO
MANUAL DE INSTALACIÓN
Leealo antes de utilizar equipe.
GUIDE D'INSTALLATION
Veuillez lire avant d'utiliser cet appareil.
ALPINE ELECTRONICS OF AUSTRALIA PTY, LTD.
161-165 Princess Highway, Hallam
Victoria 3803, Australia
Tel.: 03-8787-1200
ALPINE ELECTRONICS GmbH
Wilhelm-Wagenfeld-Strase 1-3
80807 München, Germany
Tel.: 089-32 42 640
ALPINE ELECTRONICS OF U.K., LTD.
ALPINE House
Fletchamstead Highway, Coventry CCV4 9TW, U.K.
Tel.: 0870-33 33 763
R
ALPINE ELECTRONICS FRANCE S.A.R.L.
(RCS PONTOISE B 338 101 280)
98, Rue de la Belle Etoile, Z.I. Paris Nord II,
B.P. 50016, 95945 Roissy Charles de Gaulle
Cedex, France
Tel.: 01-48638989
ALPINE ITALIA S.p.A.
Viale C. Colombo 8, 20090 Trezzano
Sul Naviglio (MI), Italy
Tel.: 02-484781
ALPINE ELECTRONICS DE ESPAÑA, S.A.
Portal de Gamarra 36, Pabellón, 32
01013 Vitoria (Alava)-APDO 133, Spain
Tel.: 945-283588
Designed by Alpine Electronics of America, Inc.
Printed In China
EN
ES
FR
Advertisement
Table of Contents

Related Manuals for Alpine PKG-RSE3HDMI


Summary of Contents for Alpine PKG-RSE3HDMI
- Page 1 ALPINE ELECTRONICS DE ESPAÑA, S.A. Fletchamstead Highway, Coventry CCV4 9TW, U.K. Tel.: 02-725 1315 Tel.: 0870-33 33 763 Portal de Gamarra 36, Pabellón, 32 01013 Vitoria (Alava)-APDO 133, Spain Tel.: 945-283588 Designed by Alpine Electronics of America, Inc. Printed In China...
-
Page 2: Installation And Connections
Do not tap into these leads to provide power for for installations or ground connections. Using such parts could this unit. When connecting the PKG-RSE3HDMI to the fuse disable control of the vehicle and cause fire, etc. box, make sure the fuse for the intended circuit of the PKG- KEEP SMALL OBJECTS SUCH AS BATTERIES OUT OF THE RSE3HDMI has the appropriate amperage. -
Page 3: Installing The Overhead Monitor
Accessories Installing the Overhead Monitor Install the metal installation bracket to the ceiling. Check accessory parts. 4 screws will be used to attach the bracket to the ceiling. AV Input Connector AV Output Connector Power Connector The protruding screw holes should be facing down, away from the ceiling. -
Page 4: Removing Interchangeable Color Cover
The trim ring is used to make the monitor sit flush against the Remove both side panels of the interchangeable ceiling contour. Ask ALPINE dealer for detail. color covers. Screw the shroud to the monitor body using the provided screws. -
Page 5: Mount Side
Remove the top interchangeable color cover. Exercise caution when removing the top plate. - The LCD screen must be fully closed during removal. - Begin removal from the rear of the panel (side facing the 3 button panel). - Removal by hand or by using soft tools is recommended as hard tools may scratch the panel surface. - Page 6 Dome Light Wire (Green) The dome light wire connects the built-in dome light to the cable from the vehicle’s dome light Switch. Polarity change switch is located on the top surface that mounts into the headliner. Vehicle door polarity depends on the vehicle type. The polarity can be changed by the “Door SW polarity”...
- Page 7 Permanent Installation of USB and Connect the KCU-315UH HDMI/USB Extension Connector for PKG-RSE3HDMI (15 ft) (Sold HDMI2 separately). If desired, the second HDMI input may be permanently wired through the headliner. MEDIA PLAY Remove the cover. KCU-315UH HDMI/USB Extension Connector Remove 2 screws.
-
Page 8: System Connections
Monitor(s) Output Devices Devices Rear Side Image AV OUTPUT AV INPUT HDMI1 INPUT USB Media Play HDMI2 INPUT with USB (5V) USB Storage USB Charge HDMI2 PKG-RSE3HDMI DVD MHL or Overhead Monitor Apple HDMI Adapter Media Streaming Smart Device Phone... - Page 9 Connects to the audio output of other products. AV IN (AUDIO R) Red (R) REMOTE OUT White/Brown Connect to ALPINE DVD player, TV tuner (for Europe) or AV/AVN head unit, for their control. REMOTE IN White/Brown Connect from AV/AVN head unit in the front area of the vehicle for PKG-RSE3HDMI control.
-
Page 10: Guía De Consulta Rápida
ALPINE ELECTRONICS DE ESPAÑA, S.A. Fletchamstead Highway, Coventry CCV4 9TW, U.K. Tel.: 02-725 1315 Tel.: 0870-33 33 763 Portal de Gamarra 36, Pabellón, 32 01013 Vitoria (Alava)-APDO 133, Spain Tel.: 945-283588 Designed by Alpine Electronics of America, Inc. Printed In China... - Page 11 HALT USE IMMEDIATELY IF A PROBLEM APPEARS. injury or death Failure to do so may cause personal injury or damage to the product. Return it to your authorized Alpine dealer or the nearest DO NOT WATCH VIDEO WHILE DRIVING. Alpine Service Center for repairing.
-
Page 12: Getting Started
DVD overhead monitor and other devices can be DEVICE buttons controlled by using these buttons. Press the button to change control of other Alpine peripheral devices such as DVD-HU (In-Dash DVD HU), EXT-DVD Front Passenger Control Buttons : FM modulator ON/OFF switch The audio is transmitted to the radio’s FM Tuner, when FM button... -
Page 13: Basic Operations
Switching the Source Basic Operations Main Control Keys and Remote Control Turning Power ON/OFF Press SELECT ( ) to display the Source Select Menu. The power state of the monitor is memorized when Ignition/ACC is turned off. When Ignition/ACC is turned back on, the monitor Press SELECT ( ) again to cycle through the returns to the memorized power state (either ON or OFF),... - Page 14 Loading and Unloading Discs Turn on the power before loading and unloading discs. Pull the USB Media Play cover out, plug the USB storage device into the USB port. Loading discs Change the source to USB. Contents (video, music Insert the disc with the label side facing upwards. and picture) will be played.
-
Page 15: Monitor Setup
HDMI2 Input Monitor Setup The second HDMI input port is located with a USB power Picture Mode, brightness, color, tint and contrast are adjustable. connector on rear side of the overhead monitor. To access the Settings menus, press and hold the DIMMER ( ) button on the Main Control Keys or Remote Control for at least 2 seconds and then... -
Page 16: System Setting
Setting the Picture Mode System Setting To change the Picture Mode, press to cycle The IR audio transmitter, FM modulator and frequency can be through the OSD and select from STANDARD, adjusted for all available sources. VIVID, CINEMA, SPORT and GAME. (Default: STANDARD) SETUP SYSTEM... -
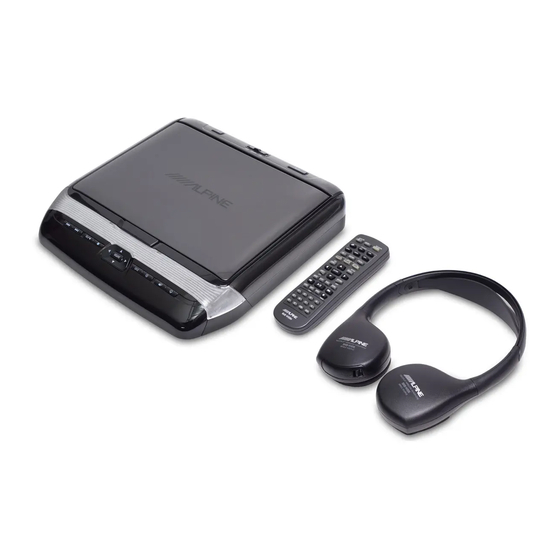
Page 17: Wireless Headphones
Wireless Headphones Accessories Check accessory parts. Headphone Receivers AV Input Connector AV Output Connector Power Connector 1) Battery Cover RUE-4159H Universal SHS-N106 Single Installation Bracket 2) Volume Control Remote Control Source Fold -Flat 3) Power Switch Wireless Headphones 4) Power Indicator LED MONITOR DEVICE MUTE... -
Page 18: Specifications
Specifications Video Display System NTSC/PAL Compatibility DISPLAY SCREEN Size 10.1" Width 221mm (8.70”) Height 132mm (5.20”) Aspect Ratio 16:9 Type Transparent type TN Liquid Crystal Display System TFT-LCD, Active Matrix Number of Elements 1024(W) x 600(H) x 3 1.84M Pixels (WSVGA) Effective Number of 99.9% or more Elements... -
Page 19: Limited Warranty
Warranty. We suggest that you read it thoroughly. Should you have any questions, please contact your Dealer or contact Alpine at one of the telephone numbers listed below. 3 You must supply proof of your purchase of the PRODUCTS COVERED: product.