
Related Manuals for Escort iMiniPlus


Summary of Contents for Escort iMiniPlus
- Page 1 M i n i P l u s U S E R M A N U A L Version 2.12.07MP iMiniPlus User Manual Version 2.12.07MP Copyright © 2016 Cryopak Verification Technologies, Inc. All rights reserved.
- Page 2 The information contained within this document regarding ConsolePro software usage is intended as a guide and does not constitute a declaration of performance. The information contained in this document is subject to change without notice. Complying with all applicable copyright laws is the responsibility of the user. No representation or warranty is given and no liability is assumed by Cryopak Verification Technologies, Inc.
-
Page 3: Table Of Contents
Installing ConsolePro Software .................... 12 Quick Start Guide Connecting the serial or USB cable to PC ................14 Connecting the serial or USB cable to the iMiniPlus ............... 14 Launching the software ....................... 15 Starting and using the iMiniPlus ................... 19 Stopping the iMiniPlus ...................... - Page 4 Contents Summary and Upload Program into iMiniPlus ................ 30 Program upload Failure ....................... 32 Results from iMiniPlus Getting results from iMiniPlus ....................32 Download Wizard ........................ 33 Inspecting the information at close range ................35 View Manager........................35 Views ........................36 Links ........................
- Page 5 Print preview toolbar ......................61 Working with Networks Getting more information Getting updated software ....................62 Finding your software version ....................62 Warranty Dry Ice iMiniPlus Specifications ........................63 Appendix Troubleshooting ........................64 Changing the Battery ......................64 Contact details...
-
Page 7: Introduction
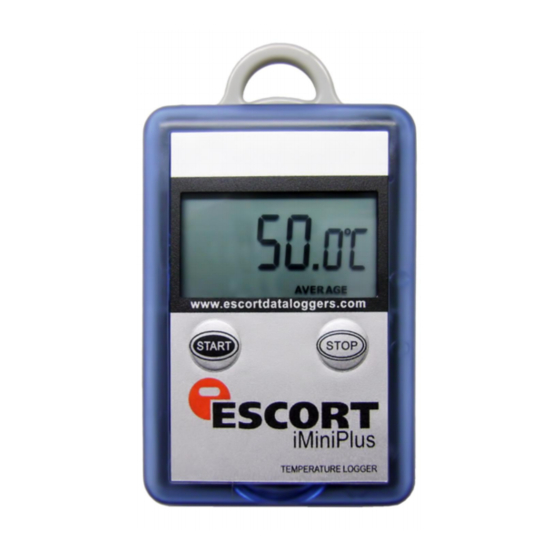
This user manual will take you through the relevant steps so that you will be able to operate your iMiniPlus product. The chapters in this manual are placed in an order that you will need to follow in order to successfully use the iMiniPlus for the first time. - Page 8 MP-OE-D-8-L MP-OE-N-8-L / MP-OE-N-8-L External sensor For Dry Ice logger MP-ST-D-8-L MP-IN-D-8-L Attachment lug For fixing to item or wall Low Battery Icon External sensor Temperature For D range Latest, Highest, Lowest or Average HIGH ALARM LOW ALARM alarm has been triggered HIGHEST LOWEST AVERAGE Displays the high, low and...
-
Page 9: System Requirements
3. Installing the Software & USB driver To operate your iMiniPlus logger you will need to first install the software on your computer. This will allow you to prepare your iMiniPlus for use, retrieve the readings the iMiniPlus has recorded, and analyse the data. This chapter will take you through the steps necessary to successful install the software on to your computer so you can begin using your iMiniPlus. -
Page 10: Getting A Copy Of The Consolepro Software
Getting a copy of the ConsolePro software The software is available on CD from your distributor or downloadable from www.cryopak.com site, Data Logging Systems does not charge for the on-line download of the ConsolePro software or for the updates to the ConsolePro software. Install the free Console Pro Software using either The Console Pro Software CD or 2. - Page 11 Profile 5. Once you have downloaded and installed the Console Pro Software, move on to the second phase of installation by installing the USB Drivers. For a more in depth guide to Console Po Installation, please refer to the user manual provided on the website:...
-
Page 12: Installing The Usb Adaptor Cable Drivers
Programs" item to locate the "Console" shortcut. Installing the USB adaptor cable drivers To be able to operate the iMiniPlus with ConsolePro Software, you have to connect the iMiniPlus to your computer with a serial to USB or serial to serial adaptor. -
Page 13: Getting A Copy Of The Usb Drivers From The Web
Profile Getting a copy of the USB drivers from the web If you misplace the driver mini CD, you can obtain the driver files from our web site www.cryopak.com http://www.cryopak.com/temperature-monitors/software-downloads/ Here you can On the Software Download page, you will see a list of driver file USB driver for windows. -
Page 14: Installing Usb Driver Files Using Found New Hardware Wizard
Installing USB Driver Files using Found New Hardware Wizard If you have experienced a problem installing your USB drivers using the original instructions, you can install either the mini CD or the extracted ZIP file you have downloaded as detailed in the previous chapter, via the “Found New Hardware Wizard” in your computer Control Panel. -
Page 15: Quick Start Guide
Now you have the software and drivers installed on your computer, you can start to use the iMiniPlus. This chapter will briefly cover the steps involved to get your iMiniPlus ready to use, how to get it started and then retrieve the recorded... -
Page 16: Connecting The Serial Or Usb Cable To Pc
Connecting the serial or USB cable to the iMiniPlus The iMiniPlus has a serial DB9 connection on the rear. Connect either the serial cable or USB cable DB9 male connector to this. Make sure that the connector is pushed in, making the connection tight and not loose. -
Page 17: Launching The Software
Products Tab In the Products tab you will see a list of all the products supported by the ConsolePro Software. Make sure the “iMiniPlus” box is ticked and click on OK or Apply. If you intend to use other products, you may tick as many of the boxes you require. - Page 18 Next click on the Program and Configure icon that is located on the toolbar. The Program and Configuration Wizard finds the communication port that the iMiniPlus is connected to enable it to be setup for use. If your software is unable to...
- Page 19 Quick Start Guide MP D range MP Dry Ice Select the Next button Details tab. Enter a description of the temperature application in the 24 characters’ box. Select Next button or Date/Time tab. Check that the date and time is correct.
- Page 20 MP D range MP Dry Ice Next Select button or Summary tab. Check that program settings are what you want. Select Program button or Program tab Program conditions are being uploaded to iMiniPlus...
-
Page 21: Starting And Using The Iminiplus
If it has any different information displayed, the iMiniPlus cannot be started. To activate the iMiniPlus press and hold the START button until the display changes to a series if dashed lines and then the temperature reading. -
Page 22: Stopping The Iminiplus
The iMiniPlus can be stopped only if this has been enabled in the program conditions. (See Opening the Software section). To stop the iMiniPlus press the Stop button and hold for 2 seconds, the word “STOPPED” will be displayed in the top right corner. - Page 23 Quick Start Guide MP D range MP Dry Ice Select the Next button or Finish tab. Select Finish button...
- Page 24 “My Logger Data” in the “My Documents” folder on your computer. You can change this destination if you prefer it to be saved for instance to a shared network drive. See Data from iMiniPlus Chapter that explains in more detail the information that is displayed as a result of downloading the iMiniPlus.
-
Page 25: Preparing Iminiplus For Use
Preparing iMiniPlus for use Before you can start using an iMiniPlus to log the environment you must first prepare it for use. The process of preparing an iMiniPlus for use allows you to define a number of parameters, including: How long it should log the environmental condition for, so that you can be assured that it will record for ... -
Page 26: Password Requirements
If there is a X in the description box, only the Search tab will be displayed and the Program and Configure Wizard cannot proceed any further. This may indicate a fault with either the software or iMiniPlus itself (for example, low battery or lease of the current logger has expired). Consult your nearest distributor or Cryopak technical support team... -
Page 27: Details And Changing Password
If you leave the password blank but enable the protection, to access the iMiniPlus just click OK in the Password Required dialog. -
Page 28: Specification And Alarm
Specification and Alarm Raise alarm on below lower spec readings – tick this box if you want to activate the low alarm and select the value in the box immediately to the right. Note if the lower spec value is 0C, then the alarm can be triggered at -0.1C, not 0.0C as this value is considered within specification. - Page 29 50.1C, not 50.0C as this value is considered within specification. The table below demonstrates arbitrary data from an iMiniPlus and how different alarm sources will be triggered. This is complicated scenario for alarm settings based on: ...
-
Page 30: Iminiplus Display
Tick this box if you want to enable the display to show the temperature readings and statistics. If the box is un-ticked, all other features will be greyed out. The iMiniPlus LCD will show “d-off” instead of a temperature value. Additionally you will not be able to scroll through the highest lowest, average and out of spec readings. -
Page 31: Checking The Time Clock
Preparing iMiniPlus for use equal to the logging interval. So if the iMiniPlus is programmed to log every 1 minute, that will be the rate at which the “LATEST” reading changes. Checking the time clock There may be times when the time clock on the iMiniPlus may alter. -
Page 32: Start New Log Trip
The slowest logging interval the iMiniPlus can log is every 18 hours. Start new log trip The only way to start an iMiniPlus is by using the START button. With other products it is possible to have a timed or date start as well as a switch start. - Page 33 Preparing iMiniPlus for use Program conditions are being uploaded to iMiniPlus The iMiniPlus has been correctly programmed MP D range MP Dry Ice If the program settings have been uploaded correctly the blue progress bar will show 100% and the word...
-
Page 34: Program Upload Failure
PC screen. It is usually very important that the information retrieved from an iMiniPlus is retained. Through the software you can save the information retrieved from an iMiniPlus to your disk drive so that you can view the information at a later date. This chapter explains how you can retrieve the logged data stored within an iMiniPlus and have the software display it to you on the screen in a meaningful way. -
Page 35: Download Wizard
Additionally some Help documentation may not be present due to the software version you are currently using. Consult this iMiniPlus manual if you are not sure about any description. Download Wizard Start page Displays information about the iMiniPlus along with the date and time of the first reading. - Page 36 If FAILURE appears in the Result and there is a RED next to in the Description this may indicate the iMiniPlus has already been programmed. If this is not the case, there is a fault with the iMiniPlus and it will need to be returned to your distributor.
-
Page 37: Inspecting The Information At Close Range
The View Manager will only be functional when a set of data has been opened or been downloaded from an iMiniPlus. If you want to see the View Manager in any other ConsolePro window location, simply select and drag. The View Manager has 3 tabs: Views - Manages the type of reading, graph or summary you would like to display. -
Page 38: Views
Displays reading summary report followed by detailed list of actual readings. Summary report includes such facts as the serial number of the iMiniPlus and a description of the environment recorded, trip number, start and finish dates, time zone, number of readings, etc. - Page 39 Results from iMiniPlus 2D Graph. Line - displays the logger’s reading as a line graph. Step - displays the logger’s readings as a step graph. You can enlarge a section of the graph with the mouse. Move the mouse to one corner of the area you...
-
Page 40: Links
MP-OE-D-8-L and it refers to the sensor that is externally connected to the iMiniPlus via a one meter cable. Each time an iMiniPlus is downloaded into ConsolePro software or a series of data is opened, a separate Readings and Summary box is opened like the picture below:... -
Page 41: Multiple Trip Synchronization Wizard
“Manually define how To customize how the log trip data from an iMiniPlus is included, select the option the trip data is to be compared with other trip data”... -
Page 42: Analysis
You can use Reading number or @ fields to set time and date to be used for the first reading of the iMiniPlus to be added or you can use Suggest button to allow software set first reading date and time. - Page 43 Results from iMiniPlus Highest reading Select this option to display the maximum value of the iMiniPlus readings in the 2D graph legend. Lowest reading Select this option to display the minimum value of the iMiniPlus readings in the 2D graph legend.
- Page 44 Select this option to display the Mean Kinetic Temperature of the iMiniPlus readings in the 2D graph legend. There are some products and materials that exist which have accelerated rates of degradation at higher temperatures. For example, perishable food items,...
-
Page 45: View Data In A Graph
View Data in a Graph Open the data either from downloading an iMiniPlus or from a saved file. When the data opens it will present a List and Summary Report. Go to the View Manager and select the View tab. Then select 2D... - Page 46 You can select the Graph option under the Edit menu to customize the look of the 2D graph.
-
Page 47: Data
(specification) limits as shown in this example. In the left hand side of the box the description of the iMiniPlus data is displayed. If there were more than one data file was selected through the Multi Trip Synchronization feature, you would see those listed here as well. -
Page 48: Zoom
Vertical (Y) Axis This enables you to fill the graph from the left or right or use both sides of the graph. Border Colors This enables you to select border colors for your graph. Vertical (Y) Axis Limits This enables you to display the graph Y-axis (temperature readings) to fit either the complete range of the sensor (-40°C to +70°C) or within the alarm limits (if programmed) or from 0°C to the actual readings. -
Page 49: Legend
GMT Time Zone All times are displayed in Greenwich Mean Time representation Use daylight time By selecting the box, the iMiniPlus data will shift +1 hour to accommodate Daylight Saving Time. Colors 2D Graphs can be customized to your color preferences. -
Page 50: Printing The Results
Printing the results The print window can be brought up by simply clicking once on the toolbar "Print" icon located on the or by clicking the "Print..." menu item from within the File menu. Sending a file by e-mail direct from Console You can send files of interest to another person, by e-mail, directly from the software without the need to exit to your e-mail software or to deal with file attachments. -
Page 51: General
Select this box to display the available communications ports and list of loggers that need to be selected. See section Getting an iMiniPlus ready for logging. Display Tip of the Day when starting Select this box if you want to display a Tip of the Day box when ConsolePro is first opened. This can be... -
Page 52: File
File Recently used file list This determines how many of the most recently accessed files File are listed in the " " menu for quick access to be opened and viewed again. Once this number of files has been reached, the reference to the oldest file opened will be removed and the most recently opened file will be added to position 1. -
Page 53: Time
This option will not have any effect on the original recorded data. GMT Time Zone All times are displayed in Greenwich Mean Time representation Use daylight time By selecting the box, the iMiniPlus data will shift +1 hour to accommodate Daylight Saving Time. 2D Graphs... -
Page 54: Legend
Comment Select this box if you want to display the comment line on the bottom of the graph Title Select this box if you want to place a title on the top of the graph. Readings ToolTip Select this box if you want the Tooltip box to open next to the mouse cursor on the graph. -
Page 55: Products
Communications You need to select the correct communication port that is connected to the iMiniPlus. The box above displays all the ports available to be used within Console. Please make sure that if a USB adaptor is used it is connected BEFORE you start Console, otherwise it will not show in the list. -
Page 56: Colors
The Advanced tab in Options enables you to select or deselect certain parts of the ConsolePro software program. See descriptions below. These options not apply to iMiniPlus: Automatically expand list of sensors(s) when grouping them Calculate and display interpolated readings... -
Page 57: Menus And Toolbars
Menus and Toolbars Show connection reminder for programming loggers and ChartReaders This description box appears at the start of the program and configuration wizard and can either be selected or disabled through the Advanced tab or disabled by ticking the “Do not remind me of this again”... -
Page 58: Menu Commands
The "File" menu contains commands that generally relate to an iMiniPlus file as a whole. An iMiniPlus file contains a variety of information that relates to a data set representing readings that were recorded over a discrete period of time by a single iMiniPlus. The File menu will appear similar to the following picture. -
Page 59: Edit Menu
Edit Menu The "Edit" menu contains commands that generally relate to the contents of an iMiniPlus file and will appear similar to the following picture. The following table outlines the commands and the explanation of each command that may appear in the "Edit" menu when using the ConsolePro... - Page 60 Command Explanation Places a copy of the contents of the currently displayed window onto the Copy ( clipboard, which can then be pasted into any Windows ® application. If you are copying a graph, the graph at its current zoom range is copied to the clipboard. If you are copying from one of the tabular style windows (Readings or Summary), then the entire contents of the window are copied to the clipboard, regardless of what part of the data you have scrolled to view.
-
Page 61: Action Menu
This will display a wizard to help you through the necessary Program and Configure...( steps to prepare the iMiniPlus for its next use. This command Preparing is explained in further detail in the chapter "... -
Page 62: Help Menu
Save a copy of the iMiniPlus data to a file on your disk drive. Opens the window that will allow you to print a copy of the iMiniPlus data to a printer. Creates a new blank email for sending a copy of the currently selected open file as an attachment to a recipient of your choice. -
Page 63: Status Bar
Opens Restart Wizard that reprograms iMiniPlus using previous logging settings for new logged trip. Opens Program and Configure Wizard to help you through the necessary steps to prepare the iMiniPlus for its next use. This command is explained in further detail in the chapter Preparing iMiniPlus for use” "... -
Page 64: Working With Networks
Warranty The iMiniPlus has a 24 months warranty valid from date of purchase. In the event of a malfunction please contact your distributor. The warranty has the following exclusions: If the unit has been modified from manufacturer’s specifications. -
Page 65: Dry Ice Iminiplus
Dry Ice iMiniPlus Important Notes: Do not place the logger inside the dry ice temperatures, use external probe instead 2. Battery of iMiniPlus is not able to withstand temperatures below -40°C 3. Do not crush or cut the external probe Specifications... -
Page 66: Appendix
10minutes or when it is interrogated by software i.e. downloading or program and configure. To change the battery, turn the iMiniPlus over and unscrew the battery cover on the back with a coin. Remove the old battery and exchange for a fresh Battery one. -
Page 67: Contact Details
Contact details 14. Contact details If you require further information regarding CRYOPAK Verification Technologies, Inc. products please contact us at: Mailing Address: PO Box 309, Buchanan, VA 24066 Office: 120 Parkway Drive, Buchanan, VA 24066 Phone: +1-540-254-1433 +1-732-346-9200 Ext. 150 Fax: +1-540-254-2433 Email:...