
Related Manuals for MD SPORTS 1656310


Summary of Contents for MD SPORTS 1656310
-
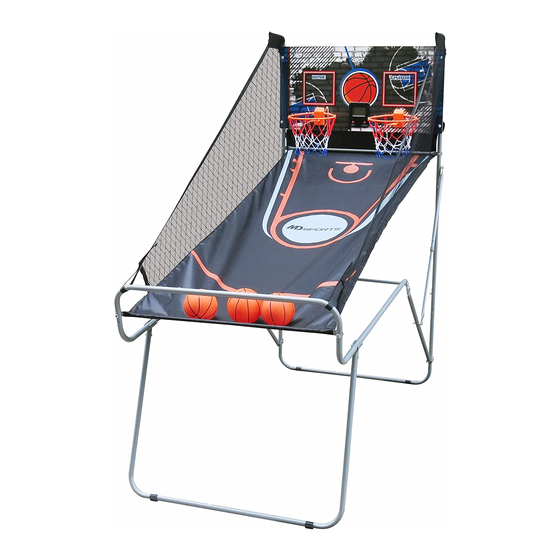
Page 1: Assembly Instructions
MODEL: 1656310 Blain's ASSEMBLY INSTRUCTIONS ATTENTION DO NOT RETURN TO THE STORE Contact MD Sports Customer Service * For additional resources and Frequently Ask Questions, please visit us at themdsports.com... - Page 2 2 - Please review the replacement parts list and make sure that you have all of your parts before beginning assembly. For questions that may arise or for missing/damaged parts, please contact us. (Continued on the next page.) www.themdsports.com 1656310...
-
Page 3: Tools Required
3 years. Strong Adults Needed No Children in Keep away from pets Do not use or keep product outdoors. For indoor use only. Assembly Area No wet/humid conditions. (Continued on the next page.) www.themdsports.com 1656310... - Page 4 1656310 PARTS LIST Tube Set-1 Tube Set-2 Tube Set-3 Tube Set-4 Tube - 8 Tube - 6 Tube - 7 Tube Set-5 Φ19*740mm Φ19*740mm Φ12.7*715mm Tube - 9 Ball Return Net Backboard M6x15mm Bolt Φ12.7*740mm M6x30mm Bolt M6x42mm Bolt M6 Washer...
- Page 5 Carefully cut or tear the four corners of the box so that the bottom of the box can be used as your work surface. BEFORE ASSEMBLY - Please inspect and layout all the POLES and parts 1656310 (Continued on the next page.) www.themdsports.com...
- Page 6 3. Attach the Tube Set - 1 (#1) and the Tube Set - 2 (#2) using the spring locks as shown in FIG. 1. FIG. 2 Spring Lock FIG.2 4. Attach the Tube Set - 4 (#4) and the Tube Set - 5 (#5) using the spring locks as shown in FIG. 2. 1656310 www.themdsports.com (Continued on the next page.)
- Page 7 FIG.4 Spring Lock Spring Lock FIG.4 6. Attach the Tube Sets - 1 (#1), 2 (#2), 3 (#3), 4 (#4) and 5 (#5) together using the spring locks as shown in Fig. 4. 1656310 www.themdsports.com (Continued on the next page.)
- Page 8 2 Nuts (#16) as shown in FIG. 6. 10. Attach the Tube - 8 (#8) to the Tube Set - 4 (#4) and the Tube Set - 5 (#5) as shown in FIG. 6. 1656310 www.themdsports.com (Continued on the next page.)
- Page 9 Ball Return Net and attach it to the Tube - 8 (#8) using 2 Bolts (#13), 4 Washers (#15) and 2 Nuts (#16) as shown in FIG. 8D y 8E. 1656310 www.themdsports.com (Continued on the next page.)
- Page 10 A. Using the spring lock, fold part (#P4) as shown. B. Fold parts (#4 and #5) as shown. FIG. 9D FIG. 9C D. Fold part (#8) as shown. C. Fold part (#6) as shown. 1656310 www.themdsports.com (Continued on the next page.)
- Page 11 FIG. 9E FIG. 9F E. DO NOT store vertically as shown. F. DO NOT store horizontally as shown. FIG. 9G G. Store flat as shown. 1656310 www.themdsports.com (Continued on the next page.)
- Page 12 . The player that scores first on their own hoop during each 5 second game receives 2 points. . Only one score is counted for each 5 second game. . The winner is the player with the most points at the end of the 20 game match. 1656310 www.themdsports.com (Continued on the next page.)
- Page 13 3) Do not mix alkaline, standard (carbon zinc), or (1) This device may not cause harmful interference, rechargeable (nickel-cadmium) batteries. (2) This device must accept any interference received, including interference that may cause undesired operation. YOU ARE NOW READY TO PLAY! 1656310 (The last page) www.themdsports.com...