
Related Manuals for Cisco Explorer 8300C


Summary of Contents for Cisco Explorer 8300C
- Page 1 User Guide Explorer 8240C and 8300C Digital Video Recorder with Multi-Stream CableCARD Interface CH + GUIDE POWER VOL - VOL + INFO CH - SELECT EXIT LIST INPUT AUDIO VIDEO...
- Page 2 Notice to Installers The servicing instructions in this notice are for use by qualifi ed service personnel only. To reduce the risk of electric shock, do not perform any servicing other than that contained in the operating instructions, unless you are qualifi ed to do so.
-
Page 3: Table Of Contents
Contents Important Safety Instructions.....................iv Welcome ........................... 1 Safety First ..........................1 For More Information ......................... 1 Identify Your 8240C or 8300C ....................1 What’s On the Front Panel? ...................... 2 What’s On the Back Panel? ....................... 3 Connecting the DVR ........................4 Connections for a Standard-Defi nition TV and VCR .............. -
Page 4: Important Safety Instructions
IMPORTANT SAFETY INSTRUCTIONS Read These Instructions Antenna Lead In Wire Keep These Instructions Heed All Warnings Ground Clamps Follow All Instructions Antenna Discharge Unit (NEC Section 810-21) Power Source Warning Grounding Conductors Electric Service (NEC Section 810-20) A label on this product indicates the correct power source Equipment for this product. -
Page 5: Operating Environment
IMPORTANT SAFETY INSTRUCTIONS, continued Prevent Power Cord Damage Accessories Warning Protect the power cord from being walked on or pinched, particularly at plugs, convenience receptacles, and the point where the cord exits from the apparatus. WARNING: Avoid electric shock and fi re hazard! Only use attachments/accessories specified by your service provider or the Provide Ventilation and Select a Location... -
Page 6: Welcome
The consumer support website provides news and information about this product. For more information, please refer to the following Web address: http://www.cisco.com/web/consumer/support/index.html Identify Your 8240C or 8300C To fi nd the serial number for your 8240C or 8300C, look on the back for a label that is similar to the example shown here. -
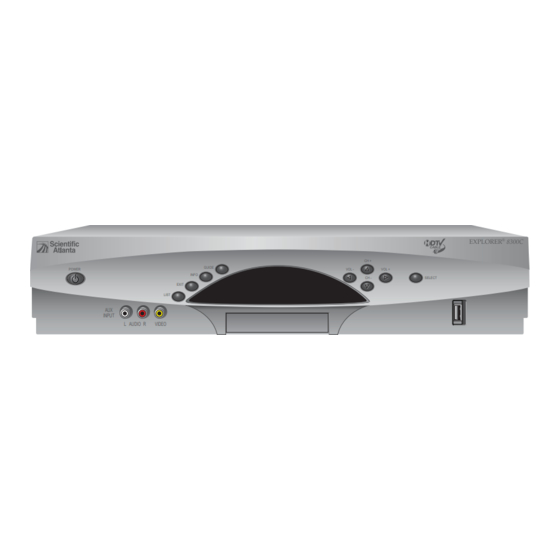
Page 7: What's On The Front Panel
What’s on the Front Panel? CH + GUIDE POWER VOL - VOL + INFO CH - SELECT EXIT LIST INPUT AUDIO VIDEO 1 Power Turns the DVR on and off 2 Video and Connects to video and left/right (L/R) audio outputs of an external device to deliver the Audio Input audio and video to a TV or other device. -
Page 8: What's On The Back Panel
What’s on the Back Panel? CAUTION CABLE RISK OF ELECTRIC SHOCK DO NOT OPEN MULTI-STREAM OUT 1 OUT 2 AVIS: RISQUE DE CHOC ELECTRIQUE NE PAS OUVRIR THIS DEVICE IS INTENDED TO BE ATTACHED TO A RECEIVER THAT IS NOT USED TO RECEIVE OVER-THE-AIR BROADCAST SIGNALS. -
Page 9: Connecting The Dvr
Connecting the DVR To connect your DVR to your entertainment devices, complete these steps. Connect the coaxial cable that carries the signal from your service provider to the CABLE IN connector on the back panel of the set-top. Connect your SDTV to the DVR. Refer to the Connections for a Standard-Defi nition TV and Standard VCR section on page 5. -
Page 10: Connections For A Standard-Defi Nition Tv And Vcr
Connections for a Standard-Defi nition TV and VCR When using the DVR with an SDTV, you must make one of the following connections to view content. Some SDTVs may not have all of these connections. In addition, you can make connections to a VCR to archive recordings to a VCR tape. -
Page 11: View And Record Television Programming
View and Record Television Programming Access Services and Programs Access cable services and programs by pressing the following keys on the remote control: • Guide–Access the on-screen guide. The on-screen guide displays schedules of TV programs and other services available from your service provider, such as video-on-demand and pay-per-view programs. •... -
Page 12: Performance Tips
Performance Tips If the DVR does not perform as expected, the following tips may help. If you need further assistance, contact your service provider. No Picture • Verify that the power to your TV is turned on. • If the DVR is plugged into a wall switch, verify the wall switch is in the ON position. Note: You should avoid plugging the DVR into an outlet that is controlled by a wall switch. -
Page 13: Connecting To A Standard Tv And Standard Vcr
Connecting to a Standard TV WARNING: Electric shock hazard! Unplug all electronic devices before connecting or disconnecting any device cables to the DVR. Explorer DVR CAUTION CABLE RISK OF ELECTRIC SHOCK DO NOT OPEN MULTI-STREAM OUT 1 OUT 2 AVIS: RISQUE DE CHOC ELECTRIQUE NE PAS OUVRIR THIS DEVICE IS INTENDED TO BE ATTACHED... -
Page 14: Connecting To A Stereo Tv And Stereo Vcr
Connecting to a Stereo TV Explorer DVR CAUTION CABLE RISK OF ELECTRIC SHOCK DO NOT OPEN MULTI-STREAM OUT 1 OUT 2 AVIS: RISQUE DE CHOC ELECTRIQUE NE PAS OUVRIR THIS DEVICE IS INTENDED TO BE ATTACHED TO A RECEIVER THAT IS NOT USED TO RECEIVE OVER-THE-AIR BROADCAST SIGNALS. -
Page 15: Connecting To A Home Theater Receiver And Stereo Tv
Connecting to a Home Theater Receiver and Stereo TV WARNING: Electric shock hazard! Unplug all electronic devices before connecting or disconnecting any device cables to the DVR. Explorer DVR CAUTION CABLE RISK OF ELECTRIC SHOCK DO NOT OPEN MULTI-STREAM OUT 1 OUT 2 AVIS: RISQUE DE CHOC... -
Page 16: Connecting To An Esata Hard Disk Drive (Optional)
Connecting to an eSATA Hard Disk Drive (optional) Complete the following steps to install an eSATA drive. 1. Make sure that both the DVR and the eSATA drive are unplugged from power. 2. Connect the data cable for the eSATA drive to the DVR. 3. - Page 17 Connecting to an eSATA Hard Disk Drive (optional), continued Guidelines for Using the eSATA Hard Disk Drive The eSATA hard disk drive requires continuous power. If the eSATA drive loses power while the DVR is plugged in, the DVR may stop current recordings or not provide enough space for future recordings. Follow these guidelines for using the eSATA drive: •...
-
Page 18: Index
Index FAQs FCC compliance Back Cover Outlet iv, 3, 11 Frequently Asked Questions. See FAQs Power input Front panel Back panel Burn-in of screen Hard disk drive, external. See eSATA Home theater system connection CableCard 3, 7 Cable Out, connector Compliance, FCC and Canadian EMI Back Cover IR Sensor... - Page 19 Index, continued S-Video Safety ii, iv-v, 7 Screen burn-in SD mode SDTV connections Serial number, locating Set-top. See Welcome Software updates Sound, troubleshooting Standard TV 5, 8 Support, consumer Time display Troubleshooting programming recording Updating, software USB port VCR connection 5, 8, 9 View programs Watch TV...
-
Page 20: Fcc Compliance
Lawrenceville, GA 30042 www.cisco.com Cisco and the Cisco logo are trademarks or registered trademarks of Cisco and/or its affi liates in the U.S. and other countries. A listing of Cisco’s trademarks can be found at www.cisco.com/go/trademarks. CableCARD and M-Card are trademarks of Cable Television Laboratories, Inc.