
Related Manuals for EverFocus EZ632e


Summary of Contents for EverFocus EZ632e
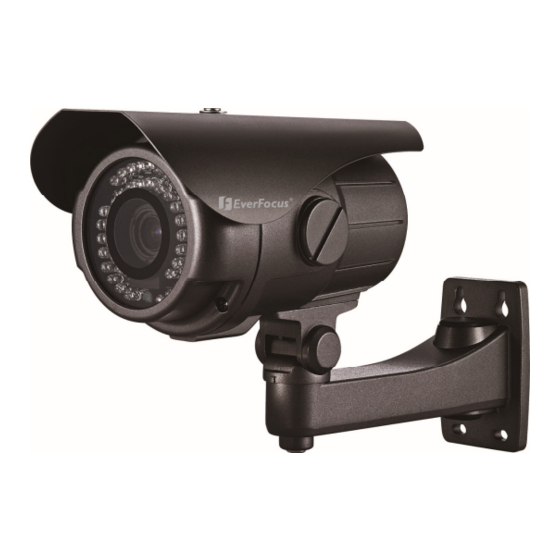
- Page 1 EverFocus Operation Instruction 700TVL High Resolution Day / Night Weather Resistant Outdoor IR Bullet Camera...
-
Page 2: Operation Instruction
All specifications are therefore subject to change without notice. All rights reserved. No part of the contents of this manual may be reproduced or transmitted in any form or by any means without written permission of the EverFocus Electronics Corporation. - Page 3 PRECAUTIONS Do not install the camera near electric or magnetic fields. Install the camera away from TV/radio transmitters, magnets, electric motors, transformers and audio speakers since the electromagnetic fields generated from these devices may distort the video image or otherwise interfere with camera operation. Never disassemble the camera beyond the recommendations in this manual nor introduce materials other than those recommended herein.
- Page 4 ATTENTION! This is a class A product which may cause radio interference in a domestic environment; in this case, the user may be urged to take adequate measures. Federal Communication Commission Interference Statement This equipment has been tested and found to comply with the limits for a Class B digital device, pursuant to Part 15 of the FCC Rules.
-
Page 5: Table Of Contents
Table of Contents 1. PRODUCT OVERVIEW ........................6 ............................. 6 EATURES ....................... 6 CCESSORY ARTS ........................... 7 PECIFICATIONS ..........................8 IMENSIONS 2. INSTALLATION AND CONNECTION..................... 9 ....................9 NSTALLATION OF THE AMERA ......................9 DJUST RACKET ........................10 OCUS DJUSTMENT .................... -
Page 6: Product Overview
1/3” Sony Exview HAD CCD II 960H sensor, is just the beginning with the new EverFocus EZ632e. Equip with 42 IR LEDs to get extended IR range, variable output IR control to manage illumination and conserve energy, 700TVL resolution, full motion true day/night images even... -
Page 7: Specifications
Please Note: If an item appears to have been damaged in shipment, replace it properly in its carton and notify the shipper. If any items are missing, notify your EverFocus Electronics Corp. Sales Representative or Customer Service. The shipping carton is the safest container in which the unit may be transported. -
Page 8: Dimensions
Dimensions... -
Page 9: Installation And Connection
Chapter 2. Installation and Connection Installation of the Camera Use the supplied screws (in the appurtenance bag), and secure the camera in position. Adjust 2-Axis Bracket Adjust the bracket while checking the view angle from the monitor. Loosen the X-Y screws and then adjust the 2-Axis bracket (X-Y to get the desired viewing angle). -
Page 10: Focus Adjustment
Focus Adjustment Focus adjustment should be done with zoom focus at the same time. Use the screwdriver to adjust the zoom/ focus ratio (from wide to tele or near to far). NOTE: Focus adjustment position may be different depending on model type. Remove the Controller Cap Use a coin to remove the controller cap and make adjustments. -
Page 11: Install Sunshield
The Table below shows the suggested LED brightness and IR distance adjustment: LED Brightness IR Distance Focal Length H (High) 25m~40m 9~22mm M (Middle) 15m~25m 6~12mm L (Low) 10m~15m 3.7~6mm (1) Function Switch 1 Left Key 2 Up Key 3 Enter Key 4 Right Key 5 Down (2) IR Distance Adjustment... -
Page 12: Connect To A Monitor
Connect to a Monitor Connect the Video-out port of the camera to a monitor. As the connecting method varies depending on the instrument, therefore refer to the manual supplied with the instrument for more information. Connect the Power Connect to a DC 12V, 500mA adaptor or an AC 24/ DC 12V adaptor (optional). Note: The Alarm out application cable is an optional item, the standard type does not provides it. -
Page 13: Osd Menu & Configuration
Chapter 3. OSD Menu & Configuration Main Menu Display OSD Setup Menu page 1 AUTO↲ ↲ ↲ ↲ LENS AUTO↲ ↲ ↲ ↲ SHUTTER /AGC WHITE BAL BACKLIGHT ↲ ↲ ↲ ↲ ↲ ↲ ↲ ↲ PICT ADJUST NEXT↲ ↲ ↲ ↲ EXIT↲... -
Page 14: Osd Main Menu Description
OSD Main Menu Description 3.1.1 LENS: MANUAL /AUTO selectable. LENS: MAUNAL Adjustment is not required. LENS: AUTO TYPE:DC MODE:AUTO/ OPEN /CLOSE AUTO SPEED:000~255 AUTO: Camera automatically controls the lens. OPEN: Lens is fully open. CLOSE: Lens is fully closed. SPEED: Speed of the lens. 3.1.2 SHUTTER/AGC: AUTO / MANUAL selectable. -
Page 15: White Bal: Atw / Push / User1 / User2 / Anti Cr / Manual / Push Lock Selectable
SHUTTER/AGC: MANUAL MODE:SHUT+AGC SHUTTER:1/60, 1/100, 1/250, 1/500, 1/1000, 1/2000, 1/4000, 1/10000 MANUAL AGC:6.00、12.00、18.00、24.00、30.00、36.00、42.00、44.80 SHUTTER: Fixed electronic shutter speed. AGC: Fixed AGC gain control. 3.1.3 WHITE BAL: ATW / PUSH / USER1 / USER2 / ANTI CR / MANUAL / PUSH LOCK selectable. -
Page 16: Backlight: Blc / Hlc / Off Selectable
3.1.4 BACKLIGHT: BLC / HLC / OFF selectable. BACKLIGHT.: BLC Enable the function of Back Light Compensation, and the detection method is BLC Smart. BACKLIGHT.: HLC Enable the function of High Light Compensation. 3.1.5 ATR: ON / OFF selectable. ATR.: ON LUMINANCE LOW、MID、HIGH CONTRAST... -
Page 17: Next
NEXT: ↲ 3.1.8 Move to MAIN MENU. EXIT: ↲ 3.1.9 Exit OSD to choose the list. 3..1.10 SAVE ALL: When you change the OSD menu settings, before leaving the OSD item option SAVE ALL. Press ENTER key to change the memory settings for the OSD. 3.1.11 PRIVACY: ON / OFF selectable. -
Page 18: Motion: On / Off Selectable
3.1.12 MOTION: ON / OFF selectable. MOTION DET: ON DETECT SENSE 000~127 BLOCK DISP ON / OFF / ENABLE MONITOR AREA ON / OFF AREA SEL 000~244 (NTSC) / 000~288(PAL) BOTTOM 000~244 (NTSC) / 000~288(PAL) 540TVL:000~378 (NTSC)、000~370 (PAL) LEFT 650TVL:000~474 (NTSC)、000~468 (PAL) 540TVL:000~378 (NTSC)、000~370 (PAL) RIGHT 650TVL:000~474 (NTSC)、000~468 (PAL) -
Page 19: Language
The display switches to the camera ID display position setting screen when the Enter operation input is performed from the status in which POS has been selected using the character selection cursor. On the camera ID display position setting screen, the camera ID display position is changed in real time in response to the left, right, up or down operation input. - Page 20 EverFocus USA - California: EverFocus USA - New York: 1801 Highland Avenue, Unit A, Duarte, CA 415 Oser Avenue, Unit S, Hauppauge, NY 11788, 91010, USA TEL: +1 626 844 8888 TEL: +1 631 436 5070...