
Related Manuals for Zoom Q2N


Summary of Contents for Zoom Q2N
- Page 1 User Guide Safety and Operation Precautions must be read before using this unit. © 2016 ZOOM CORPORATION Copying or reprinting this User Guide in part or in whole without permission is prohibited.
-
Page 2: Table Of Contents
Contents Safety Precautions ........ 3 S Mic that supports plug-in power ... 16 Usage Precautions ........ 4 Headphones/line and HDMI output ... 17 Parts and their functions ...... 5 S Headphones/line output ..... 17 S Front ..........5 S HDMI output ........ 17 S Back .......... -
Page 3: Safety Precautions
Use 2 commercially-available 1.5V AA Never use any AC adapter other than a batteries (alkaline dry cell batteries or nickel ZOOM AD-17 . metal hydride batteries). Always hold the AC adapter itself when Carefully study the warning indications of the disconnecting it from an outlet. -
Page 4: Usage Precautions
Zoom Corporation will not assume any re- However, equipment that is very susceptible sponsibility related to infringements of copy- to interference or that emits powerful electro- rights. -
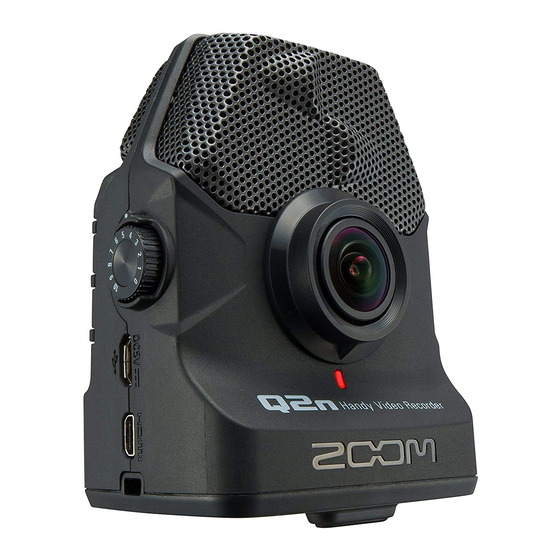
Page 5: Parts And Their Functions
Parts and their functions S Front Built-in XY mic Lens REC LED S Back VIDEO button LO CUT button FOV button AUDIO button SCENE button AUTO GAIN button POWER/PLAY button SETTING/EXIT button REC button... -
Page 6: S Sides
Parts and their functions (continued) S Sides Left side Right side Input volume control Output volume control USB port * A ZOOM AD-17 Headphone AC adapter (sold separately) can also jack be connected here. External input HDMI port jack Strap... -
Page 7: S Mic Overview
Parts and their functions (continued) S Mic overview The Q uses the XY technique with two crossing directional mics. SETTING/ EXIT Features: Providing a three-dimensional sound with natural depth and width, this technique is ideal for recording when you want to capture a specific sound source that is nearby or at a medium distance. -
Page 8: Turning The Power On And Off
Turning the power on and off S Turning the power on Press The REC LED on the front will light red and then green. S Turning the power off Press and hold After “Goodbye See You!” appears, the power turns off. -
Page 9: Preparing For Use
Preparing for use S Formatting SD cards You should format SD cards for use with the Q. When the Recording Screen is open, press c to open the Setting Screen. Select “SD Format” . On the Confirmation Screen, press r and select “YES R” . This will start SD card formatting. -
Page 10: Adjusting Recording Levels
Adjusting recording levels I on the right side of the unit. Turn If a peak indicator lights on the screen, turn I to lower the level. Lower level Raise level Adjust the level so that the peak indica- tors do not light even when loud sounds are input. -
Page 11: Recording
Recording S Recording operations Press This starts video recording. r again to stop video re- Press cording. NOTE During video recording, the REC LED on the front lights red. -
Page 12: S Using The Recording Screen
Recording (continued) S Using the Recording Screen Set recording operations and the recording format on this screen. When recording: recording time When paused: available recording time Remaining battery level VIDEO setting „ LO CUT setting ‚ FOV setting … AUDIO setting †... -
Page 13: Camera Setting For Recording Conditions
Recording (continued) ƒ SCENE: camera setting for recording scene conditions Setting Explanation AUTO Adjustments are made without specific scene conditions. OUTDOOR Adjustments are optimized for outdoor recording. SUNSET Adjustments are optimized for sunset scenes. NIGHT Adjustments are optimized for night and other dark situations. Adjustments are optimized for concert lighting conditions that are bright CONCERT LIGHT and change drastically. -
Page 14: Playing Recordings
Playing recordings S Using the Playback Screen On this screen, you can control playback, check file information and switch and delete files. Remaining playback Status indicator Remaining battery level Playing: time Paused: Stopped: Deleting files Check file information Select next file Select previous file Move playback... -
Page 15: Making System Settings
Making system settings S Using the Setting Screen Use this screen to make system settings. Use 6 to change the item shown. Change adjacent items Show different items Setting item Description HDMI Out Set the format of the video output from the HDMI port. Select NTSC or PAL. Set whether the Q makes sounds when it is turned on and operated. -
Page 16: Connections With External Input Jacks
Connections with external input jacks You can capture audio with an external mic or audio device when recording audio or video. Connect the external mic or audio device to the external input jack. Press This starts video recording. EXT IN S Mic that supports plug-in power Enable plug-in power for mics that support it. -
Page 17: Headphones/Line And Hdmi Output
Headphones/line and HDMI output S Headphones/line output You can listen to the audio with headphones or an external audio amplifier. Connect headphones or audio equip- ment to the headphone jack using a stereo mini plug cable. p to play the video or Press audio. -
Page 18: Usb Connections
F–10.0 F in 0.5 increments. (1 F = 33 msec) NOTE To use as a web camera, an audio driver must be downloaded from the ZOOM website (www.zoom. • co.jp) and installed. The recorder can simultaneously transmit video and audio with resolutions up to HD720p and 48 kHz/16- •... -
Page 19: S Using As A Card Reader (Computer/Ios Device)
USB connections (continued) S Using as a card reader (computer/iOS device) You can use the Q as a card reader to transfer data to and from computers and iOS devices. View the contents of the SD card loaded in the Q on the file man- agement screen of the computer or iOS device. -
Page 20: Updating The Firmware
Copy the file for updating the firm- ware to the root directory on an SD card. The latest version of the firmware can be downloaded from www.zoom.co.jp. Insert the SD card into the card slot on the bottom. p while pressing and Press holding r to turn the power on. -
Page 21: Responding To Alert Messages
Recording stopped because writing to the SD was not fast enough. Use a recommended SD card that has been formatted by the Q. For a list of recommended SD cards, visit www.zoom.co.jp. The SD card has become full. Delete unnecessary data or replace it with a new SD card. -
Page 22: Troubleshooting
Troubleshooting If you think that the Q is operating strangely, check the following items first. Recording/playback trouble u There is no sound or output is very quiet · Check the connection status and volume setting of the connected device. · Confirm that the output volume is not set low. u The recorded sound cannot be heard or is very quiet ·... -
Page 23: Specifications
Note: Audio interface and mass storage operations are supported with iOS devices. Note: USB bus power supported Power supply 2 AA batteries AC adapter (ZOOM AD-17): DC 5 V/1 A Battery operation Rated: about 2 hours or more (when recording 720p/30 fps video using time alkaline batteries) - Page 24 ZOOM CORPORATION 4-4-3 Kandasurugadai, Chiyoda-ku, Tokyo 101-0062 Japan http://www.zoom.co.jp Z2I-2811-01...