Troy-Bilt 01924 Owner's Manual
Hide thumbs
Also See for 01924:
- Owner's manual (36 pages) ,
- Illustrated parts list (6 pages) ,
- Owner's manual (8 pages)
Table of Contents
Advertisement
Available languages
Available languages
Owner's Manual / Manual del Propietario
Portable Generator / Generador Portátil
Model / Modelo 01924
IMPORTANT: READ SAFETY RULES AND INSTRUCTIONS CAREFULLY
IMPORTANTE: LEYO LA SEGURIDAD LAS ORDENES Y LAS INSTRUCCIONES DETENIDAMENTE
Questions? Preguntas?
Helpline - 1-888-611-6708 M-F 8-5 CT
Troy-Bilt® is a registered trademark of MTD and is used under license to Briggs & Stratton Power Products.
Troy-Bilt® es una marca registrada registrada de MTD y se usa abajo licencia a Briggs & Stratton Power Products.
BRIGGS & STRATTON POWER PRODUCTS GROUP, LLC
JEFFERSON,WISCONSIN, U.S.A.
Printed in USA
Manual No. 192790GS Revision 1 (05/28/2003)
Advertisement
Chapters
Table of Contents

Related Manuals for Troy-Bilt 01924


Summary of Contents for Troy-Bilt 01924
- Page 1 Troy-Bilt® is a registered trademark of MTD and is used under license to Briggs & Stratton Power Products. Troy-Bilt® es una marca registrada registrada de MTD y se usa abajo licencia a Briggs & Stratton Power Products. BRIGGS & STRATTON POWER PRODUCTS GROUP, LLC JEFFERSON,WISCONSIN, U.S.A.
-
Page 2: Table Of Contents
Section Safety Rules TABLE OF CONTENTS SAFETY RULES Safety Rules........2-4 This is the safety alert symbol. -
Page 3: Safety Rules
Section 1: Safety Rules DANGER WARNING Running generator gives off carbon monoxide, Fuel and its vapors are extremely flammable and an odorless, colorless, poison gas. explosive. Breathing carbon monoxide will cause nausea, Fire or explosion can cause severe burns or fainting or death. - Page 4 Section 1: Safety Rules CAUTION WARNING Exceeding generators wattage/amperage capacity can damage generator and/or electrical devices connected Unintentional sparking can result in fire or to it. electric shock. • See “Don’t Overload Generator” on page 11. • Start generator and let engine stabilize before connecting WHEN ADJUSTING OR MAKING REPAIRS TO YOUR electrical loads.
-
Page 5: Know Your Generator
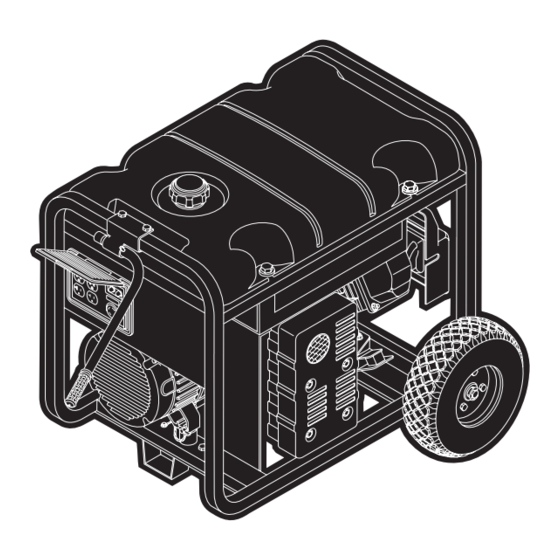
Features and Controls Section KNOW YOUR GENERATOR Read this owner’s manual and safety rules before operating your generator. Compare this illustration with your generator to familiarize yourself with the locations of various controls and adjustments. Save this manual for future reference. Rocker Switch Fuel Tank Recoil Starter... -
Page 6: Assembly
Assembly Section ASSEMBLY Install Wheel Kit The wheel kit is designed to greatly improve the portability Your generator requires some assembly and is ready for of your generator. use after it has been properly serviced with the NOTE: Wheel kit is not intended for over-the-road use. recommended oil and fuel. - Page 7 Section 3: Assembly Place one end of needle nose pliers on bottom of axle Add Engine Oil and Fuel and other end of pliers on top of e-ring. Seat e-ring by • Place generator on a level surface. pressing pliers closed. •...
- Page 8 Operation Section GROUNDING THE OPERATING THE GENERATOR GENERATOR CAUTION The National Electrical Code requires that the frame and external electrically conductive parts of this generator be Exceeding generators wattage/amperage capacity can properly connected to an approved earth ground. Local damage generator and/or electrical devices connected electrical codes may also require proper grounding of the to it.
-
Page 9: Operation
Section 4: Operation Connecting Electrical Loads Build a structure that will enclose three sides and the top of the generator: • Let engine stabilize and warm up for a few minutes after Make sure entire muffler-side of generator is exposed. starting. - Page 10 Section 4: Operation RECEPTACLES This receptacle powers 120/240 Volt AC, 60 Hz, single phase loads requiring up to 3,550 watts of power CAUTION (3.55 kW) at 20 Amps for 120 Volts or 240 Volts.The outlet is protected by a push–to–reset circuit breaker. Receptacles may be marked with rating value greater than generator output capacity.
-
Page 11: Example
Section 4: Operation DON'T OVERLOAD Plug in and turn on the next load. Again, permit the generator to stabilize. GENERATOR Repeat steps 4 and 5 for each additional load. NEVER add more loads than the generator capacity.Take special care to consider surge loads in generator capacity, Capacity as described above. -
Page 12: Maintenance
Section Maintenance GENERAL MAINTENANCE Generator Cleaning • Use a damp cloth to wipe exterior surfaces clean. RECOMMENDATIONS CAUTION The Owner/Operator is responsible for making sure that all periodic maintenance tasks are completed on a timely Improper treatment of generator can damage it and basis;... -
Page 13: Storage
Storage Section STORAGE Engine Storage See engine owner’s manual for instructions. The generator should be started at least once every seven days and allowed to run at least 30 minutes. If this cannot Other Storage Tips be done and you must store the unit for more than 30 days, use the following guidelines to prepare it for storage. -
Page 14: Schematic/Wiring Diagram
Schematic and Wiring Diagram Section SCHEMATIC... - Page 15 Section 8: Schematic and Wiring Diagram WIRING DIAGRAM...
- Page 16 Exploded Views and Parts Lists Section EXPLODED VIEW - MAIN UNIT...
- Page 17 Section 9: Exploded Views and Parts Lists PARTS LIST - MAIN UNIT Item Part # Qty. Description Item Part # Qty. Description B192765GS CRADLE 27 J191790GS SHIELD, Heat 70642GS MOUNT,Vibration 28 192374GS DECAL, Heat Shield 76222GS SCREW 29 86292GS SCREW, Self Driller 186058AGS HOUSING, Engine Adapter 30 48031CGS...
- Page 18 Section 9: Exploded Views and Parts Lists ALTERNATOR EXPLODED VIEW AND PARTS LIST Item Part # Qty. Description 186059GS ADAPTER, Mounting, Alternator 191685GS ROTOR 191686AGS STATOR 186060GS RBC, with O-Ring (p/n 189197GS) 86308GS SCREW 91825GS ASSY, Holder, Rectifier/Brush 66849GS SCREW 22694GS RECEPTACLE, 6 pin 81917GS...
- Page 19 Section 9: Exploded Views and Parts Lists CONTROL PANEL EXPLODED VIEW AND PARTS LIST Item Part # Qty. Description 188914GS COVER, Lid, Control Panel 188889AGS CONTROL PANEL, Compact 189167GS CLIP, Hinge Pin Retainer 189182GS SPRING, Hinge, Pin 189166GS PIN, Hinge, Cover, Compact 68759GS OUTLET, 120V, 20A, Duplex 189165GS...
- Page 20 Section 9: Exploded Views and Parts Lists WHEEL KIT EXPLODED VIEW AND PARTS LIST Item Part # Qty. Description 189715GS ASSY, Handle B1764GS LEG, Mounting 52858GS NUT, Lock 39287GS SCREW 191267NGS AXLE B4966GS WHEEL 191265GS E-RING 22247GS WASHER 42907GS SCREW...
-
Page 21: Notes
Notes NOTES... - Page 22 Sección Reglas de Seguridad TABLA DE CONTENIDOS REGLAS DE SEGURIDAD Reglas De Seguridad ......22-24 Éste es el símbolo de alerta de seguridad.
-
Page 23: Reglas De Seguridad
Sección 1: Reglas de Seguridad PELIGRO ADVERTENCIA Al generador funcionar, se produce monóxido de La gasolina y sus vapores son extremadamente carbono, un gas inodoro y venenoso. inflamables y explosivos. El respirar el monóxido de carbono, producirá El fuego o una explosión pueden causar quemaduras náusea, desmayo o la muerte. - Page 24 Sección 1: Instrucciones de Seguridad PRECAUCIÓN ADVERTENCIA El sobrepasar la capacidad del amperaje y vataje del generador, puede dañar al generador y los aparatos eléctricos Chispear involuntario puede tener como resultado el conectados al mismo. fuego o el golpe eléctrico. •...
-
Page 25: Conozca Su Generador
Sección Características y Mandos CONOZCA SU GENERADOR LEA ESTE MANUAL DEL PROPIETARIO Y LAS REGLAS DE SEGURIDAD ANTES DE OPERAR SU GENERADOR. Compare las ilustraciones con su Generador para familiarizarse con las ubicaciones de los diferentes controles y ajustes. Conserve este manual para referencias futuras. -
Page 26: Instale El Juego De Ruedas
Sección Montaje MONTAJE Instale el Juego de Ruedas El juego de ruedas está diseñado para mejorar el transporte del Su generador requiere de ciertos procedimientos de montaje y generador. solo estará listo para ser utilizado después de haberle suministrado servicio con el combustible y aceite recomendados. NOTA: Este Juego de Ruedas no ha sido diseñado para ser usado en la carretera. - Page 27 Sección 3: Montaje Coloque un extremo de las pinzas de puntas de aguja en la ANTES DE DARLE ARRANQUE AL parte inferior del eje y el otro extremo de las pinzas en la MOTOR parte superior del e-ring. Asiente el e-ring cerrando las pinzas.
-
Page 28: Encienda El Motor
Sección Operación CONEXION A TIERRA DEL OPERANDO EL GENERADOR GENERADOR PRECAUCIÓN El Código Nacional de Electricidad exige que el marco y las partes El sobrepasar la capacidad del amperaje y vataje del exteriores del generador conductoras de electricidad, estén generador, puede dañar al generador y los aparatos eléctricos conectadas a tierra adecuadamente. -
Page 29: Parado Del Motor
Sección 4: Operación Conexion De Cargas Electricas Construya una estructura que pueda cubrir los tres lados y la parte superior del generador: • Deje que el motor se estabilice y se caliente por unos Asegúrese que el lado del amortiguador del generador está minutos después del arranque. - Page 30 Sección 4: Operación RECEPTÁCULOS 120 Volt AC, 20 Amp, Receptáculos Dobles Cada receptáculo (Figura 14) está protegido en contra de El generador está equipado con los siguientes enchufes hembra: sobrecargas por un corto-circuitos de, del tipo "empuje para PRECAUCIÓN reposicionar". El valor nominal que se indica en los enchufes hembra puede Figura 14 —...
- Page 31 Sección 4: Operación NO SOBRECARGUE GENERADOR Conecte y encienda la próxima carga. De nuevo, permita que el generador se estabilice. Capacidad Repita los pasos 4 y 5 para cada carga adicional que usted tenga. Usted debe asegurarse que su generador puede proveer el NUNCA añada más cargas sobre la capacidad del generador.
-
Page 32: Mantenimiento
Sección Mantenimiento RECOMENDACIONES Para Limpiar el Generador • Utilice un trapo húmedo para limpiar las superficies exteriores. GENERALES DE PRECAUCIÓN MANTENIMIENTO El propietario / operador es responsable por asegurarse de que El tratamiento inadecuado del generador puede dañarlo y todos los trabajos periódicos de mantenimiento se lleven a cabo acortar su vida productiva. -
Page 33: Almacenamiento
Sección Almacenamiento ALMACENAMIENTO Almacenando el Motor Consulte el manual del propietario del motor para las El generador deberá ser encendido al menos una vez cada siete instrucciones de cómo preparar adecuadamente el motor para su días y deberá dejarlo funcionar al menos durante 30 minutos. Si almacenamiento. -
Page 34: Diagnosticos De Averías
Sección Diagnosticos de Averías DIAGNOSITICOS DE AVERÍAS Problemo Causa Accion El interruptor automático de circuito Reposicione el interruptor. está abierto. Conexión mal o defectuosa del juego Revise y repare. No hay corriente alterna, pero el de cables. motor funciona. El dispositivo conectado está dañado. Conecte otro dispositivo que esté... - Page 35 GARANTÍA LIMITADA "Troy-Bilt® es una marca registrada de MTD bajo licencia de Briggs & Stratton Power Products. Briggs & Stratton Power Products reparará o sustituirá sin cargo alguno cualquier componente del equipo** que presente defectos de materiales y/o mano de obra. Los gastos de transporte de las piezas enviadas para reparar o sustituir conforme a los términos de esta garantía correrán a cargo del...
-
Page 36: Example
LIMITED WARRANTY “Troy-Bilt® is a registered trademark of MTD and is used under license to Briggs & Stratton Power Products. Briggs & Stratton Power Products will repair or replace, free of charge, any part, or parts of the equipment** that are defective in material or workmanship or both.Transportation charges on parts submitted for repair or replacement under this warranty must be borne...