Table of Contents
Advertisement
Quick Links
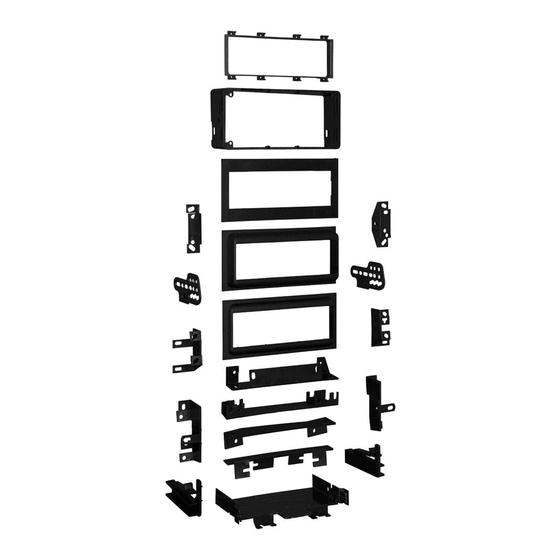
KIT COMPONENTS
• A) Radio housing • B) Flat faceplate • C) 1/2" Faceplate • D) 1" Faceplate • E) Rear support tray
• F) ISO trimring • G) Bracket set #1 • H) Bracket set #2 • I) Bracket set #3 • J) Bracket set #4
• K) Bracket set #5 • L) Bracket set #6 • M) Bracket set #7 • N) Bracket set #8 • O) Bracket set #9
• P) Bracket set #10 • Q) ISO brackets • R) Bracket (L) S-10 • S) (4) Carriage bolts/studs
• T) (4) Nuts • U) (4) Hex-head screws
A
B
F
G
K
L
P
Q
INSTALLATION INSTRUCTIONS FOR PART 99-4644
APPLICATIONS
See application list inside
GM 1982-2005
99-4644
C
D
H
I
M
N
R
S
E
J
O
T
U
KIT FEATURES
• DIN and ISO radio provisions
• Also, for vehicles equipped with J-2000
panel-style
TOOLS REQUIRED
• Panel removal tool/flat head screwdriver
• Torx-head screwdriver • Socket wrench
CAUTION: Metra recommends disconnecting the
negative battery terminal before beginning any
installation. All accessories, switches, and especially
air bag indicator lights must be plugged in before
reconnecting the battery or cycling the ignition.
NOTE: Refer to the instructions included with the
aftermarket radio.
Advertisement
Table of Contents

Related Manuals for Metra Electronics 99-4644


Summary of Contents for Metra Electronics 99-4644
- Page 1 INSTALLATION INSTRUCTIONS FOR PART 99-4644 APPLICATIONS See application list inside KIT FEATURES GM 1982-2005 • DIN and ISO radio provisions • Also, for vehicles equipped with J-2000 99-4644 panel-style KIT COMPONENTS • A) Radio housing • B) Flat faceplate • C) 1/2” Faceplate • D) 1” Faceplate • E) Rear support tray • F) ISO trimring • G) Bracket set #1 • H) Bracket set #2 • I) Bracket set #3 • J) Bracket set #4 • K) Bracket set #5 • L) Bracket set #6 • M) Bracket set #7 • N) Bracket set #8 • O) Bracket set #9 • P) Bracket set #10 • Q) ISO brackets • R) Bracket (L) S-10 • S) (4) Carriage bolts/studs • T) (4) Nuts • U) (4) Hex-head screws TOOLS REQUIRED • Panel removal tool/flat head screwdriver • Torx-head screwdriver • Socket wrench CAUTION: Metra recommends disconnecting the negative battery terminal before beginning any installation.
-
Page 2: Table Of Contents
99-4644 Applications Chevrolet Chevrolet (continued) GMC (continued) Oldsmobile (continued) Buick Astro ......1985-2005 Malibu ......1997-2000 S-15 Pickup ....1982-1990 Ninety-Eight* ....1984-1990 Century* ...... 1982-1996 Avalanche ....2002 Monte Carlo ....1986-1988 Safari ......1985-2005 Omega ......1983-1984 Electra*...... - Page 3 Dash Disassembly 99-4644 Buick Century Buick Electra 1984-1990 Buick Reatta Buick Estate Wagon/ 1982-1996 1990-1991 LeSabre/Park Avenue 1. Remove (4) screws from the top-inside edge of the 1. Remove (2) torx-head screws above the 1984-1994 dash trim bezel. (Figure A) instrument panel. (Figure A) 2. Remove (5) screws from both sides of the 1. Unsnap the climate control trim bezel and remove 2. Remove (1) torx-head screw from each A/C vent. steering column. (4) star-drive screws exposed. (Figure A) (Figure A) 3. Remove (3) Phillips screws securing the rocker 2. Pull the steering collar back and carefully unsnap 3. Unclip the dash trim bezel and remove. switch housing and lift the housing out.
- Page 4 Dash Disassembly 99-4644 Buick Regal Buick Riviera Buick Riviera 1984-1987 1983-1985 1990-1995 1. Remove the radio knobs and cigarette lighter. 1. Carefully pull and remove the dash 1. Remove (2) torx-head screws above the instrument panel. (Figure A) trim bezel. (Figure A) 2. Gently unclip the radio trim bezel and remove. 2. Remove (1) torx-head screw from each A/C vent. 2. Remove (4) screws securing the factory radio and (Figure A) (Figure A) disconnect the wiring. 3. Remove the hardware securing the factory 3. Unsnap the panel. 3. Remove the hardware securing the factory mounting brackets to the factory radio. (Figure B) mounting brackets to the factory radio. 4. Remove the hardware securing the factory (Figure B) mounting brackets to the factory radio.
- Page 5 Dash Disassembly 99-4644 Buick Syhawk 1982-1989/Oldsmobile Buick Roadmaster 1991-1994 Firenza 1982-1988 Chevrolet Caprice 1991-1993 1. Remove (2) screws from the 1. Remove the glove box by removing driver’s side service panel and the doorstrap wire clip and (4) unclip the panel. screws. (Figure A) 2. Pry off the trim piece located 2. Remove (2) screws below the above the glove box and remove cigarette lighter housing and (3) (1) screw. screws below the steering column. 3. Remove (3) screws from the (Figure A) top edge of the dash trim bezel. 3. Remove (1) screw from the top-left (Figure A) of the factory radio and unclip the 4. Remove (1) screw from the dash trim bezel. (Figure A)
- Page 6 Dash Disassembly 99-4644 Buick Skylark 1983-1986 Buick Skylark Buick Skylark 1990-1995 1987-1989 1. Remove (4) screws from the top edge of the 1. Pull out on the ashtray and remove (2) screws instrument panel. (Figure A) exposed in the ashtray cavity. 1. Unsnap the gear shifter bezel from the base 2. Remove (2) screws securing the front of the 2. Remove (1) screw from the bottom-left corner of of the console. ashtray and lower section of the dash trim bezel. the panel. (Figure A) 2. Remove (2) screws securing the bottom of the (Figure A) 3. Remove (2) screws from the steering column trim dash trim bezel and remove the bezel. (Figure A) 3. Using a panel removal tool, gently pry out on the and remove the trim. trim bezel and remove. 3. Remove the hardware securing the factory 4. Pull up and out on the dash trim bezel and remove.
-
Page 7: Suburban*
Dash Disassembly 99-4644 Cadillac Escalade, Escalade Cadillac Deville 1985-1995 Cadillac Eldorado/Seville EXT/Chevrolet Avalanche, Fleetwood 1985-1992 1984-1991 C-K Pickup, Silverado, 1. Remove (2) screws from the top of the radio 1. Remove (2) Phillips screws above the A/C vents. Suburban, Tahoe/GMC C-K trim bezel. (Figure A) Pickup, Sierra, Suburban, Yukon 1995-2002 2. Pull out on the top edge of the bezel and lift up 2. Pull out on the top edge of the dash trim bezel to remove. (Figure A) unhook the bottom edge and remove. 1. Remove the steering column filler panel and the 3. - Page 8 Dash Disassembly 99-4644 Chevrolet Astro/GMC Chevrolet Astro/GMC Chevrolet Astro/GMC Safari 1985-1989 Safari 1990-1995 Safari 1996-2005 1. Remove (3) Phillips screws from the top portion of 1. Remove (2) screws from the bottom of the dash 1. Place the gear selector in its lowest position. the dash trim bezel. (Figure A) trim bezel. (Figure A) 2. Unclip the perimeter of the dash trim bezel. 2. Open the glove box and remove (2) 10mm bolts 2. Gently unclip and remove the bezel. (Figure A) from the lower edge of the trim bezel. (Figure A) 3. Remove (4) screws from the factory radio and 3. Disconnect the rear A/C control harness and the 3. Pull the console trim forward and remove (2) 7mm disconnect the wiring. headlight switch from the back of the dash trim bolts exposed.
-
Page 9: S-10 Blazer
Dash Disassembly 99-4644 Chevrolet S-10 Blazer/ Chevrolet Beretta/Corsica Chevrolet Blazer (full size) S-10 Pickup 1998-2001, 1991-1996 Suburban/GMC Jimmy (full GMC S-15 Jimmy/Sonoma Suburban 1989-1991 size) 1. Using a panel removal tool, pry outward on the 1998-2001, Isuzu Hombre dash trim bezel and remove. (Figure A) 1. Remove (2) screws from the radio trim bezel and 1998-2001 remove the bezel. (Figure A) 2. Remove (2) screws securing the factory radio and 1. Remove (2) 9/32” hex-head screws from the knee 2. Remove (2) screws securing the factory radio and bolster. (Figure A) - Page 10 Dash Disassembly 99-4644 Chevrolet Camaro/Pontiac Chevrolet Camaro/Pontiac Chevrolet Camaro Firebird 1982-1984 Firebird 1985-1992 1997-2002 1. Remove (4) star-drive screws from the dash trim 1. Remove (4) star-drive screws from the dash trim 1. Unclip the radio trim bezel and remove. (Figure A) bezel and remove the bezel. (Figure A) bezel and remove the bezel. (Figure A) 2. Remove (2) 7mm hex-head screws securing the 2. Remove (4) screws securing the factory radio and 2. Remove (4) screws securing the factory radio and factory radio and disconnect the wiring. disconnect the wiring. disconnect the wiring. 3. Locate Bracket Set #10. (Figure B) 3. Cut and remove all mounting tabs on Bracket #2 3. Cut and remove all mounting tabs on Bracket #2 Note: Identify mounting tabs by the stamped letter EXCEPT those tabs with holes “A”. (Figure B)
- Page 11 Dash Disassembly 99-4644 Chevrolet Cavalier 1982-1990, Chevrolet Caprice/Impala Cadillac Cimarron 1982-1988, 1994-1996 Pontiac Sunbird with J-2000 panel style factory radio 1. Remove (5) hex-head screws from 1982-1988 the ashtray cavity. (Figure A) 2. Remove (4) hex-head screws from 1. Remove (6) star-drive screws from the base of the dash trim bezel. the dash trim bezel and remove (Figure A) the bezel. (Figure A) 3. Unsnap the fuse box cover 2. Remove (2) screws from and remove (1) hex-head screw e xposed.
- Page 12 Dash Disassembly 99-4644 Chevrolet Cavalier Chevrolet Cavalier 1995-1999 1991-1994 1. Open drivers door and remove fuse panel on end of 5. Remove (1) Phillips screw from the defroster duct. dash then open passenger door and remove panel 1. Using a panel removal tool, carefully pry out on the 6. Remove the duct work and (1) Phillips on end of dash. dash trim bezel and remove. (Figure A) screw exposed. 2. Remove (1) Phillips screw from each side, 2. Remove (2) screws securing the factory radio and 7. Remove the dash pad and (3) Phillips screws now exposed. disconnect the wiring. exposed at the top of the radio trim bezel. 3. Remove (3) 7mm hex-head screws (Figure A) 3. Cut and remove all mounting tabs on Bracket #3 from the top of the glove box liner. 8. Locate Bracket Set #10. (Figure B) EXCEPT tabs “B”. (Figure B) 4. Remove (2) 7mm hex-head screws...
- Page 13 Dash Disassembly 99-4644 Chevrolet Celebrity 1984-1990 Chevrolet Celebrity 1982-1983 1. Remove the glove box compartment by depressing 5. Grasp the lighter socket, unscrew the brass nut on the clip on the bottom of the glove box liner and the back of the lighter and remove the socket. 1. Remove the plastic plate next to each A/C vent and removing (6) nuts exposed above the opening. remove (2) screws exposed. (Figure A) 6. Remove the dash trim bezel and disconnect (Figure A) 2. Remove (4) screws surrounding the steering the wiring. column. (Figure A) 2. Remove (6) Phillips screws below the 7. Remove the hardware securing the factory steering column. 3. Depress the light control knob spring remove the mounting brackets to the factory radio. knob and lift the bezel off. 3. Remove the headlight knob by depressing the clip (Figure B) 4. Remove the hardware securing the factory on the back of the knob and removing the nut.
-
Page 14: Corvette*
Dash Disassembly 99-4644 Chevrolet Citation II Chevrolet Corvette Chevrolet Corvette 1985 1984-1989 1997-2004 1. Remove (2) screws from the bottom steering 1. Remove (7) screws from the dash trim bezel. 1. Pry out on the ride control switch and disconnect (Figure A) the wiring. column trim panel and remove. (Figure A) 2. Unsnap the switch trim and remove (2) 10mm hex- 2. Move the gear shifter to the lowest position. 2. Remove (6) screws from the dash trim bezel, head bolts exposed. disconnect the wiring and remove. (Figure A) 3. Pull the right edge of the bezel forward, unhook the 3. Open the center console door, remove (4) screws left side and remove. from the inner hinge and remove the door. 3. Remove the hardware securing the factory 4. Remove the hardware securing the factory 4. -
Page 15: Monte Carlo
Dash Disassembly 99-4644 Chevrolet El Camino Chevrolet Express/GMC Chevrolet Lumina 1986-1987, Monte Carlo Savana 1996-2000 1990-1994 1986-1988 1. Unclip the plastic trim piece located below the 1. Remove (2) screws from the lower steering column panel. steering column. 1. Remove (4) screws from the dash trim bezel. (Figure A) 2. Pull the panel down to access the bottom portion 2. Unclip the dash trim bezel. Pull the bezel over the of the radio trim bezel. (Figure A) 2. Remove the bezel and disconnect the cigarette steering column and disconnect the wiring. lighter wiring. 3. Pull the top and bottom edges of the bezel. (Figure A) (Figure A) 3. Cut and remove all mounting tabs on Bracket #2 3. -
Page 16: Silhouette
Dash Disassembly 99-4644 Chevrolet Lumina APV/ Chevrolet Lumina APV/ Chevrolet Malibu Oldsmobile Silhouette/ Oldsmobile Silhouette/Pontiac 1997-2000 Pontiac TransSport TransSport 1996 1. Unclip the radio trim bezel 1990-1995 1. Remove (1) Phillips screw from each side of the center console. and remove. 1. Remove (2) screws securing the lower steering 2. Open the glove box and remove (2) Phillips screws exposed. 2. Remove (2) 9/32” hex-head column panel and remove. (Figure A) screws securing the factory radio and disconnect the wiring. 3. Remove (2) 7mm hex-head screws and (1) pop-clip from the 2. Remove (2) screws exposed on the left tab of the... -
Page 17: S-15 Jimmy
Dash Disassembly 99-4644 Chevrolet S-10 Pickup/S-10 Chevrolet S-10 Pickup Chevrolet Nova Blazer 1982-1985 1986-1993/S-10 Blazer 1985-1988 GMC S-15 Pickup/S-15 1986-1994, GMC S-15 1. Remove the ashtray and (2) screws from the Jimmy 1982-1985 Pickup 1986-1990/S-15 ashtray bracket. (Figure A) Jimmy 1986-1994/Sonoma 1. Remove (4) star-drive screws from the corners of 1991-1993, Oldsmobile the dash trim bezel. (Figure A) 2. Remove (2) screws above the radio opening and Bravada 1991-1994 remove the radio trim bezel. (Figure A) -
Page 18: G-Series Van
Dash Disassembly 99-4644 Chevrolet Lumina Chevrolet/GMC G-Series Van Chevrolet Venture/ Oldsmobile Silhouette 1995-2001/Monte 1988-1996 1997-1999, Pontiac Carlo 1995-1999 1. Carefully unsnap the radio Montana 1999/Transport from the cigarette lighter trim bezel and remove. compartment. 1. Unclip the dash trim bezel and 1997-1998 (Figure A) remove (it may be necessary to 6. Remove (2) Phillips screws loosen the knee bolster). (Figure A) 2. Remove (2) screws securing securing the factory radio 1. Remove the ashtray and (1) Phillips screw exposed the factory radio and and disconnect the wiring. -
Page 19: Cutlass Calais*
Dash Disassembly 99-4644 Oldsmobile Ninety-Eight Oldsmobile Achieva Oldsmobile Cutlass Calais 1984-1990/Delta 88 1992-1995 1984-1991 1986-1988 1. Remove (4) screws from the top edge of the dash 1. Remove the console/glove box assembly and (3) trim bezel. (Figure A) screws below the box. 1. Place the gear shifter in low and remove the rubber trim boot from the steering column. 2. Lift up the parking brake trim and remove (2) 2. Remove (2) screws from the bottom edge of the screws from the gear shifter trim. (Figure A) bezel. (Figure A) 2. Remove (2) Phillips screws from the radio trim bezel. 3. Remove the ashtray from the gear shifter area and 3. Unsnap the A/C ducts, disconnect the light switch 3. Unhook the ashtray/light wiring terminal and (2) 7mm screws exposed. and remove the bezel. -
Page 20: Cutlass Ciera*
Dash Disassembly 99-4644 Oldsmobile Cutlass Ciera Oldsmobile Cutlass Oldsmobile Omega 1982-1996 Supreme 1984-1988 1983-1984 1. Remove the ashtray and (2) screws from the 1. Remove the radio trim bezel, and then disconnect 1. Remove (4) hex-head washer screws from the ashtray location. (Figure A) steering column trim panel, pull down on the rear the cigarette lighter connector. (Figure A) edge of the panel and remove. 2. Remove (1) screw below and (2) screws above the 2. Remove the hardware securing the factory 2. Remove (4) Phillips screws from the top edge of steering column. (Figure A) mounting brackets to the factory radio. the dash trim bezel. (Figure A) 3. Pry the A/C vents out and remove the screws (Figure B) 3. Remove (2) hex-head washer screws from exposed in the vent cavities. -
Page 21: Toronado
Dash Disassembly 99-4644 Oldsmobile Toronado Pontiac 6000 Pontiac Bonneville 1982-1985 1982-1991 1987-1993 1. Depress the clip located behind the headlight 1. Open the glove box and remove (1) screw from the 1. Gently unsnap and remove the dash trim bezel. knob and remove the knob. side of the radio trim bezel. (Figure A) (Figure A) 2. Remove (3) screws securing the steering column 2. Remove the screws securing the factory radio and 2. Gently remove the bezel from the dash and the trim and remove. disconnect the wiring. dummy plate from the bezel. 3. Remove (4) screws from the bottom edge of the dash trim bezel and remove. (Figure A) 3. Remove the hardware securing the factory 3. Cut and remove all mounting tabs on Bracket #5 mounting brackets to the factory radio. EXCEPT tabs “A”. (Figure A) 4. Remove the hardware securing the factory (Figure B) mounting brackets to the factory radio. -
Page 22: Bonneville*
Dash Disassembly 99-4644 Pontiac Bonneville Pontiac Fiero 1984-1988 Pontiac Firebird 1994-1999 1993-2002 1. Remove (4) star-drive screws from the dash trim bezel. (Figure A) 1. Unclip the right side of the dash trim bezel. 1. Unclip the radio trim bezel. (Figure A) (Figure A) 2. Gently pull out on the trim bezel and remove. 2. Remove (4) 3. Remove (4) hex-head screws from the factory 2. Unclip the left side of the bezel and remove. 7mm hex-head radio and disconnect the wiring. (Figure A) screws securing the factory radio and 4. Remove the hardware securing the factory 3. Remove (3) 7mm hex-head screws securing the disconnect the wiring. -
Page 23: Grand Am
Dash Disassembly 99-4644 Pontiac Grand Am Pontiac Grand Am Pontiac Grand Am 1985-1991 1992-1995 1996-1998 1. Carefully unsnap the front edge of the gear shifter 1. Remove (6) 7mm hex-head screws from the driver’s 1. Remove (2) Phillips screws from the pocket. side knee bolster panel and lower the panel. console panel. 2. Remove (2) Phillips screws above the instrument 2. Remove (4) Phillips screws from the glove box/ cluster. (Figure A) 2. Unsnap and remove the dash trim bezel. (Figure A) cupholder assembly. 3. Unclip the dash trim bezel and remove. 3. Remove (1) 7mm hex-head screw from the left 3. Remove the hardware securing the factory corner of the dash trim bezel. (Figure A) mounting brackets to the factory radio. 4. Remove (3) 7mm hex-head screws securing the 4. -
Page 24: Grand Prix
Dash Disassembly 99-4644 Pontiac Grand Am Pontiac Grand Prix Pontiac Grand Prix 1999-2000 1990-1993 1994-1996 1. Unclip the radio trim bezel. 1. Remove (1) 9/32” hex-head screw from the computer diagnostic 1. Using a small set of pliers, grasp the retaining clip (Figure A) on the back of the gear shifter handle and remove plug and twist to access (1) 9/32” screw on the trim panel. the clip. 2. Remove (3) 9/32” screws securing 2. Remove (3) 9/32” screws from the bottom edge of the 2. Remove the gear shifter handle. Unclip the center the factory radio and disconnect panel and remove. console and remove. the wiring. 3. Open the glove box and remove (4) 9/32” screws from the dash 3. Remove (2) 7mm hex-head screws exposed under 3. Locate Bracket Set #9. (Figure B) trim bezel. (Figure A) - Page 25 Dash Disassembly 99-4644 Pontiac Grand Prix Pontiac Grand Prix 1985-1987 1997-2003 Bonneville 1982-1986 1. Unclip the entire dash trim bezel. (Figure A) 1. Remove (3) screws from the top edge of 5. Remove the hardware securing the factory the dash trim bezel. mounting brackets to the factory radio. 2. Remove the screws securing the factory radio and (Figure B) 2. Remove (4) screws from the metal steering disconnect the wiring. column trim and remove the trim. 6. Remove and retain the brackets. 3. Locate Bracket Set #9. (Figure B) 3. Remove (4) screws exposed at the bottom edge of the dash trim bezel. 4. Remove the cigarette lighter and retainer ring and remove the dash trim bezel. (Figure A) (S-10 application...
-
Page 26: Sunfire
Dash Disassembly 99-4644 Pontiac Sunfire 1995-1999 Saturn (all models) 1991-1994 1. Open the glove box and remove (2) Phillips screws exposed on the right edge of 1. Gently unclip the dash trim bezel. (Figure A) the radio trim bezel. (Figure A) 2. Remove (2) screws from the factory radio and disconnect the wiring. 2. Unclip the bezel and remove. 3. Cut and remove all mounting tabs on Bracket #6 EXCEPT tabs “A”. (Figure B) 3. Remove (2) 7mm hex-head screws securing the factory radio and disconnect Note: Identify mounting tabs by the stamped letter on the back of each tab. the wiring. 4. Locate Bracket Set #9. (Figure B) “A”... -
Page 27: Kit Assembly
Kit Assembly 99-4644 DIN radio provision 1. Choose a faceplate (according to the desired installation depth) and snap it onto 5. Locate the factory wiring harness and antenna plug in the dash. Metra the front of the radio housing and secure with (4) hex-head screws. (Figure A) recommends using the proper mating adapter from Metra or AXXESS. Re- connect thenegative battery terminal and test the radio for proper operation 2. Secure mounting brackets to the radio housing with the supplied carriage bolts and nuts. (Figure A) 6. Reassemble dash in reverse order of disassembly using screws previously removed. (Figure B) 3. Then snap the rear support tray onto the back of the radio housing. (Figure A) 4. Silde the DIN cage into the kit and secure by bending the metal locking tabs. (Figure B) (Figure A) (Figure B) - Page 28 Kit Assembly 99-4644 ISO radio provision 1. Choose a faceplate (according to the desired installation depth) and snap it onto 4. Slide the radio into the radio opening, aligning the holes in the radio to the holes in the ISO brackets. Then secure the radio to the brackets with the suppled the front of the radio housing and secure with (4) hex-head screws. (Figure A) screws. (Figure B) 2. Snap the ISO trimring into the back of the faceplate. (Figure A) 5. Locate the factory wiring harness and antenna plug in the dash. Metra 3. Secure mounting brackets to the radio housing with the supplied carriage bolts recommends using the proper mating adapter from Metra or AXXESS. Re- and nuts. (Figure A) connect thenegative battery terminal and test the radio for proper operation. 4. Then slidethe ISO brackets onto the the rear support tray and snap the tray onto 6. Reassemble dash in reverse order of disassembly using screws previously the back of the radio housing. (Figure A) removed. (Figure B) (Figure A) (Figure B)