Table of Contents
Advertisement
Available languages
Available languages
Quick Links
Bedienungsanleitung
Instruction manual
info@Testo-Direct.com
Allgemeine Hinweise ............................................2
1.
Sicherheitshinweise ..............................................4
2.
Bestimmungsgemäße Verwendung ......................5
3.
Produktbeschreibung ..........................................6
3.1
Anzeige- und Bedienelemente ........................................6
3.2
Schnittstellen ..................................................................8
3.3
Spannungsversorgung ....................................................8
4.
Inbetriebnahme ....................................................9
5.
Bedienung..........................................................10
5.1
Fühler anschließen ........................................................10
5.2
Ein- / Ausschalten ........................................................10
5.3
Displaybeleuchtung ......................................................11
6.
Gerät einstellen ..................................................12
6.1
Konfigurationsmenü ......................................................12
6.1.1
Profil................................................................................12
6.1.2
Einheiten ........................................................................13
6.1.3
Gerät ..............................................................................13
6.1.4
Fühler..............................................................................14
6.1.5
Language ........................................................................16
6.2
Hauptmenü ..................................................................17
6.2.1
Speicher (nur 735-2 ) ......................................................18
6.2.2
Messreihe (nur 735-2 ) ..................................................19
6.2.3
Mittelwert ......................................................................20
6.2.4
Zyklisch Drucken (nur 735-1) ..........................................20
6.2.5
Alarm ..............................................................................21
7.
Messen ..............................................................22
8.
Wartung und Pflege............................................24
9.
Fragen und Antworten........................................25
10. Technische Daten ..............................................26
11. Zubehör / Ersatzteile ..........................................27
www.
testo 735
Temperatur- Messgerät
Inhalt
1.888.475.5235
.com
de
en
Advertisement
Chapters
Table of Contents

Related Manuals for TESTO 735


Summary of Contents for TESTO 735
-
Page 1: Table Of Contents
6.1.2 Einheiten ................13 6.1.3 Gerät ................13 6.1.4 Fühler................14 6.1.5 Language ................16 Hauptmenü ..............17 6.2.1 Speicher (nur 735-2 ) ............18 6.2.2 Messreihe (nur 735-2 ) ..........19 6.2.3 Mittelwert ..............20 6.2.4 Zyklisch Drucken (nur 735-1) ..........20 6.2.5 Alarm ................21 Messen ..............22 Wartung und Pflege..........24 Fragen und Antworten........25... -
Page 2: Allgemeine Hinweise
Handlungsschritte ausführen. Bei nummerierten Handlungsschritten die vorgegebene Reihenfolge beachten! Text Displaytext Text erscheint auf dem Gerätedisplay. Taste Bedientaste Taste drücken. Funktionstaste Taste drücken. Resultat Nennt das Ergebnis eines vorangegangenen (Handlungs-)Schritts. Querverweis Verweis auf weiterführende oder detailliertere Informationen. Testo-Direct info@Testo-Direct.com 1.888.475.5235 www. .com... - Page 3 In diesem Dokument wird eine Kurzschreibweise verwendet, um Handlungs- schritte (z. B. den Aufruf einer Funktion) darzustellen. Beispiel: Funktion „Gerätedaten“ aufrufen Kurzschreibweise: Gerät Ger.-Dat. Erforderliche Handlungsschritte: die Funktion Gerät wählen. Auswahl bestätigen. die Funktion Ger.-Dat. wählen. Auswahl bestätigen. Testo-Direct info@Testo-Direct.com 1.888.475.5235 www. .com...
-
Page 4: Sicherheitshinweise
Aus Sicherheitsgründen nur Original-Ersatzteile von Testo ver- wenden. Fachgerecht entsorgen Defekte Akkus / leere Batterien an den dafür vorgesehenen Sammelstellen abgeben. Produkt nach Ende der Nutzungszeit an Testo senden. Wir sorgen für eine umweltschonende Entsorgung. Testo-Direct info@Testo-Direct.com 1.888.475.5235 www. -
Page 5: Bestimmungsgemäße Verwendung
Setzen Sie dass Produkt nur für die Bereiche ein, für die es konzipiert wurde. Im Zweifelsfall bitte bei Testo nachfragen. Das testo 735 ist ein kompaktes Messgerät zur Messung von Temperaturen. Das Produkt wurde für folgende Aufgaben / Bereiche konzipiert: ·... -
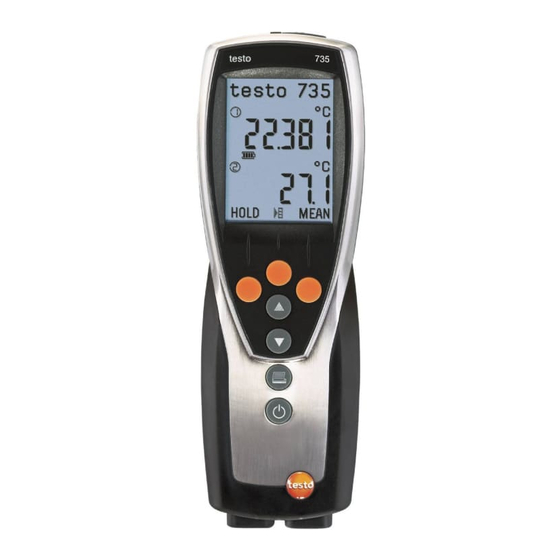
Page 6: Produktbeschreibung
Im Konfigurationsmodus: Wert erhöhen, Option wählen Anzeige der 2. Messwertzeile wechseln Im Konfigurationsmodus: Wert verringern, Option wählen Daten drucken Nur 735-1: Ist die Funktion Zyklisches Drucken aktiviert, wird die programmierte Messreihe gestartet. Gerät einschalten, Displaybeleuchtung ein-/ausschalten; Gerät ausschalten (gedrückt halten) Testo-Direct info@Testo-Direct.com... - Page 7 Reset Menüpunkt „Zeitliche Mittelwertbildung“ öffnen Mittl Menüpunkt „Messreihe“ öffnen (nur 735-2) Messr Messreihe starten (nur 735-2) Start Messreihe beenden (nur 735-2), Zyklisches Drucken beenden (nur 735-1) Ende Werte speichern (nur 735-2) Menüpunkt „Funk“ öffnen Funk Menüpunkt „Messort“ öffnen Prot. Wichtige Displayanzeigen...
-
Page 8: Schnittstellen
3. Produktbeschreibung 3.2 Schnittstellen Infrarot-Schnittstelle Über die Infrarot-Schnittstelle an der Kopfseite des Geräts können Messdaten an einen Testo-Protokolldrucker gesendet werden. USB-Schnittstelle Über die USB-Schnittstelle an der Kopfseite des Geräts kann das Netzteil (Zubehör) zur Spannungsversorgung des Geräts angeschlossen werden. Geräte mit Speicher: Mess- / Gerätedaten können über die USB-Schnittstelle mit einem PC ausgetauscht werden. -
Page 9: Inbetriebnahme
Batteriefachdeckel abnehmen. Batterien / Akkus (3 x Mignon) in das Batteriefach einlegen. Polung beachten! Funkmodul (Zubehör) in den Funkmodulschacht einschieben, bis dieses einrastet. Führungsnut beachten. Batteriefachdeckel aufsetzen, andrücken und durch Anziehen der beiden Schrauben befestigen. Testo-Direct info@Testo-Direct.com 1.888.475.5235 www. .com... -
Page 10: Bedienung
, S. 15. ÜHLER 5.2 Ein-/Ausschalten Gerät e e inschalten: drücken. - Nur 735-2: Sind Fühler-Abgleichdaten im Gerät hinterlegt und aktiviert, erscheint Abgleich aktiv im Display (Dauer: 2s). Siehe Kapitel , S. 15. ÜHLER - Die Messansicht wird geöffnet: Der aktuelle Messwert wird angzeigt bzw. -
Page 11: Displaybeleuchtung
- Funktion Language wird geöffnet. Siehe Kapitel , S. 16. ANGUAGE Gerät a a usschalten: gedrückt halten (ca. 2s), bis das Display erlischt. 5.3 Displaybeleuchtung Displaybeleuchtung e e in- / / ausschalten: Das Gerät ist eingeschaltet. drücken. Testo-Direct info@Testo-Direct.com 1.888.475.5235 www. .com... -
Page 12: Gerät Einstellen
Im Standardprofil sind alle Funktionen verfügbar. In den anwendungsspezifi- schen Messprofilen sind die verfügbaren Funktionen bedarfsgerecht reduziert, um einen schnelleren Zugriff zu gewährleisten. Profil e e instellen: Das Konfigurationsmenü ist geöffnet, Konfig. wird angezeigt. Profil gewünschtes Profil wählen und mit bestätigen. Testo-Direct info@Testo-Direct.com 1.888.475.5235 www. .com... -
Page 13: Einheiten
Datum / Uhrzeit Datum / Uhrzeit e e instellen: Das Konfigurationsmenü ist geöffnet, Konfig. wird angezeigt. Gerät Dat./Zeit den Wert für Jahr einstellen und mit bestätigen. Die weiteren Werte wie in Handlungsschritt beschrieben einstellen. Testo-Direct info@Testo-Direct.com 1.888.475.5235 www. .com... - Page 14 Ist pr MinMaxAuto eingeschaltet, werden Minimal- und Maximalwerte beim Drucken der Messwerte mit ausgedruckt. pr MinMax e e in- / / auschalten: Das Konfigurationsmenü ist geöffnet, Konfig. wird angezeigt. Gerät pr MinMax Ein oder Aus wählen und mit bestätigen. Testo-Direct info@Testo-Direct.com 1.888.475.5235 www. .com...
-
Page 15: Fühler
Metallgegenstände, Wände oder andere Barrieren zwischen Empfänger und Sender, andere Sender gleicher Frequenz, starke elektromagnetische Felder). Falls erforderlich: Mögliche Ursachen für die Störung der Funküber- tragung beseitigen. Alternativ ist auch eine manuelle Eingabe der Fühler-ID möglich. die Fühler-ID eingeben. Testo-Direct info@Testo-Direct.com 1.888.475.5235 www. .com... -
Page 16: Language
Abgleich (nur 735-2) Die Funktion ist nur verfügbar, wenn Fühler-Abgleichdaten im Gerät hinterlegt sind. Zum Hinterlegen von Fühler-Abgleichdaten im Gerät ist die PC-Software Abgleichsoftware testo 735-2 erforderlich. Siehe Dokumentation zu dieser Software. Im Gerät hinterlegte Fühler-Abgleichdaten können de- / aktiviert werden. -
Page 17: Hauptmenü
Profil eingestellt, so kann sich der Weg zum Aufruf einzelner Funktionen ändern bzw. die Funktion ist im eingestellten Profil nicht verfügbar. Einige Funktionen sind nur verfügbar, wenn ein Fühler gesteckt ist bzw. ein Funk- fühler eingeschaltet und angemeldet ist. Menüübersicht testo 735-1 Profil Menüpunkte Funktion... -
Page 18: Speicher (Nur 735-2)
Sie jeweils eine Menüebene zurück. Zum Verlassen des Hauptmenüs mehrfach drücken, bis das Gerät zur Messansicht gewechselt hat. 6.2.1 Speicher (nur 735-2) Info Der freie Speicherplatz wird angezeigt. Messort Der aktive Messort kann geändert werden. Es können max. 99 Messorte angelegt werden. -
Page 19: Messreihe (Nur 735-2)
Speicher l l öschen: Das Hauptmenü ist geöffnet, Menü wird angezeigt. Speicher Löschen den gesamten Speicher löschen. 6.2.2 Messreihe (nur 735-2) Eine Messreihe kann programmiert und de- / aktiviert werden: Bezeichnung Beschreibung Messreihe ausgeschaltet: Messwerte können manuell gespeichert werden AUTO Automatische Messreihe: Messtakt (mind. -
Page 20: Mittelwert
6. Gerät einstellen 6.2.3 Mittelwert Der Menüpunkt Mittelwertbildung ist nur in dem Gerät testo 735-2 verfügbar. Bei dem Gerät testo 735-1 erfolgt der Aufruf der Funktion Mittelwertbildung über die Funktionstaste Mittl Zur Durchführung einer Mittelwertbildung siehe Kapitel Messen, Seite 22. -
Page 21: Alarm
6. Gerät einstellen 21 Alarmschwellen e e instellen: Das Hauptmenü ist geöffnet, Menü wird angezeigt. Nur testo 735-2: Messort aktivieren, für den die Einstellungen gelten sollen. Alarm die Max (obere Alarmschwelle) oder Min (untere Alarm- schwelle) wählen und mit bestätigen. -
Page 22: Messen
Einige Fühler benötigen eine Aufheizphase, bis sie messbereit sind. Messung d d urchführen: Das Gerät befindet sich in der Messansicht. Die Messreihe AUTO ist nicht aktiviert (nur 735-2). Fühler positionieren und Messwerte ablesen. Anzeige O O bere M M esskanal-Z Z eile ä ä ndern: drücken. - Page 23 Das Gerät befindet sich in der Messansicht und Zyklisches Drucken ist aktiviert. Zyklisches Drucken mit starten. - Die Messreihe startet. Die Messwerte werden an den Testo-Protokoll- drucker übertragen. - Die Messung läuft, bis ein Abbruch mit erfolgt oder bis das End- Stopp kriterium eintritt (Anzahl Messwerte erreicht).
-
Page 24: Wartung Und Pflege
Die beiden Schrauben auf der Rückseite des Geräts lösen und Batteriefachdeckel abnehmen. Leere Batterien / Akkus entnehmen und neue Batterien / Akkus (3 x Mignon) in das Batteriefach einlegen. Polung beachten! Batteriefachdeckel aufsetzen und die beiden Schrauben anziehen. Testo-Direct info@Testo-Direct.com 1.888.475.5235 www. .com... -
Page 25: Fragen Und Antworten
· Stromversorgung war für längere Zeit · Geräteeinstellungen neu vornehmen. nicht mehr korrekt unterbrochen Falls wir Ihre Frage nicht beantworten konnten: Wenden Sie sich bitte an Ihren Händler oder den Testo-Kundendienst. Kontaktdaten finden Sie im Garantieheft oder im Internet unter www.testo.com . Testo-Direct info@Testo-Direct.com 1.888.475.5235 www. -
Page 26: Technische Daten
Eigenschaft Werte Fühleranschlüsse 2x Omega TE-Buchse, 1x Mini-DIN-Buchse, Funkmodul (Zubehör) Speicher Nur 735-2: max. 99 Messorte, bis zu 10000 Messwerte (abhängig von Anzahl Messorte, Protokolle, Kanäle) Batteriestandzeit ca. 200h mit Fühler Typ K/T ca. 250h mit Fühler Pt100 ca. 60h mit Fühler Pt100 0614 0235 Spannungsversorgung 3x Mignon-Batterie (Lieferumfang)/-akku oder Netzteil (Zubehör) -
Page 27: Zubehör/Ersatzteile
Messbereich: siehe Tabelle oben Nach EN 13485 ist eine regelmäßige Überprüfung und Kalibrierung des Messgeräts gemäß EN 13486 durchzuführen (Empfehlung: jährlich). Kontaktieren Sie uns für nähere Informationen: www.testo.com 11. Zubehör/Ersatzteile Dieses Kapitel nennt wichtige Zubehör- und Ersatzteile für das Produkt. - Page 28 Notizen Testo-Direct info@Testo-Direct.com 1.888.475.5235 www. .com...
-
Page 29: Testo-Direct
Device ................41 6.1.4 Probe ................43 6.1.5 Language ................44 Main menu ..............45 6.2.1 Memory (735-2 only) ............46 6.2.2 Measuring program (735-2 only) ........47 6.2.3 Mean ................48 6.2.4 Cyclical Print (735-1 only) ..........48 6.2.5 Alarm ................49 Measuring ............50 Care and maintenance ........52 Questions and answers ........53... -
Page 30: General Notes
Display text Text appears on the instrument display. Button Control button Press the button. Function button Press the button. Result Denotes the result of a previous step. Cross-reference Refers to more extensive or detailed information. Testo-Direct info@Testo-Direct.com 1.888.475.5235 www. .com... -
Page 31: Testo-Direct
This document uses a short form for describing operating steps (e.g. calling up a function). Example: Calling up the “Instrument data” function Short form: Device Inst.data Steps required: Press to select the Device function. Confirm selection with Press to select the Inst.data function. Confirm selection with Testo-Direct info@Testo-Direct.com 1.888.475.5235 www. .com... -
Page 32: Safety Instructions
Ensure correct disposal Take faulty rechargeable batteries/spent batteries to the collection points provided for them. Send the product back to Testo at the end of its useful life. We will ensure that it is disposed of in an environmentally friendly manner. Testo-Direct info@Testo-Direct.com... -
Page 33: Intended Purpose
Use the product only for those applications for which it was designed. Ask Testo if you are in any doubt. testo 735 is a compact measuring instrument for measuring temperature. The product was designed for the following tasks/applications: · Food industry ·... -
Page 34: Product Description
Change display of the 2 reading line In configuration mode: Decrease value, select option Print data 735-1 only: If the Cyclical Printing function is activated, the programmed measuring program is started. Switch instrument on, switch display light on/off; switch instrument off (press and hold) Testo-Direct info@Testo-Direct.com... -
Page 35: Testo-Direct
Open menu item “Multi-point mean calculation“ Mean Open menu item “Measuring program” (735-2 only) Measp Start test series (735-2 only) Start End test series (735-2 only), End Cyclical Print (735-1 only) Save values (735-2 only) Save Open menu item “RadioC“ Radio Open menu item“Location“... -
Page 36: Interfaces
3. Product description 3.2 Interfaces Infrared interface Measurement data can be sent to a Testo printer via the infrared interface on the head of the instrument. USB interface The mains unit (accessory part) can be connected to the head of the instrument via the USB interface to power the instrument. -
Page 37: Commissioning
Observe the polarity! Push the radio module (accessory part) into the radio module compartment until it engages in place. Note the guide groove. Replace the battery compartment cover, press down and secure by tightening the two screws. Testo-Direct info@Testo-Direct.com 1.888.475.5235 www. .com... -
Page 38: Operation
5.2 Switching on/off Switching t t he i i nstrument o o n: Press - Only 735-2: If probe adjustment data are stored in the instrument and activated, Adjustm. active appears in the display (duration: 2s). See chapter , p. 43. -
Page 39: Display Light
Switching t t he i i nstrument o o ff: Press and hold (for approx. 2s) until the display goes out. 5.3 Display light Switching t t he d d isplay l l ight o o n/off: The instrument is switched on. Press Testo-Direct info@Testo-Direct.com 1.888.475.5235 www. .com... -
Page 40: Setting The Instrument
Setting a a p p rofile: The configuration menu is open, config. is displayed. Profile Select the desired profile with and confirm with Testo-Direct info@Testo-Direct.com 1.888.475.5235 www. .com... -
Page 41: Units
Date / Time Setting t t he d d ate/time: The configuration menu is open, config. is displayed. Device date/time to set the value for year and confirm with Set the other values as described in step Testo-Direct info@Testo-Direct.com 1.888.475.5235 www. .com... -
Page 42: Testo-Direct
If pr MinMaxAuto is activated, minimum and maximum values are also printed with the measurement readings. Switching o o ff p p r MinMax: The configuration menu is open, Config. is displayed. Device pr MinMax Choose On or Off with and confirm with Testo-Direct info@Testo-Direct.com 1.888.475.5235 www. .com... -
Page 43: Probe
If necessary, rectify the possible causes of the fault in radio transmission. Alternatively, the probe ID can also be entered manually. Press to enter the probe ID. Testo-Direct info@Testo-Direct.com 1.888.475.5235 www. .com... -
Page 44: Language
Adjustment (735-2 only) The function is only available if probe adjustment data are stored in the instrument. The PC adjustment software testo 735-2 is required to store probe adjustment data in the instrument. See documentation on this software. Probe adjustment data stored in the instrument can be activated/deactivated. -
Page 45: Main Menu
Some functions are only available when a probe is connected or a wireless probe is switched on and registered. Menu overview testo 735-1 Profile menu items Function... -
Page 46: Memory (735-2 Only)
Press to select the location to be activated and confirm with Protocol Saved measurement protocols can be printed out on a Testo printer (accessory part) via the infrared interface. Printing a a m m easurement p p rotocol: The main menu is open, Menu is displayed. -
Page 47: Measuring Program (735-2 Only)
The main menu is open, Menu is displayed. Memory Delete Press to clear the entire memory. 6.2.2 Measuring program (735-2 only) A measuring program can be programmed and activated/deactivated: Designation Description Measuring program switched off: Readings can be stored manually AUTO Automatic measuring program: The measuring cycle (min. -
Page 48: Mean
If an alarm threshold is exceeded or undershot during a measurement, an alarm tone is emitted. testo 735-2 only: The alarm thresholds are related to the location. They are only applied to the location that was activated in the setting. -
Page 49: Alarm
6. Setting the instrument 49 Setting a a larm t t hresholds: The main menu is open, Menu is displayed. testo 735-2 only: Activate the location for which the settings are to apply. Alarm Press to select Max (upper alarm threshold) or Min (lower alarm... -
Page 50: Measuring
Press Hold Press to change back to displaying the actual reading. Saving r r eadings ( ( 735-2 2 o o nly): Press Save - A measurement protocol with the readings of all available measurement channels is created for the active location. -
Page 51: Testo-Direct
Pick Press to stop mean calculation. Running t t he A A UTO m m easuring p p rogram ( ( 735-2 2 o o nly): The instrument is in measurement view and the AUTO measuring program is activated. Start the measuring program with Start - The measuring program starts. -
Page 52: Care And Maintenance
Undo the two screws on the rear of the instrument and lift off the battery compartment cover. Remove spent batteries/rechargeable batteries and insert new batteries/rechargeable batteries (3x mignon) into the battery compartment. Observe the polarity! Replace the battery compartment cover and tighten the two screws. Testo-Direct info@Testo-Direct.com 1.888.475.5235 www. .com... -
Page 53: Questions And Answers
· Re-enter instrument settings. no longer correct long time. If we are unable to answer your question, please contact your dealer or Testo Customer Service. Contact details can be found on the guarantee card or on the Internet under www.testo.com . -
Page 54: Technical Data
Value Probe connections 2x Omega TC socket, 1x Mini-DIN socket, radio module (accessory) Memory 735-2 only: max. 99 locations, up to 10000 readings (depending on number of locations, protocols, channels) Battery life approx. 200h with probe type K/T approx. 50h with probe Pt100 approx. -
Page 55: Accessories/Spare Parts
Measurement range: see table above According to EN 13485, the measuring instruments should be checked and calibrated regularly under the terms of EN 13486 (Recommended: Yearly). Contact us for more information: www.testo.com 11. Accessories/spare parts This chapter gives important accessory and spare parts for the product. -
Page 56: Testo-Direct
AG Postfach 11 40, 79849 Lenzkirch Testo-Straße 1, 79853 Lenzkirch Telefon: (07653) 681-0 Fax: (07653) 681-100 E-Mail: info@testo.de Internet: http://www.testo.com Testo-Direct info@Testo-Direct.com 1.888.475.5235 www. .com 0977.7350/04/T/dr/11.04.2007...