
Related Manuals for Yamaha AUDIOGRAM 6


Summary of Contents for Yamaha AUDIOGRAM 6
- Page 1 USB AUDIO INTERFACE Owner’s Manual Bedienungsanleitung AUDIOGRAM 6 Mode d’emploi Manual de instrucciones Руководство пользователя 取扱説明書 Owner’s Manual C0 (10.11.30) AUDIOGRAM 6 Owner’s Manual...
- Page 2 2) this device must accept any interference received including interference that may cause undesired operation. See user manual instructions if interference to radio reception is suspected. * This applies only to products distributed by YAMAHA CORPORATION OF AMERICA. (FCC DoC) FCC INFORMATION (U.S.A.)
- Page 3 If it should appear to be malfunctioning, discontinue use spill into any openings. If any liquid such as water seeps into the immediately and have it inspected by qualified Yamaha service device, unplug the USB cable from this device immediately. Then have personnel.
- Page 4 • Copying of the software or reproduction of this manual in whole or in part by any means is expressly forbidden without the written consent of the manufacturer. • Yamaha makes no representations or warranties with regard to the use of the software and documentation and cannot be held responsible for the results of the use of this manual and the software.
-
Page 5: Table Of Contents
Introduction Thank you for choosing a Yamaha AUDIOGRAM 6 Computer Recording System. The AUDIOGRAM 6 includes a USB audio interface for digital audio data transfer, and Cubase AI DAW (Digital Audio Worksta- tion) software for Windows® and Macintosh® computer operating systems. With the AUDIOGRAM 6 and your personal computer you have the basic elements of a high-performance computer recording system that is easy to set up and operate. -
Page 6: Introduction
A PHANTOM switch supplies +48V phantom power to the channel 1 microphone input, so you can use high-quality phantom-powered condenser microphones for superior recording quality. Accessories • Cubase AI DVD-ROM • USB cable • Owner’s Manual (this book) AUDIOGRAM 6 Owner’s Manual... -
Page 7: Setup
Keyboard, etc. Microphone Guitar CD player Headphones USB cable To connect a device such as a microphone: To connect an instrument such as an electric guitar Cubase AI or bass: Computer AUDIOGRAM 6 Owner’s Manual... -
Page 8: Quick Guide
Set the MIC/INST switch according to the type of device connected to channel 1 or 2. Select MIC ( ) if a microphone is connected, or INST ( ) if a guitar or similar instrument is con- nected. AUDIOGRAM 6 Owner’s Manual... -
Page 9: Powering Up The System
DAW control phones or monitor speakers. PEAK indicators MASTER LEVEL control Lower the volume using the LEVEL controls until the level indicator PEAK LEDs flash only briefly on occa- sional high-level peaks or not at all. AUDIOGRAM 6 Owner’s Manual... -
Page 10: Recording With Cubase Ai
CODEC] in the [ASIO Driver] field on the right side of the window. A dialog box will appear asking “Do you want to switch the ASIO driver?”. Click [Switch]. A new project is created. Recorded Cubase AI data is stored as a NOTE “Project.” AUDIOGRAM 6 Owner’s Manual... - Page 11 Cubase AI, then open the Device Setup window. The added tracks will appear. NOTE You will normally use a stereo track when recording synthesizers, and a monaural track when recording vocals or guitars. AUDIOGRAM 6 Owner’s Manual...
- Page 12 If the [Record Enable] button is off, click it to turn it Play the instrument to be recorded, and adjust the AUDIOGRAM GAIN controls and LEVEL controls so that the Clipping indica- tor never lights. <Transport panel> Clipping indicator AUDIOGRAM 6 Owner’s Manual...
- Page 13 Cubase AI for recording using the AUDIO- GRAM level indicators while the DAW control is set to minimum. Adjust the channel LEVEL controls so that the corresponding PEAK LEDs flash only occasionally on the highest input transients. AUDIOGRAM 6 Owner’s Manual...
-
Page 14: Mixing With Cubase Ai
For further details refer to the pdf manual pro- vided with the Cubase AI software. It’s a good idea to lower the channel fader a bit before adding an effect, since the effect can cause an increase in the overall channel CAUTION level. AUDIOGRAM 6 Owner’s Manual... -
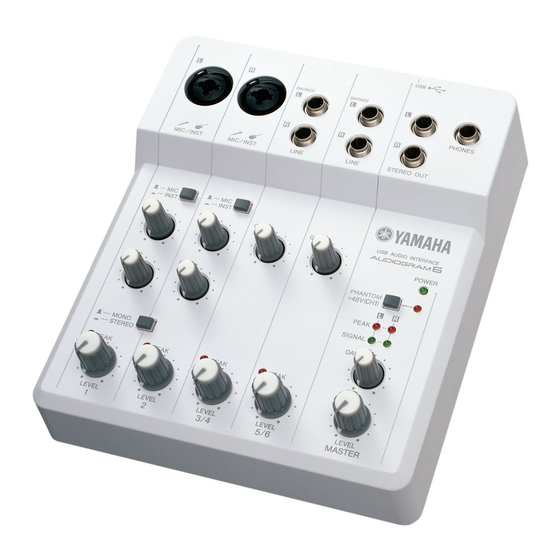
Page 15: Controls And Functions
PEAK indicator lights GRAM will recognize the signal as monaural and will send the identical signal to both the L and R jacks. only occasionally and briefly on the highest input tran- sients. Phone-type AUDIOGRAM 6 Owner’s Manual... -
Page 16: Input Signal Flow
MASTER LEVEL control all the way down. . Turn this switch on when using a phantom-powered CAUTION condenser microphone. NOTE Yamaha recommends that you use a USB cable with a length of 1.5 meter or less. ■ Input Signal Flow Level Adjust the recording level... -
Page 17: Troubleshooting
“Sound” to open the “Sound” dialog window. If so, try removing the other device(s) and connecting only the Yamaha USB device. 2. Click the “Input” tab and under “Choose a device for sound input” select “USB Audio CODEC”. - Page 18 2. Click the “Volume” tab and click “Advanced” in “Speaker settings.” The “Advanced Audio Proper- ties” dialog window will open. 3. Click the “Performance” tab. Set “Hardware accel- eration” to “Full”, and “Sample rate conversion quality” to “Good.” AUDIOGRAM 6 Owner’s Manual...
-
Page 19: Specifications
Dimensions (W x H x D) 170 x 59 x 192 mm Net Weight 760 g Cubase AI DVD-ROM Included Accessories USB cable Owner’s Manual ■ Dimensional Diagrams W: 170 D: 192 H: 59 Unit: mm AUDIOGRAM 6 Owner’s Manual... - Page 20 Specifications ■ Block Diagram and Level Diagram AUDIOGRAM 6 Owner’s Manual...
-
Page 21: About The Accessory Disk
Center” icon. “*” indicates where the version number appears in • Note that Yamaha does not offer technical support the actual icon name. for the DAW software in the accessory disk. For information about the minimum system require- ments and latest information on the software in the disk, check the web site below. - Page 22 Niederlassung und bei Yamaha Vertragshändlern in den jeweiligen Bestimmungsländern erhältlich. Pour plus de détails sur les produits, veuillez-vous adresser à Yamaha ou au distributeur le plus proche de vous figurant dans la liste suivante. Para detalles sobre productos, contacte su tienda Yamaha más cercana o el distribuidor autorizado que se lista debajo.