
Related Manuals for York Fitness YBR AXT 120


Summary of Contents for York Fitness YBR AXT 120
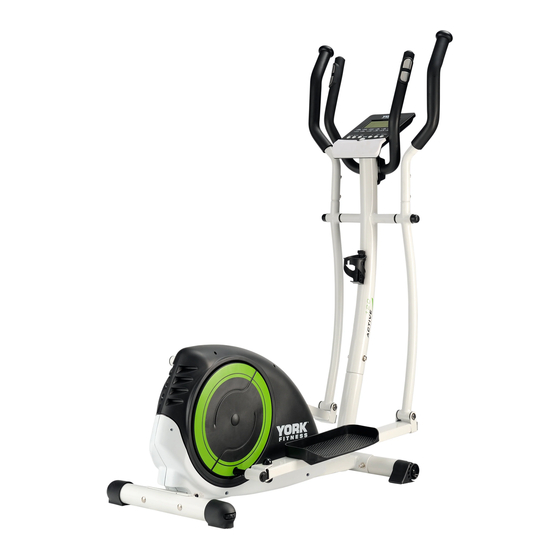
- Page 1 Owner’s Manual YBR AXT 120 Crosstrainer Item #52069 March 31, 2014 www.yorkfitness.com...
-
Page 2: Table Of Contents
Table of Contents Congratulations on CONTENTS purchasing your exercise equipment from Safety information Customer support Assembly instructions Operational instructions You have chosen a high quality, safe and innovative piece of equipment as your training partner and we are certain it will keep you motivated on the way to achieving your Troubleshooting personal fitness goals. -
Page 3: Safety Information
Always check that any pins / fixings are tight and secure • Due to our continuous policy of product development, before use and after adjustment. York Fitness reserves the right to change specifications without notice. • Never leave any adjustment devices projecting from the equipment. -
Page 4: Customer Support
Underside of the main body. IMPORTANT!! - Please retain your sales receipt, York Fitness Customer Care may request proof of purchase to validate eligibility for warranty service. Warranty cover starts from the date shown on the proof of purchase. -
Page 5: Assembly Instructions
Assembly Instructions Prepare your work area - It is important you assemble the product in a clean and uncluttered space. Work with a friend - We recommend you have someone assist you with the assembly as some of the components are quite heavy. Open the carton - Check any warnings on the carton and make sure you have it the right way up. - Page 6 Assembly Instructions N-1 x 4 N-2 x 4 (M8 x 1.25 x 75L) (M8 x 1.25 x 15L) N-3 x 4 (D22 x D8.5 x 1.5T) N-4 x 4 (D15.4 x D8.2 x 2T) N-6 x 8 (M6 x 1 x 15L) N-7 x 2 (D29 x 21, M8) N-5 x 8...
- Page 7 N-1 x 4 N-2 x 4 N-3 x 4 N-4 x 4 D-11 www.yorkfitness.com...
- Page 8 Assembly Instructions N-5 x 8 N-6 x 8 N-10 N-10 N-9 x 2 N-8 x 2 N-4 x 2 N-7 x 2 N-10 x 2 www.yorkfitness.com...
- Page 9 N-12 N-11 N-12 N-12 x 10 N-4 x 10 N-3 x 10 A-2 x 4 pre-installed www.yorkfitness.com...
- Page 10 Assembly Instructions Final Check Your exercise equipment is now assembled. Please make the following final checks: • Make sure all screws / bolts are tightened. • Make sure the equipment is on a flat, level surface. Input Power Plug in the adaptor to the equipment then the computer will produce a beep sound and turn on the computer at the Manual mode.
-
Page 11: Operational Instructions
Operational Instructions Hand Pulse Sensors This cross trainer is fitted with 2 hand pulse sensors. To obtain a pulse reading you must have both your left and right hands on the sensors at the same time. Do not grip the hand sensors Hand Pulse Sensor too tight and allow the computer a few seconds to display the reading. - Page 12 Operational Instructions Console: BODY FAT RECOVERY DOWN RESET START/STOP MODE Power On: Plug in power supply and the computer will power on and display all segments for 2 seconds. After power on the monitor for the first time, the user will be prompted to enter his / her age, sex, height and weight. Use the UP / DOWN buttons to change the value and press the MODE key to confirm each setting.
- Page 13 Key Function: DESCRIPTION • Increase resistance level. • Setting selection. DOWN • Decrease resistance level. • Setting selection. MODE • Confirm setting or selection. RESET • Press the RESET button once to go back to main menu during setup. • Press and hold the RESET button for 2 seconds to reboot computer and start from default setting.
- Page 14 Operational Instructions Manual Mode User can begin manual mode by pressing the START button in main menu. 1. Use the UP / DOWN buttons to select MANUAL and press MODE to confirm. 2. Use the UP / DOWN buttons to preset a target TIME, DISTANCE, CALORIES or PULSE. Press MODE to confirm.
- Page 15 WATT Mode 1. Use the UP / DOWN buttons to select WATT and press MODE to confirm. 2. Use the UP / DOWN buttons to select a WATT target (Default: 120). 3. Use the UP / DOWN buttons to set a workout time. 4.
-
Page 16: Troubleshooting
Troubleshooting If you have a problem with your exercise equipment, before you do anything else please check that all the cables have been connected correctly. Loose cables are very common and many problems can be solved by making sure the cables are properly connected. - Page 17 Notes www.yorkfitness.com...
-
Page 18: Fitness Guide
Fitness Guide Starting and Finishing Your Workout Begin and end each workout with a Warm Up / Down session - a few minutes of stretching to help prevent strains, pulls and cramps. Correct Crosstraining Form To start using the cross trainer, simply stand on the foot pedals with the front of your shoes close to the front edge of the pedal cap. - Page 19 How Long Should I Exercise For? That really depends on your current level of fitness. If you’re just starting out on a new exercise program, you should start gradually and build up - do not try to do too much too quickly. 30 minutes, 3 times a week should be enough. Don’t push yourself too hard - you should never feel exhausted during or following exercise.
-
Page 20: Exploded Drawing
Exploded Drawing N-12 N-11 N-10 N-12 N-10 N-12 www.yorkfitness.com... - Page 21 D-11 G-11 G-10 G-15 G-4 G-6 D-10 G-14 G-12 G-13 Q-7 Q-8 Q-9 T-10 T-11 Q-10 Q-5 Q-3 Q-4 T-9 T-1 T-7 H-3 H-4 S-2 S-3 www.yorkfitness.com...
-
Page 22: Part List
Part List YORK REF. REF. DESCRIPTION QTY. YORK REF. REF. DESCRIPTION QTY. 52069-1001 COMPUTER SET 52069-1053 G-14 NYLON NUT (M10*1.5*10T) 52069-1002 COMPUTER (SM-2789-67) 52069-1054 G-15 JOINT 52069-1003 BOLT (M5*0.8*10L) 52069-1055 CHAIN COVER SET 52069-1004 FIXING BAR SET 52069-1056 LEFT CHAIN COVER 52069-1005 FIXING BAR 52069-1057... - Page 23 YORK REF. REF. DESCRIPTION QTY. 52069-1105 C-CLIP (S-17(1T)) 52069-1106 WAVED WASHER (D17*D22*0.3T) 52069-1107 FLAT WASHER (D23*D17.2*1.5T) 52069-1108 BELT (420(1067)L PJ5) 52069-1109 FLYWHEEL SET 52069-1110 FLYWHEEL 52069-1111 BEARING (#6000ZZ) 52069-1112 FLYWHEEL AXLE 52069-1113 NYLON NUT (3/8"-26UNF*6.5T) 52069-1114 NUT (D9.5X5T(3/8"-26UNFX5T)) 52069-1115 NUT (D9.5X3T(3/8"-26UNFX3T)) 52069-1116 FIXING RING (D13*D10*1.9T) 52069-1117...
- Page 24 www.yorkfitness.com...