CYBEX CLOUD Q Owner's Manual
Hide thumbs
Also See for CLOUD Q:
- Instruction manual (190 pages) ,
- Instruction manual (120 pages) ,
- Manual (38 pages)
Table of Contents
Advertisement
Available languages
Available languages
Advertisement
Chapters
Table of Contents

Related Manuals for CYBEX CLOUD Q


Summary of Contents for CYBEX CLOUD Q
- Page 1 CLOUD Q Owner’s Manual Manual del Propietario READ this Owner’s Manual carefully before first use, and keep it for future reference. LEA este Manual del Propietario minuciosamente antes de usarlo y guarde para su futura referencia.
- Page 2 A new function of the Cloud Q is that it can be changed to a full recline position when used outside of the car. With an extended Keep this Owner’s Manual for future reference by storing it in the...
-
Page 3: Table Of Contents
INSTALLING THE INFANT CARRIER WITHOUT THE BASE ..37 WARNINGS AND IMPORTANT SAFETY INFORMATION ..4 USING ONLY A LAP AND SHOULDER BELT .........37 OVERVIEW OF THE CLOUD Q INFANT CARRIER ....11 USING ONLY A LAP AND SHOULDER BELT (ALTERNATE OVERVIEW OF THE LOAD LEG BASE US .......13 METHOD) ..................39... -
Page 4: Registration And Recall Information
Please ll this card out and mail it NOW, or register online at http://cybex-online.com/register while you are thinking about it. The card is already addressed and we’ve paid the postage. Columbus Trading-Partners USA Inc. - Page 5 WARNING! DEATH or SERIOUS INJURY can occur • READ this Owner’s Manual carefully manufacturer. Refer to your vehicle's before first use, and keep it for future Owner’s Manual for information about reference. vehicle seat belt systems, air bags, and child restraint installations, to determine •...
- Page 6 WARNING! DEATH or SERIOUS INJURY can occur of the vehicle itself; a child restraint will children 12 and under. not protect a child when the vehicle • ONLY USE this child restraint REAR is seriously impacted. CORRECTLY FACING. USED, this child restraint will •...
- Page 7 WARNING! DEATH or SERIOUS INJURY can occur even for one minute. attached to the Load Leg Base US, each time you use this restraint. After • ALWAYS have the handle LOCKED attaching the Infant Carrier to the base, in the DRIVE POSITION towards the LIFT UP on the Infant Carrier handle to back of the vehicle while using this child make sure that it is securely attached to...
- Page 8 WARNING! DEATH or SERIOUS INJURY can occur • NEVER LEAVE a vehicle seat back • ALWAYS CHECK buckles and other with a folding mechanism unlocked. In parts for hot surfaces. A hot surface the event of a sudden stop, an unlocked could burn your child! Cover an unoccupied child restraint with a blanket vehicle seat back could prevent this child...
- Page 9 • NEVER USE accessories or move carrier. NEVER place carrier parts with this child restraint other on counter tops, tables, or any other than those approved by CYBEX. elevated surfaces. Use of accessories or parts from • ALWAYS USE the complete and...
- Page 10 Carrier to your stroller. For a list of • MAKE SURE the handle is LOCKED compatible strollers, please visit in the CARRY POSITION before lifting www.cybex-online.com Infant Carrier by the handle. An unlocked ADDITIONAL SAFETY handle could move unexpectedly, causing child to fall.
- Page 11 WARNING! DEATH or SERIOUS INJURY can occur • REGISTER this child restraint. This is child that can reach the seat belt and the best way to reach you in the event of may wrap it around his or her neck. a recall.
-
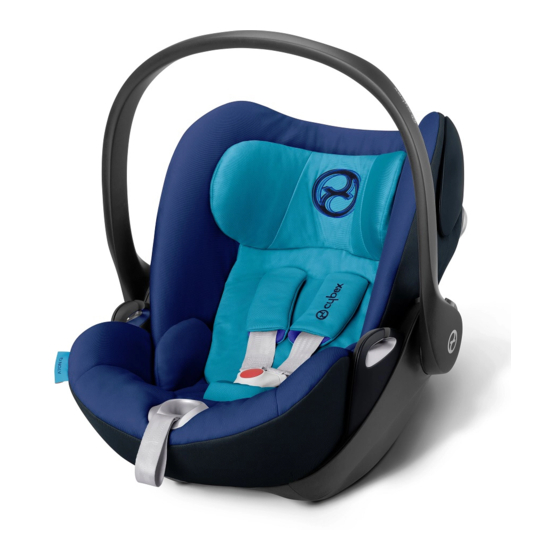
Page 12: Overview Of The Cloud Q Infant Carrier
OVERVIEW OF THE CLOUD Q INFANT CARRIER TOP VIEW Carry Handle No Rethread Harness Adjuster Headrest Shoulder Pads (removable) Canopy (Stored position) Chest Clip L.S.P. device (fully extended) Handle Belt Guide Travel System Release Button Carry Handle Adjustment Button Harness Straps... - Page 13 OVERVIEW OF THE CLOUD Q INFANT CARRIER Recline Release Handle BOTTOM VIEW Shoulder Belt Guide L.S.P. device (stored) Base Attachment Rod Carry Handle Adjustment Buttons Travel System Attachment Slot Owner's Manual (Stored) Harness Base Attachment Rod Harness Adjustment Strap...
-
Page 14: Overview Of The Load Leg Base Us
OVERVIEW OF THE LOAD LEG BASE US FRONT VIEW Level Indicator (hidden) Locking Lever Infant Carrier Attachment Lock Belt Tensioning Plate Leveling Foot Belt Guide Steel Chassis LATCH Strap Tensioning Loop Infant Carrier Attachment Catch Infant Carrier Release Green Safety Button Load Leg Adjustment Handle Load Leg Load Leg Foot... - Page 15 OVERVIEW OF THE LOAD LEG BASE US REAR VIEW Level Adjustment Handle Belt Tensioning Plate Locking Lever LATCH Connector Storage Leveling Foot (fully extended) LATCH Strap Adjuster LATCH Connector LATCH Guides...
-
Page 16: Unique Features Of The Cloud Q
50%! FULL RECLINE BACKREST STEEL CHASSIS A new function of the Cloud Q is that The Steel Chassis is a continuous metal frame integrated into the it can be changed to a full recline Base from front to back. It position outside of the car. -
Page 17: Child Size Requirements
Use the CYBEX Cloud Q until your child reaches the maximum weight or height limits. Because not all children have the same shapes and sizes, DO NOT USE the Cloud Q when the top of the child's head is less than 1 inch (2.5 cm) from the top of the Infant Carrier. This allows for proper protection during a crash. -
Page 18: Using The Infant Carrier
USING THE INFANT CARRIER HARNESS BUCKLE To release Buckle Tongues, firmly press the red button on the Harness Buckle and pull the tongues out. To fasten, insert each Tongue into Buckle, listening for an CLICK! CLICK! audible CLICK. Pull on each to verify a secure connection. Check that the Buckle functions properly and is kept free of dirt and debris. -
Page 19: Handle Positions
INTEGRATED CANOPY Simply pull forward to extend the Cloud Q Canopy. The Canopy has four positions. To retract the Canopy, gently push it back into its original position. -
Page 20: Adjusting The Seat
The car seat may be adjusted up and down through eleven positions to perfectly fit your baby. The Cloud Q is shipped in the lowest position with the Infant Insert already in position. 1. Unbuckle the Harness and Chest Clip 2. -
Page 21: Securing The Child
USING THE INFANT CARRIER SECURING THE CHILD 1. Loosen Harness by firmly pressing down on the Harness Adjustment Button while pulling forward on both straps at shoulder level. 2. Press red button on Harness Buckle to release Tongues. 3. Separate Chest Clip and spread straps apart. Place child in Infant Carrier in seated position making sure their bottom is in the seat, and their back is fully supported. - Page 22 USING THE INFANT CARRIER 7. Pull up on Harness Straps to snug around the child's hips while holding the Harness Buckle in place. 8. Slowly pull the adjuster strap to tighten the Shoulder Straps. A snug strap should not allow any slack. It lies in a relatively straight line without sagging.
-
Page 23: Adjusting The Recline Position
USING THE INFANT CARRIER OUTSIDE OF THE VEHICLE ADJUSTING THE RECLINE POSITION A new function of the Cloud Q is that it can be reclined to an almost horizontal position outside of the car. With an extended leg-rest RECLINED MODE and a fully reclined backrest, the child can lie comfortably and in an ergonomically correct position. -
Page 24: Vehicle Seat Location Requirements
VEHICLE SEAT LOCATION REQUIREMENTS WARNING! DEATH or SERIOUS INJURY can occur NEVER place this child restraint on a front seat with an active airbag. DEATH or SERIOUS INJURY may occur. The REAR seat is the safest place for children 12 and under. - Page 25 VEHICLE SEAT LOCATION REQUIREMENTS The Cloud Q is allowed to touch the vehicle seat(s) in front of it, as long the recline angle of the Cloud Q is not affected. The best position for the child restraint is one that is recommended by your vehicle Owner’s Manual, AND allows a proper and secure installation of the restraint every time.
-
Page 26: Using Latch
Top tether anchors are located in various places behind the seat. Top tethers are not required on infant car seats like the Cloud Q. Is it safer? LATCH typically offers an easier and more consistent installation. -
Page 27: Using Latch Guides
Lower Anchors from the outboard seating positions to install a Child Restraint. CYBEX allows this child restraint to be installed using the two inner Lower Anchors from the outboard seating positions if the distance between the inner Lower Anchors is between 11 and 20 inches (28-51 cm) AND if your vehicle manufacturer allows it. -
Page 28: Removing And Storing Latch Connectors
REMOVING AND STORING LATCH CONNECTORS TO REMOVE FROM STORAGE To install the Base using LATCH, the Connectors must be removed from their storage compartments. 1. To access the LATCH Connector Storage compartments, squeeze the Level Adjustment Handle to fully extend the Leveling Foot. 2. -
Page 29: Using The Load Leg
USING THE LOAD LEG The Load Leg is an effective safety feature of the Cloud Q and using it is STRONGLY RECOMMENDED. However, if necessary (e.g. in a center position with a hump in the floor), the Base may be installed with the Load Leg folded up underneath the Base. If... -
Page 30: Adjusting The Recline Angle Using The Base
ADJUSTING THE RECLINE ANGLE USING THE BASE It is very important for your child's safety that this child restraint be installed at the correct recline angle. Before attaching the Infant Carrier to the Base, always check the Level Indicator for the correct recline angle range based on your child's weight. -
Page 31: Installing The Base
INSTALLING THE BASE USING LATCH 1. Remove LATCH anchors from storage. See page 27. 2. Unfold the Load Leg from underneath the Base. 3. Position Base on a rear vehicle seat. If a hump is present on the floor of the vehicle, See page 28 for important information on using the Load Leg in this seating position. -
Page 32: Using Latch
INSTALLING THE BASE USING LATCH 8. Press the Belt Tensioning Plate down with both Automatic hands, where indicated, until it locks into place. The DO NOT turn orange Locking Lever will rotate to the CLOSE position automatically when the Plate is locked. If Belt Tensioning Plate does not lock, try loosening the LATCH strap slightly. -
Page 33: Using A Lap And Shoulder Belt
INSTALLING THE BASE USING A LAP AND SHOULDER BELT 1. Unfold the Load Leg from underneath the Base. 2. Position Base on a rear vehicle seat. If a hump is present on the floor of the vehicle, See page 28 for important information on using the Load Leg in this seating position. - Page 34 NEVER install this child restraint using a non-locking vehicle lap shoulder belt. A locking clip must be used with a vehicle belt that firmly against DOES NOT LOCK. Call the CYBEX Customer Care Department at vehicle floor 1.877.242.5676 to obtain a locking clip.
-
Page 35: Using A Lap Belt Only
INSTALLING THE BASE USING A LAP BELT ONLY 1. Unfold the Load Leg from underneath the Base. 2. Position Base on a rear vehicle seat. If a hump is present on the floor of the vehicle, See page 28 for important information on using the Load Leg in this seating position. - Page 36 INSTALLING THE BASE USING A LAP BELT ONLY 8. Press the Belt Tensioning Plate down with both Automatic hands, where indicated, until it locks into place. The DO NOT turn orange Locking Lever will rotate to the CLOSE position automatically when the Plate is locked. If the Belt Tensioning Plate does not lock, try loosening the vehicle belt slightly.
-
Page 37: Using The Infant Carrier With The Base
The green Safety Button will pop out from the middle of the Infant Carrier Release to indicate proper attachment. The Cloud Q is allowed to touch the vehicle seat(s) in front of it, as long as the recline angle of the Cloud Q is not affected. - Page 38 DO NOT INTERFERE with the Infant Carrier. NEVER install this child restraint using a non-locking vehicle lap shoulder belt. A locking clip must be used with a vehicle belt that DOES NOT LOCK. Call the CYBEX Customer Care Department at 1.877.242.5676 to obtain a locking clip.
- Page 39 See page 43. LINE MUST BE LEVEL WITH GROUND The Cloud Q is allowed to touch the vehicle seat(s) in front of it, as WHEN INSTALLED WITHOUT BASE long the recline angle of the Cloud Q is not affected.
- Page 40 A locking clip must be used with a vehicle belt that DOES NOT LOCK. Call the CYBEX Customer Care Department at 1.877.242.5676 to obtain a locking clip. 5. Make sure that vehicle belt buckle and hardware...
- Page 41 See page 43. LINE MUST BE LEVEL WITH GROUND The Cloud Q is allowed to touch the vehicle seat(s) in front of it, as WHEN INSTALLED WITHOUT BASE long the recline angle of the Cloud Q is not affected.
- Page 42 Infant Carrier near the vehicle seat back to adjust the angle. See page 43. The Cloud Q is allowed to touch the vehicle seat(s) in front of it, as long the recline angle of the Cloud Q is not affected.
-
Page 43: Using The Linear Side-Impact Protection (Lsp)
CLICK! intermediate. Pull out the L.S.P. device on the side of the Cloud Q adjacent to the vehicle door or panel listening for an audible CLICK. If the L.S.P. device is touching the door or panel, retract the L.S.P. to the intermediate positon by pressing the button and pushing in the L.S.P. -
Page 44: Adjusting The Recline Angle Without The Base
ADJUSTING THE RECLINE ANGLE WITHOUT THE BASE It's very important for your child's safety that this child restraint be installed at the correct angle. DO NOT use this or any other child restraint with a premature, low birth weight, or medically fragile infant, until after you have consulted with your doctor. - Page 45 The FAA recommends that children up to 40 pounds (18 kg) use a certified, harnessed child seat while travelling on an airplane. The Cloud Q is certified for airplane use. INSTALLING THE CARRIER ON AIRPLANE Install your Infant Carrier in a window seat to avoid blocking the aisle.
-
Page 46: Care And Cleaning
CARE AND CLEANING REMOVING THE SEAT COVER INSTALLING THE SEAT COVER Reverse the removal instructions to reinstall the Seat Cover. The integrated Harness System cannot be removed from the seat. NEVER remove or attempt to remove parts of the Harness System. BACKREST COVER DO NOT damage, remove or dispose of any EPS foam. -
Page 47: Washing Instructions
CARE AND CLEANING SPOT CLEANING HARNESS STRAPS Spot clean Seat Covers, Shoulder Pads, Buckle Pad, and the Sponge clean using warm water and mild soap. Air dry. Do not iron. Infant Insert as needed with a clean cloth using mild detergent and water. -
Page 48: Safety Checklist
SAFETY CHECKLIST go, and please DRIVE SAFELY! Did you read and understand this Owner’s Manual and all labels found on this child restraint? SAFE CAR PRACTICES Is the child restraint rear facing in an approved vehicle seat NEVER drive under the influence of alcohol or drugs. •... -
Page 49: If You Need Help
This information can be found on page 3 of this Owner’s Manual, or on the underside of your Infant Carrier and Base. Please contact the U.S. CYBEX Distributor, Columbus DO NOT USE this child restraint if it has been in a Trading-Partners USA Inc. -
Page 50: Warranty
Owner’s Manual. product will be free from defects in material and workmanship for In no event will CYBEX or the dealer selling this product be liable two (2) years from the date of original purchase (the “Warranty to you for any damages, including incidental or consequential Period”). -
Page 52: Bienvenido A Cybex
Cloud Q aporta dos importantes innovaciones de seguridad para la categoría de asientos infantiles de auto. Antes de utilizar el asiento infantil de auto Cloud Q por primera vez, asegúrese de haber cumplido con todos los pasos en la Lista de Protección de Impacto Frontal... - Page 53 UTILIZANDO DEL CINTURÓN DE REGAZO Y HOMBRO ....32 ADVERTENCIAS E IMPORTANTE INFORMACIÓN ......4 UTILIZANDO DEL CINTURÓN DE REGAZO ÚNICAMENTE ..34 VISTA GENERAL DEL PORTA BEBÉ CLOUD Q ........11 USO DEL PORTA BEBÉ CON LA BASE ..........36 VISTA GENERAL DE LA LOAD LEG BASE US ........13 INSTALAR EL PORTA BEBÉ...
-
Page 54: Registro E Información De Retiro Del Producto
Please ll this card out and mail it NOW, or register online at http://register.cybex-online.com/us/carseats http://cybex-online.com/register while you are thinking about it. The card is already addressed and we’ve paid the postage. o llame al 1-877–242–5676 Para más información sobre retiro de productos del mercado, llame... - Page 55 ¡ ADVERTENCIA! MUERTE o GRAVES LESIONES podrían ocurrir • LEA ESTE Manual del Propietario vehículo para obtener información minuciosamente antes del primer uso y acerca de los sistemas de cinturones de guárdelo para su futura referencia. seguridad, bolsas de aire e instalación de sistemas de sujeción infantil para •...
- Page 56 ¡ ADVERTENCIA! MUERTE o GRAVES LESIONES podrían ocurrir • La protección principal para los sujeción. ocupantes de un vehículo en un choque • JAMÁS COLOQUE este sistema de es la estructura del vehículo mismo; sujeción infantil en un asiento del frente un sistema de sujeción infantil no que tenga bolsa de aire activa.
- Page 57 • CUANDO ES POSIBLE, INSTALE la • USAR SOLAMENTE con Load Leg Base del Cloud Q con Pata de Carga Base US en una posición de asiento que permita • SIEMPRE UTILICE un dispositivo que el Extremo de la Pata de Carga esté...
- Page 58 ¡ ADVERTENCIA! MUERTE o GRAVES LESIONES podrían ocurrir • JAMÁS UTILICE este sistema de aplicaciones no certificadas. sujeción infantil en una ubicación de • ANTES de cada uso, VERIFIQUE asiento donde no pueda sujetarse SIEMPRE que el sistema de sujeción firmemente.
- Page 59 • Si los conectores del sistema LATCH con este sistema de sujeción infantil NO ESTÁN SIENDO UTILIZADOS, distintos a los autorizados por CYBEX. asegúrese que estén bien guardados. La utilización de accesorios o piezas de otros fabricantes podría modificar el •...
- Page 60 Para obtener una lista de • RIESGO DE CAÍDA: JAMÁS los cochecitos compatibles, visite COLOQUE el porta bebé sobre topes, www.cybex-online.com mesas, u otras superficies elevadas. Los movimientos del niño podrían hacer que el INFORMACIÓN ADICIONAL porta bebé se deslice y tanto el niño come el porta bebé...
- Page 61 ¡ ADVERTENCIA! MUERTE o GRAVES LESIONES podrían ocurrir prematuro, de bajo peso al nacer o un • NO DEJE objetos sueltos (por ejemplo, bebé médicamente frágil sino hasta que libros, bolsas, etc.) en un vehículo. En caso haya consultado a su médico. Algunos de un frenado súbito, los objetos sueltos bebés podrían tener dificultad para respirar seguirán desplazándose con el potencial...
-
Page 62: Vista General Del Porta Bebé Cloud Q
VISTA GENERAL DEL PORTA BEBÉ CLOUD Q Asa de Acarreo VISTA DESDE LO ALTO Un arnés ajustable que no necesita recolocar las correas Apoyo para la cabeza Almohadillas de Hombros (desmontable) Capucha (almacenada) Inserto Acolchado L.S.P. dispositivo (completamente extendido) Clip de Pecho Maneje Guía del cinturón... - Page 63 VISTA GENERAL DEL PORTA BEBÉ CLOUD Q Botón de liberación de VISTA DESDE ABAJO reclinación Guía del Cinturón de Hombro L.S.P. dispositivo (almacenado) Varilla de Sujeción de la Base Botón de Ajuste del Asa de Acarreo La ranura para la fijación del...
-
Page 64: Vista General De La Load Leg Base Us
VISTA GENERAL DE LA LOAD LEG BASE US VISTA DESDE LO ALTO Indicador de Nivel (oculto) Palanca de Bloqueo Tope de Sujeción del Porta Bebé Placa Tensora de Cinturones Pata Niveladora Guía del cinturón Chasis de Acero Prensilla Tensora de la correa del sistema LATCH Infant Carrier Attachment Catch Pestillo de Sujeción... - Page 65 VISTA GENERAL DE LA LOAD LEG BASE US VISTA DESDE ABAJO Manija de Ajuste de Nivel Placa Tensora de Cinturones Palanca de Bloqueo Almacenamiento para Conector del sistema LATCH Pata Niveladora (completamente extendida) Ajuste del sistema LATCH Conector del sistema LATCH Las Guías de LATCH...
-
Page 66: Características Únicas Del Cloud Q
El Chasis de Acero es un RESPALDO RECLINABLE COMPLETO marco de metal continuo integrado a la Base de Una nueva función del Cloud Q es que adelante hasta atrás, el permite cambiar a una posición horizontal cual ofrece resistencia, una fuera del auto. -
Page 67: Requisitos De Tamaño Del Niño
Utilice el asiento CYBEX Cloud Q hasta que el niño alcance los límites máximos de peso o altura. Debido a que no todos los niños tienen las mismas formas y tamaños, no utilice el asiento Cloud Q cuando la parte superior de la cabeza del niño esté a menos de 1 pulgada (2.5 cm) de la parte superior del Porta Bebé. -
Page 68: Uso Del Porta Bebé
USO DEL PORTA BEBÉ HEBILLA DEL ARNÉS Para liberar las lengüetas de la hebilla, presione firmemente el botón ROJO de la Hebilla del Arnés y jale las lengüetas. Para abrochar, inserte cada una de las lengüetas en la hebilla hasta escuchar un sonoro. Tire de las lengüetas para verificar que estén bien abrocha CLIC das. -
Page 69: Asa De Acarreo
CAPUCHA INTEGRADA Simplemente tire hacia adelante para extender la Capucha del Cloud Q, la cual tiene cuatro posiciones como se muestra. Para replegar la Capucha, regrésela con cuidado hacia su posición original... -
Page 70: Para Ajustar El Asiento
El Posicionador Perfecto puede ajustarse hacia arriba y hacia abajo en ocho posiciones para acomodar perfectamente al bebé. El Cloud Q se entrega en la posición más baja con el Inserto Acojinado ya doblado. 1.Desabroche el Arnés y el Clip del Pecho. -
Page 71: Asegurar Al Niño
USO DEL PORTA BEBÉ ASEGURAR AL NIÑO 1. Afloje el arnés oprimiendo firmemente el Botón Ajustador mientras tira de ambas correas hacia adelante. al nivel de las axilas. 2. Oprima el botón rojo de la Hebilla del Arnés para liberar las lengüetas. - Page 72 USO DEL PORTA BEBÉ 7. Tire hacia arriba de las Correas del Arnés para ceñirlas alrededor de las caderas del niño mientras sostiene en su lugar la Hebilla del Arnés. 8. Lentamente tire de la correa ajustadora para apretar las Correas de Hombros.
- Page 73 Combinado con los cochecitos Priam y M de CYBEX - la Cloud Q se convierte en un sistema de viaje muy sorprendente y práctico MODO DE PORTA BEBÉ...
-
Page 74: Requisitos De Ubicación En El Asiento Del Vehículo
REQUISITOS DE UBICACIÓN EN EL ASIENTO DEL VEHÍCULO ¡ ADVERTENCIA! MUERTE o GRAVES LESIONES podrían ocurrir JAMÁS coloque este sistema de sujeción infantil en un asiento del frente que tenga bolsa de aire activa. La MUERTE o LESIONES GRAVES podrían ocurrir. El asiento trasero es el lugar más seguro para los niños menores de 12 años. - Page 75 REQUISITOS DE UBICACIÓN EN EL ASIENTO DEL VEHÍCULO El Cloud Q puede tocar el respaldo del (los) asiento(s) en frente, siempre y cuando el ángulo de reclinación del Cloud Q no se vea afectado. La mejor posición para el sistema de sujeción infantil es la recomendada en el Manual de Propietario de su vehículo y que permita una instalación correcta y segura del sistema de sujeción cada vez.Si es posible, haga que un adulto viaje en la parte trasera con el niño...
-
Page 76: Que Es El Sistema Latch
Las correas de anclaje superiores están localizadas en diversos lugares detrás del asiento. Las correas superiores de anclaje no son necesarias en asientos infantiles como el Cloud Q. ¿Es más seguro? De manera característica, el sistema LATCH ofrece una instalación más sencilla y homogénea. -
Page 77: Posiciones Del Asiento Central
Anclajes Inferiores del interior de los asientos laterales al instalar el asiento para niños. CYBEX permite este asiento de seguridad para ser instalado usando los dos Anclajes Inferiores del interior de los asientos... -
Page 78: Para Desmontar Y Almacenar Los Conectores Del Sistema Latch
PARA DESMONTAR Y ALMACENAR LOS CONECTORES DEL SISTEMA LATCH PARA SACAR DE ALMACENAMIENTO Para instalar la base usando LATCH, los conectores deben ser removidos de sus compartimientos de almacenamiento. 1. Para tener acceso a los conectores del sistema LATCH, oprima la Manija de Ajuste de Nivel y extienda totalmente la Pata Niveladora 2. -
Page 79: Usando La Pata De Carga
USANDO LA PATA DE CARGA La pata de carga es una medida de seguridad eficaz del Cloud Q y se RECOMIENDA SU USO. Sin embargo, si es necesario (por ejemplo, en una posición central con una joroba en el suelo), la base puede ser instalada con la pata de carga plegada por debajo de la base. -
Page 80: Ajuste Del Ángulo De Reclinación Usando La Base
AJUSTE DEL ÁNGULO DE RECLINACIÓN USANDO LA BASE Es muy importante para la seguridad del niño que el Sistema de Sujeción Infantil quede instalado en el ángulo correcto. Antes de colocar el Porta Bebé a la Base , verifique siempre el Indicador de Nivel para asegurar que está... -
Page 81: Instalación De La Base
INSTALACIÓN DE LA BASE UTILIZANDO EL SISTEMA LATCH 1. Saque los anclajes del sistema LATCH del lugar donde están guardados. Consulte la página 27. 2. Extienda la Pata de Carga ubicada debajo de la Base. 3. Coloque la Base en un asiento posterior del vehículo Si el piso del vehículo tiene una joroba, consulte la página 28 para obtener información importante sobre cómo usar la Pata de Carga en este acomodo de asiento. - Page 82 INSTALACIÓN DE LA BASE UTILIZANDO EL SISTEMA LATCH 8. Presione la Placa Tensora de Cinturones hacia abajo con ambas manos, donde aparece indicado, hasta que quede Automático bloqueada en su lugar. La palanca de bloqueo de color naranja NO girar girará...
-
Page 83: Utilizando El Sistema Latch
INSTALACIÓN DE LA BASE UTILIZANDO DEL CINTURÓN DE REGAZO Y HOMBRO 1. Extienda la Pata de Carga ubicada debajo de la Base. 2. Coloque la Base en un asiento posterior del vehículo Si el piso del vehículo tiene una joroba, consulte la página 28 para obtener información importante sobre cómo usar la Pata de Carga en este acomodo de asiento. - Page 84 Es necesario utilizar firmemente un clip de bloqueo con un cinturón de seguridad SIN BLOQUEO. contra el piso Comuníquese con el Departamento de Atención al Cliente de CYBEX al del vehículo. 1.877.242.5676 para obtener un clip de bloqueo.
- Page 85 INSTALACIÓN DE LA BASE UTILIZANDO EL CINTURÓN DE REGAZO ÚNICAMENTE 1. Extienda la Pata de Carga ubicada debajo de la Base. 2. Coloque la Base en un asiento posterior del vehículo. Si el piso del vehículo tiene una joroba, consulte la página 28 para obtener información importante sobre cómo usar la Pata de Carga en este acomodo de asiento.
- Page 86 INSTALACIÓN DE LA BASE UTILIZANDO EL CINTURÓN DE REGAZO ÚNICAMENTE 8. Presione la Placa Tensora de Cinturones hacia abajo con Automático ambas manos, donde aparece indicado, hasta que quede NO girar bloqueada en su lugar. La palanca de bloqueo de color naranja girará...
-
Page 87: Uso Del Porta Bebé Con La Base
Liberación del Porta Bebé para indicar que ambos elementos se fijaron correctamente. El cloud Q puede tocar el respaldo del (los) asiento(s) en frente, siempre y cuando el ángulo de reclinación del Cloud Q no se vea afectado. Siempre mantenga el asa bloqueada en la posición Manejar cuando utilice este sistema de sujeción infantil... - Page 88 Es necesario utilizar un clip de bloqueo con un cinturón de seguridad SIN BLOQUEO. Comuníquese con el Departamento de Atención al Cliente de CYBEX al 1.877.242.5676 para obtener un clip de bloqueo. 5. Empuje firmemente el Porta Bebé en el asiento del vehículo, presionando hacia abajo cerca de la correa de la entrepierna entre las piernas del niño, mientras se quita la holgura del cinturón...
- Page 89 LÍNEA DEBE ESTAR NIVELADA CON EL SUELO CUANDO SE INSTALA SIN BASE El Cloud Q puede tocar el respaldo del (los) asiento(s) en frente, siempre y cuando el ángulo de reclinación del Cloud Q no se vea afectado. EL FRENTE DEL VEHÍCULO 8.
-
Page 90: Alterno)
Es necesario utilizar un clip de bloqueo con un cinturón de seguridad SIN BLOQUEO. Comuníquese con el Departamento de Atención al Cliente de CYBEX al 1.877.242.5676 para obtener un clip de bloqueo. - Page 91 ángulo. Consulte la página 43 El Cloud Q puede tocar el respaldo del (los) asiento(s) en frente, siempre y cuando el ángulo de reclinación del Cloud Q no se vea afectado. EL FRENTE DEL VEHÍCULO EL FRENTE DEL VEHÍCULO...
- Page 92 ángulo. Consulte la página Si el Porta Bebé se mueve demasiado, apriete más los cinturones de El Cloud Q puede tocar el respaldo del (los) asiento(s) en frente, siempre y cuando el ángulo de reclinación del Cloud Q no se vea afectado.
-
Page 93: Uso De Protección Linear Contra Impactos Laterales
L.S.P. puestas. CLICK! PARA EXTENDER Extienda el dispositivo L.S.P. en el lado del Cloud Q junto a la puerta del vehículo o en el panel hasta escuchar un CLIC perceptible. Si el dispositivo de L.S.P. está en contacto con la puerta o el panel, retraer el L.S.P. -
Page 94: Ajuste Del Ángulo De Reclinación Con Sin Base
AJUSTE DEL ÁNGULO DE RECLINACIÓN CON SIN BASE Es muy importante para la seguridad del niño que el Sistema de Sujeción Infantil quede instalado en el ángulo correcto. NO UTILICE éste o ningún otro Sistema de Sujeción Infantil con un bebé prematuro, de bajo peso o condición delicada sino hasta que haya consultado a su médico. -
Page 95: Uso Del Porta Bebé En Una Aeronave
40 libras (18 Kg.) de peso utilicen un asiento infantil certificado provisto de arnés al viajar en una aeronave. El Cloud Q está certificado para uso en aviones. INSTALAR EL PORTA BEBÉ EN UNA AERONAVE Instale su Porta Bebé... -
Page 96: Cuidados Y Limpieza
CUIDADOS Y LIMPIEZA se conectan a la concha de plástico y retirar la cubierta del PARA RETIRAR LA FUNDA DEL ASIENTO respaldo. • Recline totalmente el asiento, soltar los broches por debajo de El sistema de arnés integrado no debe ser removido la correa de piernas. -
Page 97: Para Sacar Manchas
CUIDADOS Y LIMPIEZA PARA SACAR MANCHAS CONECTORES DEL SISTEMA LATCH Utilice un paño limpio usando detergente y agua para sacarle Limpie con esponja o lave a fondo con agua tibia los Conectores manchas a las Fundas del Asiento, Almohadillas de Hombros, LATCH. -
Page 98: Lista De Puntos De Verificación De Seguridad
LISTA DE PUNTOS DE VERIFICACIÓN DE SEGURIDAD Leyó y entendió completamente este Manual ¿Es la fecha de hoy anterior a la fecha señalada como “No del Propietario y todas las etiquetas colocadas utilizar después de” en el Sistema de Sujeción Infantil? en este sistema de sujeción juvenil? ¿Comprobó... -
Page 99: Recursos
Favor comunicarse con CYBEX: deshacerse del asiento infantil. Le recomendamos que NO le • Gratuitamente: 1–877–242–5676 regale o venda el asiento infantil a persona alguna, ni que lo tire a • Por correo electrónico: info.us@cybex-online.com la basura. • En sitio de internet: www.cybex-online.com SI EL ASIENTO DE AUTO HA ESTADO EN UN AYUDA CON LA INSTALACIÓN... -
Page 100: Garantía
Ni Para dar curso al procesamiento de reclamaciones futuras de CYBEX ni el distribuidor que vende este producto han autorizado a garantía si las hubiera y verificar la fecha de compra original, favor persona alguna a crear para ellos ninguna otra garantía, obligación... - Page 102 Distributed in the United States by Columbus Trading-Partners USA Inc. 560 HARRISON AVENUE | BOSTON, MA 02118 TOLL FREE: 1-877-242-5676 | E-MAIL: INFO.US@CYBEX-ONLINE.COM | WWW.CYBEX-ONLINE.COM © 2015 CYBEX Industrial Limited All rights reserved. Printed in China. This product and its components are subject to change without notice. Patents pending.