Advertisement
Available languages
Available languages
Quick Links
3 YEARS LIMITED WARRANTY: We pride ourselves on
the quality of our products. For complete warranty details
and a list of our worldwide offices, please visit www.
targus.com. Features and specifications are subject
to change without notice. Microsoft, Windows and
User Guide
Windows Vista are registered trademarks or trademarks
of Microsoft Corporation in the United States and/or other
countries. Mac is a trademark of Apple Inc., registered
N2953
in the U.S. and other countries. Logitech is a registered
trademark of Logitech International in the United States
and other countries. All trademarks and registered
trademarks are the property of their respective owners.
用戶指南 / 用户指南 / Petunjuk Pengguna / 説明書 / 사용자 가이드
©2010 Targus Group International, Inc.
Advertisement

Related Manuals for Targus AMW50AP


Summary of Contents for Targus AMW50AP
- Page 1 3 YEARS LIMITED WARRANTY: We pride ourselves on the quality of our products. For complete warranty details and a list of our worldwide offices, please visit www. targus.com. Features and specifications are subject to change without notice. Microsoft, Windows and User Guide...
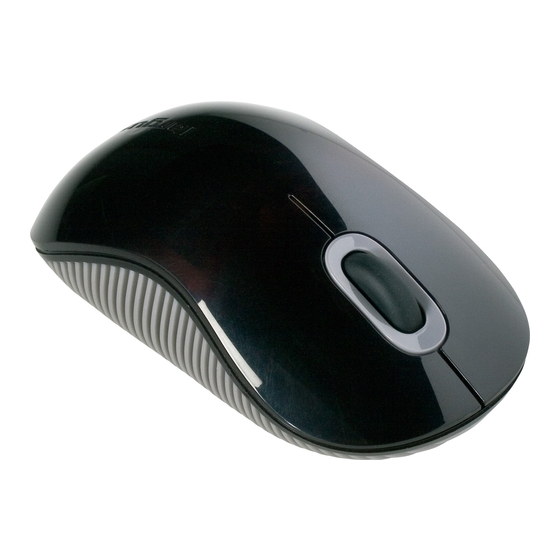
- Page 2 Targus Wireless Optical Mouse Targus Wireless Optical Mouse Table of Contents Introduction Thank you for your purchase of the Targus Wireless Optical Mouse. The English ..................3 USB receiver conveniently attaches to the mouse for ease of use while traveling or on the go.
-
Page 3: Installing The Batteries
Targus Wireless Optical Mouse Targus Wireless Optical Mouse Installing the Batteries 3. Insert two AA-size batteries, making sure that the positive (+) and negative (-) ends of each battery match the polarity indicators inside the battery compartment. 1. Remove the battery cover from the top of the mouse by using the notch on the back. - Page 4 This can be downloaded from the following location: Visit www.targus.com to download and install the driver. Once installation is complete, open the driver software and select the (C) This mouse is a plug and play device. It will automatically operate desired setting for the scroll-wheel button.
-
Page 5: Regulatory Compliance
•Mac OS ® X 10.4或更高版本 Hereby, Targus, declares that this device is in compliance with the essential requirements and other relevant provisions of Directive 1999/5/EC. Microsoft, Windows, and Windows Vista are either registered trademarks or trademarks of Microsoft Corporation in the United States and/or other countries. - Page 6 Targus Wireless Optical Mouse Targus Wireless Optical Mouse 安裝電池 3.安裝兩顆AA電池,確保每枚電池的正(+)負(-)極和電池槽中所標示的正 負極保持一致。 1.用手按住滑鼠背面的凹處,從滑鼠的頂部將電池蓋取下。如圖所示,小 心地將電池蓋掀開。 4.將電池蓋裝回原處。小心安裝電池蓋,直到它卡入電池槽的正確位置為 止。 2.用手擠壓固定扣中心,並將它向後朝滑鼠的背面滑動,將電池固定扣取 下。將安全扣向上抬高並旋轉取下。 連接 (A)將USB接收器從滑鼠的底部取下。 注意:在將電池蓋裝回之前,需將電池固定扣放置在一個安全的位置。...
- Page 7 Targus Wireless Optical Mouse Targus Wireless Optical Mouse 程式化按鍵 (B)將USB接收器插入電腦的可用USB埠中。 (Windows Only) 如果需要使用進階滾輪功能,請下載並安裝軟體驅動程式。此軟體驅動程 式可從下列網站下載: 請登入www.targus.com下載並安裝驅動程式。 當軟體安裝完成時,開啟驅動程式,選擇滾輪鍵所需的設定。關閉驅動程 式,便可以開始操作了。按下滑鼠滾輪啟動所選擇的功能。 (C)這是一款隨插即用的滑鼠。當USB接收器安裝到電腦上後,即可開始 使用。 低電量指示燈。 低電量指示燈安裝在滑鼠左右鍵之間的接合處。當電池電量不足時,此指 示燈會發光,請更換電池。...
- Page 8 經測試符合規定 前項合法通信,指依電信法規定作業之無線電通信。 低功率射頻電機須忍受合法通信或工業、科學及醫療用電波輻射性電機設 根據聯邦通訊委員會第15節的規定,本裝置已經測試及證明符合B級數位裝 備之干擾。 置的限制。 這些限制的設定是對於設在住宅區的裝置所發出的有害干擾, 無線滑鼠 為居民提供合理保護。本裝置會產生、使用及發出無線電頻率,如不按照 USB接收器 說明而安裝及使用,可能對無線電通訊造成有害干擾。但是這不能保證以 CCAI09LP1030T7 CCAI09LP1040T0 特定的安裝方式便不會產生干擾。如本裝置確實對無線電或電視接收產生 有害干擾(您可以把本裝置關了再開啟予以確定),使用者可嘗試採取以下一 種或多種方法以改善干擾情況: • 調整接收天線的方向及位置 • 擴大本裝置與接收器之間的距離 • 把本裝置的電源介面與接收器的電源介面分開 • 諮詢經銷商或經驗豐富的無線電/電視工程師,尋求協助。 未經法規遵守負責方授權的變更和改動將撤銷用戶操作本產品的權利。 符合聲明 Targus Group International 在此聲明本裝置符合 Directive 1999/5/EC 的實質性要 求和其它相應規定。 Microsoft, Windows, 及 Windows Vista為已注冊商標或在美國/其他國家的微軟公司的商標。 所有的商標及注冊商標都歸商標持有者所有。版權所有。...
- Page 9 Targus Wireless Optical Mouse Targus Wireless Optical Mouse 介绍 电池安装 感謝您購買Targus無線光學滑鼠。USB接收器可便地連接在滑鼠上,當旅 1.用手按住鼠标背面的凹口,从鼠标的顶部将电池盖取下。如图所示,小 行或外出時,易於使用。這是一款隨插即用設備,所以無需使用附加的軟 心地将电池盖掀开。 件。 目录 • Targus无线光学鼠标 • 两节AA型电池 • 迷你型USB接收器 2.用手挤压保险夹的中心并将它向后朝鼠标的背面滑动,将电池保险夹取 • 用户指南 下。将保险夹向上抬高并旋转取下。 系统要求 硬件 • USB接口 操作系统 •Microsoft Windows ® 2000 •Microsoft Windows ® •Microsoft Windows Vista ®...
- Page 10 Targus Wireless Optical Mouse Targus Wireless Optical Mouse (B)将USB接收器插入计算机的一个可用的USB端口中。 3.插入两节AA型电池,确保每节电池的正(+)负(-)极和电池盒中所标示的正 负极保持一致。 (C)这是一款即插即用的鼠标。此鼠标在USB接收器连接到计算机上时会 自动工作。 4.将电池盖装回原处。小心安装电池盖直到它卡入电池盒的正确位置为 止。 低电量指示灯。 连接 (A)将USB接收器从鼠标的底部取下。 低电量指示灯安装在鼠标左右键之间的接合处。当电池电量不足时,此指 示灯会发光,因此需要更换电池。...
- Page 11 而安装及使用,可能对无线电通讯造成有害干扰。但是这不能保证以特定的 安装方式便不会产生干扰。如本装置确实对无线电或电视接收产生有害干扰( 您可以把本装置关了再开启予以确定),使用者可尝试采取以下一种或多种方 法以改善干扰情况: • 调整接收天线的方向及位置 • 大本装置与接收器之间的距离 • 把本装置的电源接口与接收器的电源接口分开 • 咨询经销商或经验丰富的无线电/电视工程师,寻求协助。 未经法规遵守负责方授权的变更和改动将撤销用户操作本产品的权利。 符合声明 Targus Group International 在此声明本装置符合 Directive 1999/5/EC 的实质性要 求和其它相应规定。 无线电发射设备 接收装置 CMIIT ID: 2009DJ4743 型号核准证 鼠标 CMIIT ID: 2009DJ4300 Microsoft, Windows, 及 Windows Vista为已注册商标或在美国/其他国家的微软公司的商 标。所有的商 标及注册商 标都归商标持有者所有。版权所有。...
- Page 12 Targus Wireless Optical Mouse Pengenalan Memasang Baterai Selamat akan pembelian Mouse Optik Nirkabel Targus Anda. Penerima 1. Pindahkan penutup baterai dari atas mouse dengan menggunakan USB terhubung dengan mouse secara tepat untuk kemudahan penggunaan takik di belakang. Angkat secara hati-hati penutup seperti tertera pada ketika sedang dalam perjalanan atau bepergian.
- Page 13 Targus Wireless Optical Mouse Targus Wireless Optical Mouse (B) Masukkan steker penerima USB ke dalam port USB pada komputer 3. Masukkan dua baterai ukuran AA, pastikan bahwa ujung positif (+) dan Anda. negatif (-) dari setiap baterai sesuai dengan indikator kutub di dalam kompartemen baterai.
- Page 14 Deklarasi Persesuaian Dengan ini, Targus, menyatakan bahwa perangkat ini telah memenuhi persyaratan esensial dan provisi yang relevan dari Directive 1999/5/EC. Microsoft, Windows, dan Windows Vista merupakan merk dagang teregistrasi atau merk dagang dari Microsoft Corporation di Amerika Serikat dan/atau negara lainnya.
- Page 15 Targus Wireless Optical Mouse Targus Wireless Optical Mouse 初めに 電池の装着 ワイヤレスオプティカルマウスをお買い上げいただきありがとうございます。マウスに装着 1. 後ろ側にあるツメを使って、マウス上部の電池収納部のカバーを外してください。 可能なUSBレシーバーで持ち運びにも便利。なこの製品は、プラグ&プレイ対応の 図に示すようにカバーを注意深く引き上げてください。 ため追加ドライバソフトは不要です。 内容物 • ワイヤレスオプティカルマウス • 単三電池2個 • ミニUSBレシーバー 2. 電池収納部の安全クリップをクリップの中央部を絞ってから、マウスの後ろ側にずら • ユーザーマニュアル して取り外してください。取り外す際にはクリップを引き上げて、回してください。 システム要件 ハードウェア • USBポート • マイクロソフト・ウィンドウズ ® 2000 • マイクロソフト・ウィンドウズ ® • マイクロソフト・ウィンドウズVista ®...
- Page 16 Targus Wireless Optical Mouse Targus Wireless Optical Mouse (B)USBレシーバーをPCの使用可能なUSBポートに接続してください。 3.単三電池2個を、プラス(+)極とマイナス(-)極の方向が電池収納部内の表示に合 うように装着してください。 (c) このマウスはプラグ&プレイのデバイスのため、USBレシーバーがPCに接続されれ ば、自動的に作動します。 4.電池収納部のカバーを注意深く合わせ、カチッと音がするまで押し込んで閉じて ください。 電池残量低表示 接続 (A)USBレシーバーをマウスの底部から取り外してください。 左と右のボタンのすき間のライトが光ります。このライトは電池残量が低く、電池を取 り替える必要がある際に点灯します。...
- Page 17 Targus Wireless Optical Mouse Targus Wireless Optical Mouse マウスのプログラミング 規制準拠 本デバイスはFCC規則パート15に準拠しています。動作は次の2つの条件を基にしています。(1) (Windows Only) 本デバイスは有害な混信の原因となってはならず、(2)望ましくない動作の原因となりうる混信を 含め、受けたいかなる混信も受け入れなければなりません。 アドバンスド・スクロールホイールをご利用になるには、ドライバソフトをダウンロードして FCC 準拠 インストールする必要があります。このドライバは以下のサイトからダウンロードできま 準拠テスト済み す。 本装置は、FCC規則パート 15に従って、クラスBデジタルデバイスの限度についてテスト済みで、 www.targus.comでドライバをダウンロードして、インストールしてください。 それらの限度に準拠することが証明されています。これらの限度は、住宅地で設置した際に有 害な混信に対する妥当な保護がなされるよう意図されています。本装置は高周波エネルギーを 生成・使用し、放射の可能性があり、説明に従って設置・使用されなかった場合、ラジオ通信に インストール終了後には、ドライバソフトを開いて、お望みのスクロールホイールボタン 有害な混信を生じることがあります。ただし、特定の設置において混信が生じないという保証は 設定を選択してください。ドライバソフトを終了すれば、使用可能になります。選択し ありません。 た機能はスクロールホイールを押すことで起動します。 本装置がラジオまたはテレビの受信に有害な混信を生じるかどうかは、本装置の電源をオン・オ フして判定できますが、混信が生じた場合は、下記の対処方法の1つ以上で混信を是正してく ださい。 • 受信アンテナの方向または位置を変えます。 • 本装置と受信機の距離を増やします。 • 受信機を接続しているものとは異なった回路にあるコンセントに本装置を接続します。...
- Page 18 Targus Wireless Optical Mouse Targus Wireless Optical Mouse 소개 배터리 삽입 타거스 무선 광마우스를 구입해 주셔서 감사합니다. 여행 중이나 1. 뒤에 있는 노치를 사용하여 마우스 상단에서 배터리 덮개를 이동 중에 쉽게 사용할 수 있도록 USB 수신기가 마우스에 부착되어 분리합니다. 그림에서와 같이 조심스럽게 덮개를 들어올립니다.
- Page 19 Targus Wireless Optical Mouse Targus Wireless Optical Mouse (B) USB 수신기를 컴퓨터의 USB 포트에 연결합니다. 3. AA 배터리 2개를 삽입하고, 각 배터리의 양극(+)과 음극(-) 이 배터리함 내부에 표시된 양극(+) 및 음극(-)과 일치하는지 확인합니다. (C) 이 마우스는 플러그앤플레이 방식의 장치입니다. USB 수신기가...
- Page 20 해를 받더라도 이를 견딜 수 있어야 합니다. 및 설치해야 합니다. 다음 위치에서 다운로드할 수 있습니다. 연방 통신 위원회 (FCC) 선언문 www.targus.com 을 방문하여 드라이브를 다운로드 및 설치합니다. 순응 검사 설치가 완료되면 드라이버 소프트웨어를 열고 원하는 스크롤 휠 버튼 본 장치는 FCC 규정의 제 15조에 의거하여 B 급 디지털 장치의 제한에 검사...
- Page 21 Targus Wireless Optical Mouse Targus Wireless Optical Mouse KCC Marking Requirement TGS - AMW50 TGS - AMW50R 제품 정보 신청자 이름: Targus Asia Pacific Ltd. 디자인 명칭: 타거스 무선 광마우스 (Wireless Optical Mouse) 모델: AMW50 (AP) 생산년/월: 제품 라벨 참조...