Table of Contents
Advertisement
Quick Links
Advertisement
Table of Contents

Related Manuals for Integra RDA-7.1


Summary of Contents for Integra RDA-7.1
- Page 1 Seven Channel Amplifier RDA-7.1 Instruction Manual...
-
Page 2: Important Safety Instructions
WARNING: TO REDUCE THE RISK OF FIRE OR ELECTRIC SHOCK, DO NOT EXPOSE THIS APPARATUS TO RAIN OR MOISTURE. CAUTION: TO REDUCE THE RISK OF ELECTRIC SHOCK, DO NOT REMOVE COVER (OR BACK). NO USER-SERVICEABLE PARTS INSIDE. REFER SERVICING QUALIFIED PERSONNEL. -
Page 3: Table Of Contents
Features I RDA-7.1 was designed by Balanced Audio Technology in USA. They are known for producing superbly engineered, meticulously crafted products that recreate music with unmatched fidelity and accuracy. I THX ® Ultra2 Certified I THX Surround EX™ Capable (7 Channels) I Over 1000 Watts of Total Output Power (150W ×... -
Page 4: Precautions
For details on the fuse rating, refer to “ For replacing the fuse, make sure to contact your Integra/ Onkyo authorized service center or your Integra Research dealer. For Canadian model... - Page 5 • Never operate the RDA-7.1 in environments with explosive gases or materials. • Do not install the RDA-7.1 in a location within the reach of small children. Lightning storms Never touch the power cord or plug of the RDA-7.1 during a lightning storm.
-
Page 6: Supplied Accessories
After unpacking, store the cardboard box and packing materials in a safe place; do not throw them away. If you are to transport the RDA-7.1 at a later date, you will need this cardboard box and the packing materials. The RDA- 7.1 is very heavy and may become damaged if it is... -
Page 7: Installation
Installation Preventing excessive rise in the internal temperature of the RDA-7.1 is vital to the long operational life of the equipment. This will also help prevent trouble at the RDA-7.1 from damaging other connected components. Therefore, it is important to choose a location with excellent ventilation for installation. -
Page 8: Quick Operation Guide
1. Lower the volume at the AV controller. Lower the volume of the AV controller to the minimum so that when the RDA-7.1 is turned on, you do not hear loud unwanted sounds. 2. Connect the speakers to the RDA-7.1. -
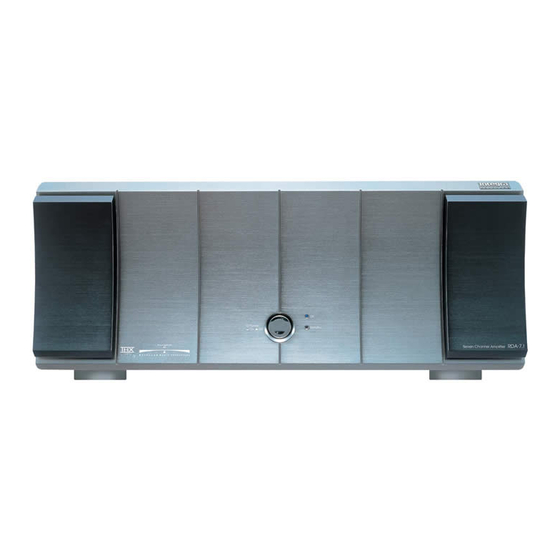
Page 9: Front Panel Facilities
12V TRIGGER OUT terminal of AV controller or pre amplifier to the 12V TRIGGER IN terminal of the RDA- 7.1, and leave the Power switch of the RDA-7.1 set to On. For example, to control the RDA-7.1 while it is connected to the RDC-7.1 AV controller, connect the 12V... -
Page 10: Rear Panel Facilities And Connections
• Read the instructions that came with the other components you are connecting. • Do not make connections to input or output jacks while the RDA-7.1 is turned on (Power • Always turn the volume of the AV controller down before turning on the RDA-7.1. - Page 11 12V TRIGGER output jack, such as the RDC-7.1. This jack works on between 5 to 12 volts DC. With the Power switch of the RDA-7.1 set to On, you can switch the RDA-7.1 between the On and Standby states with operations at the AV controller.
-
Page 12: Connecting Speakers
(+) on the RDA-7.1 are connected to the (+) terminals on the speakers and the binding posts (–) on the RDA-7.1 are connected to the (–) terminals on the speakers. • If you want to connect a single speaker, do not connect it to several terminals. -
Page 13: Connecting To The Rdc-7.1
Connecting to the RDC-7.1 Since many users will purchase the RDA-7.1 together with the RDC-7.1, here is an explanation of how to connect the RDA-7.1 to the RDC-7.1. Balanced input/output connection Note: When using the balanced inputs, do not connect anything to the RCA inputs. -
Page 14: Cautions Regarding Humming Noise
Never remove the ground terminal (the third round terminal) from the plug of the power cord that comes with the RDA-7.1. Doing so is very dangerous for it may cause an electrical shock or even electrocution. 4. Improper grounding in your home is... -
Page 15: Troubleshooting Guide
Troubleshooting guide If the RDA-7.1 fails to function normally, first check the following points before contacting your Integra Research dealer. If the problem is not solved after going through the following list, unplug the power cord and contact your Integra/Onkyo authorized service center. - Page 16 Units 2102-2107, Metroplaza Tower I, 223 Hing Fong Road, Kwai Chung, N.T., HONG KONG Tel: 852-2429-3118 Fax: 852-2428-9039 http://www.onkyochina.com SN 29343637 (C) Copyright 2003 ONKYO CORPORATION Japan. All rights reserved. Printed in Japan D0312-1 * 2 9 3 4 3 6 3 7 *...