Table of Contents
Advertisement
Available languages
Available languages
Advertisement
Chapters
Table of Contents

Related Manuals for Omron Pedometer with Download Capability HJ-720ITCAN


Summary of Contents for Omron Pedometer with Download Capability HJ-720ITCAN
- Page 1 INSTRUC TION MANUAL Pedometer with Download Capability HJ-720ITCAN Model...
-
Page 2: Table Of Contents
Before Using the Unit Introduction ...3 Important Safety Information...4 Know Your Unit ...6 Main Unit ...6 Components ...7 Aerobic Step Function ...8 Calorie/Amount of Fat Burned Display ...8 Stride Length Measurement ...9 Operating Instructions Battery Installation ...10 Battery Replacement ...11 Setting the Time ...12 Setting the Weight ...14 Setting the Stride Length...15... -
Page 3: Introduction
Thank you for purchasing the Omron download capability. Fill-in for future reference DATE PURCHASED: ________________ Staple your purchase receipt here. A pedometer is a great motivational tool to track your distance, the number of steps you take and how many calories you burn. The convenient memory function supports the management of daily walking. -
Page 4: Important Safety Information
IMPORTANT SAFETY INFORMATION To assure the correct use of the product basic, safety measures should always be followed including the warnings and cautions listed in this instruction manual. SAFETY SYMBOLS USED IN THIS INSTRUCTION MANUAL WARNING CAUTION OPERATING THE DEVICE Keep the unit out of reach of young children. - Page 5 IMPORTANT SAFETY INFORMATION CARE AND MAINTENANCE Do not disassemble or modify the unit. Changes or modifications not approved by Omron Healthcare will void the user warranty. Consult your physician or healthcare provider before beginning an exercise program.
-
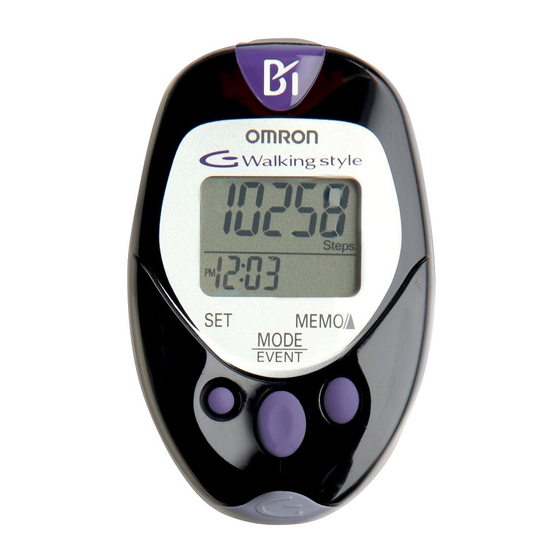
Page 6: Know Your Unit
KNOW YOUR UNIT KNOW YOUR UNIT Main Unit Display SET Button Back of the main unit USB Connector Holder Strap Clip USB Connector Cover SYSTEM RESET Button Battery Cover Screw of Battery Cover MEMO/ Button MODE/EVENT Button... -
Page 7: Components
KNOW YOUR UNIT Components Holder Use this holder when attaching the unit to your belt or the top of your pants. 1) Attach the main unit to the holder. How to attach the strap to the main unit Hole to attach the strap 2) Fasten the holder clip to your pants. -
Page 8: Aerobic Step Function
AEROBIC STEP FUNCTION The unit displays the total number of aerobic steps in a day that satisfies the following two conditions: (The minutes you walked as the number of aerobic steps is also displayed.) • Walk more than 60 steps per minute •... -
Page 9: Stride Length Measurement
STRIDE LENGTH MEASUREMENT Measure your stride length before beginning to set the pedometer. How to measure your stride length 1. Walk 10 steps with your normal stride as illustrated below. 2. Measure the distance from START to END in centimeters. 3. -
Page 10: Battery Installation
BATTERY INSTALLATION Remove the screw on the battery cover located on the back of the main unit. Use the supplied screwdriver or use a commercially available small screwdriver to remove the screw on the battery cover. Open the battery cover. Insert the battery. -
Page 11: Battery Replacement
BATTERY INSTALLATION Tighten the screw on the battery cover. NOTES: • The time setting display will appear on the screen for approximately 5 minutes after the battery is inserted. • After installing the battery, set time of day, weight and stride length. (Refer to “Setting the Time”... -
Page 12: Setting The Time
Setting range: 0:00 to 23:59 Install the battery. (Refer to “Battery Installation” on page 10) The hour flashes on the display. If the MEMO/ for 5 minutes, complete setting and display the number of steps and time. Press the MEMO/ increments of one hour. - Page 13 SETTING THE TIME Press the SET button to set the minute. The weight flashes on the display.
-
Page 14: Setting The Weight
SETTING THE WEIGHT Setting range: 30 to 136 kg. The weight flashes on the display. Press the MEMO/ to advance by increments of 1 kg. Press and hold the button to advance weight in 10 kg increments. NOTE: Press the MODE/EVENT button to return the weight to 30. -
Page 15: Setting The Stride Length
SETTING THE STRIDE LENGTH Setting range: 30 to 120 cm The stride length flashes on the display. Press the MEMO/ to advance by increments of 1 cm. Press and hold the button to advance the stride in 10 cm inches increments. NOTE: Press the MODE/EVENT Button to return the stride length to 40 cm. -
Page 16: Attaching The Pedometer
ATTACHING THE PEDOMETER Place the unit in the upper front pocket of your jacket, in a bag you hold tightly, or attach unit to your pants or belt. Place the unit in your pocket. • Do not place the unit in the back pocket of your pants. - Page 17 ATTACHING THE PEDOMETER NOTE: The unit may not be able to count the steps correctly in the following cases. When the memory is being displayed or the unit is being set When the unit is not vertical to the ground •...
-
Page 18: Changing The Display
CHANGING THE DISPLAY Press the MODE/EVENT Button to change the display Each time you press the MODE/EVENT Button, the display will change. Number of steps USING THE EVENT FUNCTION Press the MODE/EVENT Button for 2 seconds while current day’s data is displayed. -
Page 19: Using The Memory Function
USING THE MEMORY FUNCTION This unit can store up to previous 41 days and display the most recent 7 days of data. The current day’s data is automatically stored in memory when the time reaches 0:00. The display will return to 0. NOTE: The time must be correctly set in the unit. - Page 20 USING THE MEMORY FUNCTION NOTES: • Full memory indicator starts display when there are 35 days including current day of stored data which has not been downloaded. • Follow the direction by instructor or service provider to download the data. (Refer to “Downloading Data to a PC” on page 22) Full Memory Indicator...
-
Page 21: Using The System Reset Function
USING THE SYSTEM RESET FUNCTION Use the SYSTEM RESET function in the following cases: • When the display becomes unrecognizable Press the SYSTEM RESET Button on the back of the main unit with a thin stick that is not easily breakable. The time is reset. -
Page 22: Downloading Data To A Pc
DOWNLOADING DATA TO A PC Use only the authorized Omron USB cable sold separately, (Model Number HHX-CABLE-USB2) with this pedometer. Use of any other cable may cause damage to the pedometer and will void the user warranty. Open the USB Connector cover. Plug the normal USB Connector (Large Connector) into the personal computer. -
Page 23: Care And Maintenance
CARE AND MAINTENANCE Clean the unit with a soft dry cloth. • Do not use any abrasive or volatile cleaners. • The unit is not waterproof. Do not wash it or touch it with wet hands. • Never immerse the unit in water. •... -
Page 24: Troubleshooting Tips
TROUBLESHOOTING TIPS Problem The battery is low The Low Battery or worn. Indicator blinks. The polarities of battery (+ and -) are aligned in the Nothing is wrong directions. displayed. The battery is worn. The unit is positioned incorrectly. Irregular movement. The displayed values are Inconsistent pace. -
Page 25: Specifications
Model: Power Supply: Measurement Range: Memory: IT Function: Operating Temperature / Humidity: Storage Temperature / Humidity / Air Pressure: Precision of Step Counting: Time Precision: Battery Life: External Dimensions: Weight: Contents: UPC: • Specifications are subject to change without notice. SPECIFICATIONS HJ-720ITCAN 3 VDC (1 lithium battery CR2032) -
Page 26: Fcc Statement
FCC STATEMENT NOTE: POTENTIAL FOR RADIO/TELEVISION INTERFERENCE (for U.S.A. only) This product has been tested and found to comply with the limits for a Class B digital device, pursuant to part 15 of the FCC rules. These limits are designed to provide reasonable protection against harmful interference in a residential installation. -
Page 27: Warranty Information
Repair or replacement is our only responsibility and your only remedy under the above warranties. To obtain warranty service contact Omron Healthcare’s Customer Service by calling 1-800-634-4350 for the address of the repair location and the return shipping and handling fee. - Page 28 Distributed by: Omron Healthcare Canada 5500 N. Service Road Penthouse Burlington, ON L7L 6W6 Copyright © 2006 OMRON HEALTHCARE, INC. 720ITCAN INST Rev...
- Page 29 GUIDE DE L'UTILISATEUR Pédomètre à capacité de téléchargement HJ-720ITCAN Modèle...
- Page 30 TABLES DES MATIÈRES Avant d’utiliser l’appareil Introduction ...3 Renseignements de sécurité importants ...4 Familiarisez-vous avec l’appareil..6 Unité principale ...6 Composants ...7 Fonction de pas aérobiques ...8 Affichage des calories et de la quantité de gras brûlés ...8 Mesure de la longueur des foulées ...9 Mode d’emploi Installation de la pile ...10 Remplacement de la pile ...11...
-
Page 31: Introduction
Merci d’avoir acheté le pédomètre Omron de téléchargement. Veuillez inscrire les renseignements demandés à des fins de référence. DATE D’ACHAT: Le pédomètre est un excellent outil de motivation pour mesurer la distance parcourue et compter le nombre de pas ainsi que le nombre de calories brûlées. -
Page 32: Renseignements De Sécurité Importants
RENSEIGNEMENTS DE SÉCURITÉ IMPORTANTS Il est important de toujours respecter les mesures de sécurité de base ainsi que les avertissements et les mises en garde de ce guide de l'utilisateur afin d’assurer une utilisation appropriée du produit. SYMBOLES DE SÉCURITÉ UTILISÉS DANS CE GUIDE DE L'UTILISATEUR AVERTISSEMENT MISE EN GARDE... - Page 33 RENSEIGNEMENTS DE SÉCURITÉ IMPORTANTS ENTRETIEN Ne pas démonter ni modifier l’appareil. Tout changement ou altération non approuvés par Omron Healthcare entraînera l’annulation de la garantie. Veuillez consulter votre médecin ou votre fournisseur de soins de la santé avant d’entreprendre un programme d'exercices.
- Page 34 FAMILIARISEZ-VOUS AVEC L’APPAREIL. FAMILIARISEZ-VOUS AVEC L’APPAREIL Unité principale Écran Touche réglage (SET) Partie arrière de l’unité principale Connecteur USB Support Courroie Pince Couvercle du connecteur USB Bouton de réinitialisation du système (SYSTEM RESET) Couvercle de la pile Vis du couvercle de la pile Touche mémoire (MEMO)/ Touche mode/séance...
-
Page 35: Familiarisez-Vous Avec L'appareil
FAMILIARISEZ-VOUS AVEC L’APPAREIL Composants Support Veuillez utiliser ce support lorsque vous fixez l’appareil à votre ceinture ou à la partie supérieure de votre pantalon. 1) Fixez l’unité principale au support. Comment fixer la courroie à l’unité principale Trou pour fixer la courroie 2) Fixez l’agrafe du support à... -
Page 36: Fonction De Pas Aérobiques
FONCTION DE PAS AÉROBIQUES L’appareil affiche le nombre total de pas aérobiques effectués dans une journée selon les deux conditions suivantes: (Le nombre de minutes pendant lesquelles vous avez marché, ainsi que le nombre de pas aérobiques, sont également affichés.) •... -
Page 37: Mesure De La Longueur Des Foulées
MESURE DE LA LONGUEUR DES FOULÉES Veuillez mesurer la longueur de vos foulées avant de régler le pédomètre. Comment mesurer la longueur de vos foulées 1. Faites 10 pas à foulée normale comme l’indique l’illustration ci-dessous. 2. Mesurez en centimètres la distance du DÉBUT à la FIN. 3. -
Page 38: Installation De La Pile
INSTALLATION DE LA PILE Retirer la vis du couvercle de la pile situé à l’arrière de l’unité principale. Utiliser le tournevis fourni avec l’emballage ou un petit tournevis disponible sur le marché pour retirer la vis du couvercle de la pile. Ouvrir le couvercle de la pile. -
Page 39: Remplacement De La Pile
INSTALLATION DE LA PILE Serrer la vis du couvercle de la pile. REMARQUES: • L’écran de réglage de l’heure sera affiché pendant environ 5 minutes après que la pile aura été insérée. • Après l’installation de la pile, régler l’heure, le poids et la longueur des foulées. -
Page 40: Réglage De L'heure
RÉGLAGE DE L’HEURE Échelle de réglage : 0:00 à 23:59 Installer la pile. (Consulter « Installation de la pile » à la page 10) L’heure clignote à l’écran. Si la touche mémoire (MEMO)/ touche réglage (SET) n'est pas enfoncée pendant 5 minutes, terminer le réglage et afficher le nombre de pas et l'heure. - Page 41 RÉGLAGE DE L’HEURE Appuyer sur la touche réglage (SET) pour régler les minutes. Le poids clignote à l’écran.
-
Page 42: Réglage Du Poids
RÉGLAGE DU POIDS Échelle de réglage : 30 à 136 kg. Le poids clignote à l’écran. Appuyer sur la touche mémoire (MEMO)/ pour avancer par intervalles de 1 kg. Appuyer sur la touche et la maintenir enfoncée pour faire avancer le poids par intervalles de 10 kg. -
Page 43: Réglage De La Longueur Des Foulées
RÉGLAGE DE LA LONGUEUR DES FOULÉES Échelle de réglage : 30 à 120 cm La longueur des foulées clignote à l’écran. Appuyer sur la touche mémoire (MEMO)/ pour avancer par intervalles de 1 cm. Appuyer sur la touche et la maintenir enfoncée pour faire avancer les foulées par intervalles de 10 cm. -
Page 44: Fixation Du Pédomètre
FIXATION DU PÉDOMÈTRE Déposez l’appareil dans la poche supérieure avant de votre veston ou dans un sac que vous tenez fermement, ou bien fixez l’appareil à votre pantalon ou à votre ceinture. Déposez l’appareil dans votre poche. • Ne placez pas l’appareil dans la poche arrière de votre pantalon. - Page 45 FIXATION DU PÉDOMÈTRE REMARQUE: Il se peut que l’appareil ne compte pas les pas correctement dans les cas suivants. Au moment de l’affichage de la mémoire ou du réglage de l’appareil. Lorsque l’appareil n’est pas perpendiculaire au sol • Lorsque le devant de l’appareil se trouve dans un angle inférieur à...
-
Page 46: Changement De L'affichage
CHANGEMENT DE L’AFFICHAGE Appuyer sur la touche mode/séance (MODE/EVENT) pour changer l’affichage L'affichage changera chaque fois que vous appuierez sur la touche mode/séance (MODE/EVENT). Nombre de pas UTILISATION DE LA FONCTION SÉANCE Appuyer sur la touche mode/séance (MODE/EVENT) pendant 2 secondes lorsque les données du jour en cours sont affichées. -
Page 47: Utilisation De La Fonction Mémoire
UTILISATION DE LA FONCTION MÉMOIRE Cet appareil peut enregistrer les données des 41 derniers jours et afficher les données des 7 derniers jours. Les données du jour en cours sont automatiquement enregistrées en mémoire lorsque l’heure atteint 0:00. L’affichage reviendra à 0. REMARQUE: L’heure qu’affiche l’appareil doit être correctement réglée. - Page 48 UTILISATION DE LA FONCTION MÉMOIRE REMARQUES: • L’indicateur de mémoire pleine s’affiche lorsque 35 jours de données enregistrées, y compris celles du jour en cours, n’ont pas été téléchargées. • Suivre les directives de l’instructeur ou du fournisseur de services pour télécharger les données.
-
Page 49: Utilisation De La Fonction Réinitialisation
UTILISATION DE LA FONCTION RÉINITIALISATION Utiliser la fonction RÉINITIALISATION DU SYSTÈME dans les cas suivants: • Lorsque l’affichage devient illisible Appuyer sur la touche réinitialisation du système (SYSTEM RESET) à l’aide d’un bâton mince qui ne se casse pas facilement. L’heure est de nouveau réglée. -
Page 50: Téléchargement De Données Vers Un Pc
TÉLÉCHARGEMENT DE DONNÉES VERS UN PC Avec ce pédomètre, utiliser uniquement le câble USB autorisé par Omron (modèle numéro HHX-CABLE-USB2) vendu séparément. L’utilisation de tout autre câble peut causer des dommages et entraînera l’annulation de la garantie. Ouvrir le couvercle du connecteur USB. Brancher le connecteur USB normal (grand connecteur) dans l’ordinateur personnel. -
Page 51: Entretien
Nettoyer l’appareil avec un linge doux et sec. • Ne pas utiliser de nettoyants abrasifs ou volatils. • L’appareil n’est pas étanche. Ne pas le laver ou le toucher avec les mains mouillées. • Ne jamais immerger l’appareil dans l’eau. •... -
Page 52: Conseils De Dépannage
CONSEILS DE DÉPANNAGE Problème L’indicateur de La pile est faible pile faible ou usée. clignote. Les polarités de la pile (+ et -) sont inversées. Rien ne s’affiche. La pile est usée. L’appareil est mal positionné. Mouvement irrégulier. Les valeur Rythme inégal. -
Page 53: Spécifications
Modèle: Alimentation: Gammes de mesures: Mémoire: Fonction TI: Température / humidité d'utilisation: Température / humidité d'entreposage / pression d’air: 700 - 1600 hPa Précision du compteur de pas: Précision de l’heure: Durée des piles: Dimensions externes: Poids: Contenu: CUP: • Les spécifications sont sujettes à changements sans préavis. SPÉCIFICATIONS HJ-720ITCAN 3 V.C.C. -
Page 54: Conformité Fcc
CONFORMITÉ FCC REMARQUE: INTERFÉRENCES POTENTIELLES POUR LA RADIO/TÉLÉVISION (pour les É.-U. seulement) Ce produit a été testé et déclaré conforme aux limites de la section 15 du règlement FCC, applicables aux appareils numériques de classe B. Ces limites sont conçues pour fournir une protection satisfaisante contre les interférences dans les installations résidentielles. -
Page 55: Renseignements Sur La Garantie
Pour obtenir du service en vertu de cette garantie, communiquez avec le service à la clientèle de Omron Healthcare en composant le 1 800 634-4350 pour obtenir l’adresse de l’emplacement pour la réparation et des frais d’expédition de retour et de manutention. - Page 56 Distribué par : Omron Healthcare Canada 5500 N. Service Road Penthouse Burlington, ON L7L 6W6 Copyright © 2006 OMRON HEALTHCARE, INC. 720ITCAN INST Rev 9054997-3A...