Table of Contents
Advertisement
Available languages
Available languages
Advertisement
Chapters
Table of Contents
Troubleshooting

Related Manuals for Omron IntelliSense HEM-650


Summary of Contents for Omron IntelliSense HEM-650
- Page 1 Instruction Manual Automatic Blood Pressure Monitor with A.P.S.® HEM-650 Model...
-
Page 2: Table Of Contents
Before Using the Monitor Introduction ........3 Important Safety Notes . -
Page 3: Introduction
Frequently measuring the blood pressure in your wrist will provide your physician with an accurate indication of changes in your blood pressure. The OMRON ® HEM-650 Automatic Wrist Blood Pressure Monitor with A.P.S. ® is intended for home use. SAVE THESE INSTRUCTIONS INTRODUCTION ®... -
Page 4: Important Safety Notes
Do not use on infants. Do not use a cellular phone near the unit. It may result in operational failure. Changes or modifications not approved by Omron Healthcare will void the user warranty. Do not disassemble or attempt to repair the unit or components. -
Page 5: Before Taking A Measurement
BEFORE TAKING A MEASUREMENT 1. Avoid eating, drinking alcohol, smoking, exercising and bathing for 30 minutes before taking a measurement. Rest for at least 15 minutes before taking the measurement. 2. Stress raises blood pressure. Avoid taking measurements during stressful times. 3. -
Page 6: Know Your Unit
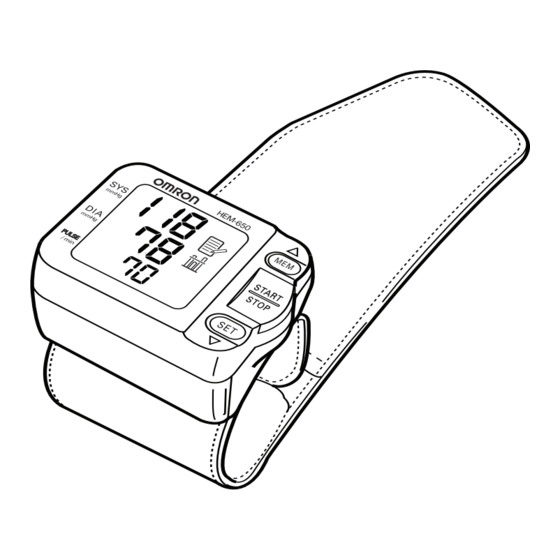
Main Unit Display Battery Compartment Accessories Two “AAA” Alkaline Batteries KNOW YOUR UNIT Wrist Cuff MEM Button START/STOP Button SET Button Storage Case... -
Page 7: Unit Display
Systolic Blood Pressure Diastolic Blood Pressure Battery Low Symbol Cuff Deflation Symbol Right Wrist Measurement Symbol Position Sensor Alarm Symbol Pulse Display IRREGULAR HEARTBEAT SYMBOL When the monitor detects an irregular rhythm two or more times during the measurement, the Irregular Heartbeat Symbol will appear on the display with the measurement values. -
Page 8: Battery Installation
BATTERY INSTALLATION 1. Press both sides of the battery cover and lift the cover off in the direction of the arrow. 2. Install two “AAA” Alkaline Batteries in the battery compartment, so that + (positive) and - (negative) polarities match the polarities of the battery compartment as indicated. -
Page 9: Advanced Positioning Sensor
ADVANCED POSITIONING SENSOR The Advanced Positioning Sensor, A.P.S. unit is in the correct position before it starts to take a measurement. 1. Press the SET button while the power is turned off. The Position Sensor symbol ( appear on the display. 2. -
Page 10: Wrist Measurement Selection
WRIST MEASUREMENT SELECTION Blood Pressure Measurements can be taken on the left or right wrist. 1. Press the SET button three (3) times while the power is turned off. The Right Wrist Measurement symbol ( ) will appear on the display. Select “on”... -
Page 11: Setting The Date And Time
SETTING THE DATE AND TIME The Blood Pressure Monitor stores up to 90 measurement values with the date and time. The monitor also calculates an average reading based on the last three measurement values. Set the monitor to the current date and time before taking a measurement for the first time. - Page 12 SETTING THE DATE AND TIME 3. SETTING THE MONTH Press the MEM button to advance by increments of one month. Press the SET button to set the current month. The day flashes on the display. 4. SETTING THE DAY Press the MEM button to advance by increments of one day. Press the SET button to set the current day.
-
Page 13: Applying The Wrist Cuff
APPLYING THE WRIST CUFF Wrapping the wrist cuff is one of the most important points for taking a correct measurement. APPLYING THE CUFF ON THE LEFT WRIST 1. Roll up sleeve. Make sure your sleeve is not rolled up too tightly on your arm. This may constrict the flow of blood in your arm. -
Page 14: Taking A Measurement
TAKING A MEASUREMENT 1. Sit comfortably in a chair with your feet flat on the floor. 2. Press the START/STOP button. 3. Hold your arm across your chest at heart level. Hold your elbow firmly to avoid body movement. Sit still and do not talk or move during the measurement. - Page 15 TAKING A MEASUREMENT 5. After the monitor has detected your blood pressure and pulse rate, the cuff automatically deflates. Your blood pressure and pulse rate are displayed. NOTE: The time and date of the measurement are displayed alternately. 6. Press the START/STOP button to turn the monitor off.
-
Page 16: Using The Memory Function
USING THE MEMORY FUNCTION Every time you complete a measurement the monitor stores the blood pressure and pulse rate in the memory. The Blood Pressure Monitor automatically stores up to 90 measurement values. When 90 sets of measurement values are stored in the memory, the oldest record is deleted to save the most recent measurement values. -
Page 17: To Display The Measurement Values
USING THE MEMORY FUNCTION TO DISPLAY THE MEASUREMENT VALUES The date and time is alternately displayed with the measurement values. 1. Press the MEM button to display the measurement values stored in the memory beginning with the most recent values to the oldest values. -
Page 18: Care And Maintenance
CARE AND MAINTENANCE To keep your Automatic Wrist Blood Pressure Monitor in the best condition and protect the unit from damage follow the directions listed below: Clean the monitor with a soft dry cloth. Do not use any abrasive or volatile cleaners. Do not attempt to wash the cuff. Never immerse the monitor or any components in water. -
Page 19: Error Indicators And Troubleshooting Tips
SYMBOL After several seconds After several seconds ERROR INDICATORS CAUSE Movement during measurement. The cuff is not fastened securely. Wrist is not in the correct position. Batteries are worn. Cuff over-inflated. CORRECTION Press the START/STOP button to turn the unit off. Remove the monitor from your wrist. -
Page 20: Troubleshooting Tips
SYMBOL TROUBLESHOOTING TIPS PROBLEM No display appears on the unit when the START/STOP button is pressed. Measurements values appear too high or too low. ERROR INDICATORS CAUSE Abnormal unit function. Replace worn batteries. Check the battery installation for proper placement of the battery polarities. -
Page 21: Fcc Statement
FCC STATEMENT NOTE: POTENTIAL FOR RADIO/TELEVISION INTERFERENCE (for U.S.A. only) This product has been tested and found to comply with the limits for a Class B digital device, pursuant to part 15 of the FCC rules. These limits are designed to provide reasonable protection against harmful interference in a residential installation. -
Page 22: Warranty Information
Repair or replacement is our only responsibility and your only remedy under the above warranties. To obtain warranty service contact Omron Healthcare’s Customer Service by calling 1-800-634-4350 for the address of the repair location and the return shipping and handling fee. -
Page 23: Specifications
These specifications, to improve performance, are subject to change without notice. SPECIFICATIONS OMRON Automatic Wrist Blood Pressure Monitor with A.P.S. HEM-650 Digital Display Oscillometric method Pressure; 0 to 299 mmHg Pulse; 40 to 180 beats/min 90 measurements with date and time Pressure;... - Page 24 Distributed by: OMRON HEALTHCARE, INC. 1200 Lakeside Drive Bannockburn, Illinois 60015 www.omronhealthcare.com Manufactured by Omron Made in China Copyright © 2005 OMRON HEALTHCARE, INC. 650INST Rev...
- Page 25 Manual de instrucciones Monitor automático para medir la presión arterial con A.P.S.® (sensor avanzado de posición) HEM-650 Modelo...
- Page 26 Antes de usar el monitor Introducción ........3 Notas importantes de seguridad .
-
Page 27: Introducción
El Monitor automático con muñequera para medir la presión arterial OMRON ® HEM-650 con A.P.S. en casa. GUARDE ESTAS INSTRUCCIONES INTRODUCCIÓN ® ®... -
Page 28: Notas Importantes De Seguridad
NOTAS DE SEGURIDAD IMPORTANTES Para asegurar el uso correcto del producto, deben tomarse medidas de seguridad básicas, entre ellas las precauciones listadas a continuación: Consulte a su médico antes de tomarse la presión arterial en la muñeca si tiene alguno de los siguientes padecimientos: hipertensión grave, diabetes grave, arteriosclerosis grave, insuficiencia renal grave o enfermedad vascular que pueda poner en peligro la circulación. -
Page 29: Antes De Medir La Presión Arterial
ANTES DE MEDIR LA PRESIÓN ARTERIAL Evite alcohol, el comer, el beber, el fumar, el ejercitar, y el bañarse para 30 minutos antes de tomar una medición. Descanse durante al menos 15 minutos antes de tomar la medición. El estrés aumenta la presión arterial. Evite realizar mediciones durante momentos de estrés. -
Page 30: Conozca Su Unidad
CONOZCA SU UNIDAD Unidad principal Pantalla Compartimiento de las pilas Accesorios Dos pilas alcalinas “AAA” Muñequera Botón MEM (memoria) Botón START/STOP (inicio/paro) Botón SET (ajustar) Estuche de almacenamiento... -
Page 31: Pantalla De La Unidad
PANTALLA DE LA UNIDAD Presión arterial sistólica Presión arterial diastólica Símbolo de pilas bajas Símbolo de desinflado de la muñequera Símbolo de medición en la muñeca derecha Símbolo de alarma del sensor de posición Indicador del pulso SÍMBOLO DE LATIDO CARDIACO IRREGULAR Cuando el monitor detecte un ritmo irregular dos o más veces durante la medición, el símbolo de latido cardiaco irregular aparecerá... -
Page 32: Instalación De Las Pilas
INSTALACIÓN DE LAS PILAS 1. Oprima ambos lados de la cubierta de las pilas y levántela en dirección de la flecha. 2. Instale dos pilas alcalinas “AAA” en el compartimiento de las pilas, de manera que las polaridades + (positiva) y - (negativa) coincidan con las polaridades que se indican en el compartimiento de las pilas. -
Page 33: Sensor Avanzado De Posición
SENSOR AVANZADO DE POSICIÓN El sensor avanzado de posición, A.P.S. unidad se encuentre en la posición correcta antes de comenzar a tomar la medición. 1. Oprima el botón SET (ajustar) mientras la unidad está apagada. El símbolo del sensor de posición ) aparecerá... -
Page 34: Selección De Medición En La Muñeca
SELECCIÓN DE MEDICIÓN EN LA MUÑECA Se puede medir la presión arterial en la muñeca izquierda o derecha. 1. Oprima el botón SET (ajustar) 3 veces mientras la unidad está apagada hasta que el símbolo de medición en la muñeca derecha ( aparezca en la pantalla. -
Page 35: Ajuste De La Fecha Y La Hora
AJUSTE DE LA FECHA Y LA HORA El monitor de la presión arterial almacena hasta 90 valores de medición con la fecha y hora. El monitor también calcula una lectura promedio basada en los últimos tres valores de medición. Ajuste el monitor con la fecha y hora actuales antes de realizar la primera medición. - Page 36 AJUSTE DE LA FECHA Y LA HORA 3. AJUSTE DEL MES Oprima el botón MEM (memoria) para avanzar en incrementos de un mes. Oprima el botón SET (ajustar) para ajustar el mes actual. El día parpadea en la pantalla. 4. AJUSTE DEL DÍA Oprima el botón MEM (memoria) para avanzar en incrementos de un día.
-
Page 37: Colocación De La Muñequera
COLOCACIÓN DE LA MUÑEQUERA La colocación de la muñequera es uno de los pasos más importantes para tomar una medición correcta. APLICACIÓN DE LA MUÑEQUERA EN LA MUÑECA IZQUIERDA 1. Súbase la manga. Asegúrese de que no le quede muy apretada en el brazo. Esto puede reducir el flujo sanguíneo del brazo. -
Page 38: Cómo Medir La Presión Arterial
CÓMO TOMAR UNA MEDICIÓN 1. Siéntese cómodamente en una silla con los pies en el suelo. 2. Oprima el botón START/STOP (inicio/paro). 3. Sosténgase el brazo sobre el pecho al nivel del corazón. Sosténgase el codo con firmeza para evitar movimiento corporal. - Page 39 CÓMO TOMAR UNA MEDICIÓN 5. Después de que el monitor le haya detectado la presión arterial y el pulso, la muñequera comenzará a desinflarse automáticamente. Aparece la presión arterial y pulso en la pantalla. NOTA: La hora y fecha de la medición se muestran automáticamente.
-
Page 40: Uso De La Función De Memoria
USO DE LA FUNCIÓN DE MEMORIA Cada vez que realiza una medición, el monitor almacena los valores de presión arterial y pulso en la memoria. El monitor de presión arterial automáticamente almacena hasta 90 valores de medición. Cuando se almacenan 90 conjuntos de valores de medición en la memoria, el registro más antiguo se elimina para guardar el registro más reciente. - Page 41 USO DE LA FUNCIÓN DE MEMORIA PARA MOSTRAR LOS VALORES DE MEDICIÓN La fecha y la hora se muestran alternadamente con los valores de medición. 1. Oprima el botón MEM (memoria) para mostrar lores de medición almacenados en la memoria en orden de más reciente a más antiguo.
-
Page 42: Cuidado Y Mantenimiento
CUIDADO Y MANTENIMIENTO Para mantener en buen estado su Monitor automático con muñequera para medir la presión arterial y proteger la unidad contra daños, siga las instrucciones que se presentan a continuación: Limpie el monitor con un paño suave y seco. No use limpiadores abrasivos ni volátiles. -
Page 43: De Problemas
INDICADORES DE ERROR SÍMBOLO Después de varios segundos Después de varios segundos CAUSA Movimiento durante la medición. La muñequera no está bien asegurada. La muñeca no está en la posición correcta. Las pilas están gastadas. La muñequera está demasiado inflada. CORRECCIÓN Oprima el botón START/STOP (inicio/paro) - Page 44 INDICADORES DE ERROR SÍMBOLO SUGERENCIAS PARA LA RESOLUCIÓN DE PROBLEMAS PROBLEMA No aparece nada en la unidad al oprimir el botón START/STOP (inicio/paro). Los valores de medición aparecen demasiado altos o demasiado bajos. CAUSA Función anormal de la unidad. Reemplace las pilas desgastadas. Verifique la instalación de las pilas para asegurar la correcta ubicación de sus polaridades.
-
Page 45: Declaración De La Fcc
DECLARACIÓN DE LA FCC NOTA: POSIBILIDAD DE INTERFERENCIA EN RADIO Y TELEVISIÓN (para los EE.UU. únicamente) Las pruebas a las que se sometió este producto comprobaron que cumple con los límites establecidos para dispositivos digitales Clase B, de conformidad con la sección 15 de las reglas de la FCC. -
Page 46: Información Sobre La Garantía
Para obtener servicios cubiertos por la garantía, comuníquese con el Servicio al cliente de Omron Healthcare llamando al 1-800-634-4350 para obtener la dirección del local de reparación, así como información sobre los gastos de manejo y envío de retorno. La información sobre servicio cubierto por la garantía está... -
Page 47: Especificaciones
A fin de mejorar el funcionamiento, estas especificaciones están sujetas a cambio sin previo aviso. ESPECIFICACIONES Monitor automático con A.P.S. muñequera para medir la presión arterial OMRON HEM-650 Pantalla digital Método oscilométrico Presión: 0 a 299 mmHg Pulso: 40 a 180 latidos/min 90 mediciones con fecha y hora Presión;... - Page 48 Distribuido por: Omron Healthcare, Inc. 1200 Lakeside Drive Bannockburn, Illinois 60015 www.omronhealthcare.com Fabricado por Omron Hecho en China Copyright © 2005 OMRON HEALTHCARE, INC. 650INST Rev...