
Related Manuals for Rangemaster RMB60HPNGFGL


Summary of Contents for Rangemaster RMB60HPNGFGL
- Page 1 RMB60HPNGFGL/ Gas on Glass Hob User Guide & Installation & Service Instructions U110606 - 01...
-
Page 3: Table Of Contents
Contents Before You Start... Hob Overview Cleaning Your Hob Troubleshooting Installation Conversion to LPG Circuit Diagram Technical Data 11. Warranty/After Sales Service... -
Page 5: Before You Start
1. Before You Start... DocNo.011-0001 - Introduction gas Personal Safety Thank you for buying a Rangemaster hob. It should give you many years trouble-free cooking if installed and operated Accessible parts will become hot during use and will correctly. It is important that you read this section before you retain heat even after you have stopped cooking. - Page 6 Do not use water on grease fires and never pick up a flaming pan. Turn off the controls and then smother a flaming pan on a surface unit by covering the pan completely with a well fitting lid or baking tray. If available, use a multi-purpose dry chemical or foam- type fire extinguisher.
-
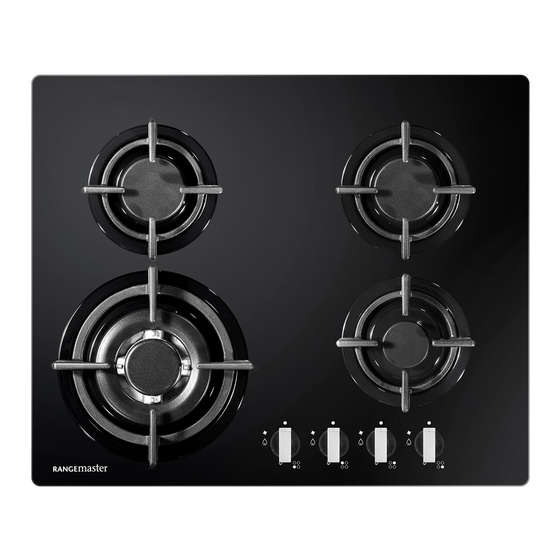
Page 7: Hob Overview
Gas burner: 3.8 kW Gas burner: 1.0 kW Type Material Power supply Size (mm) Built-in (mm) RMB60HPNGFGL/ Glass 230V 50Hz 500 x 600 x 90 477 x 557 The diagram by each of the control knobs indicates which Fig. 2.2 burner that knob operates (Fig. - Page 8 Pans and kettles with concave bases or down turned base Fig. 2.5 rims should not be used (Fig. 2.5). Simmering aids, such as asbestos or mesh mats, are NOT recommended. They will reduce burner performance and could damage the pan supports (Fig. 2.6). ArtNo.311-0002 Pan with rim You should also avoid using unstable and misshapen pans that may tilt easily, and pans with a very small base diameter,...
-
Page 9: Cleaning Your Hob
3. Cleaning Your Hob • DocNo.041-0002 - Cleaning gas 5-element Essential Information Fig.3-1 Allow the cooker to cool and then isolate the electricity supply before carrying out any thorough cleaning. Never use paint solvents, washing soda, caustic cleaners, biological powders, bleach, chlorine based bleach cleaners, coarse abrasives or salt. -
Page 10: Cleaning Table
Cleaning Table Recommended Part Finish Refer to the cleaning tables (Table 3-1 and Table 3-2) for cleaning method details on cleaning the hob. Hotplate top Stainless steel or Hot soapy water and a soft cloth. glass remove stubborn stains gently The cleaners listed are available from supermarkets or with a nylon scourer. -
Page 11: Troubleshooting
4. Troubleshooting If there is an installation problem and I don’t get my original installer to come back to fix it, who pays? You do. Service organisations will charge for their call- outs if they are correcting work carried out by your original installer. -
Page 12: Installation
INSTALLATION Check the appliance is electrically safe and gas sound when you have finished. 5. Installation • DocNo.061-0004 - Installation RGG77 gas • Dear Installer The Gas Safety (Installation and Use) regulations • Before you start your installation, please complete the details The relevant Building / IET regulations BELOW. - Page 13 INSTALLATION Check the appliance is electrically safe and gas sound when you have finished. You will need the following equipment to complete the hob installation satisfactorily: • Gas Pressure tester • Flexible gas hose • Multimeter You will also need the following tools: •...
- Page 14 INSTALLATION Check the appliance is electrically safe and gas sound when you have finished. Positioning the Hob Fig. 5.1 The hob should be fitted into a work surface, which is at least 600mm deep. In position, the hob has a maximum thickness of 80mm from the top of the work surface, and an overall thickness of 100mm (120mm max depth including the gas connector).
- Page 15 INSTALLATION Check the appliance is electrically safe and gas sound when you have finished. Fixing the seal to the back of the hob The hob must be sealed to the work surface to prevent liquid from entering into the cabinet. A tape seal is supplied with the hob.
- Page 16 INSTALLATION Check the appliance is electrically safe and gas sound when you have finished. Fixing the seal to the back of the hob Fig. 5.3 Step 2: Inner seal Step 3 Step 4: Outer Seal Step 5 seal C seal A Overlaps Overlaps Spread seal...
- Page 17 INSTALLATION Check the appliance is electrically safe and gas sound when you have finished. Fastening the Installation Brackets Fig. 5.5 Rear Screw Rear Screw Front Screw Front Screw Installing the Hob Fig. 5.6 Rear side Front side Knobs Front Rear Screw Screw...
-
Page 18: Conversion To Lpg
WARNING – SERVICING TO BE CARRIED OUT ONLY BY AN AUTHORISED PERSON Disconnect from electricity and gas before servicing. Check appliance is safe when you have finished. 6. Conversion to LPG Check in the ‘Technical Data’ section at the back of the Fig. - Page 19 WARNING – SERVICING TO BE CARRIED OUT ONLY BY AN AUTHORISED PERSON Disconnect from electricity and gas before servicing. Check appliance is safe when you have finished. Tap Adjustment Fig. 6.3 Disconnect from the electricity supply. When changing from one type of gas to another, the minimum tap output must also be correct, considering that in this position the flame must be about 4 mm long and must remain lit even when the knob is turned...
-
Page 20: Gas Connection
INSTALLATION Check the appliance is electrically safe and gas sound when you have finished. Conversion to LP If the appliance is to be converted to LP gas do the conversion at this point. See the conversion section of these instructions. Gas Connection Before connecting the appliance, check that it is suitable for your gas and electricity supply. -
Page 21: Connection To The Gas Supply
INSTALLATION Check the appliance is electrically safe and gas sound when you have finished. Connection to the Gas Supply Fig. 6.1 1/2" G cylindrical 1/2" G cylindrical Gas connection (GB) Cat: II 2H3+ (ISO 228-1) male (ISO 228-1) female The fitting (Fig. 6.1) is made up of: Nut “C”... -
Page 22: Safety Information
INSTALLATION Check the appliance is electrically safe and gas sound when you have finished. Safety Information Ensure that the gas supply pipe is never able to touch moveable parts of the built-in cabinet (e.g. drawers). It must not pass through compartments that could be used for storage purposes. -
Page 23: Electrical Connections
INSTALLATION Check the appliance is electrically safe and gas sound when you have finished. Electrical Connections This appliance must be installed by a qualified electrician to comply with the relevant Institute of Electrical Engineers (I.E.T.) regulations and also the local electricity supply company requirements. -
Page 24: Circuit Diagram
7. Circuit Diagram Spark 1 Spark 2 Igniter Spark 3 Spark 4 Blue Micro Switch Blue Yellow & Green Brown Blue Yellow & Green... -
Page 25: Technical Data
8. Technical Data The hob is an independent Class 3 built-in unit. This hob is category II It is supplied set for group H natural gas. A conversion kit from NG to LP is available for the hob. INSTALLER: Please leave these instructions with the user. DATA BADGE LOCATION: Base of the hob. - Page 26 Hotplate Efficiency Brand Rangemaster Model Identification RMB60HPNGFGL/ Size (mm) Type Type of Hob Number of gas burners Auxiliary / Small Burner (EE gas burner) Semi-rapide / Medium Burner (EE gas burner) 55.63 % Rapide / Large Burner (EE gas burner) 53.68 %...
-
Page 27: Warranty/After Sales Service
11. Warranty/After Sales Service DocNo.111-0003 Warranty No.10 If consultation or technical assistance is needed, please provide the local authorised service agent with the purchase invoice and the product code/serial number. The 2 years free maintenance for the operation of the appliance started from the date of purchase of this product. - Page 28 Notes...
- Page 29 Notes...
- Page 30 Notes...
- Page 31 Notes...
- Page 32 Clarence Street, Royal Leamington Spa, Warwickshire, CV31 2AD, England. Tel: +44 (0) 800 8046261 E-mail: consumers@agarangemaster.co.uk...