JUKI MO-50e Instruction Manual
2-needle,3/4-thread overlock sewing machine
Hide thumbs
Also See for MO-50e:
- Instruction manual (46 pages) ,
- Service manual (17 pages) ,
- Instruction manual (23 pages)
Table of Contents
Advertisement
2-Needle,3/4-Thread Overlock Sewing Machine
Surjeteuse-Raseuse 2 Aiguilles, 3/4Fils
Maquina de coser Sobreorilladora da 2 Agujas, 3/4 Hilos
2 Aghi overlock a 3/4 fili con punto di sicurezza integrato
2 Nadeln, 3/4-Faden Overlock mit integrierter Sicherheitsnaht
2 Иглы, 3/4-х ниточный оверлочный шов с укрепляющей строчкой
MO-50e/51e
Instruction Manual
Manuel d instructions
Manual de instrucciones
Manuale di istruzioni
Bedienungsanleitung
Инструкция по эксплуатации
IMPORTANT:
Read all safety regulations carefully and
understand them before using your sewing
machine.
Retain this instruction manual for future reference.
IMPORTANT:
Avant de mettre la machine en marche, lire
attentivement et assimiler les regles de securite
de ce manuel.
Conserver le manuel afin de pouvoir le consulter
ul terieurement.
IMPORTANTE:
Lea cuidadosamente todas las recomendaciones
con respecto a la seguridad y comprendalas
perfectamente antes de usar su maquina.
Guarde este libro de instrucciones para
referencias futuras.
Advertisement
Table of Contents

Related Manuals for JUKI MO-50e


Summary of Contents for JUKI MO-50e
- Page 1 Maquina de coser Sobreorilladora da 2 Agujas, 3/4 Hilos 2 Aghi overlock a 3/4 fili con punto di sicurezza integrato 2 Nadeln, 3/4-Faden Overlock mit integrierter Sicherheitsnaht 2 Иглы, 3/4-х ниточный оверлочный шов с укрепляющей строчкой MO-50e/51e Instruction Manual Manuel d instructions Manual de instrucciones...
-
Page 2: Important Safety Instructions
“IMPORTANT SAFETY INSTRUCTIONS“ When using an electrical appliance, basic safety precautions should always be followed, including the following: Read all instructions brfore using this overlock sewing machine. “DANGER“___ To reduce the risk of electric shock: 1. The appliance should never be left unattended when plugged in. 2. - Page 3 “PRESCRIPTIONS DE SECURITE IMPORTANTES“ L’emploi d’un appareil électrique exige d’observer les mesures de sécurité suivantes: “DANGER“___ Pour laprotection contre tout choc électrique: 1. Ne pas laisser la surjeteuse sans surveillance tant qu’elle est raccordée au réseau. 2. Aprés usage et avant un nettoyage, séparer toujours la machine du réseau. 3.
-
Page 4: Normas De Seguridad
“NORMAS DE SEGURIDAD IMPORTANTES“ Cuando se usa un aparato eléctrico deben respetarse las siguientes normas de seguridad: “PELIGRO ___ “ para reducir el riesgo de electrochoque: 1. No dejar nunca la máquina de punto cadeneta y cobertura sin vigilancia si ella está enchufada. 2. - Page 5 “IMPORTANTI NORME DI SICUREZZA“ Quando si utilizza un elettrodomestico, è necessario seguire sempre alcune norme basilari di sicurezza. Una di esse è quella di leggere per intero il manuale di istruzioni prima di utilizzare la taglia cuce. “PERICOLO“ Per ridurre il rischio di scossa elettrica. La macchina non deve mai essere lasciata incustodita quando la spina è...
- Page 6 “WICHTIGE SICHERHEITSHINWEISE“ Beim Gebrauch eines elektrischen Gerätes sind folgende Sicherheitsmassnahmen zu beachten: “GEFAHR “ _____ Zum Schutz vor elektischem Schlag: 1. Dic Overlockmaschine nie unbeaufsichtigt stehen lassen, solange sie am Stromnetz angeschlossen ist. 2. Nach Gebrauch und vor einer Reinigung die Maschine immer vom Stromnetz trennen. 3.
- Page 7 “ОСНОВНЫЕ УКАЗАНИЯ ПО ТЕХНИКЕ БЕЗОПАСНОСТИ“ При пользовании электромеханическим устройством следует соблюдать основные меры безопасности, приведенные ниже. Ознакомьтесь с ними перед началом работы на данной оверлочной швейной машине. “ ОПАСНО “ Для снижения риска поражения электричеством: 1. Никогда не оставляйте швейную машину без внимания во включенном состоянии. Немедленно...
-
Page 8: Table Of Contents
Contents Table des matières Índice 1. Safety regulations 2. Consignes de sécurité 3. Normas de seguridad 7. Contents 7. Table de matière 7. Índice del contenido 9. Details of the machine 13. Détails de la machine 13. Detalles de la máquina 12. - Page 9 Índice Inhalt Содержание 5. Sicherheitsvorschriften Меры предосторожности 4. Norme di sicurezza 9. Details der Maschine Детали машины . Indice 14. Bereitstellen der Maschine 14 Подготовка машины 10 Componenti e controlli 14. - Zubehör 14 Принадлежности 13 Prima di cucire 14. - Zubehörbox 14 Коробка...
-
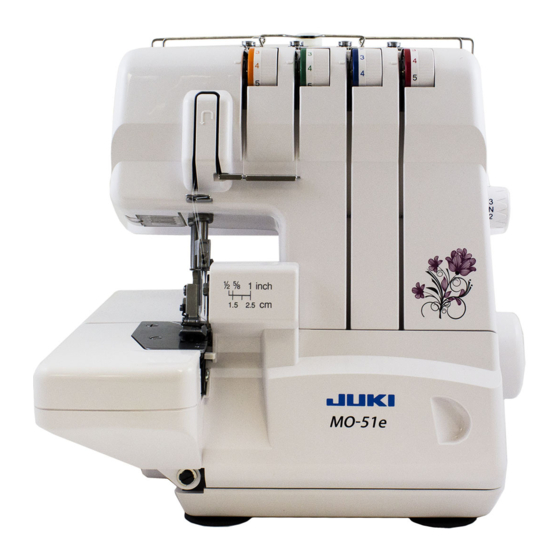
Page 10: Details Of The Machine
Details of the machine Details of the machine 1. Looper cover 2. Looper cover opening indent 3. Knife guard 4. Cloth plate 5. Stitch plate 6. Presser foot 7. Upper looper tension dial 8. Lower looper tension dial 9. Right needle tension dial 10.Left needle tension dial 11.Thread take up cover 12.Thread guide plate... - Page 11 Détails de la machine Detalles de la máquina Componenti e controlli Détails de la machine Detalles de la máquina Componenti e controlli 1. Couvercle du boucleur 1. Tapa del ojo-guía 1. Coperchio crochet 2. Guidage pour l'ouverture du 2. Guiado para la apertura de la 2.
- Page 12 Детали машины Details der Maschine Details der Maschine Детали машины 1 Крышка петлителя 1. Greiferdeckel 2 Углубление для открывания крышки 2. Führung zum Öffnen des петлителя Greiferdeckels 3 Ограждение ножа 3. Messerabdeckung 4 Пластина под ткань Иголь ная пластина 4. Stoffauflagedeckel 6 Прижимная...
-
Page 13: Preparing The Machine
Preparing the machine Accessories 1. Screwdriver 2. Tweezers 3. Cleaning brush 4. Set of needles ELx705 5. Net 6. Spool caps 7. Waste collector 8. Hexagon wrench 9. Upper knife 10.Oiler Accessory Box All standard accessories are stored in the box. Pull out to open. Push in to close. -
Page 14: Préparation De La Machine
Préparation de la machine Preparación de la máquina Prima di cucire Accessories Accesorios Accessori 1. Tournevis 1. Destornillado 1. Cacciavite 2. Pincette 2. Pinzas 2. Pinzette 3. Pinceau 3. Cepillo de limpieza 3. Spazzola di pulizia 4. Juego de agujas ELx705 4. - Page 15 Bereitstellen der Maschine Подготовка машины Zubehör Принадлежности 1. Schraubenzieher 1 Отвертка 2 Пинцет 2. Pinzette 3 Щетка 3. Pinsel 4 Набор игл ELx705 4. Nadelset ELx705 5. Netz 5 Сетка 6. Garnableiterscheiben 6 Катушечные колпачки 7. Stoffauffangbehälter 7 Сборник отходов 8.
-
Page 16: Attaching The Foot Control
Preparing the machine Attaching the foot control Plug foot control into machine socket (A) and then into main socket (B). Sewing speed The sewing speed can be adjusted by increasing or decreasing the pressure on the foot control ( C ). Assembling the thread stand Raise the support rod fully, turning slightly until the... -
Page 17: Montage Du Support Des Fils
Prépartion de la machine Preparación de la máquina Collegamento del reostato Conexión del pedal de mando Infilate l'attacco del cavo del Raccorder de la pédale de commande Conecte el pedal en la toma de Reostato nella presa della Brancher la pédale dans la prise corriente de la máquina (A) y macchina (A) e la spina nella de la surjeteuse (A), puis relier la... - Page 18 Bereitstellen der Maschine Подготовка машины Fussanlasser anschliessen Подключение педали управления Anschlussstecker für Fussanlasser in die Вставьте штекер педали Overlockmaschinensteckdose (A) управления в гнездо в машине stechen und anschliessend den а вилку в розетку (B). Netzstecker (B) mit der Netzsteckdose verbinden. Nähgeschwindigkeit Скорость...
-
Page 19: Using The Machine
Using the machine Handwheel The handwheel turns counterclockwise. Presser foot lifter To raise the presser foot, raise the lever on the rear of the machine until it engages. Changing the presser foot - Switch the machine off " O ". - Raise the presser foot. -
Page 20: Mise En Service De La Machine
Mise en service de la machine Utilización de la máquina Uso della macchina Volant Volante Volantino Le volant tourne dans le sens El volante gira a izquierdas. Il volantino gira in senso inverse des aiguilles d'une montre. antiorario. Elévateur de pied-de-biche Elevador del prensatelas Leva alza-piedino Pour relever le pied-de-biche,... - Page 21 Inbetriebnahme der Maschine Работа на машине Handrad Маховик Das Handrad dreht sich im Маховик вращается против Gegenuhrzeigersinn. часовой стрелки. Nähfusslifterhebel Рычаг подъема прижимной лапки Durch Hochklappen des Lifterhebels den Nähfuss Чтобы поднять прижимную лапку, hochstellen. поднимите рычаг сзади машины, пока она не встанет на свое место.
-
Page 22: Inserting Needles
Using the machine Inserting needles - Switch the machine off " O ". Disconnect machine from electricity supply. - Turn the handwheel until needles are fully raised. - Lower the presser foot. - Use the hexagon wrench to loosen the needle setscrew. Remove needle. -
Page 23: Relevage Du Couteau Supérieur
Mise en service de la machine Utilización de la máquina Inserimento degli aghi Remplacment des aiguilles Inserción de las agujas - Débrancher la machine du - Desconecte la máquina de la red y - Spegnete la macchina réseau et placer l'interrupteur coloque el interruptor principal en la mettendo su "... - Page 24 Inbetriebnahme der Maschine Работа на машине Nadeln ersetzen Установка игл - Maschine ausschalten, - Отключите машину Hauptschalter auf " O ". (положение «0»). - Handrad drehen, um die Nadeln in Отсоедините машину от die höchste Stellung zu bringen. источника питания. - Nähfuss senken.
-
Page 25: Threading
Threading Threading / Preparation - Disconnect machine from electricity supply. - Support rod with thread guide must be fully raised. - Open the looper cover and the colth plate cover. - Turn the handwheel towards you until needles are fully raised. - Thread the machine in the correct sequence. -
Page 26: Enfilage
Enfilage Enhebrado Infilatura Préparation de l'enfilage Enhebrado/ preparación Infilatura / Preparazione - Débrancher la machine du - Desconecte la máquina de la - Scollegate la macchina dalla réseau et placer l'interrupteur red. presa elettrica. principal sur . - La varilla de soporte con el guía - L'asta del guidafili deve essere - Dégager complètement le sup- hilos debe quedar completamente... - Page 27 Einfädeln Заправка нитками Einfädeln vorbereiten Заправка нитками/Подготовка - Maschine ausschalten, - Отсоедините машину от Hauptschalter auf " O " stellen, источника питания. Netzstecker herausziehen. - Шток с нитенаправителями - Fadenführungsstab mit должен быть поднят полностью. Fadenführung vollständig - Откройте крышку петлителя и ausziehen.
-
Page 28: Lower Looper (Red
Threading Lower looper (red) - Place the spool on the spool holder pin. - Bring thread up from back to front through guide (1). - Pull the thread under the protector (2) and pass under the guider up to go around the pre-tension (3) - Thread guide (4,5,6). -
Page 29: Fil Du Boucleur Inférieur (Rouge
Enfilage Enhebrado Infilatura Fil du boucleur inférieur Hilo del ojo-guía inferior (rojo) Crochet inferiore (rosso) (rouge) - Mettete il rocchetto sul oloque la bobina sobre el husillo portarocchetti - Enficher la bobine sur la broche. Partiendo desde atr s inserte el á... - Page 30 Einfädeln Заправка нитками Untergreiferfaden (rot) Нижний петлитель (Красный цвет) - Fadenspule auf den Spulenhalterstift stecken. - Установите катушку на оси - Faden von hinten in die катушкодержателя. Fadenführung (1) legen. - Пропустите нить через - S-Schlaufe an der направитель (1) сзади вперед. Fadenführungsleiste (2.3).
-
Page 31: Right Needle (Green
Threading Right needle (Green) - Place the spool on the spool holder pin. - Bring thread up through guide (1). - Pull the thread under the protector (2) and pass under the guider up to go around the pre-tension (3) - Thread guide (4,5). -
Page 32: Fil D'aiguille De Droite (Vert
Enfilage Enhebrado Infilatura Fil d'aiguille de droite (Vert) Hilo de aguja de la derecha Ago destro ( Verde (Verde) - Enficher la bobine sur la broche. - Mettete il rocchetto sul - En partant de l'arrière, introduire portarocchetti. Coloque la bobina en el husillo le fil dans le guide-fil (1). - Page 33 Einfädeln Заправка нитками Rechter Nadelfaden ( Правая игла ( Зеленый цвет Grün - Fadenspule auf den - Установите катушку на оси spulenhalterstift stecken. катушкодержателя. - Faden von hinten in die - Пропустите нить через Fadenführung (1) legen. направитель (1). - S-Schlaufe an der Faden- - Пропустите...
-
Page 34: Left Needle (Yellow
Threading Left needle (Yellow) - Place the spool on the spool holder pin. - Bring thread up through guide (1). - Pull the thread under the protector (2) and pass under the guider up to go around the pre-tension (3). - Thread guide (4,5). -
Page 35: Fil D'aiguille De Gauche (Jaune
Enfilage Enhebrado Infilatura Fil d'aiguille de gauche Ago sinistro (Giallo) Hilo de la aguja de la izquierda (Jaune) (Amarillo) - Mettete il rocchetto sul portarocchetti. - Enficher la bobine sur la broche. Coloque la bobina en el husillo - Portate il filo da dietro verso - En partant de l'arrière, introduire artiendo desde atrás enhebre l'avanti passandolo... - Page 36 Einfädeln Заправка нитками Linker Nadelfaden (Gelb) Левая игла (Желтый цвет) - Fadenspule auf den - Установите катушку на оси Spulenhalterstift stecken. катушкодержателя. - Faden von hinten in die - Пропустите нить через направитель Fadenführung (1) legen. (1). - S-Schlaufe an der - Пропустите...
-
Page 37: Trial Sewing, Thread Tension
Trial sewing, thread tension Sewing test After threading make a trial run. Always use a double layer of fabric in order to be able to check the stitch formation and thread tension properly. - Switch the machine on "I". - Set all tension dials to 3. - Raise the front of the presser foot slightly with your thumb and position the fabric under the foot... -
Page 38: Echantillon De Couture
Echantillon de couture, Muestra de costura, Prova di cucito,tensione Tension de fil tensión del hilo del filo Echantillon de couture Muestra de costura Prova di cucito Procéder à un échantillon,une fcis Una vez terminado el enhebrado, Dopo aver infilato la macchina, l'enfilage terminé. - Page 39 Nähprobe, Fadenspannung Пробное шитье, натяжения нитей Nähprobe Пробное шитье Nach dem Einfädeln eine После заправки нитками сделайте Nähprobe machen. Um das пробную прошивку. Stichbild und dié Fadenspannung Всегда используйте двойной слой richtig zu beurteilen, die Nähprobe ткани, чтобы можно было проверить auf doppeltem Stoff nähen.
-
Page 40: Adjusting The Thread Tension
Adjusting the thread tension Adjusting the thread tension The left needle thread forms loops on the underside: Tighten the left needle thread tension (yellow). The right needle thread forms loops on the underside: Tighten the right needle thread tension (green). The looper loops are formed on the underside: Tighten the upper looper tension... -
Page 41: Adaptation Des Tensions De Fil
Regolazione della tensione del Ajuste de la tensión del hilo Adaptation des tensions de fil filo Ajuste de a tensión del hilo Adaptation des tensions de fil Regolazion della tensione del filo El hilo de la aguja de la izquierda Le fil d'aiguille de gauche forme forma nudos en la parte inferior: des noeuds sur le dessous et non... - Page 42 Fadenspannungen anpassen Регулировка натяжения нитей Fadenspannungen anpassen Регулировка натяжения нитей Der linke Nadelfaden bildet Нить левой иглы образует петли с Schlingen auf der Unterseite: изнаночной стороны: Linke Nadelfadenspannung Увеличьте натяжение нити левой (gelb) mehr anziehen. иглы (желтая). Der rechte Nadelfaden bildet Нить...
-
Page 43: Adjustments And Settings
Adjustments and settings Stitch length - The stitch length can be adjusted from 1 to 4 mm. - Higher number = longer stitch, lower number = shorter stitch. - Basic stitch length = N. Cutting width - The cutting width should be adjusted according to the type of fabric being sewn. -
Page 44: Réglage Et Utilisation
Réglage et utilisation Ajuste y utilización Regolazioni e impostazioni Réglage de la longueur Ajustes de la longitud Lunghezza dei punti de point de la puntada - E' possibile regolare la lunghezza dei punti da 1 et 4 mm. - La longitud de la puntada puede - La longueur de point peut être - A valori superiori ajustarse de 1 a 4 mm. - Page 45 Einstellen und Bedienen Регулировки и установки Stichlänge Длина стежка - Die Stichlänge kann von 1-4mm - Длину стежка можно регулировать verstellt werden. от 1 до 4 мм. - Grössere Nummer, längerer - Чем больше число, тем длиннее Stich, kleinere Nummer, kürzerer стежок, чем...
-
Page 46: Differential Feed
Differential feed* Differential feed* There are two feed dogs: one front and one rear. The two feed dogs move independently and the distance each feed dog travels during one complete movement can be adjusted. Stretching effect To stretch the fabric select a number from N to 5 in the section “... -
Page 47: Entraînement Différentiel
Entraînement différentiel Arrastre diferencial* Trasporto differenziale Entraînement différentiel * Arrastre diferencial* Trasporto differenziale * La griffe d'entraînement est Hay dos dientes de arrastre: uno Vi sono due griffe di trasporto, constituée d'une paitie avant et delantero y otro trasero. Los dos una anteriore e una posteriore. - Page 48 Дифференциальная подача Differentialtransport * Differentialtransport * Дифференциальная подача Der Transporteur besteht aus Транспортер имеет две рейки: одну переднюю и одну заднюю. Рейки einem vorderen und einem движутся независимо, и расстояние, hinteren Teil. Innerhalb einer на которое рейка перемещается за vollständigen Transporteur- bewegung können die beiden одно...
-
Page 49: Practical Sewing
Practical sewing 3 thread overlock For a 3-5 mm wide 3 thread overlock, remove the left needle. Thread both loopers and then the right needle. For a 5-7 mm wide 3 thread overlock, remove the right needle. Thread both loopers and then the left needle. -
Page 50: Costuras Prácticas
A pplicattions pratiques Costuras prácticas Esempi di cucito 3 Surjet à fils Costura sobreorillada Overlock a 3 fili (overlock) de 3 hilos Pour réaliser un surjet à fils de Per realizzare overlock a 3 fili, di 3 à 5 mm de large, il faut retirer ampiezza compresa fra 3-5 mm, Para realizar una costura overlock l'aiguille de gauche. - Page 51 Praktisches Nähen Практическое шитье 3-Faden Overlock 3-ниточный оверлочный шов Für einen 3-5 mm breiten 3-Faden Для шитья 3-ниточным оверлочным Overlockstich die linke Nadel швом шириной 3-5 мм удалите entfernen. Die beiden Greifer левую иглу. einfädeln und anschliessend die Заправьте нитками оба петлителя, rechte Nadel einfädeln.
-
Page 52: Changing Light Bulb
Maintenance Changing light bulb - Switch the machine off "O" and disconnect it from electricity supply by removing the mains plug. - Loosen the bulb cover setscrew (A) and remove the bulb cover. - Unscrew the bulb and replace it with a new one. -
Page 53: Sostituzione Della Lampadina
Entretien Mantenimiento Manutenzione Remplacer l'ampoule Cambio de la bombilla Sostituzione della lampadina - Débrancher la machine du réseau et - Desconecte la máquina de la - Spegnete la macchina mettendo su "O" placer l'interrupteur principal sur "O". alimentación de la red y ponga el I'interruttore e scollegatela dala presa - Desserrer la vis (A) du capot de interruptor principal en la posición”O”. - Page 54 Wartung Обслуживание Glühlampe wechseln Замена лампочки - Maschine ausschalten. Hauptschalter - Отключите машину (положение «0») auf “ O “. Netzstecker herausziehen. и отсоедините ее от источника питания, - Schraube (A) der вынув главную вилку. Glühlampenabdeckung lösen - Ослабьте установочный винт (А) крышки und Abdeckung entfernen.
-
Page 55: Trouble Shooting Guide
Trouble shooting guide Thread tension is too tight for thread Reduce thread tension. used. 24/27 The machine is not threaded correctly. Check the threading. Thread breaks Needles are incorrectly inserted. Insert needles fully into needle clamp 30/33 with flat side to the back. Needles are bent, blunt or the points Replace the needles. - Page 56 Guía de corrección de averías Reducir la tensión del hilo La tensión del hilo es demasiado Comprobar el enhebrado de los hilos fuerte para el hilo utilizado. Introducir las agujas con el lado El enhebrado de la máquina no es 25/28 Rotura del hilo Plano hacia atrás y hasta que quede a...
- Page 57 Hife bei Störungen Fadenspannung reduzieren. Fadenspannung zu stark für gewählten Einfädelwege überprüfen. Faden Fadenreissen Nadeln mit flacher Seite nach hinten bis 26/27 Maschine ist nicht korrekt eingefädelt. zum Anschlag einsetzen. 32/35 Nadeln sind nicht richtig eingesetzt. Nur Nadeln ELx705 verwenden. Nadeln ersetzen.
-
Page 58: Technical Data
Technical data Données techniques Stitch types: Points réalisabels: - 2 needles, 4 thread overlock with integrated - 2 aiguilles, surjet à 4 fils a avec point de safety seam sécurité intégré - 1 needle. 3-thread overlock, 3 thread rollhem. - 1 aiguille, surjet à 3 fils Ourlet roulé à 3 fils Needle system: Système d'aiguille: ELX705... -
Page 59: Dati Tecnici
Données techniques Dati tecnici Puntadas realizables: Punti realizzabili: - 2 agujas, overlock de 4 hilos con puntada de - 2 aghi, overlock a 4 fili con punto di sicurezza seguridad integrada. integrato - 1 aguja, overlock de 3 hilos, dobladillos de 3 hilos - 1 ago, overlock a 3 fili con orlo arrotolato Sistema de aguja: Sistema di aghi:... - Page 60 Technische Daten Технические данные Тип строчек: Stichmöglichkeiten: - 2 иглы, 4-х ниточный оверлочный шов с - 2 Nadeln, 4-Faden Overlock mit integrierter укрепляющей строчкой Sicherheitsnaht - 1 игла, 3-х ниточный оверлочный шов, 3-х - 1 Nadel, 3-Faden Overlock, 3-Faden Rollsaum. ниточный...
- Page 61 English The product in this manual fulfil the demands in below norms: 72/23 EEC 89/336 EEC 89/392 EEC Please pay attention on the needle area: The needle area can not be completely protected, as a totally protection will spoil the fundamental function of the overlock machine. Great caution should be shown when working in the needle area.
- Page 62 Françhaise Ce produit satisfait aux normes européennes ci-dessous mentionnées: 72/23 EEC 89/336 EEC 89/392 EEC Prenez grand soin de l'aiguille car celle-ci ne peut étre entiérement protégée sous peine d'atténuer la fonction fondamentale de la machine á coudre. Faites trés attention lorsque vous travaillez avec ou aux alentours de l'aguille. Si vous désirez changer l'aiguille, la lumiére de travail ou effectuer toute autre manipulation dans cette partie de la machine, nous vous conseillons vivement d'éteindre la machine en débranchant la prise de courant.
- Page 63 JUKI CORPORATION 2-11-1, Tsurumaki, Tama-shi, Tokyo 206-8551, JAPAN PHON: (81)42-357-2341 FAX: (81)42-357-2379 Copyright © 2012 JUKI CORPORATION. All rights reserved throughout the world. 40131848 E1P25 000912...