
Related Manuals for EverFocus ECOR264-4F1


Summary of Contents for EverFocus ECOR264-4F1
- Page 1 User Manual...
-
Page 2: Front Panel
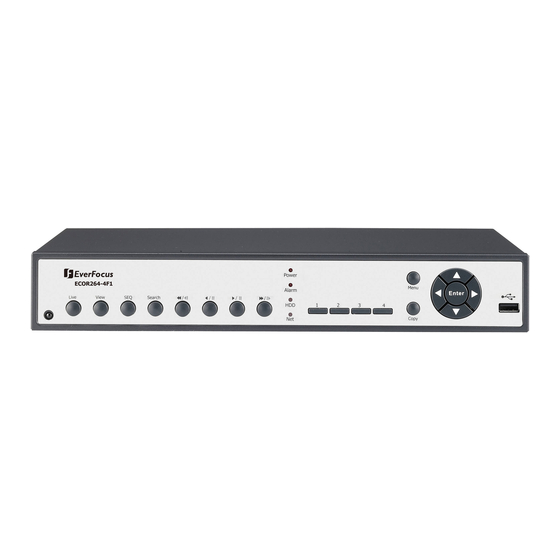
1.4 FRONT PANEL Your primary interaction with your new DVR will be through the Front Panel buttons and their corresponding buttons on the included Remote Control. Take a moment to learn where the keys are as the remainder of the manual will refer to them often. Figure 1-1 Front Panel IR Receiver: Receiver for IR remote control... - Page 3 Fast reverse playback or step reverse playback depending on playback mode. ◄◄/◄I: ◄/ I I: Reverse playback or pause ►/ I I: Forward playback or pause Fast Forward playback or step forward playback depending on playback mode. ►►/I►: DVD+RW: DVD+RW burner (D models only) POWER LED: This LED ON indicates Power on.
-
Page 4: Mouse And Front Panel Operation
Chapter 2 MOUSE AND FRONT PANEL OPERATION ECOR264-4/ECOR264-8 DVRs support multiple sources to control the DVR. It can be controlled with a mouse, the front panel, an EKB500, and the handheld remote control. This chapter will cover the basic operation using the mouse and the front panel buttons. 2.1 GENERAL USB MOUSE OPERATION 2.1.1 How to select a channel / Enable audio 1. -
Page 5: Field Input Options
Click on the icon to access the Configuration Menu. The Configuration menu screens (shown in Figure 2-2 OSD Menu) are divided into 3 main sections. Figure 2-2 OSD Menu 1 In section 1, there are ten setup options available. Move the mouse over an icon and click to select it. 2 In section 2, the categories for the selected icon will be displayed. - Page 6 Bar: Click and hold on the bar to adjust the set point Left or Right. * Note about on-screen keyboard: Click on a button to input that character. The buttons on the right and bottom have the following functions: Delete Delete the letter Done Confirm the selection...
-
Page 7: General Front Panel Operation
2.2 General Front Panel Operation 2.2.1 How to select a channel / Enable audio 1. In a view consisting of more than one channel, use the mouse or press arrow keys (Up/Down/Right/Left) to scroll through each channel that is displayed. The selected channel will be highlighted by white frame. - Page 8 Figure 2-3 OSD Menu 1 In section 1, there are ten setup options available. Use arrow keys to highlight an icon and press “Enter” to select it. 2 In section 2, the main choices for the selected icon will be displayed. Use Up/Down arrow keys to highlight a choice and press “Enter”...
- Page 9 Bar: Press “Enter” key to activate the slider, then use arrow keys to adjust the setting. Press “Enter” again to finalize the changes. * Note about on-screen keyboard: Click on a button to input that character. The buttons on the right and bottom have the following functions: Delete Delete the letter Done...
-
Page 10: General Dvr Operations
Chapter 3. GENERAL DVR OPERATIONS This chapter introduces the operations on major functions including playback, layout change, sequence, triplex operations, copy, and search. 3.1 RECORD By default, the DVR will always be in record mode. When the DVR is turned on, it will start to record. The exceptions are: 1. -
Page 11: Select Camera Operation
+ To input password using front panel: press “Enter” key to show the on-screen keyboard (see Figure 3-2 On-screen Keyboard). Use the arrow buttons to highlight each character and press the “Enter” key on the front panel to input the selected characters. When finished, highlight “Done” and press the “Enter” key on the front panel to confirm the password. - Page 12 To playback: By mouse: Right-click to bring up the menu bar and click on to enter Playback Menu. By front panel: Press key to enter Playback Menu. The playback bar will show (see figure below): 1 2 3 4 10 11 13 12 10 10 5 6 7 8 2009/05/25 09:09:30PM...
-
Page 13: General Ptz Control
Click “Delete” button 9. For Auto Pan a. Click “Auto Pan” button 10. Pattern Operation (Pattern is the “0” Tour in Everfocus and Pelco PTZ cameras) a. Click “Pattern” button 11. Steps to run a tour a. Click “Tour” button... -
Page 14: Express Control Of Ptz
c. Click “Go” button 12. Steps to remove a tour (if supported by the camera) a. Click “Tour” button b. Click the number of the desired tour c. Click “Delete” button Click “C” to clear the digit in the number display Click “X”... - Page 15 • 14, 15: PTZ tilt down • 16: PTZ pan/tilt right and down • 6: Focus closer • 10: Focus further • 7: Zoom in • 11: Zoom out REMEMBER: Click “X” at the top-right corner to hide the PTZ menu (see Express control below) Click “Exit”...
-
Page 16: Bring To Full Screen Mode
3.7 LAYOUT The ECOR264-4/ECOR264-8 DVR has a total of three display modes available. The different available layouts are shown below: (Full) (4 screens) (PIP) (9 screens)* NOTE: PIP display is not available in Playback mode To change layout, follow the steps below: By mouse: Right-click to bring up the menu bar and click then click on the desired layout choice. - Page 17 3.9 DISPLAY 1. Press Display button on menu by using mouse. 2. Press again to show status information. Please see the following table for status representation. Recording Playback Fast forward Fast backward Back pause Alarm Motion Video loss Express copy Audio out 3.
- Page 18 4. When in ZOOM mode, the mouse cursor will change to a different icon in different areas of the screen. Users can control the portion of the magnified image to be displayed by clicking directly on screen: Figure 3-4 Zoom Express Control The screen is divided into a 4x4 grid.
-
Page 19: Time Search
3.12.1 Time Search Figure 3-5 Search Menu – Time Search Play From: Select the time to begin the search by choosing the Date and Time. Click on the “Play” button to start the search. The DVR will automatically play the video being searched. The DVR will play the nearest time if there is no data in selected time. -
Page 20: Event Search
3.12.2 Event Search Figure 3-6 Search Menu – Event Search From: Select starting date and time To: Select ending date and time. Camera: Select which cameras to search for. Event: Select which event type(s) to search for. Choose from Alarm, Motion, Video Loss, or Others. Click on the “Search”... - Page 21 Prev Page: Go to previous page Next Page: Go to next page Play: Playback selected item Copy: Copy selected item 3.13 COPY To bring up Copy menu: By mouse: Right-click to bring up the menu bar and click on to enter Copy Menu. By front panel: Press the “Copy”...
- Page 22 Archive To: Select whether you want to copy to USB or DVD (CD/DVD on “D” models only). Data Size: Shows the estimated total size for the time period. Copy Now: Press “Copy” button to start archiving. Eject: Press “Eject button to eject the CD/DVD. Eject button will only appear if media type is CD/DVD. 3.14 LOGOUT Right-click to bring up the menu bar and click the button to bring up the Logout Confirmation...