
Related Manuals for Motorola Organizer


Summary of Contents for Motorola Organizer
- Page 1 User’s Guide StarTAC clipOn Organizer, Synchronization, and TrueSync Desktop www.starfish.com www.mot.com...
- Page 2 5,778,346; other patents pending. For TrueSync Desktop: U.S. patent nos. 5,519,606, 5,778,346, 5,845,257, and D388,776; other patents pending. For the StarTAC clipOn Organizer device: U.S. patent no. 4,369,516. The furnishing of the Software Product, any accompanying product, or any related documentation or materials does not give you any license to any patents.
-
Page 3: Table Of Contents
Getting started Turning on the StarTAC clipOn Organizer ....Getting started with the Setup Wizard .... - Page 4 Chapter 4 TrueSync Desktop and TrueSync Plus Introducing TrueSync technology ....Requirements ......Installing the product .
- Page 5 Chapter 8 TrueSync Desktop: Contacts view Using the Contacts view ......Cardfile basics ......Creating a cardfile .
- Page 6 Contents...
-
Page 7: Introduction
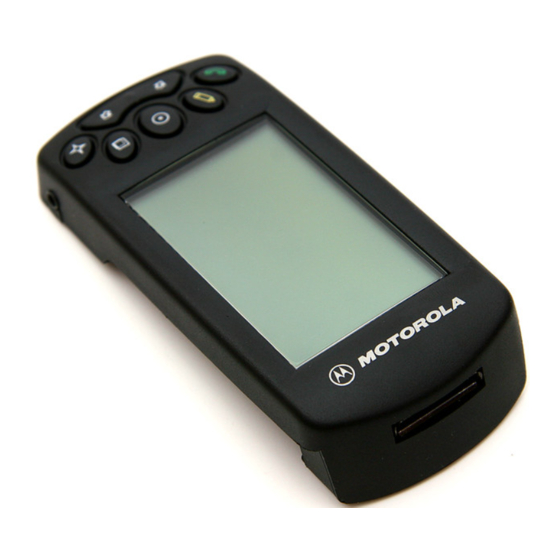
Introducing the StarTAC Congratulations on your purchase of the StarTAC clipOn Organizer. Attaching directly to your StarTAC phone, the StarTAC clipOn enables you to store, view, and edit thousands of names, numbers, appointments, notes, and tasks in a space smaller than the average wallet. -
Page 8: About Starfish Truesync Technology
About Starfish TrueSync technology TrueSync’s unique architecture provides one-step synchronization support for many popular PIMs, devices, and services (referred to as accessors). Starfish provides frequent free accessor updates, to ensure that customers can synchronize with the most recent releases of supported software and devices. -
Page 9: Getting Started
Turning on the StarTAC clipOn Organizer Turn on the StarTAC clipOn by pressing any key. The seven clipOn keys are described here: Name Home View Select Edit Call Getting started Chapter 1 Description Press to go up one level; press and hold again to return to the main (Home) screen. -
Page 10: Getting Started With The Setup Wizard
Name Back/Up Next/Down Getting started with the Setup Wizard Before using the clipOn, you will need to complete the Setup Wizard. Start the Setup Wizard by pressing any key to turn on the clipOn. In the second Wizard screen, select your user profile. Your selection determines which set of pre-defined QuickLists is offered when you add a new event, contact, or task. - Page 11 NOTE You can change your selected user profile later. To change it, open the TrueSync window (see “Starting TrueSync:” on page 37 for details), choose Client | StarTAC clipOn options, click the QuickLists tab, then click Reset and choose a new profile. The next Wizard screen confirms your profile selection.
- Page 12 Now enter your last name, using the keys described previously. After checking your entries to make sure they are correct, press The next task is to customize the time zone setting. Use to select a city in your time zone. To enter the correct date, use then press and press...
-
Page 13: Using The Clipon Home Screen And Views
The next screen shows a summary of your settings. If they are correct, press Press to enter each choice, then press area code. The clipOn will use this area code when you select a phone number to dial that includes seven digist only (does not include an area code). -
Page 14: Synchronizing With The Clipon
Synchronizing with the clipOn After you have completed the clipOn’s Setup Wizard, described in “Getting started with the Setup Wizard” on page 4, you can quickly and easily synchronize data between a desktop application, such as TrueSync Desktop or Outlook, and the clipOn. -
Page 15: Using The Startac Clipon Organizer
NOTE Telephone numbers that begin with “011” or “+” are dialed as international calls. All other telephone numbers are dialed as long distance domestic calls. key in any view to see a list of the Using the StarTAC clipOn Organizer... -
Page 16: Using Contacts
You will then see a dialog displaying the telephone number being dialed, as shown below. To end a call, press the clipOn’s phone’s End key, or close the phone. Using Contacts Using Contacts, you can view and create contact information such as names, phone numbers, and addresses. - Page 17 , highlighting the desired category with to make your choice. to scroll. to move the highlight to the field by which to choose the sort order. Using the StarTAC clipOn Organizer telephone icon indicates that you are viewing telephone information.
- Page 18 To change the information displayed in the Contacts index view: 1 In the Contacts module, use specific lettered tab. 2 Press card. Press 3 Use may need to press in the telephone field if you see a telephone icon at the upper right corner of the card).
- Page 19 Confirm the company name by pressing make a change, press , and then use , and then use when you are finished. Using the StarTAC clipOn Organizer Choose the Contact type, and then press to enter each . Press again to when you are .
- Page 20 9 Next, enter the contact’s phone, e-mail, or Web information. method, such as “Work Fax.” Then enter the phone number, e-mail address, or Web site address. If you enter a telephone number without hyphens or parentheses, such as “18315553000”, the clipOn will auto format it for you, adding hyphens and parentheses as needed, such as “1 (831) 555-3000”.
-
Page 21: Using The Calendar
Calendar event. to scroll through the details. Using the StarTAC clipOn Organizer to undo to confirm. . Calls are listed again. - Page 22 Using reminder alarms If you set a reminder alarm when you create an event in the clipOn, or set an alarm for an event in your PIM and synchronize, the clipOn alarm will remind you of that event. When an alarm sounds, go to the Home screen to read the reminder details.
- Page 23 , and then use to enter your choice. to scroll through the list and highlight a to enter your choice. to accept the Event summary. Using the StarTAC clipOn Organizer to go to a , and then use . Use to tab...
-
Page 24: Using To Do Lists
2 Press up” creates a new meeting; “Reschedule” moves the original meeting’s date. Press 3 If you are: ‹ following up or rescheduling an event, choose the new date and/or time, and press ‹ canceling an event, you will be asked if you are certain that you want to delete the event. - Page 25 To Do items you want to check off the item (or press , highlight “New To Do”, and then press , then to enter your choice. Using the StarTAC clipOn Organizer to return to the To Do , then press again to...
- Page 26 when you are finished. The subject will be added to your QuickList for this type of To Do item (task or deliverable). 4 The Confirmation screen appears. Press selection or press 5 Depending on your selections, you may now be asked to select a participant.
-
Page 27: Using Memos
Highlight an item, and then press , highlight the Reschedule or Remove option, and . If you are removing the To Do item, press to choose the new date, and press to confirm each choice. Using the StarTAC clipOn Organizer to read it,... -
Page 28: Creating A Memo
using list. 2 Press 3 To see a list of your options for a Memo, highlight the Memo, and press Creating a Memo 1 Press 2 Enter the text of the Memo. 3 Use each letter that you want to enter. Press Numbers, and to return to Letters. -
Page 29: Using Time Zones
1 Move from the Home Clock to the World Clock by using 2 Press and highlight the Append option, then press to change to a different city or time zone. Using the StarTAC clipOn Organizer . The... -
Page 30: Setting The Clock
3 Use . See “Selecting cities” on page 66 for information about changing the cities displayed in the list. Setting the clock 1 In the Time Zones module, press 2 Highlight Time Preferences and press 3 Highlight Clock Time and press 4 Use time. -
Page 31: Using Preferences
. In the Preferences screen, use to scroll through the list. Highlight your in the Preferences module. to highlight the Set Password option, then press Using the StarTAC clipOn Organizer to move move from one field to another. Highlight Set... - Page 32 3 If you want to protect the clipOn with a password, choose an option other than Disabled in the Password Lock field. Choose Disabled if you want to remove password protection. 4 To set a password, move to the Password field and press five keys.
-
Page 33: Product Care
Removing the clipOn from the phone 1 Slide the clipOn down and swing it away from the phone. 2 Lift the clipOn’s hook out of the slot on the back of the phone. Installing new batteries The clipOn is powered by two CR2430, 3-volt lithium batteries, which can last for up to nine months of average use. -
Page 34: Resetting The Clipon
7 Insert new batteries, with the positive (+) side facing up. If you do not hear a confirmation tone, you may need to reset the clipOn as described in the next section, “Resetting the clipOn”. 8 Carefully slide the battery compartment door back in until it snaps shut. -
Page 35: Charging The Phone With The Clipon Connected
After resetting, set the clock by pressing Preferences, then pressing press Charging the phone with the clipOn connected When the clipOn is connected to your phone, charge your StarTAC by plugging the charger cable into the accessory connector on the bottom of the clipOn (the cable’s release tab should face up toward the phone’s keypad). - Page 36 Chapter 3...
-
Page 37: Truesync Desktop And Truesync Plus
TrueSync Desktop Chapter 4 and TrueSync Plus TrueSync Desktop is a full-featured personal information manager (PIM) for your contact names and addresses, calendar events, tasks, calls, and memos. TrueSync Plus provides direct synchronization among your desktop applications, devices, and/or services. Both software programs accompany your purchase. -
Page 38: Requirements
Requirements Before you install TrueSync Desktop or TrueSync Plus, make sure that you have the necessary hardware and software listed here. Some features may require special configurations. To use TrueSync Desktop or TrueSync Plus, you need: ‹ A computer running Windows 95, Windows 98, or Windows NT 4.0 workstation (U.S. - Page 39 Upgrade information TrueSync Information Manager users: Installing TrueSync Desktop upgrades TrueSync Information Manager to TrueSync Desktop. Sidekick 99 users: If you decide to use TrueSync Desktop instead of Sidekick 99, you must uninstall Sidekick 99 before installing TrueSync Desktop. Installing TrueSync Desktop or TrueSync Plus: Insert the TrueSync Desktop CD-ROM into your CD-ROM drive.
-
Page 40: Uninstalling Your Product
Uninstalling your product If you want to remove TrueSync Desktop and/or TrueSync Plus from your computer, use the uninstall program, which permanently removes the product’s program components. If you have data files in the TrueSync Desktop folder (usually Program Files\Starfish\TrueSync Desktop\Userdata), it does not remove them. -
Page 41: Starting Truesync Plus
Starting TrueSync Plus Instructions for using TrueSync Plus are provided in “Synchronizing” on page About the documentation This User’s Guide provides installation instructions, a guide to synchronizing, and an overview of TrueSync Desktop. The Troubleshooter Guide helps you get started and provides access to online resources, including technical support information. - Page 42 Chapter 4...
-
Page 43: Synchronizing
Use Starfish TrueSync technology to synchronize your contact information, calendar events, tasks, and memos quickly and easily among your desktop applications, devices, and services. Synchronize directly from TrueSync Desktop or, if you prefer to synchronize data from another personal information manager such as Outlook, use TrueSync Plus. - Page 44 ‹ which files, folders or categories you want to synchronize. NOTE You can modify your selections after completing the Setup Wizard. Using the TrueSync Setup Wizard 1 Click Next in the Welcome screen. 2 Select your desktop application, such as TrueSync Desktop or Outlook.
- Page 45 10 Specify which Contacts fields you want to synchronize. For details, see on page 11 Specify the Calendar files or folders you want to synchronize. 12 Specify the Memos files or folders you want to synchronize. 13 Specify the To Do list files or folders you want to synchronize. 14 When you are satisfied with your selections, click Finish to display the TrueSync window.
-
Page 46: Changing The Truesync Setup
When you perform the first synchronization between two clients, it is recommended that you overwrite the data in one of the clients to avoid duplicate records. To learn how, see “Changing synchronization options” on page To synchronize: 1 Connect your device to your computer. Some devices may require that you turn them on before synchronizing. -
Page 47: Changing Synchronization Options
To add a client to your configuration: Choose Client | Add, then select the client from the Application, Device, or Service lists. You will be prompted to specify details about the client, such as which folders or categories to synchronize. NOTE If you do not see the client you want to add, check for availability by clicking the Windows Start button and... - Page 48 Selecting what to synchronize All data types (Calendar, Contacts, Memos, To Do items) will be synchronized unless you specifically exclude them. To exclude a data type from synchronization, choose Data | <datatype>, and check the “Do not synchronize <datatype>” option. The data type will be excluded from each synchronization until you uncheck the option.
- Page 49 4 Click on your choice from the list: The number of files, folders, or categories that you can select is limited by devices. For example, suppose you have four Contacts folders set up for synchronization to a device, the limit for that device. You then decide to synchronize another Contacts folder.
-
Page 50: Changing Your Preferences
3 Specify how to map the fields. You can choose: ‹ SmartMap SmartMap automatically maps your Contacts fields. All you have to do is choose one of the SmartMap options; your choice determines which fields to synchronize. For information about each of the SmartMap options, click the Help button. -
Page 51: Using The Truesync Log
Using the TrueSync Log The TrueSync Log displays messages about your recent synchronization sessions. The messages provide details about the progress and results of the synchronizations. Select Synchronize | Options to specify how TrueSync displays TrueSync Log entries. Click the Help button for details. To get help on error messages, highlight an error and click F1 . -
Page 52: Staying Up To Date With Truesync Central
Staying up to date with TrueSync Central TrueSync Central is your place on the Internet to: ‹ register your product electronically. ‹ get free software updates; accessories for your connected devices such as batteries, cables, and software; and the latest news about TrueSync synchronization. ‹... -
Page 53: Truesync Desktop
TrueSync Desktop Chapter 6 Using TrueSync Desktop’s features The following illustration shows the Calendar view and identifies the features common to most Desktop views. Highlight any Click buttons on the Toolbar to command on the perform tasks quickly, without menu bar and using the menus. -
Page 54: Customizing The Toolbar
Shortcut menus If you right-click certain TrueSync Desktop objects, such as a Contact card, Calendar entry, memo, or EarthTime city, a context-sensitive shortcut menu appears. These menus provide basic editing commands and other commands specific to that object or view. Customizing the Toolbar To customize the buttons on the Toolbar in the Calendar or Memos view, choose Tools | Preferences | Toolbar;... - Page 55 in the Memos and Calendar views for overall TrueSync Desktop preferences. Choose where you want the Deskpad icons. Change the display fonts for the Contacts and Memos views. Click Password at Start-Up and set a Start-up password so that only someone with the password can open TrueSync Desktop.
- Page 56 Chapter 6...
-
Page 57: Truesync Desktop: Calendar View
TrueSync Desktop: Chapter 7 Using the Calendar view The Calendar view is a powerful tool for helping you organize your appointments and other events. Use the Calendar to schedule events, set reminders, and maintain a list of To Do items and phone calls. To change to the Calendar view, click the Calendar icon on the Deskpad, press F6 , or choose View | Calendar. -
Page 58: Viewing Your Calendar
The following figure illustrates the Calendar Daily view. A magnified view of the Toolbar is shown below. The To Do pane shows the tasks you need to accomplish— including any you did not complete yesterday. The Calendar Toolbar: Save Calendar Print Schedule TrueSync... -
Page 59: The Weekly And Monthly Views
If you have changed to another date, clicking the Calendar icon returns you to today. Click the Calendar icon twice to return to today’s daily view from another Calendar view. Selecting dates in the Daily view In the Daily view, the selected date is highlighted in the mini- calendar. -
Page 60: The Yearly View
The Yearly View The Yearly view displays only multi-day events, such as vacations and conferences. Change to the Yearly view by clicking its View tab. Scheduling events Enter your appointments and scheduled events on the Events list. You can have a maximum of 288 events scheduled Chapter 7 Change to the previous or next year... -
Page 61: When You Travel: Changing Time Zones
throughout the day, and a maximum of three overlapping events starting at the same fifteen minute time slot. Create an event by typing in an empty time slot, or click the starting time to open the Schedule an Event dialog box. The bell icon indicates an alarm. -
Page 62: Entering To Do Items And Calls
calendar. If you need to phone in during a meeting in San Francisco that occurs at 2 p.m. (San Francisco time), it will appear on your calendar at 5 p.m. (New York time), so you know when to make the call. After you synchronize to your device and/or service, your device and/or service also displays the appointment times using the Local Time you chose on the desktop. -
Page 63: Truesync Desktop: Contacts View
TrueSync Desktop: Chapter 8 Using the Contacts view Use the Contacts view to manage personal information stored in cardfiles, each of which can contain full address information and numerous other details about your contacts. Once you have updated your cardfiles, you can use the TrueSync window to transfer them to your device. - Page 64 The following figure shows the Contacts view. A magnified view of the Toolbar is shown below. The index lines of cards in the current cardfile. Click one to see the card or modify its contents. Click the scroll bar Click a or letters in the cardfile’s tab scale to move in...
-
Page 65: Creating A Cardfile
Creating a cardfile When you create a cardfile, first decide what fields you want on each card. You can create all these fields yourself, or you can use a template—an empty cardfile that already has fields in place. If you select a template, you can customize it, keeping some or all of its fields and adding your own. - Page 66 box appears with a list of the fields that are set up in the cardfile. 1 Type the information for each field in the list. To move from one field to the next, use the up and down arrow keys or the Tab key.
-
Page 67: Truesync Desktop: Memos View
TrueSync Desktop: Chapter 9 Using the Memos view The Memos view lets you create memos, organize them in folders, and save them as files. You can apply formatting to your memos, and you can even create memos to merge with names from a cardfile. -
Page 68: Memo Files, Folders, And Memos
The following figure shows the Memos view. A magnified view of the Toolbar is shown below. The Memos list displays the subject lines of all memos in the current folder. Click a subject to display that memo. Click the tab of the folder you want. -
Page 69: Creating Memos
By using folders, you can organize memos according to projects, tasks, people, subject, or any other grouping. Creating memos To create a memo 1 Click the tab of the folder into which you want to place the memo. 2 Click the Add New Memo button or choose Memos | Memo | Add. - Page 70 If you do not see the ruler below the Subject, choose View | Ruler. Drag to change the left margin after the first line of a paragraph. Drag to move both left margin markers together. If you create a new paragraph by pressing Enter at the end of an existing paragraph, the new paragraph retains the margins and...
-
Page 71: Truesync Desktop: Earthtime View
TrueSync Desktop: Chapter 10 EarthTime displays a map showing daylight and nighttime around the world, and shows the current time in eight different cities you select. You can use EarthTime to calculate the difference in time between two locations, and you can configure it to show both your home location and the local time as you travel. -
Page 72: Selecting Cities
City clock for Scotts Valley. Icon indicating Home City, where you live. Icon indicating that daylight saving time is in effect. Selecting cities To change one of the displayed cities: Click the panel containing the city you want to change. 1 Click the city panel and choose Select a Different City... -
Page 73: Changing The Local Time
Changing the Local Time Change the Local Time when you travel to display all your events in the current local time. For more details, see you travel: changing time zones” on page To change the Local Time when you change time zones: 1 Set one of the eight city panels to display the local city. - Page 74 Chapter 10...
-
Page 75: Truesync Desktop: Printing
TrueSync Desktop: Chapter 11 Using the Printing options You can print from the Contacts, Calendar, or Memos views to a variety of formats, using either preprinted or customized forms. Preview your output before you print it to save time and materials. -
Page 76: Printing In Contacts View
(Weekly, Monthly, or Yearly) that you want to print and Choose File | Print. You can print using any paper size, including paper sized for your personal organizer. Printing in Contacts view You can print individual or several cards in the Contacts view. - Page 77 Printing labels, address book pages, and envelopes You can also print Contact information using almost any label, address book page, or envelope size. Templates let you print in a variety of popular label, index card, and address book formats. You can modify these formats or create your own templates.
-
Page 78: Printing In The Memos View
Printing in the Memos view To print memos, choose File | Print from the Memos view, or click the Print button on the Memos Toolbar. The Print Memos dialog box appears. You can print a single memo, all of the memos filed in specific folders, selected memos, marked memos, or, after a search operation, memos listed in the Found window. -
Page 79: Glossary
™ device A handheld information manager, such as a Palm ™ ® Organizer, REX PRO , and StarTAC clipOn Organizer. The process of matching one client’s contact fields or categories with another client’s fields or categories for synchronization. For example, you might map a field called “Home Phone”... - Page 80 Personal Information Manager. Used in this guide to refer to an organizer program that runs on your PC. ™ service An online information manager, such as Yahoo! and TrueSync.com. ™ SmartMap The technology used by TrueSync to map your client contact fields automatically for synchronization.
- Page 81 TrueSync Log A display for viewing messages resulting from your synchronization session that display in the Log pane at the bottom of the TrueSync window (if you don’t see it, check View | Log). The messages provide details on the progress and results of your synchronization.
- Page 82 Glossary...
-
Page 83: Index
To Do items and Calls Toolbar buttons TrueSync Desktop charging phone checking off To Do items cities, EarthTime cleaning cleaning screen clients, changing preferences clipOn. See StarTAC clipOn Organizer clock, clipOn setting time display Index Index... - Page 84 time zones clocks, EarthTime connecting clipOn to phone with PC Contacts adding adding cards creating new files editing icons, clipOn printing cards removing synchronizing tabs templates creating cardfiles Contacts, clipOn events events, clipOn memos Memos on clipOn To Do items and Calls To Do items, clipOn customizing Toolbars...
- Page 85 getting started, clipOn setup globe, EarthTime Go to today shortcut hardware requirements help Home Clock Home key house icon icons clipOn contacts clipOn views Toolbars index cards, printing Index View, memos installation requirements upgrading installing batteries international time zones Internet Synchronization keys, clipOn labels lettered tabs...
- Page 86 Setup Wizard clipOn TrueSync TrueSync Desktop shortcut menus sorting cards special days, viewing StarTAC clipOn Organizer basics batteries bell icon Calendar charging phone cleaning screen connecting connecting to phone Contacts device information editing text...
- Page 87 keys making a call Memos password Preferences product care removing from phone resetting Setup Wizard synchronizing To Do items turning off (Home key) turning on starting clipOn TrueSync Desktop starting times, events starting TrueSync start-up password, TrueSync Desktop status bar clipOn TrueSync Desktop synchronization...
- Page 88 View key viewing events, clipOn multi-day events special days time zones To Do items views Calendar Contacts customizing EarthTime Memos printing Calendar setting default TrueSync Desktop Web site addresses Weekly view Calendar clipOn Wizard clipOn Setup TrueSync Desktop Setup TrueSync Setup World clock world map Yearly view, Calendar...
- Page 89 In this document TrueSync Plus, TrueSync Desktop, and TrueSync Component Install are together called "PC Software". All software on the StarTAC clipOn Organizer device are together called "Device Software". This Software License Agreement, Disclaimer, and Limitation of Liability (together called "Agreement") is a legal agreement between you (an individual or a single entity) and Starfish Software, Inc.