
Related Manuals for Cushman Refresher fs2


Summary of Contents for Cushman Refresher fs2
- Page 1 OWNER’S GUIDE REFRESHER FS2 REFRESHER OASIS REFRESHER NSF 648730-C ISSUED JULY 2015 REVISED FEBRUARY 2016...
- Page 2 WELCOME Thank you for purchasing this vehicle. Before driving the vehicle, we ask you to spend some time reading this Owner’s Guide. This guide contains the information that will assist you in maintaining this highly reliable vehicle. Some illustrations may show items that are optional for your vehicle. This manual may cover the operation of several different models or show items that are optional;...
- Page 3 OWNER’S GUIDE GASOLINE POWERED VEHICLE REFRESHER FS2 REFRESHER OASIS REFRESHER NSF STARTING MODEL YEAR 2016 CALIFORNIA Proposition 65 Warning WARNING: Engine exhaust, some of its constituents, and certain vehicle components contain or emit chemicals known to the State of California to cause cancer and brith defects or other reproductive harm. In addition, certain fluids con- tained in vehicles and certain products of component wear contain or emit chemicals known to the State of California to cause cancer and birth defects or other reproductive harm.
- Page 4 NOTES This vehicle was designed and manufactured in the United States of America (USA). The standards and specifications listed in the following text originate in the USA unless other- wise indicated. Use Original Equipment Manufacturer (OEM) approved parts to keep the warranty effective. Overfilling the battery may void the warranty.
-
Page 5: Table Of Contents
GENERAL OPERATION....................3 MAINTENANCE ........................ 4 LABELS AND PICTOGRAMS................... 5 GENERAL SPECIFICATIONS SPECIFICATIONS SHEET - REFRESHER FS2 .............. 7 SPECIFICATIONS SHEET - REFRESHER 1200 NSF............. 8 SPECIFICATIONS SHEET - REFRESHER OASIS............9 VEHICLE DIMENSIONS - REFRESHER FS2 ..............10 VEHICLE DIMENSIONS - REFRESHER 1200 NSF ............11 VEHICLE DIMENSIONS - REFRESHER OASIS............ - Page 6 TABLE OF CONTENTS BEFORE INITIAL USE..................... 17 OPERATING THE VEHICLE ................... 18 Key and Headlight Switch Operation ..............19 Direction Selector Operation ................19 Accelerator Pedal Operation ................20 Brake and Parking Brake Operation ..............20 Horn Operation ....................20 12-Volt Power Outlet ...................20 STARTING AND DRIVING ....................21 Run-in .........................21 Starting Vehicle On A Hill ..................22 Coasting ......................22...
- Page 7 TABLE OF CONTENTS Trash Compartment ................... 39 Cup Dispensers ....................39 Shelves ......................39 Air Pots ....................... 39 MAINTENANCE VEHICLE CLEANING AND CARE.................. 41 REFRESHER Unit Cleaning ................41 ENVIRONMENTAL CONCERNS..................42 Battery Disposal ....................42 LIFTING THE VEHICLE....................42 WHEELS AND TIRES.....................
- Page 8 TABLE OF CONTENTS REAR AXLE........................54 Checking the Lubricant Level ................54 AIR CLEANER INSPECTION AND REPLACEMENT ............. 54 Cleaning the Air Filter Element ................54 SPARK PLUG ........................55 BRAKES .......................... 55 Periodic Brake Test .....................56 LUBRICATION......................... 56 PROLONGED STORAGE ....................57 CAPACITIES AND REPLACEMENT PARTS ..............
-
Page 9: Safety
SAFETY Read all of SAFETY and this section before attempting any procedure. Pay particular attention to Notices, Cautions, Warnings and Dangers. SAFETY GENERAL For any questions about material in this manual, contact an authorized representative. Read and understand all labels on the vehicle. Always replace any damaged or missing labels. Steep hills allow the vehicle to move at faster speeds than on a flat surface. - Page 10 All users must read and obey this manual. Make sure you give special attention to the CAUTIONS, WARNINGS and DANGERS. For questions about this vehicle, contact your E-Z-GO/CUSHMAN dealer or write to the address on the back cover of this publication, Attention: Customer Care Department.
-
Page 11: General Operation
SAFETY Read all of SAFETY and this section before attempting any procedure. Pay particular attention to Notices, Cautions, Warnings and Dangers. GENERAL OPERATION Read the following warnings before you operate the vehicle. When you leave the vehicle, turn the key to the OFF position and remove the key from the vehicle. Drive the vehicle only as fast as terrain and conditions allow. -
Page 12: Maintenance
SAFETY Read all of SAFETY and this section before attempting any procedure. Pay particular attention to Notices, Cautions, Warnings and Dangers. Remove all jewelry before you service the vehicle. Do not allow loose clothing or hair to contact the moving parts. Do not touch hot objects. -
Page 13: Labels And Pictograms
SAFETY Read all of SAFETY and this section before attempting any procedure. Pay particular attention to Notices, Cautions, Warnings and Dangers. LABELS AND PICTOGRAMS DO NOT OPERATE UNDER DRUG/ALCOHOL NO PUBLIC OPERATOR MUST FOR INFORMATION INFLUENCE ROAD USE BE MIN 150 CM REFER TO OWNERS 614121 MANUAL OR... - Page 14 SAFETY Read all of SAFETY and this section before attempting any procedure. Pay particular attention to Notices, Cautions, Warnings and Dangers. Notes: Owner’s Guide...
-
Page 15: General Specifications
GENERAL SPECIFICATIONS Read all of SAFETY and this section before attempting any procedure. Pay particular attention to Notices, Cautions, Warnings and Dangers. GENERAL SPECIFICATIONS SPECIFICATIONS SHEET - REFRESHER FS2 MODEL: REFRESHER ® TYPE: GASOLINE POWERED REFRESHMENT VEHICLE MODEL YEAR: 2016 Option Part No: 634187 &... -
Page 16: Specifications Sheet - Refresher 1200 Nsf
GENERAL SPECIFICATIONS Read all of SAFETY and this section before attempting any procedure. Pay particular attention to Notices, Cautions, Warnings and Dangers. SPECIFICATIONS SHEET - REFRESHER 1200 NSF ® MODEL: REFRESHER 1200 NSF TYPE: GASOLINE POWERED REFRESHMENT VEHICLE MODEL YEAR: 2016 Option Part No: 635617 &... -
Page 17: Specifications Sheet - Refresher Oasis
GENERAL SPECIFICATIONS Read all of SAFETY and this section before attempting any procedure. Pay particular attention to Notices, Cautions, Warnings and Dangers. SPECIFICATIONS SHEET - REFRESHER OASIS MODEL: REFRESHER OASIS ® TYPE: GASOLINE POWERED REFRESHMENT VEHICLE MODEL YEAR: 2016 Option Part No: 648341 & Base Refresher 633911 PRODUCT SPECIFICATION CONFIGURATION HIGHLIGHTS Refresher Unit Overview: Refresher unit designed for inventory of unopened, pre-packaged, non-perishable foods for distribution through daily use. -
Page 18: Vehicle Dimensions - Refresher Fs2
GENERAL SPECIFICATIONS Read all of SAFETY and this section before attempting any procedure. Pay particular attention to Notices, Cautions, Warnings and Dangers. VEHICLE DIMENSIONS - REFRESHER FS2 76.5 in. (194.3 cm) 48.5 in. (123.2 cm) Front 77.0 in. (196.0 cm) 37.0 in. -
Page 19: Vehicle Dimensions - Refresher 1200 Nsf
GENERAL SPECIFICATIONS Read all of SAFETY and this section before attempting any procedure. Pay particular attention to Notices, Cautions, Warnings and Dangers. VEHICLE DIMENSIONS - REFRESHER 1200 NSF 74.5 in. (189 cm) 48.6 in. (123 cm) Front 77.0 in. (196 cm) 37.0 in. -
Page 20: Vehicle Dimensions - Refresher Oasis
GENERAL SPECIFICATIONS Read all of SAFETY and this section before attempting any procedure. Pay particular attention to Notices, Cautions, Warnings and Dangers. VEHICLE DIMENSIONS - REFRESHER OASIS 73 in. (185 cm) 49 in. (123 cm) Front 77 in. (196 cm) 37 in. -
Page 21: Turning Diameter And Incline Information - All Models
GENERAL SPECIFICATIONS Read all of SAFETY and this section before attempting any procedure. Pay particular attention to Notices, Cautions, Warnings and Dangers. TURNING DIAMETER AND INCLINE INFORMATION - ALL MODELS RECOMMENDED MAX RAMP GRADE RECOMMENDED MAX SIDE TILT 25% or 14 MAX 25% or 14 MAX TURNING CLEARANCE DIAMETER 22.0 ft. - Page 22 GENERAL SPECIFICATIONS Read all of SAFETY and this section before attempting any procedure. Pay particular attention to Notices, Cautions, Warnings and Dangers. Notes: Owner’s Guide...
-
Page 23: Introduction
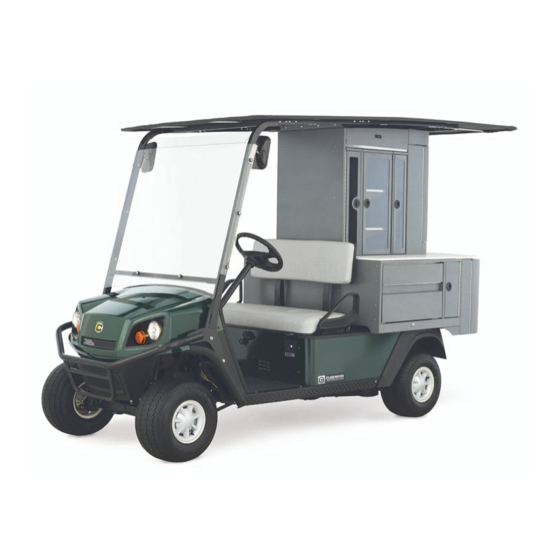
Read all of SAFETY and this section before attempting any procedure. Pay particular attention to Notices, Cautions, Warnings and Dangers. INTRODUCTION REFRESHER VEHICLE OVERVIEW Welcome to your new Cushman Refresher. The innovative Refresher® is a mobile, customizable profit-making club- house. The Refresher unit is designed for inventory of unopened, pre-packaged, non-perishable foods for distribution through daily use. -
Page 24: Accelerator Pedal
INTRODUCTION Read all of SAFETY and this section before attempting any procedure. Pay particular attention to Notices, Cautions, Warnings and Dangers. 6. Accelerator Pedal The accelerator pedal allows the operator to increase the speed of the vehicle. 7. Brake and Parking Brake Pedal The brake pedal is a combination brake and parking brake pedal. -
Page 25: Operating Procedures
OPERATING PROCEDURES Read all of SAFETY and this section before attempting any procedure. Pay particular attention to Notices, Cautions, Warnings and Dangers. OPERATING PROCEDURES SERIAL NUMBER LOCATION Three serial number and manufacture date code labels are on the vehicle. PARTS A and B are on the crossmember sec- tion of the chassis on the driver side. -
Page 26: Operating The Vehicle
OPERATING PROCEDURES Read all of SAFETY and this section before attempting any procedure. Pay particular attention to Notices, Cautions, Warnings and Dangers. Before a new vehicle is put into operation, complete the items shown in the INITIAL SERVICE CHART. INITIAL SERVICE CHART Item Service Operation Battery... -
Page 27: Key And Headlight Switch Operation
OPERATING PROCEDURES Read all of SAFETY and this section before attempting any procedure. Pay particular attention to Notices, Cautions, Warnings and Dangers. Make sure the direction selector is in correct position before you press the accelerator pedal. Make sure you completely stop the vehicle before you move the direction selector to a different position. -
Page 28: Accelerator Pedal Operation
OPERATING PROCEDURES Read all of SAFETY and this section before attempting any procedure. Pay particular attention to Notices, Cautions, Warnings and Dangers. Accelerator Pedal Operation Accidental movement of the accelerator pedal can cause the vehicle to suddenly move and cause severe injury or death. -
Page 29: Starting And Driving
OPERATING PROCEDURES Read all of SAFETY and this section before attempting any procedure. Pay particular attention to Notices, Cautions, Warnings and Dangers. STARTING AND DRIVING To reduce the possibility of roll-back which could result in severe injury or vehicle damage, do not release service brake until engine has started. -
Page 30: Starting Vehicle On A Hill
OPERATING PROCEDURES Read all of SAFETY and this section before attempting any procedure. Pay particular attention to Notices, Cautions, Warnings and Dangers. Cold-Start The use of a choke may be necessary to start a cold engine. Press the accelerator 1 inch (2.5 cm) or until the starter begins to operate. Pull the choke out if needed. -
Page 31: Fuel
OPERATING PROCEDURES Read all of SAFETY and this section before attempting any procedure. Pay particular attention to Notices, Cautions, Warnings and Dangers. FUEL To decrease the risk of severe injury or death from improper fuel handling: Do not smoke near the fuel tank. Do not add fuel near open flame or electrical items that can cause a spark. -
Page 32: Late Production Fuel Tank
OPERATING PROCEDURES Read all of SAFETY and this section before attempting any procedure. Pay particular attention to Notices, Cautions, Warnings and Dangers. Late Production Fuel Tank Late production fuel tanks can be identified by the location of the fuel cap which is located in the rear of the top of the tank as shown. -
Page 33: Refresher Vehicle Overview
OPERATING PROCEDURES Read all of SAFETY and this section before attempting any procedure. Pay particular attention to Notices, Cautions, Warnings and Dangers. REFRESHER VEHICLE OVERVIEW The REFRESHER FS2 unit consists of: • windshield with frame • struts and canopy top •... -
Page 34: Emissions Labels And Engine Access
Read all of SAFETY and this section before attempting any procedure. Pay particular attention to Notices, Cautions, Warnings and Dangers. Emissions Labels and Engine Access REFRESHER FS2 Remove the side drawer from its position to view the engine REFRESHER FS2 compartment. -
Page 35: Refreshment Unit Operation - Fs2
OPERATING PROCEDURES Read all of SAFETY and this section before attempting any procedure. Pay particular attention to Notices, Cautions, Warnings and Dangers. REFRESHMENT UNIT OPERATION – FS2 Lock-Down Mechanism Countertop: The passenger side countertop is removable for module replacement. To remove, lift the countertop up and remove from the hinge support. - Page 36 OPERATING PROCEDURES Read all of SAFETY and this section before attempting any procedure. Pay particular attention to Notices, Cautions, Warnings and Dangers. No tools are needed for module removable and installation. Passenger side countertop must be removed and module clamps released prior to removal of any module. Modules can be arranged in any order NO TOOLS REQUIRED to make different combinations...
- Page 37 OPERATING PROCEDURES Read all of SAFETY and this section before attempting any procedure. Pay particular attention to Notices, Cautions, Warnings and Dangers. Passenger side countertop must be removed and module clamp must be loosened before attempting module removal. 12” and 18” Center Module: Both the 12” and 18”...
-
Page 38: Slide Out Compartments
OPERATING PROCEDURES Read all of SAFETY and this section before attempting any procedure. Pay particular attention to Notices, Cautions, Warnings and Dangers. Slide Out Compartments 6” Pull Out Module: This module has a pull out board inside; it is equipped with slide rails for pull out access for cleaning and or refilling. -
Page 39: Removable Shelves And Inserts - Fs2
OPERATING PROCEDURES Read all of SAFETY and this section before attempting any procedure. Pay particular attention to Notices, Cautions, Warnings and Dangers. Removable Shelves and Inserts – FS2 6” Pull Out Module Pull out slide board for product storage Movable hanger inserts for custom product payout Pull out access on both Rear End Cap... - Page 40 OPERATING PROCEDURES Read all of SAFETY and this section before attempting any procedure. Pay particular attention to Notices, Cautions, Warnings and Dangers. Rear End Cap (above Trash Can) a. Bottom insert: This insert has two functional sides, one side is for beverage canisters and miscellaneous accessories and the opposite side is for various bottling/accessories.
- Page 41 OPERATING PROCEDURES Read all of SAFETY and this section before attempting any procedure. Pay particular attention to Notices, Cautions, Warnings and Dangers. 6” Pull Out Module a. Hanger Inserts: There are removable hanger inserts located inside the 6" pull out module. The hangers can be positioned as desired following the hole inserts provided on board.
-
Page 42: Compartment Storage - Fs2
OPERATING PROCEDURES Read all of SAFETY and this section before attempting any procedure. Pay particular attention to Notices, Cautions, Warnings and Dangers. Compartment Storage – FS2 Rear End Cap (above Trash Can): The shelving in this unit can be used for various storage needs. The side doors can be used for mini bottles, snacks, chips, etc. - Page 43 OPERATING PROCEDURES Read all of SAFETY and this section before attempting any procedure. Pay particular attention to Notices, Cautions, Warnings and Dangers. 6” Cup Module: This shelving unit is for cup storage only. It features five cup racks. This unit is not intended for anything that requires temperature cooling or heating.
-
Page 44: Drawer Operation - Fs2
OPERATING PROCEDURES Read all of SAFETY and this section before attempting any procedure. Pay particular attention to Notices, Cautions, Warnings and Dangers. Side Drawer Compartment: The side drawer compartment is for cooled products, such as ice and beverages. An optional removable Slide Tray sliding tray is available for additional storage of miscellaneous cooled products. -
Page 45: Trash/Recycle Operation - All Models
OPERATING PROCEDURES Read all of SAFETY and this section before attempting any procedure. Pay particular attention to Notices, Cautions, Warnings and Dangers. Trash/Recycle Operation – All Models Trash Can Pull Out: The trash can/recycle housing is equipped with slide rails on each side for pull out access. Inside the housing are two removable trash cans for waste storage. -
Page 46: Cleaning Compartments
OPERATING PROCEDURES Read all of SAFETY and this section before attempting any procedure. Pay particular attention to Notices, Cautions, Warnings and Dangers. CLEANING COMPARTMENTS The REFRESHER unit should be maintained and cleaned after each use. • Trashcan: The waste area needs to be cleaned with commercial safe detergent or any other safe liquid cleaner. -
Page 47: Consumable Ice Bin
OPERATING PROCEDURES Read all of SAFETY and this section before attempting any procedure. Pay particular attention to Notices, Cautions, Warnings and Dangers. Consumable Ice Bin Open This feature is standard or optional depending on the REFRESHER model. The consumable ice bin is for consumable ice only and should not be used for canned drinks or other products. - Page 48 OPERATING PROCEDURES Read all of SAFETY and this section before attempting any procedure. Pay particular attention to Notices, Cautions, Warnings and Dangers. Notes: Owner’s Guide...
-
Page 49: Maintenance
MAINTENANCE Read all of SAFETY and this section before attempting any procedure. Pay particular attention to Notices, Cautions, Warnings and Dangers. MAINTENANCE VEHICLE CLEANING AND CARE Read and understand all instructions supplied by the manufacturer of the pressure washer before use. -
Page 50: Environmental Concerns
MAINTENANCE Read all of SAFETY and this section before attempting any procedure. Pay particular attention to Notices, Cautions, Warnings and Dangers. ENVIRONMENTAL CONCERNS As a responsible user, practice respect for all wildlife and their habitat. Respect private property and comply with all local laws and regulations governing the use of light duty utility vehicles. Always be respectful of the environment. - Page 51 MAINTENANCE Read all of SAFETY and this section before attempting any procedure. Pay particular attention to Notices, Cautions, Warnings and Dangers. How to lift the entire vehicle: Install the wheel chocks in front and behind each front wheel. Put the jack below the center of the rear frame crossmember. Lift the vehicle enough to put jack stands below the outer ends of the rear axle as shown.
-
Page 52: Wheels And Tires
MAINTENANCE Read all of SAFETY and this section before attempting any procedure. Pay particular attention to Notices, Cautions, Warnings and Dangers. WHEELS AND TIRES To decrease the risk of tire explosion, do not exceed the tire inflation pressure rating on the tire sidewall. -
Page 53: Wheel Installation
MAINTENANCE Read all of SAFETY and this section before attempting any procedure. Pay particular attention to Notices, Cautions, Warnings and Dangers. Wheel Installation Valve Stem Cap To decrease the risk of component damage, do not tighten lug nuts to more than 85 ft. lbs. (115 Nm) torque. Always follow the cross-sequence pattern when you install the lug nuts to make sure the wheel is evenly seated against the hub. -
Page 54: Taillight
MAINTENANCE Read all of SAFETY and this section before attempting any procedure. Pay particular attention to Notices, Cautions, Warnings and Dangers. Taillight Roll Rubber To replace the taillight and brake light bulb, roll the rubber bezel from around the edge Bezel Away of the taillight and remove the lens. -
Page 55: Neutral Lock
MAINTENANCE Read all of SAFETY and this section before attempting any procedure. Pay particular attention to Notices, Cautions, Warnings and Dangers. Neutral Lock To prevent the driven clutch from turning the rear wheels during service operations, a neutral lock is located on the direction selec- tor. -
Page 56: Routine Maintenance
MAINTENANCE Read all of SAFETY and this section before attempting any procedure. Pay particular attention to Notices, Cautions, Warnings and Dangers. Disconnect the negative battery terminal before you service the vehicle to prevent accidental operation. Wear eye protection when you service the vehicle. Be careful when you do work around batteries, use solvents or compressed air. -
Page 57: Engine Specifications
MAINTENANCE Read all of SAFETY and this section before attempting any procedure. Pay particular attention to Notices, Cautions, Warnings and Dangers. Engine Specifications Engine Model ...........FJ400D Type.............Four cycle, OHV Number of Cylinders............ 1 Displacement............401 cc Rated Horsepower ..........13 hp Spark Plug Type ........ -
Page 58: Changing The Oil
MAINTENANCE Read all of SAFETY and this section before attempting any procedure. Pay particular attention to Notices, Cautions, Warnings and Dangers. Changing the Oil Tool List Qty. Tool List Qty. Socket, 19 mm ............1 Oil Filter Wrench ............1 Ratchet ................ - Page 59 MAINTENANCE Read all of SAFETY and this section before attempting any procedure. Pay particular attention to Notices, Cautions, Warnings and Dangers. Clean the area around filter. Use a filter wrench (3) to remove the filter (4) from the engine and allow the oil to drain. The O-ring (5) may have remained on engine (6) or filter (7).
-
Page 60: Starter/Generator Belt Tension
MAINTENANCE Read all of SAFETY and this section before attempting any procedure. Pay particular attention to Notices, Cautions, Warnings and Dangers. STARTER/GENERATOR BELT TENSION Tool List Qty. Required Belt Tension Gauge ............. 1 Ratchet................ 1 Wrench, 3/4"..............1 Socket, 3/4" ..............1 Wrench, 9/16".............. -
Page 61: Air Intake And Cooling Fins
MAINTENANCE Read all of SAFETY and this section before attempting any procedure. Pay particular attention to Notices, Cautions, Warnings and Dangers. To reduce the possibility of a battery explosion, do not use a metallic spray wand to clean the bat- tery and keep all smoking materials, open flame or sparks away from the battery. -
Page 62: Rear Axle
MAINTENANCE Read all of SAFETY and this section before attempting any procedure. Pay particular attention to Notices, Cautions, Warnings and Dangers. REAR AXLE The rear axle has a lubricant level check plug located on the driver side at the rear of the housing. Unless leakage of rear axle lubricant is evident, an annual lubricant check is sufficient. -
Page 63: Spark Plug
MAINTENANCE Read all of SAFETY and this section before attempting any procedure. Pay particular attention to Notices, Cautions, Warnings and Dangers. Access the air cleaner element by unsnapping the clips on the air canister and removing the cover and air filter element. Air Filter Clean inside of cover, canister and dust collector. -
Page 64: Periodic Brake Test
MAINTENANCE Read all of SAFETY and this section before attempting any procedure. Pay particular attention to Notices, Cautions, Warnings and Dangers. Periodic Brake Test Dry, Level, Clean, Paved Surface Accelerate to maximum speed. The REFRESHER unit must be empty, all drawers and doors secured, and passenger side countertop removed prior to performing the periodic brake test. -
Page 65: Prolonged Storage
MAINTENANCE Read all of SAFETY and this section before attempting any procedure. Pay particular attention to Notices, Cautions, Warnings and Dangers. PROLONGED STORAGE Do not handle fuel in an area that is not adequately ventilated. Do not smoke near the fuel tank or refuel near open flame or electrical items which could produce a spark. -
Page 66: Capacities And Replacement Parts
MAINTENANCE Read all of SAFETY and this section before attempting any procedure. Pay particular attention to Notices, Cautions, Warnings and Dangers. CAPACITIES AND REPLACEMENT PARTS CAPACITIES REPLACEMENT PARTS FS2, NSF, OASIS Fuel Tank 6 gal (22.7 L) 87 Octane LED Headlight Bulb P/N 619101 (early production) FS2, NSF, OASIS Fuel Tank... - Page 67 MAINTENANCE Read all of SAFETY and this section before attempting any procedure. Pay particular attention to Notices, Cautions, Warnings and Dangers. Notes: Owner’s Guide...
- Page 68 MAINTENANCE Read all of SAFETY and this section before attempting any procedure. Pay particular attention to Notices, Cautions, Warnings and Dangers. Notes: Owner’s Guide...
-
Page 69: Periodic Service Schedule
PERIODIC SERVICE SCHEDULE Read all of SAFETY and this section before attempting any procedure. Pay particular attention to Notices, Cautions, Warnings and Dangers. PERIODIC SERVICE SCHEDULE PERIODIC SERVICE SCHEDULE - CHECK C&A - CHECK & ADJUST CL - CLEAN R - REPLACE REMARKS Tires - Check pressure and inspect condition of tires &... - Page 70 PERIODIC SERVICE SCHEDULE Read all of SAFETY and this section before attempting any procedure. Pay particular attention to Notices, Cautions, Warnings and Dangers. REMARKS Front Wheel Alignment - Inspect for unusual tire wear. C&A C&A C&A King Pins - Check for excessive play and tightness of retaining nuts. Rear Axle - Check for unusual noise and loose/missing mounting hardware.
- Page 71 PERIODIC SERVICE SCHEDULE Read all of SAFETY and this section before attempting any procedure. Pay particular attention to Notices, Cautions, Warnings and Dangers. Notes: Owner’s Guide...
- Page 72 PERIODIC SERVICE SCHEDULE Read all of SAFETY and this section before attempting any procedure. Pay particular attention to Notices, Cautions, Warnings and Dangers. Notes: Owner’s Guide...
-
Page 73: Declaration Of Conformity
APPENDIX A Read all of SAFETY and this section before attempting any procedure. Pay particular attention to Notices, Cautions, Warnings and Dangers. APPENDIX A DECLARATION OF CONFORMITY Owner’s Guide... - Page 74 APPENDIX A Read all of SAFETY and this section before attempting any procedure. Pay particular attention to Notices, Cautions, Warnings and Dangers. Owner’s Guide...
- Page 75 APPENDIX A Read all of SAFETY and this section before attempting any procedure. Pay particular attention to Notices, Cautions, Warnings and Dangers. Owner’s Guide...
- Page 76 APPENDIX A Read all of SAFETY and this section before attempting any procedure. Pay particular attention to Notices, Cautions, Warnings and Dangers. Notes: Owner’s Guide...
- Page 79 Normal use, age, wear or abuse can cause some components on the vehicle to fail. The manufacturer can not know all possi- ble component failures or the methods that failures can occur. A vehicle in need of repair does not operate correctly and can be dangerous.
- Page 80 E-Z-GO Division of Textron Inc. 1451 Marvin Griffin Road, Augusta, Georgia 30906-3852 USA CONTACT US: North America: Technical Assistance & Warranty Phone: 1-800-774-3946, FAX: 1-800-448-8124 Service Parts Phone: 1-888-GETEZGO (1-888-438-3946), FAX: 1-800-752-6175 International: Phone: 001-706-798-4311, FAX: 001-706-771-4609 Service Parts Manuals, as well as Repair and Service Manuals are available from a local Distributor, an authorized Branch, Genuine E-Z-GO Parts &...