Table of Contents
Advertisement
Quick Links
Advertisement
Table of Contents

Related Manuals for Cushman Refresher FS2


Summary of Contents for Cushman Refresher FS2
- Page 1 Owner’s Guide REFRESHER 653038 – ISSUED AUGUST 2016...
- Page 2 Read and comply with all of the instructions and safety precautions in this manual and on all product labels. Failure to follow the safety precautions could result in serious injury or death. CALIFORNIA Proposition 65 Engine exhaust, some of its constituents, and certain vehicle components contain or emit chemicals known to the State of California to cause cancer and birth defects or other reproductive harm.
- Page 3 OWNER’S GUIDE GASOLINE Refresher FS2 Refresher OASIS Refresher NSF Starting MODEL YEAR 2017 CONTACT INFORMATION: Textron Specialized Vehicles, Inc. 1451 Marvin Griffin Road Augusta, Georgia 30906 USA NORTH AMERICA Technical Assistance & Warranty: 1-800-774-3946 Service Parts PHONE: 1-888-438-3946 International PHONE: 001-706-798-4311...
- Page 4 ELCOME Thank you for purchasing a CUSHMAN vehicle. Before driving your new vehicle, read this owner’s manual to familiar- ize yourself with safe driving practices, operation, features and controls. This manual contains instructions for minor maintenance only. Information about major repairs can be found in the repair manual.
-
Page 5: Table Of Contents
ABLE OF ONTENTS INTRODUCTION MANUFACTURER’S INTENDED USE ........................7 WARRANTY AND REGISTRATION ......................... 7 EXHAUST EMISSIONS ............................7 BATTERY PROLONGED STORAGE ........................7 BATTERY DISPOSAL ............................... 8 VEHICLE IDENTIFICATION NUMBERS .........................8 REPAIR AND PARTS MANUALS ..........................8 SAFETY SAFETY LABELS ..............................9 Operation (P/N 651654) ............................ - Page 6 DRIVING IN REVERSE ............................26 PARKING THE VEHICLE ............................26 BATTERY ................................26 REFRESHER UNIT REFRESHER UNIT OVERVIEW ..........................27 UNIT COMPONENTS - REFRESHER FS2 ......................27 UNIT COMPONENTS - REFRESHER NSF AND OASIS ..................27 SERIAL NUMBER LOCATION ..........................27 EMISSIONS LABELS AND ENGINE ACCESS .......................27...
- Page 7 ABLE OF ONTENTS REFRESHER FS2 ............................27 REFRESHER NSF and OASIS ........................28 REFRESHER UNIT OPERATION – FS2 ........................28 Lock-Down Mechanism ........................... 28 Module Removal and Installation – FS2 ......................28 Slide Out Compartments ..........................30 Removable Shelves and Inserts – FS2 ......................32 Drawer Operation –...
- Page 8 Discharged Battery ............................61 Battery Disposal ..............................61 Battery Storage ...............................61 TRANSPORTING THE VEHICLE ...........................61 Hauling the Vehicle ............................61 Towing the Vehicle ............................62 VEHICLE STORAGE ..............................62 Remove from Storage .............................63 SPECIFICATIONS REFRESHER FS2 - VEHICLE SPECIFICATIONS ....................65 SPECIFICATIONS REFRESHER OASIS - VEHICLE SPECIFICATIONS .....................67...
-
Page 9: Manufacturer's Intended Use
AFETY INTRODUCTION The following symbols appear throughout this manual and on vehicle labels. Your safety is involved when these sym- bols are used. Become familiar with their meanings before reading the manual. DANGER indicates a hazardous situation that, if not avoided, will result in death or seri- ous injury. -
Page 10: Battery Disposal
NTRODUCTION BATTERY DISPOSAL Lead-acid batteries are recyclable. Return discarded batteries to distributor, manufacturer or lead smelter for recy- cling. For neutralized spills, put residue in acid-resistant containers with absorbent material such as sand. Dispose in accordance with local, state and federal regulations for acid and lead compounds. Contact local or state environmen- tal authorized people for the disposal information. -
Page 11: Safety
AFETY SAFETY For questions about your vehicle or the material in this manual, see the contact information on page 1 or the back of this publication. Certain replacement parts can be used independently and/or in combination with other accessories to modify aTSV manufactured vehicle to permit the vehicle to operate at or in excess of 20 mph. -
Page 12: Operation (P/N 608529) (If Equipped With Card Holder)
AFETY Operation (P/N 608529) (If equipped with card holder) Located on the steering wheel. OPERATING INSTRUCTIONS 608529 BEFORE OPERATING READ all warning labels and the owner’s manual. Contact an authorized dealer or go the the manufacturer’s website for a replacement manual. This vehicle is equipped for personal use in most communities. -
Page 13: Maximum Cargo Load / Maximum Weight Capacity
AFETY MAXIMUM CARGO LOAD / MAXIMUM WEIGHT CAPACITY Exceeding the weight capacities can cause loss of vehicle control and possible injury or death. REFRESHER FS2 Vehicle Load Capacity 775 lbs. (352 kg) REFRESHER OASIS Vehicle Load Capacity 1066 lbs. (483.53 kg) •... -
Page 14: Unauthorized Operation
AFETY • Remove the ignition key when the vehicle is not in use to prevent accidental starting, unauthorized use by someone below the age of 16, or someone without a driver’s license and proper training. • Drive the vehicle at appropriate speeds for the terrain and conditions. Be aware of environmental conditions that change the terrain and your ability to control the vehicle. -
Page 15: Operating With A Load
AFETY Follow all inspection and maintenance procedures and schedules described in this owner’s manual. See SCHED- ULED MAINTENANCE on page 45. Operating with a Load The weight of cargo and occupants affects vehicle operation. Carefully calculate how the vehicle is loaded and how to safely operate it. -
Page 16: Driving On Pavement
AFETY Driving on Pavement Driving the vehicle on paved surfaces can affect handling characteristics and increase tire wear. If possible, avoid driving on paved surfaces. If unavoidable, drive slowly, travel short distances and avoid sudden turns or stops. Driving on Public Roads Driving this vehicle on public streets, roads or highways could result in a collision with another vehicle. -
Page 17: Maintenance Safety
AFETY MAINTENANCE SAFETY Routine and scheduled maintenance of this vehicle is necessary to keep your vehicle in safe and reliable condition. This section of the manual provides safety information for performing maintenance on your vehicle. Make sure you read, understand and comply with all of this information to decrease the risk of personal injury or death. Serious injury or death can occur if you do not follow the instructions and procedures shown in this owner’s manual. - Page 18 AFETY...
-
Page 19: Features And Controls
EATURES AND ONTROLS FEATURES AND CONTROLS NOTICE: Some accessories continue to operate with the key in the OFF position. Leaving these accessories activated after the vehicle is shut down can cause the battery to discharge. KEY SWITCH Fuel Horn Light Gauge Switch Switch... -
Page 20: Steering Wheel
EATURES AND ONTROLS STEERING WHEEL Steering Wheel The steering wheel allows the driver to control the Turn Signal Switch direction of travel. Cup Holder TURN SIGNAL (If Equipped) The turn signal switch is located on the steering column and is used to activate the turn signals. HYDRAULIC BRAKES (If Equipped) Some vehicles are equipped with optional... -
Page 21: Direction Selector
EATURES AND ONTROLS DIRECTION SELECTOR The direction selector is on the seat panel and allows the opera- tor to select F (forward) or R (reverse) to control the direction of travel. Direction The direction selector has a reverse warning buzzer that acti- Selector vates when in the R position. - Page 22 EATURES AND ONTROLS...
-
Page 23: Operation
PERATION OPERATION SAFETY Failure to operate the vehicle correctly can result in a collision, loss of control, accident or rollover, and cause serious injury or death. Follow all operation procedures in this section of the manual. Read and comply with all safety warnings in the safety section of this owner’s manual. -
Page 24: Cvt Belt Break-In
PERATION • Avoid long operating times at the same engine speed. • Avoid long operating times with a full load. • Vary the engine speed during operation. • Apply quick bursts of acceleration after the engine has warmed up. CVT BELT BREAK-IN The CVT belt break-in period is the first hour of operation on each new belt. -
Page 25: Choke Operation / Cold-Starting
PERATION NOTICE: When the direction selector is moved to the reverse position, a warning alarm will activate to indi- cate that the vehicle is ready to run in reverse. If vehicle is equipped with hydraulic brakes then the hand operated parking brake will need to be released, slowly press the accelerator pedal to start the engine. -
Page 26: Driving Procedure
PERATION DRIVING PROCEDURE Perform the pre-ride inspection. See page 21. Sit in the driver’s seat. Check surroundings and determine the path of travel. If the vehicle is equipped with hydraulic brake then the hand operated parking brake will need to be released. Insert the key and turn to the ON position. -
Page 27: Traversing Hillsides
PERATION • Keep both feet on the floor or a pedal. • Check the terrain before driving up a hill. Do not try to climb hills that have excessively slippery or loose surfaces. • Drive at a steady rate of acceleration and speed. •... -
Page 28: Driving In Reverse
PERATION DRIVING IN REVERSE When driving in reverse, follow these guidelines: • Check that the area behind the vehicle is clear of obstacles and people. • Check left and right fields of vision before driving in reverse. • Do not back down a steep hill. •... -
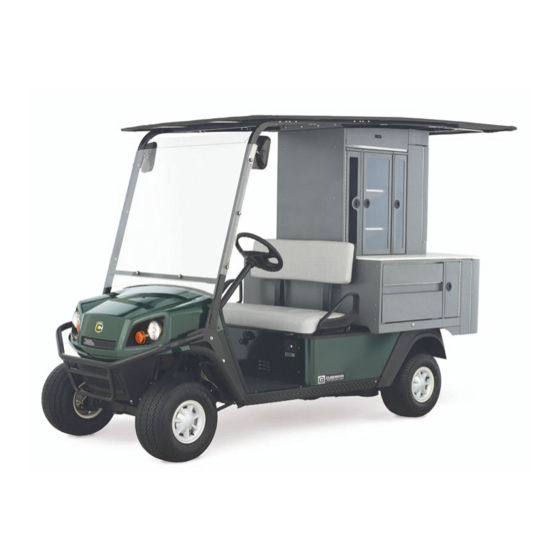
Page 29: Refresher Unit
It is not intended for long term food storage or storage of opened food and beverage items. Adherence to local food handling regulations is required. UNIT COMPONENTS - REFRESHER FS2 • windshield with frame • struts and canopy top •... -
Page 30: Refresher Nsf And Oasis
EFRESHER REFRESHER NSF and OASIS The emissions label for these models is under the seat. Lift the seat for access. REFRESHER UNIT OPERATION – FS2 Lock-Down Mechanism • Counter-top: The passenger side counter-top is removable for module Lift up passenger replacement. - Page 31 EFRESHER Modules can be arranged in any combination NO TOOLS REQUIRED of the 6” cup, 12”, 18” or 6” pull through modules up to total of 24” wide. Module Clamp 6” Cup Module 12” - 18” Center Module Dimple Boss - located on the bottom 6”...
-
Page 32: Slide Out Compartments
EFRESHER • 12” and 18” Center Module: Both the 12” and 18” modules are aligned by Dimple Boss four dimple bosses on the bottom. Removal of (all four corners) the larger units may require a second person to help support the module. Push upward slightly to nudge the dimple bosses free, while pulling the module out of the unit. - Page 33 EFRESHER • Rear End Cap (Trash Can): The unit is equipped with a 10-lb rated latch, installed at the back of the trash can housing. A pulling force exceeding 10 lbs is needed to release the latch and allow the trash can housing to slide out.
-
Page 34: Removable Shelves And Inserts - Fs2
EFRESHER Removable Shelves and Inserts – FS2 Rear End Cap 12” - 18” Center Module Double door opening with Reversible bottom insert shelving on both sides 12” and 18” interchangeable Middle storage shelving Adjustable shelving support Reversible bottom insert for selective storage needs 6”... - Page 35 EFRESHER • 18” Module and 12” Center Module • 12" Center: The shelf insert can be adjusted for custom compartment spacing or removed completely from the module. Each 12" module comes equipped with two shelves. • 18" Center: The shelf inserts can be adjusted for custom compartment spacing or removed completely from the module.
-
Page 36: Drawer Operation - Fs2
EFRESHER Drawer Operation – FS2 • Lower Side Drawer: To open the side drawer, use BOTH hands in the open palm position with finger tips under the bar. Pull up with fingers and the slide the drawer out. The bar lever is spring loaded and upon release, locks the drawer in place. -
Page 37: Compartment Storage - Fs2
EFRESHER COMPARTMENT STORAGE – FS2 • Rear End Cap (above Trash Can): The shelving in this unit can be used for various storage needs. The side doors can be used for mini bottles, snacks, chips, etc. The main back portion of the unit can be used for bottles, snacks, chips, napkins, etc. Unopened, prepackaged non-perishable food only. - Page 38 EFRESHER • 6” Cup Module: Cup Storage Racks This shelving unit is for cup storage only. It features five cup racks. This unit has no temperature cooling or heating capability. These cup racks are removable for refilling and cleaning of the compartment. •...
- Page 39 EFRESHER • Side Drawer Compartment: Optional sliding tray The side drawer compartment is for cooled products, such as ice and beverages. An optional removable sliding tray is available for addi- tional storage of miscellaneous cooled products. Unopened, pre- packaged non-perishable food only. Side drawers are located on both sides.
-
Page 40: Trash Compartment - All Models
EFRESHER TRASH COMPARTMENT – ALL MODELS Trash Can: The trash can/recycle housing is equipped with slide rails on each side for pull out access. Inside the housing are two removable trash cans for waste storage. The removable trash can may be moved in and out of the area for easier cleaning. -
Page 41: Changing The Canopy Top
EFRESHER CHANGING THE CANOPY TOP Canopy tubing support Remove the canopy top before trailering or shipping the vehicle. The canopy has an elastic fit around the frame. To loosen, open the Velcro closures on all sides. Remove the canopy top from the frame after all Velcro attachments are open. To reattach the canopy top, start with one end and cover the corners around the frame. - Page 42 EFRESHER...
-
Page 43: Winch
INCH PERATION WINCH The safety warnings and information in this section apply if your vehicle has a winch. Improper or irresponsible use of the winch can result in severe injury or death. Always follow all winch instructions and warnings in this manual. WINCH SAFETY •... -
Page 44: Winch Operation
INCH WINCH OPERATION Read all of the Winch Safety beginning page 41 before operating your winch. NOTICE: Practicing operation and use of the winch before it is needed to perform a job is recommended. Improper or irresponsible winch use can result in severe injury or death. Comply with all winch instructions and warnings in this manual. -
Page 45: Winch Cable Care
INCH Pull out as much cable as possible to maximize the winch’s pulling capac- ity. Maintain at least five full turns of winch cable wrapped around the winch drum at all times. The friction provided by the wrapped cable allows Minimum five (5) the drum to pull on the winch cable and move the load. -
Page 46: Shock Loading
INCH • Always inspect the winch cable before each use. Inspect for wear or kinks in the cable. – A kinked winch cable made of wire rope is shown at right. Even after being straightened out, this cable has been permanently and severely damaged. -
Page 47: Vehicle Maintenance
EHICLE AINTENANCE VEHICLE MAINTENANCE MAINTENANCE SAFETY To prevent serious injury or death, follow the procedures and comply with the safety information in this manual while performing vehicle service or maintenance. Use the tools shown in the tool list and wear the specified safety equipment when per- forming vehicle service or maintenance. -
Page 48: Scheduled Maintenance Chart
EHICLE AINTENANCE SCHEDULED MAINTENANCE CHART Perform all services at the maintenance interval reached first. S – Indicates operations that need to be performed on vehicles subjected to severe use. E – Indicates emission-related services (Failure to do this maintenance will not void the emissions warranty but may affect emissions). D –... - Page 49 EHICLE AINTENANCE Interval (perform at interval Item Remarks Page that comes first) Hours Calendar Engine Monthly Check for unusual noise, vibration, acceleration, oil leaks. Rear axle Monthly Check for leakage; add oil as required. General lubrication 3 Months Lubricate all fittings, pivots, cables, etc. where required. Throttle/governor linkage 3 Months Check operation and governed speed.
-
Page 50: Recommended Lubricants And Fluids
EHICLE AINTENANCE RECOMMENDED LUBRICANTS AND FLUIDS Check and lubricate all components at the intervals shown in the SCHEDULED MAINTENANCE CHART beginning on page 46. Item Capacity Lubricants/Fluids Notes 10W-30 Light duty use engines Heavy duty use in air temperatures 10W-30 below 40º... -
Page 51: Lifting The Vehicle
EHICLE AINTENANCE LIFTING THE VEHICLE Read and comply with all of the following warnings and lifting procedures to prevent the possibility of the vehicle falling and causing serious injury or death. For some maintenance procedures, it is necessary to lift the vehicle. Comply with the following warnings and follow the lifting procedure to ensure the safety of you, your vehicle and surroundings. -
Page 52: Vehicle Cleaning And Care
EHICLE AINTENANCE VEHICLE CLEANING AND CARE Keeping your vehicle clean is not only beneficial to its appearance, but can also help extend the life of various compo- nents. Washing the Vehicle NOTICE: Do not use a pressure washer to wash your vehicle. High water pressure can damage components. Some products, including insect repellents and chemicals, will damage plastic surfaces. -
Page 53: Tire Pressure
EHICLE AINTENANCE Tire Pressure Maintaining correct tire inflation pressure is essential for safe vehicle operation. You can vary the inflation pressure, within the recommended range to suit the condition of the terrain. TIRE PRESSURE RANGE TERRAIN CONDITIONS RECOMMENDATION Inflate to higher pressure within the range; never exceed hard surfaces or pavement maximum pressure indicated. -
Page 54: Wheel Installation
EHICLE AINTENANCE Wheel Installation Lug Nut Torque 65 - 85 ft.lbs. (68 - 115 Nm) NOTICE: To decrease the risk of component damage, do not tighten the lug nuts Lug Nut Tightening Pattern to more than the specified torque. Always install lug nuts using a cross sequence pattern to ensure even seating of the wheel against the hub. -
Page 55: Taillight
EHICLE AINTENANCE Taillight Roll rubber bezel Roll the rubber bezel from around the edge of the taillight and remove the away from body. lens. Install the new bulb. Taillight Replace the lens. Brake Light FUSE REPLACEMENT The fuse block is under the driver seat. NOTICE: Have the vehicle inspected by your dealer if fuses continue to blow after they have been replaced. -
Page 56: Four Cycle Engine
EHICLE AINTENANCE FOUR CYCLE ENGINE The engine is an air cooled, 4-stroke, OHV, single cylinder gasoline engine. It has a pressure fed lubrication positive displacement oil pump with a cartridge type full flow oil filter and a counter rotating balance shaft. NOTICE: The engine uses more oil during the first hours of operation, than after the internal parts are run-in. -
Page 57: Change The Engine Oil
EHICLE AINTENANCE CHANGE THE ENGINE OIL Change the engine oil at the initial service and then intervals indicated in the SCHEDULED MAINTENANCE CHART on page 46. Tools • ratchet • universal strap wrench • socket, 19 mm • funnel • Extension, 8” •... -
Page 58: Refill Oil
EHICLE AINTENANCE Inspect the new oil filter for any defects. Apply engine oil to the oil filter o-ring (5). Install the oil filter onto the engine until the o-ring con- tacts the mounting surface of the engine. Turn the filter 2/ 3 to 3/4 rotations by HAND(S). -
Page 59: Adjusting The Belt
EHICLE AINTENANCE Adjusting the Belt Loosen the starter/generator pivot bolt. While holding the lower adjusting nut with a wrench, loosen the upper jam nut with another wrench. Move the lower nut up or down the adjustment bolt until correct belt tension is achieved. Hold the lower nut in place and tighten the upper jam nut against it. -
Page 60: Lubrication
EHICLE AINTENANCE A lightly soiled filter can be cleaned by tapping out dust. Do not use compressed air on the filter. If the filter is heavily soiled, it must be replaced. Reinstall or replace the filter, making sure it is fully seated in the housing. Replace the housing and secure with latches. -
Page 61: Brakes
EHICLE AINTENANCE BRAKES Always inspect the pedal travel before you operate a vehicle to confirm some brake func- tion is present. All driving brake tests must be done in a safe location with regard for the safety of all personnel. NOTICE: Over time, a subtle loss of performance may take place;... -
Page 62: Battery
EHICLE AINTENANCE BATTERY The vehicle has a sealed battery, which requires no maintenance except to keep it corrosion-free, and to test for func- tionality. The sealed battery is filled with electrolyte and sealed at the factory. Never pry the seal strip off, or add fluid to the bat- tery. -
Page 63: Discharged Battery
EHICLE AINTENANCE Discharged Battery To decrease the risk of severe injury or death from accidental movement, do not use jumper cables to start a vehicle. The vehicle has a starter/generator and does not idle. When you start the engine, the starter/generator functions as a starter and with the engine running, it functions as a generator. -
Page 64: Towing The Vehicle
EHICLE AINTENANCE Towing the Vehicle Do not try to tow the vehicle with ropes, chains or any device different from a tow bar approved by the manufacturer. Do not tow the vehicle on highways. Do not tow the vehicle at speeds more than 12 mph (19 kph). Turn the key switch to OFF. -
Page 65: Remove From Storage
EHICLE AINTENANCE Clean the vehicle. See VEHICLE CLEANING AND CARE on page 50. Turn the key to the OFF position and put the direction selector in the NEUTRAL position. Chock the wheels to prevent the vehicle from rolling. Do not engage the parking brake. Engage the neutral lock. - Page 66 EHICLE AINTENANCE...
-
Page 67: Specifications
PECIFICATIONS SPECIFICATIONS REFRESHER FS2 - VEHICLE SPECIFICATIONS Refresher Unit Overview: Refresher unit designed for inventory of unopened, pre-packaged, non-perishable foods for distri- bution through daily use. This Refresher unit is not meant for long term food storage or storage of opened food and beverage items. -
Page 68: Specifications
PECIFICATIONS Key or Pedal Start Pedal Air Cleaner Industrial Rated Dry Filter Lubrication Pressurized Oil System Oil Filter Spin-On Cooling System Air Cooled Max Fuel Volume 6.0 Gallon (22.7 L) tank Drive Train Continuously variable transmission (CVT) Trans-axle Differential with helical gears Gear Selection Forward - Reverse Rear Axle Ratio... -
Page 69: Refresher Oasis - Vehicle Specifications
PECIFICATIONS SPECIFICATIONS REFRESHER OASIS - VEHICLE SPECIFICATIONS Refresher Unit Overview: Refresher unit designed for inventory of unopened, pre-packaged, non-perishable foods for distri- bution through daily use. This Refresher unit is not meant for long term food storage or storage of opened food and beverage items. - Page 70 PECIFICATIONS Cooling System Air Cooled Max Fuel Volume 6.0 Gallon (22.7 L) tank Drive Train Continuously variable transmission (CVT) Trans-axle Differential with helical gears Gear Selection Forward - Reverse Rear Axle Ratio 16.53:1 (Forward) 16.81:1 (Reverse) Seating Capacity 2 Persons Dry Weight 1135 lb (514.8 kg) Curb Weight...
-
Page 71: Maintenance Log
AINTENANCE MAINTENANCE LOG Record periodic maintenance in the following maintenance log. MILES (KM) SERVICE PERFORMED DATE TECHNICIAN AND HOURS COMMENTS... - Page 72 AINTENANCE MILES (KM) SERVICE PERFORMED DATE TECHNICIAN AND HOURS COMMENTS...
- Page 73 AINTENANCE MILES (KM) SERVICE PERFORMED DATE TECHNICIAN AND HOURS COMMENTS...
- Page 74 AINTENANCE MILES (KM) SERVICE PERFORMED DATE TECHNICIAN AND HOURS COMMENTS...
- Page 75 AINTENANCE MILES (KM) SERVICE PERFORMED DATE TECHNICIAN AND HOURS COMMENTS...
- Page 76 AINTENANCE MILES (KM) SERVICE PERFORMED DATE TECHNICIAN AND HOURS COMMENTS...
- Page 77 NDEX INDEX recommended 48 accelerator pedal 18 auxiliary outlet, 12V 17 fluids capacities 48 recommended 48 battery disposal 8 fuel battery maintenance 60 add 22 brakes 59 gauge 17 pedal, hydraulic 18 handling guidelines 13 pedal, mechanical 18 specifications 22 break-in tank cap 19 CVT belt 22...
- Page 78 NDEX parking brake, mechanical 18 PIN plate 8 USB port 17 pre-ride inspection 21 vehicle registration information, vehicle 7 hauling 61 removing from storage 63 specifications 65, 67 safety storage 62 carbon monoxide 13 towing 62 cargo 11 transporting 61 driving downhill 14 vehicle identification numbers 8 driving in reverse 13...
- Page 79 Normal use, age and wear on vehicle components can affect the safe operation and reliability of the vehicle. The rec- ommended Inspection and maintenance procedures are crucial for safety, performance, reliability and maximum lon- gevity of your vehicle. A damaged vehicle, or a vehicle that is not functioning properly is dangerous and must not be operated until repairs are made.
- Page 80 CUSHMAN 1451 Marvin Griffin Road, Augusta, Georgia 30906 - 3852 USA CONTACT US: North America: Technical Assistance & Warranty Phone: 1-800-774-3946, FAX: 1-800-448-8124 Service Parts Phone: 1-888-438-3946, FAX: 1-800-752-6175 International: Phone: 001-706-798-4311, FAX: 001-706-771-4609 Website: www.cushman.com Service Parts Manuals and Repair and Service Manuals are available for purchase.