Table of Contents
Advertisement
Quick Links
Download this manual
See also:
Service Manual
Advertisement
Table of Contents

Related Manuals for Mitsubishi S290U


Summary of Contents for Mitsubishi S290U
- Page 1 Projector User Manual S 290 S290U MODEL EN – 1...
- Page 2 CAUTION: The lightning flash with arrowhead symbol, within an equilateral triangle, is intended to alert the user to the presence of uninsulated “dangerous voltage” within the product’s enclosure that may be of sufficient magnitude to constitute a risk of electric shock.
-
Page 3: Table Of Contents
Contents Important safeguards ...4 Overview ... 6 Using the remote control ...8 Battery installation ... 8 Installation ...9 Basic connections ... 10 Projector + AV equipment ... 10 Projector + DVD player or HDTV decoder ... 10 Projector + personal computer ... 10 For IBM PC or IBM PC compatibles ... -
Page 4: Important Safeguards
Important safeguards Please read all these instructions regarding your LCD projector and retain them for future reference. Follow all warnings and instructions marked on the LCD pro- jector. Read instructions All the safety and operating instructions should be read before the appliance is operated. Retain instructions The safety and operating instructions should be retained for future reference. - Page 5 WARNING: Unplug immediately if there is something wrong with your projector. Do not operate if smoke, strange noise or odor comes out of your projector. It might cause fire or electric shock. In this case, unplug immediately and contact your dealer. Never remove the cabinet.
-
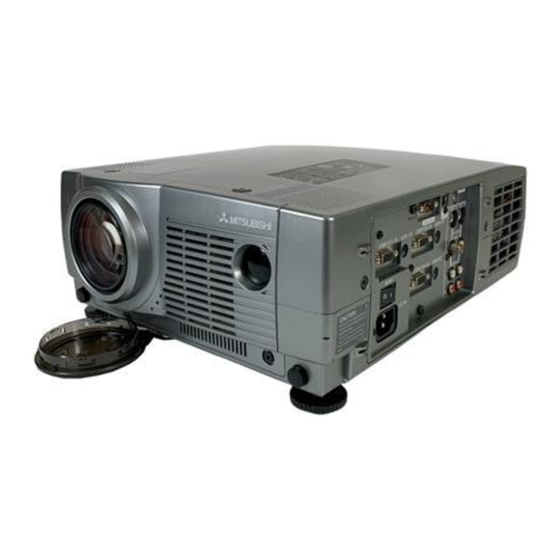
Page 6: Overview
Overview Control panel 13 12 LAMP TEMP ZOOM/ FOCUS VOLUME COMPUTER VIDEO MENU ENTER AUTO MUTE POSITION Terminal board RS-232C COMPUTER 1 IN AUDIO 1 IN COMPUTER 2 IN MAIN COMPUTER OUT AC IN EN – 6 Air inlet slots (Front) Terminal board Air outlet slots Speaker (Left/Right) -
Page 7: Bottom Side
Bottom side Remote control MUTE ZOOM/ COMPUTER VIDEO FOCUS AUTO VOLME POSITION MENU LASER RIGHT CLICK ENTER EXPAND P in P STILL AVOID EXPOSURE - RADIATION IS EMITTED FROM THIS APERTURE. Release buttons (Left/Right) Adjustment foot (Left/Right) Air inlet cover (bottom) / Filter cover (For bottom air inlet slots) Lamp cover Filter cover (For front air inlet slots) -
Page 8: Using The Remote Control
Using the remote control Battery installation Use two AA size batteries. 1. Remove the back cover of the remote control by pushing the battery compartment door in the direction of the arrow. 2. Load the batteries making sure that they are positioned correctly (+ to +, and - to -). 3. -
Page 9: Installation
Installation Orientation of the projector Picture size can be set by changing the distance between the screen and the projector. Front projection (between the screen and the Screen Height inches Width feet Diagonal size (inch) (inch) (inch) 40 " 24 " 32 "... -
Page 10: Basic Connections
Basic connections This projector can be connected to equipment such as VCRs, video cameras, videodisc players, and personal com- puters having analog RGB output. Important: • Make sure that your equipment is turned off before connection. • Plug in firmly and unplug by holding the plug, not by pulling the main power cable. •... -
Page 11: For Ibm Pc Or Ibm Pc Compatibles
Projector + Personal computer Connection For IBM PC or IBM PC compatibles When outputting to both a PC monitor and the projector. to COMPUTER OUT to COMPUTER For Macintosh When outputting to both a PC monitor and the projector. Monitor Conversion adapter (optional) to COMPUTER OUT to AUDIO IN... -
Page 12: Preparing The Projector For Operation
Preparing the projector for operation Getting ready for projection 1. Connect the power cord provided to the projector. 2. Connect the power cord to the wall power outlet. 3. Remove the lens cap. Warning: • Do not look directly into the lens when projector is “ON”. -
Page 13: To Operate Projector Power On
To operate projector power ON RS-232C COMPUTER 1 IN AUDIO 1 IN COMPUTER 2 IN MAIN COMPUTER OUT AC IN 2 , 11 3 , 9 , 10 LAMP ZOOM/ FOCUS 6 , 8 COMPUTER MENU AUTO POSITION AUTO POSITION button 1. - Page 14 To operate projector power ON (Continue) Turning off the projector 9. Press the POWER button. The message “POWER OFF? YES : PRESS AGAIN” appears on the screen. • To exit from this mode, press any button except POWER, LASER, mouse pointer, R/L-click, STILL and VOLUME + and - buttons.
-
Page 15: Menu Operation
Menu operation PICTURE BRIGHTNESS COLOR MATRIX COLOR TEMP. SHARPNESS AUDIO INSTALLATION IMAGE REVERSE AUTO POWER ON AUTO POWER OFF TEST SIGNAL OPTION MENU POSITION MODE DISPLAY SPLASH SCREEN CINEMA MODE VIDEO SIGNAL SIGNAL HORIZ.POSITION VERT.POSITION COMPUTER INPUT * : Setting range is different according to the type of the signal. - Page 16 Menu operation (continued) 1 PICTURE CONTRAST ... Adjusts the picture contrast. The contrast becomes higher as the number increases. BRIGHTNESS ... Adjusts image brightness. The image becomes brighter as the number increases. COLOR MATRIX..Adjusts color balance in each color of the image. See page 18. COLOR TEMP..
- Page 17 5 SIGNAL HORIZ. POSITION ... Use to adjust the horizontal position of the image. VERT. POSITION ... Use to adjust the vertical position of the image. FINE SYNC..Use to synchronize the projector with PC input signals so that the image is not blurred. TRACKING ...
-
Page 18: Picture Adjustment
Picture adjustment Adjusting the image You can adjust the picture by using the IMAGE menu. EXAMPLE: USER setting of COLOR TEMP. 1. Select COLOR TEMP in IMAGE menu. 2. Press the $ or % button to select 4 2. 3. Press the ENTER button. COLOR TEMP. - Page 19 Specification of RGB signals in each computer mode of the projector Signal mode resolution (H x V) TV60 – TV50 – HiVision – PC98 640 x 400 CGA70 640 x 400 CGA85 640 x 400 VGA60 640 x 480 VGA72 640 x 480 VGA75 640 x 480...
-
Page 20: Advanced Feature For Presentation
Advanced features for presentation PinP (Picture in Picture) One of the special features of this unit is the picture- in-picture (PinP) mode. PinP allows you to view differ- ent sources at the same time. 1. Press the PinP button on the remote control. The sub image will appear. -
Page 21: Mouse Remote Control
Mouse remote control By connecting to personal computer through the USB, PS/2 or ADB port, you can operate your computer with the projector remote control. Connection Projector + PC with USB connector to USB port • You can use the mouse remote control function with computer supported USB only. If your system is Win- ®... -
Page 22: Lamp Replacement
Lamp replacement The lamp is designed to project the image on the LCD panels. When the lamp no longer functions, replace it with a new one. Caution: • Do not remove the lamp immediately after using the projector, you may get burned because of the high temperature of the lamp. -
Page 23: Maintenance
Maintenance Caution: Be sure to turn off the projector and unplug the power cord from the wall outlet before you perform any main- tenance on the projector. Cleaning the air-filter This projector has two air-filters, for bottom air-outlet slots and for front air outlet slots. Clean the air-filter frequently. -
Page 24: Troubleshooting
Troubleshooting The following offers solutions to some of the common problems you may encounter. We suggest that you consult this chart before contacting your dealer. PROBLEMS The power is off. • The air inlet slots, outlet slots or air filter is clogged with dust or some objects. -
Page 25: Indicators
Indicators The projector has three indicators each of which shows the working condition of the projector. The following offers solutions to possible problems. If a problem persists, turn the projector off and consult your dealer. Normal condition POWER LAMP TEMP CONDITION Stand-by Steady... -
Page 26: Specifications
Specifications Type LCD projector Model S290U Rated power supply AC100 - 240V, 50 / 60Hz Rated input 2.9 A LCD panels 1.3-inch LCD panel: 3 pieces (for R, G, B) Pixels Total Active pixel rate: 99.99 % or more (each panel) -
Page 27: Connectors
Connectors PC analog RGB input Use to input video signals (analog RGB) of a personal computer. (Pin assignment of Mini D-SUB 15P jack) PIN NO. SPEC PIN NO. R(RED)/C G(GREEN)/Y B(BLUE)/C GROUND GROUND GROUND GROUND GROUND Dimensional drawings (mm) 98.5 What’s included in the box 2 AC power cable 1 AV (Audio/Video) cable... - Page 28 Manufactured by Mitsubishi Electric Corporation 1 Zusho Baba, Nagaokakyo-City, Kyoto Japan 871D344A10 Printed in Japan...