Advertisement
Quick Links
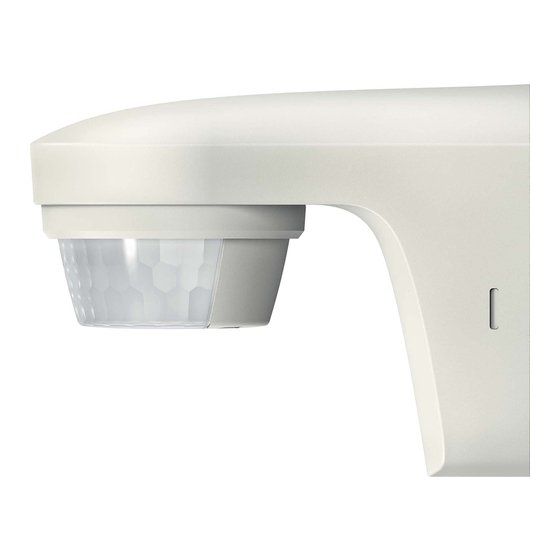
Motion detector
EN
theLuxa S150 WH
theLuxa S150 BK
theLuxa S180 WH
theLuxa S180 BK
1. Essential safety instructions
WARNING
Danger of death through electric shock or fire!
Installation should only be carried out by a pro-
fessional electrician!
•
The device conforms with EN 60669-2-1 when correctly
installed
•
IP 55 in accordance with EN 60529
Designated use
•
Motion detector for automatic lighting control dependent
on presence and brightness
•
Suitable for installation on external walls
•
Suitable for entrances, garages, gardens, corridors, parks,
etc.
•
Only intended for installation outside of arm's reach
1010500
1010501
1010505
1010506
309691
1
Advertisement

Related Manuals for Theben theLuxa S150 WH


Summary of Contents for Theben theLuxa S150 WH
- Page 1 309691 Motion detector theLuxa S150 WH 1010500 theLuxa S150 BK 1010501 theLuxa S180 WH 1010505 theLuxa S180 BK 1010506 1. Essential safety instructions WARNING Danger of death through electric shock or fire! Installation should only be carried out by a pro- fessional electrician! •...
- Page 2 Disposal Dispose of the motion detector in an environmentally sound manner (electronic waste) 2. Description Motion detector with sensor head 2 potentiometers for setting time (min) and bright- ness (lux) 3. Connection WARNING Danger of death through electric shock! Disconnect power source! †...
- Page 3 The device can be manually activated with a circuit breaker. After releasing the button (return of power) the device swit- ches on (for at least 40 secs or for the time set on the device).
-
Page 4: Installation
4. Installation If applicable, use optional corner bracket (9070902, † † 9070903) or spacer frame (9070906, 9070907) for flexible installation as well as cable insertion from side or top/ bottom. 230V Disconnect power source. † † Make marks for the holes on the wall (with en-closed drill †... - Page 5 Feed cable through the seal of the base. † † Fasten base (and spacer frame) to the wall. † † brown Phase Neutral blue conductor Earthing conductor Switched brown phase Neutral blue conductor Earthing green/yellow conductor Connect the individual wires to the appropriate terminal. †...
- Page 6 Click! Click! Plug motion detector into base and click in. † † Connect motion detector to power supply. † † Dismantling Using the screwdriver, carefully loosen the snap-in hook at † † the side and pull the device forward.
-
Page 7: Installation Instructions
Installation instructions As the detector reacts to variations in temperature, avoid the following situations: Do not direct motion detectors at objects with highly reflec- † † tive surfaces such as mirrors etc. Do not install motion detectors near heat sources such as †... - Page 8 • Recommended installation height: 2 – 4 m • Crosswise detection area: 12 m (crosswise to the detector) • Frontal detection area: 5 m (in front of the detector) • Detection angle: 150°/180° 5. Direction test and alignment The walk test is used to test the detection range and to res- trict it if necessary.
- Page 9 2 sec Test Align motion detector with sensor head The sensor head can be turned by 30° downwards and by 90° to left and right.
- Page 10 6. Setting The motion detector has two potentiometers underneath for setting the time (min) and brightness (lux). Set brightness (lux) You can set different brightness values (lux) with the potentiometer. If you want to change the preset brightness (15 lux default) Set potentiometer to desired brightness (5 –...
-
Page 11: Caractéristiques Techniques
Leave potentiometer at position † † Set time (min) If the motion detector detects no further movement, it swit- ches off after the set time. If you want to change the preset time (2 min default) Set potentiometer to desired time (0.5 s – 20 min). †... - Page 12 • Detection area: crosswise: max. 12 m, frontal: max. 5 m • Installation height: 2 – 4 m • Creep under protection: yes • Brightness setting range: 5–1000/∞ lux • Switching period range: 5 s – 20 min • Permissible ambient temperature: –25 °C to +45 °C •...
- Page 13 Service address Theben AG Hohenbergstr. 32 72401 Haigerloch GERMANY Phone +49 7474 692-0 Fax +49 7474 692-150 Hotline Phone +49 7474 692-369 Fax +49 7474 692-207 hotline@theben.de Addresses, telephone numbers etc. www.theben.de...