Advertisement
Quick Links
EXPAND AND CUSTOMIZE YOUR SYSTEM
DÉVELOPPEZ ET PERSONNALISEZ VOTRE SYSTÈME
AMPLÍE Y PERSONALICE EL SISTEMA
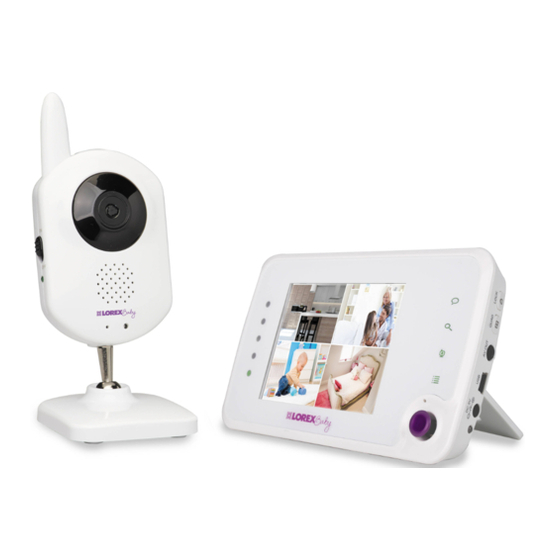
BB311AC1
• Fixed camera.
• Built-in night light.
• Wall mountable.
• Caméra fixe.
• Lumière de nuit intégrée.
• Montage mural.
• Cámara Fija.
• Luz de noche integrada.
• Montaje en la pared.
ACCWIFI1
• Remote viewing accessory.
• View your system on iPhone®, iPad® or Android™ devices.
• Easy QR code setup.
• Connects to your router using Wi-Fi or Ethernet.
• Doubles as a charging station for the monitor.
• Accessoire de visionnement à distance.
• Visionnez votre système sur des appareils iPhone®, iPad® ou Android™.
• Configuration facile avec code QR.
• Se raccorde à votre routeur par Wi-Fi ou Ethernet.
• Peut être également utilisé comme poste de recharge pour le moniteur.
• Accesorio para visualización remota.
• Visualice el sistema en dispositivos iPhone®, iPad® o Android™.
• Fácil configuración de código QR.
• Se conecta al enrutador mediante Wi-Fi o Ethernet.
• Funciona también como una estación de carga para el monitor.
www.lorextechnology.com
BB351AC1
• Pan / tilt camera.
• Auto motion tracking.
• Wall / ceiling mountable.
• Caméra panoramique/
inclinable.
• Détection automatique de
mouvement.
• Montage mural/au plafond.
• Cámara de vista
panorámica/inclinación.
• Seguimiento automático del
movimiento.
• Se puede montar en el techo
o en la pared.
Learn more at
Pour en savoir davantage, visitez
Más información en
www.lorextechnology.com
ADD-ON CAMERA
BB351AC1
QUICK START GUIDE
What's Included
x3
x1
x3
x1
Getting Started
Connect the power adapter to the
Hold the power button on the
2
1
camera and then to a power outlet.
camera for one second.
Make sure all power cables are at
least 3ft / 1m away from children.
Pairing the Camera with Your Monitor
Place the camera and monitor next to each other. Make sure
1
the monitor and the camera are plugged in and turned on.
Press
, then move the joystick left or right to navigate to
2
SETUP. Press the joystick to select SETUP.
Select
Setup
3
Select Pairing.
Select
Pairing
www.lorextechnology.com
x3
x1
NOTE:
BB351AC1 can be mounted
on a wall or ceiling. Please see the
User's Guide provided with your
monitor for details.
Use the included cable clips to help keep
TIP
power cables away from your child:
1. Pass the cable through the two plastic brackets on the
cable clip. Position the clip against a surface.
2. Remove the adhesive guard when you are prepared
to install the clip.
3. Wrap excess cable around the brackets as indicated
below by the arrows.
Use the joystick to select the channel you would like to pair
4
the camera to. Press the joystick to make a selection.
NOTE:
If a camera is already connected to this channel,
the new camera will replace the existing camera.
Press the PAIR button on the bottom of the camera within
5
30 seconds of selecting the pairing channel.*
NOTE:
Immediately move the camera away from the monitor
to avoid speaker feedback.
*If pairing was unsuccessful, repeat the pairing process described above starting with step 2.
BB351AC1_QSG_TRILINGUAL_R1
Advertisement

Related Manuals for Lorex BB311AC1


Summary of Contents for Lorex BB311AC1
- Page 1 EXPAND AND CUSTOMIZE YOUR SYSTEM BB351AC1 DÉVELOPPEZ ET PERSONNALISEZ VOTRE SYSTÈME QUICK START GUIDE AMPLÍE Y PERSONALICE EL SISTEMA What’s Included BB311AC1 BB351AC1 • Pan / tilt camera. • Fixed camera. • Built-in night light. • Auto motion tracking. NOTE: BB351AC1 can be mounted •...
- Page 2 CAMÉRA SUPPLÉMENTAIRE CÁMARA COMPLEMENTARIA BB351AC1 BB351AC1 GUIDE DE DÉMARRAGE RAPIDE GUÍA RÁPIDA DE INSTALACIÓN Ce qui est inclus ¿Qué incluye? REMARQUE : BB351AC1 peut être NOTA: La BB351AC1 se puede installé sur un mur ou sur le plafond. instalar en una pared o en el techo. Veuillez utiliser le guide de l'utilisateur Para obtener más información fourni avec le moniteur pour plus de...