Table of Contents
Advertisement
Quick Links
Advertisement
Table of Contents

Related Manuals for Lorex Baby BB7011


Summary of Contents for Lorex Baby BB7011
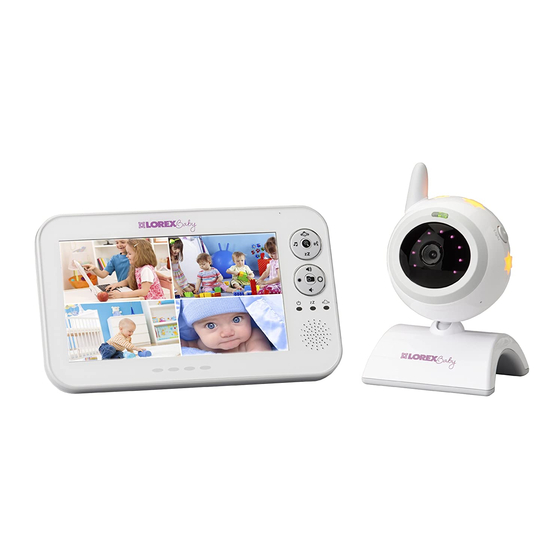
- Page 1 STAR BRIGHT VIDEO BABY MONITOR USER’S GUIDE BB7011 Version 1.0 www.lorexbaby.com...
-
Page 2: Safety Precautions
Safety Precautions • Adult assembly is required. Keep small parts away from children when assembling. • This product is not a toy. Do not allow children to play with it. • This video monitor is not a substitute for responsible adult supervision. -
Page 3: Table Of Contents
Table of Contents: Contents .........2 Camera Overview ......2 Monitor Overview ......3 Buttons ........... 3 Getting Started .......3 Optional - Wall Mounting the Camera ..5 Optional - Camera Batteries ..... 6 Using Your Baby Monitor ....7 Adjusting Screen Brightness ...... 8 Adjusting Volume ........ -
Page 4: Contents
Contents Cable Clip Power Adapter Screw Anchor Camera Battery Monitor Power Adapter * Contents may vary by model Camera Overview Antenna Power Indicator LED Night-light Infrared LEDs Light button Lens Microphone Speaker Power Switch Battery Power Port Compartment Temperature Sensor... -
Page 5: Monitor Overview
Monitor Overview Microphone LCD Screen Indicator LEDs Speaker Sound Indicator LEDs Battery Compartment Power Port Stand Buttons Motion Detection Zoom Lullaby Talkback VOX Mode Volume Up Brightness Power/Menu Down Brightness Volume Down Getting Started On the monitor, push down on the battery compartment door and slide it off. - Page 6 Insert the battery so that the blue arrow on the battery lines up with the white arrow in the battery compartment. Replace the compartment door. Connect the included power adapters to the monitor and the camera. Plug the power adapters into a power outlet. Let the monitor charge until the battery is full (about 3 hours).
-
Page 7: Optional - Wall Mounting The Camera
Optional - Wall Mounting the Camera Before mounting the camera: • Determine where you will get the best view of your child. • Ensure the power cable is long enough to power the camera. Make sure all power cables are at least 3ft / 1m away from the crib and out of reach of your child. -
Page 8: Optional - Camera Batteries
Tips • If you do not plan to use the unit for a prolonged period of time, remove the batteries from the monitor and the camera. • For prolonged / overnight monitoring, it is recommended to connect the power adapter. Battery-powered use is supported for convenient, short-term portable usage only. -
Page 9: Using Your Baby Monitor
Using Your Baby Monitor The monitor shows the following icons during use: Icon Meaning Icon Meaning Battery full Signal strength Selected camera Battery low channel Temperature alert enabled Zoomed in Current room 68°F Song currently temperature playing Camera out of OUT OF range or off (e.g. -
Page 10: Adjusting Screen Brightness
Adjusting Screen Brightness Press to lower / raise the brightness of the monitor. Adjusting Volume Press to lower / raise the volume of the monitor. Motion Detection You can set your monitor to sound an alarm when movement is detected on your camera. To configure motion detection sensitivity, see “Configuring Motion Detection”... -
Page 11: Talking To Your Baby
Talking to Your Baby Press and hold to talk to the camera which is currently being viewed. Playing Lullabies The camera can play 3 different pre-loaded lullabies. Make sure that the camera you want to play a lullaby is selected on the monitor. See “Camera Selection”... -
Page 12: Using Zoom
Using Zoom Press to zoom in. Use the buttons around to move the viewing area. The figure below shows how to use these buttons as directional keys. Press again to zoom out. Turning on the Night-Light Press the Light button on the side of the camera to turn the night-light on or off. -
Page 13: Using The Menu
Using the Menu Many features of this unit can be configured using the on-screen menu. The following procedure teaches you how to access and use this menu. Press to open the menu screen. Use the buttons around to navigate through the menu. The figure below shows how to use these buttons as directional keys. -
Page 14: Temperature Settings
Select Low, Medium, or High sensitivity and press With the level set to High, the camera will detect even slight movement. At Low sensitivity, a larger amount of movement is required to trigger the alert. Try different settings to see which works best for you. -
Page 15: Camera Selection
Select Temperature Settings. best Select Temperature Alert. Select Yes to enable the alert or No to disable it. Select Upper Temperature Alert. Use to raise / lower the temperature that triggers this alert. Select Lower Temperature Alert. Use to raise / lower the temperature that triggers this alert. -
Page 16: Vox Mode (Voice Trigger)
VOX Mode (Voice Trigger) In VOX mode, the monitor’s screen and speaker will turn off after 30 seconds unless sound is detected at the selected sensitivity level. This conserves battery power, and alerts you only when needed. You can turn the display on during VOX mode by pressing buttons on the monitor. -
Page 17: Restore Default Settings
Select Low, Medium, or High sensitivity and press With the level set to High, the microphone will detect lower sounds. Only loud noises will be detected if set to Low. Try different settings to see which works best for you. NOTE: In Split screen view, press the button to change the preferred channel (channel icon flashes brown). -
Page 18: Pairing Additional Cameras
Pairing Additional Cameras The included camera has already been paired with the monitor. If you have purchased additional add-on cameras (model# BB7011AC1), OR if your monitor and camera are not paired up, follow the steps below. To pair a camera to your monitor: Place the camera and monitor next to each other. - Page 19 Deleting cameras: Press to open the menu. Select ADD/DEL Camera. Select Camera 1, 2, 3, or 4. Make sure you select a channel with the caption PAIR OK. Under Delete camera, select Yes. The caption beside the channel name will change to NO PAIR.
-
Page 20: Technical Specifications
Technical Specifications Camera Frequency 2.4GHz Maximum Up to 450ft / 137m outdoors* Range Up to 150ft / 46m indoors* Image Sensor 1/6” Color CMOS Lens 3.0mm F2.4 IR LED 9 pcs Power Adapter 6.0V DC 800mA Battery Supports 4x AAA Batteries (not included) Battery Life Up to 4.5 hours daytime Up to 2 hours nighttime (with IR LEDs on) -
Page 21: Troubleshooting
Troubleshooting Problem Solution No video displayed • Ensure the camera(s) is plugged on the monitor into a power outlet and is powered on. • Ensure the monitor is powered on. • The camera and / or monitor may be out of batteries. •... -
Page 22: Disposal Of The Device
CLEANING Clean the monitor and camera with a slightly damp cloth or an anti-static cloth. Never use cleaning agents or abrasive solvents. • Do not clean any part of the product with cleaners with thinners or other solvents and chemicals. This may cause permanent damage to the product, which is not covered by the Warranty. - Page 24 USER’S GUIDE BB7011 Version 1.0 www.lorexbaby.com Copyright © Lorex Technology Inc. 2013...