Sign In
Upload
Manuals
Brands
Studer Manuals
Recording Equipment
A810
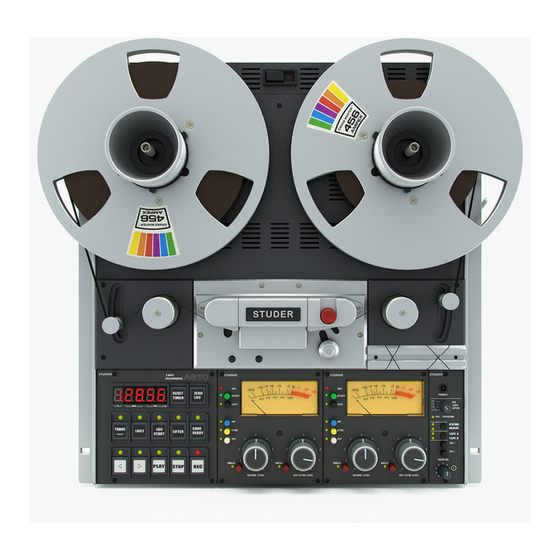
Studer A810 Manuals
Manuals and User Guides for Studer A810. We have
2
Studer A810 manuals available for free PDF download: Operating And Service Instructions, Quick Reference
Studer A810 Operating And Service Instructions (180 pages)
Reel-to-reel tape recorder
Brand:
Studer
| Category:
Recording Equipment
| Size: 34 MB
Table of Contents
Contents
2
General References Contents
3
Quick-Reference Description
4
Standard Versions
6
A810-1 Full Track Versions
6
Stereo Versions
7
A10-2/2 2-Track Versions
8
Options
10
Varispeed
10
Channel Control
10
Tape Scissors, Tape Marker
10
Accessories
11
Standard Accessories
11
Console
11
Tape Transport Remote Control
11
Studer Cleaning Kit in Carrying Case
12
Aluminium Case for A810
12
Tool Case
12
Additional Manuals
12
Technical Specifications
13
Dimansions
19
A810
19
Console of A810
20
Packing
21
Air Freight
21
Ocean Freight
21
Level Diagrams
22
Standard Calibration Values
25
Maintenance Hints for the Service Personnel
26
Abbreviations
26
Powers of Ten
27
Code Letters and Colors
27
Resistors
27
Capacitors
28
Molded RF Coils
28
Electostatically Sensitive Semiconductor Devices
29
Inductors, Transformers on Ferrite Cores
29
Installation, Putting into Operation Contents
30
Unpacking and Testing
31
Place of Installation
31
Installing the Tape Recorder
31
Portable Versions
31
Installation into Console
32
Procedure
33
Connector Panel
34
AV Power, Voltage Selector
34
Line Input
35
Line Output
35
Connectors for VU-Meter Panel
36
Remote Control Connectors
37
Remote Control Circuit
38
Varispeed Control
38
Fader Start Circuit
38
Headphones Socket
39
Operating Instructions
40
Controls
40
Output Selector Switches
41
Track Mode Selector Switches
41
Power Switch
42
Tape Timer
42
Pilot Lamps
42
Mounting the Tape
43
Three-Pronged Reel with Flange
43
NAB Reel
43
Self-Supporting Pancake
43
Threading the Tape
44
Tape Speeds
45
Play Mode
45
Recording
45
Recorders with Safe/Ready Switch
45
Sync Reproduction
46
Spooling Mode
46
Drop out from Record Mode
46
Drop-In
46
Stop Mode
47
Decreasing the Spooling Speed
47
Tape Lift
47
Autolocator
48
Dump Editing
48
Play Preselection
48
Monitor
49
VU-Meter Panel
49
Output Selector
49
Remote Controls
50
Mono-Stereo Switch
50
Test Generator
50
Time Code Channel
51
Time Code Recording
51
Time Code Reproduction
51
Editing, Splicing
52
Procedure for Searching a Tape Address
52
Searching a Tape Location with Spoiling
52
Search with Play
52
Cutting the Tape
53
Search with Autolocator
53
Cutting at the Reproduce Head
53
Marking the Tape
53
Splicing the Tape
54
Splicing Block with Cutting Groove
54
Built-In Tape Scissors
54
Degraded Operation
55
Error Messages Appearing on the Tape Timer Display
55
Operation with Serial Interface
57
Studio Bus
57
Data Protection
57
Serial Interface RS 232
57
Instruction Set
58
Daily Care
61
Cleaning the Anti-Scrape Flutter Roller
61
Power Supply, Tape Transport Control Contents
62
Functional Description
63
Power Supply
63
Line Voltages
63
Internal Supply Voltages
63
MP Unit GR 20 el 01
67
Microprocessor
67
External Memories
67
Reset
67
Tape Deck Controller GR 20 el 02
68
Bus Converter GR 20 el 05
68
Interrupt
68
Periphery Controller GR 20 el 04
69
Command Unit GR 21
70
Serial Remote Controller GR 20 el 03
70
Tape Timer Display
70
Saving the Audio Parameters on Tape
70
Capstan Motor Control GR 26
71
Spooling Motor Control GR 24
71
RS 232 Terminals
71
Debug Display
71
Tape Tension Sensors GR 27, GR 28
73
Removing the Tape Transport Assemblies
75
Covers
75
Headblock Cover
75
Head Cover
75
Cover of the Tape Tension Sensor
76
Tape Transport Cover
76
Rear Cover, Upper
77
Rear Cover, Lower
77
Top Cover
78
Panel Flap
78
Headblock
79
Wooden Side Panels
79
Tape Tension Sensors
80
Left-Hand Tape Tension Sensor
80
Pressure Roller Assembly
81
Right-Hand Tape Tension Sensor
81
Tape Lift Assembly
82
Lifter Assembly
82
Lifter Solenoid
82
Tape Brakes
83
Spooling Motors
84
Spooling Motor Control
84
Capstan Motor
85
Power Supply Unit
85
Monitor Unit
86
Mechanical Adjustments
87
Preparatory Steps
87
Basic Adjustment of the Brake Chassis
88
Adjusting the Edit Solenoid
88
Adjusting the Brake Solenoid
89
Measuring the Braking Torques
89
Pressure Unit
90
Adjustment
90
Checking the Pressure Roller Force
91
Adjusting the Tape Lift Solenoid
92
Checking the Mechanical Functions
93
Mobility of Bearing and Dashpot
93
Damping
93
Checking the Tape Travel
93
Edit Solenoid
94
Adjusting the Tape Tension Spring
95
End-Of-Tape Sensor
96
Adjusting the Dashpot
97
Replacing the Soundheads
99
Tape Guidance
101
Anti-Scrape Flutter Roller
101
Electrical Adjustments
102
Checking the Supply Voltages
102
Neutral Position
103
End Deflection
103
Max. Deflection
103
Tape Move Sensor
104
Tape-End Sensor
104
Tape Tension Adjustments
104
Checking the Tape Timer
104
Capstan Motor Control
105
Peak Tape Tension
105
Final Check
105
Adjustments
106
Check Measurements
106
Exchanging the Capstan Motor or the Capstan Motor Control
106
Centering the Capacitative Sensor
107
Circuit Descriptions
110
Stabilizer GR 07
110
Monitoring the Supply Voltages
111
Monitoring the Line Voltage
111
Tape Move Sensor GR 28 el 05
114
Liquid-Crystal Display (LCD)
121
Serial Remote Controller GR 20 el 03
122
Tape Timer Display (LED Version)
122
Copying Data on Tape
122
Expanded Test System
123
Pulse Width Modulator
125
Limiting the Spooling Speed
126
Spooling Motor Output Stage
126
Tape Move Sensor GR 28, el 05
127
Tape End Sensor GR 27 el 04, GR 28 el 06
127
Audio Contents
128
Audio Block Diagram
130
Line Amplifier GR 20 el 11, el 16, Input and Output Terminals
131
Reproduce Amplifier GR 20 el 10, el 15; Preaqmplifier in Headblock
132
Mono-Stereo Switch GR 20 el 12
133
HF Driver GR 20 el 08, el 13
134
Recrd Amplifier GR 20 el 09, el 14
135
Code Read/Write Unit GR 20 el 06
137
Code Delay Unit GR 20 el 07
139
Calibration
140
Reproduction
140
Level
141
Equalizations
141
Magnetic Reference Flux
141
Calibration Tapes
142
Reference Level Test Section
142
Azimuth Alignment Test Section
142
Frequency Response Test Section
142
Line Level
143
Checking the Output Level and the VU-Meter
143
Tape Bias
144
Input Keyboard
145
Readout of Programmed Value
145
Modifying the Parameters
147
Storing the Parameters
147
Reproduce Adjustments
148
Reproduce Level Adjustment
148
Error Message EE02 or EEE02
148
Azimuth Alignment of the Reproduce Head
149
Checking the Level
149
Frequency Response Adjustment
150
Theoretical Equalization Adjustment
150
Record Adjustment
151
Adjustments for the Slow Tape Speed
151
Record Level Preadjustment
152
Aligning the Azimuth of the Record Head
152
Bias Adjustment
153
Azimuth Alignment Stereo
153
Record Level Adjustment
153
Cross Talk Adjustment
154
Sync Adjustments
155
Checking the Height of the Heads
157
Adjusting the Height of the Right-Hand Code Head
159
External Storage of the Audio Parameters
162
Principle of Saving the Audio Parameters
162
Connecting the Cassette Recorder to the Remote Control Connector
162
Saving the Audio Parameters
163
Verification
164
Reading in the Audio Parameters through the Serial Remote Interface
165
Loading the Audio Parameters
165
Programming the Operating Parameters
166
Code Switches of the Command Unit
166
Code Switches Periphery Controller
169
Jumper Reproduce Amplifier
172
Jumper VU-Meter Amplifier
172
Jumper and Code Switches Serial Remote Controller
173
Code Switches Serial Interface
174
VU-Meter Panel Internal or External
174
Jumpers Mono/Stereo Switch And/Or Test Generator
175
Jumper Time Code Read/Write Unit
176
Jumpers Tape Deck Controller
177
Jumpers Capstan Motor Control
178
Bias Adjustments
179
Advertisement
Studer A810 Quick Reference (3 pages)
Brand:
Studer
| Category:
Controller
| Size: 0 MB
Table of Contents
General Preparatory Steps
1
Reproduce Adjustments
1
Recording Adjustment
2
Sync Reproduction Adjustment
2
Done!
3
Advertisement
Related Products
Studer A820
Studer A807
Studer A80/VU MkI
Studer A812
Studer A816
Studer A827
Studer A820MCH
Studer AJ 1000-12
Studer REVOX A76
Studer AJ 2400-S
Studer Categories
Inverter
Music Mixer
Battery Charger
Recording Equipment
Tape Deck
More Studer Manuals
Login
Sign In
OR
Sign in with Facebook
Sign in with Google
Upload manual
Upload from disk
Upload from URL